| Shelf | Level | Time | Hook | Yarn | Size |
|---|---|---|---|---|---|
| Animals | Easy | 45-60 Minutes | 5.0 mm | Worsted | 6 x 6 inch |
Whiskers the Cat Granny Square — A Sweet Appliqué Keepsake
An easy 5-round granny square in cream, grey, and blush pink, topped with a whiskery cat face appliqué — a quick, charming keepsake to stitch and give.
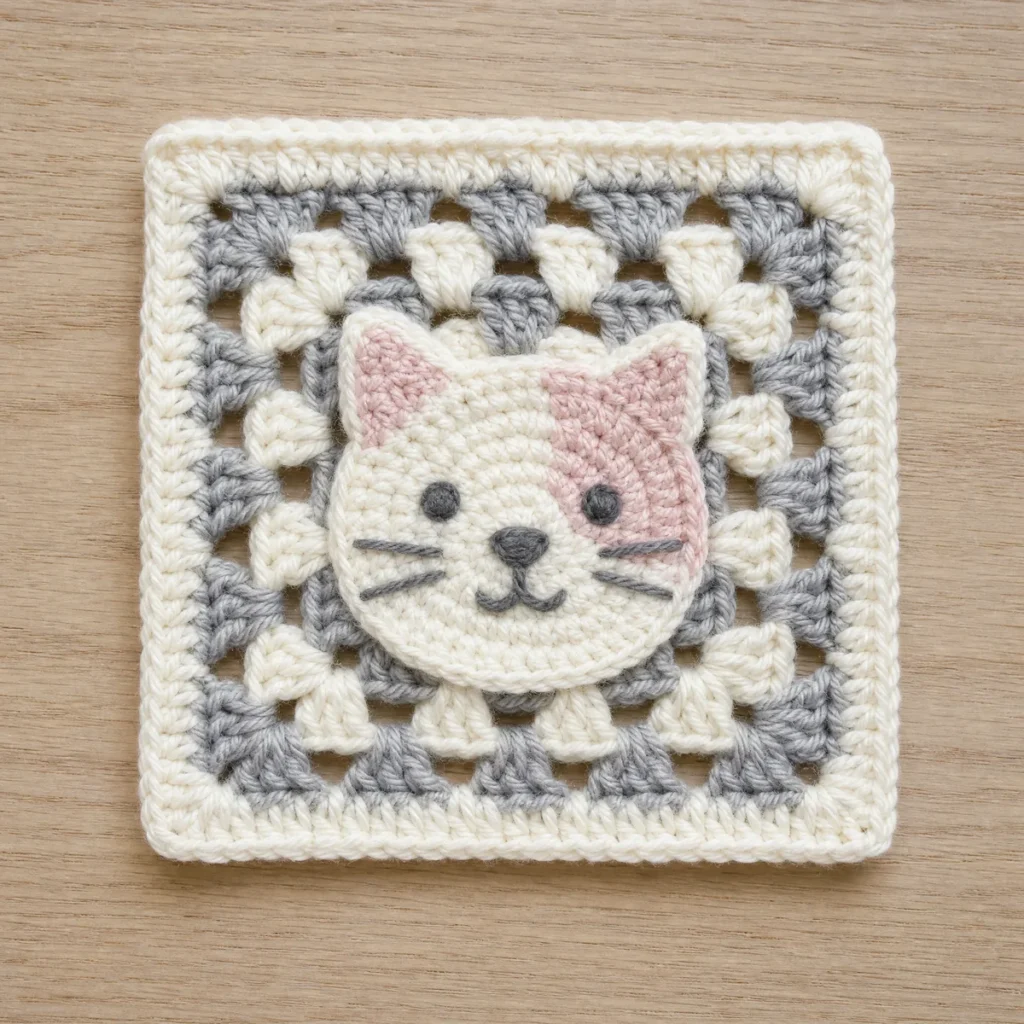
01 · The pieceWhat Whiskers the Cat Granny Square — A Sweet Appliqué Keepsake actually is
Whiskers the Cat Granny Square is a classic solid granny square dressed up with a small, sewn-on cat face — a pointed-ear appliqué with a nose and two rosy cheeks that gives the whole piece personality. It starts the way any good granny square does, worked in rounds from the center out, and finishes with Whiskers peeking out from the middle like a little mascot for your blanket.
You'll work double crochet rounds with corner increases, join as you go with slip stitches, and finish with a tidy single crochet border — all in worsted weight yarn on a 5.0 mm hook, so the stitches stay easy to see and count. The face pieces use the same simple stitches as the square, which makes this a lovely project for a confident beginner and a satisfying, quick one for anyone with a little granny square experience already under their belt.
Finished, the square measures about six by six inches, with Whiskers' face sewn on so it sits proudly at the center. It's charming stitched alone as a small gift or coaster-style keepsake, and just as lovely repeated and joined with plain solid squares into a blanket, pillow, or bag where one or two cat faces get to be the star.
02 · The count run18 rounds across 7 parts, each with its count
US terms throughout. Every row below ends with the count that round finishes on.
| Part | Qty | Finishes on |
|---|---|---|
| The Background Square | 1 | - |
| The Face | 1 | - |
| The Ear | 2 | - |
| The Inner Ear | 2 | - |
| The Nose | 1 | - |
| The Cheek | 2 | - |
| Assembly — Bringing It Together | 1 | - |
Work the plain background square first — the whiskers the cat pieces are sewn on at the end. Every count below is math-verified.
| Round | Instruction | Count |
|---|---|---|
| Round 1 | With cream, in a magic ring: ch 3, 2 dc, ch 2, [3 dc, ch 2] 3 times; sl st to top of ch-3 to join (12)Step by step Step by step: Using cream yarn, in a magic ring: make 3 chain stitches, 2 double crochet, make 2 chain stitches, [3 double crochet, make 2 chain stitches] 3 times; slip stitch to top of ch-3 to join. | - |
| Round 2 | sl st into the next corner ch-2 sp, ch 3, (dc, ch 2, 2 dc) in same sp, dc in next 3 sts, [(2 dc, ch 2, 2 dc) in next corner sp, dc in next 3 sts] 3 times; sl st to top of ch-3 to join (28)Step by step Step by step: Slip stitch into the next corner ch-2 space, make 3 chain stitches, (double crochet, make 2 chain stitches, 2 double crochet) in same space, double crochet in next 3 stitches, [(2 double crochet, make 2 chain stitches, 2 double crochet) in next corner space, double crochet in next 3 stitches] 3 times; slip stitch to top of ch-3 to join. | - |
| Round 3 | With grey, sl st into the next corner ch-2 sp, ch 3, (dc, ch 2, 2 dc) in same sp, dc in next 7 sts, [(2 dc, ch 2, 2 dc) in next corner sp, dc in next 7 sts] 3 times; sl st to top of ch-3 to join (44)Step by step Step by step: Using grey yarn, slip stitch into the next corner ch-2 space, make 3 chain stitches, (double crochet, make 2 chain stitches, 2 double crochet) in same space, double crochet in next 7 stitches, [(2 double crochet, make 2 chain stitches, 2 double crochet) in next corner space, double crochet in next 7 stitches] 3 times; slip stitch to top of ch-3 to join. | - |
| Round 4 | sl st into the next corner ch-2 sp, ch 3, (dc, ch 2, 2 dc) in same sp, dc in next 11 sts, [(2 dc, ch 2, 2 dc) in next corner sp, dc in next 11 sts] 3 times; sl st to top of ch-3 to join (60)Step by step Step by step: Slip stitch into the next corner ch-2 space, make 3 chain stitches, (double crochet, make 2 chain stitches, 2 double crochet) in same space, double crochet in next 11 stitches, [(2 double crochet, make 2 chain stitches, 2 double crochet) in next corner space, double crochet in next 11 stitches] 3 times; slip stitch to top of ch-3 to join. | - |
| Border | With cream, sl st into the corner ch-2 sp, ch 1, [3 sc in the corner sp, sc in next 15 sts] 4 times; sl st to the first sc (72)Step by step Step by step: Using cream yarn, slip stitch into the corner ch-2 space, make 1 chain stitch, [3 single crochet in the corner space, single crochet in next 15 stitches] 4 times; slip stitch to the first single crochet. | - |
Worked in grey. Leave a long tail for sewing.
| Round | Instruction | Count |
|---|---|---|
| Round 1 | 6 sc in a magic ring (6) | - |
| Round 2 | [inc] repeat 6 times (12) | - |
| Round 3 | [sc, inc] repeat 6 times (18) | - |
Worked in grey. Leave a long tail for sewing.
| Round | Instruction | Count |
|---|---|---|
| Round 1 | ch 5, sc in 2nd ch from hook, [sc] repeat 3 times (4) | - |
| Round 2 | ch 1, turn, dec, dec (2) | - |
| Round 3 | ch 1, turn, dec (1) | - |
Worked in blush pink. Leave a long tail for sewing.
| Round | Instruction | Count |
|---|---|---|
| Round 1 | ch 4, sc in 2nd ch from hook, [sc] repeat 2 times (3) | - |
| Round 2 | ch 1, turn, dec, sc (2) | - |
| Round 3 | ch 1, turn, dec (1) | - |
Worked in blush pink. Leave a long tail for sewing.
| Round | Instruction | Count |
|---|---|---|
| Round 1 | ch 3, sc in 2nd ch from hook, sc (2) | - |
| Round 2 | ch 1, turn, dec (1) | - |
Worked in cream. Leave a long tail for sewing.
| Round | Instruction | Count |
|---|---|---|
| Round 1 | 6 sc in a magic ring (6) | - |
| Round 2 | [inc] repeat 6 times (12) | - |
Step 1 Step 1: Pin the grey Face circle centered on the background square, positioned slightly below center to leave room above for the ears.
Step 2 Step 2: Sew the Face in place with a whipstitch or backstitch around its outer edge, weaving in ends on the wrong side.
Step 3 Step 3: Whipstitch one Inner Ear onto each Ear, matching points and centering the pink triangle on the grey one.
Step 4 Step 4: Pin the two Ears point-up along the top edge of the Face, one over the upper-left and one over the upper-right, tucking their straight (Row 1) edge just behind the Face's top edge so the points peek up above it; sew each Ear in place.
Step 5 Step 5: Center the Nose piece point-down in the lower third of the Face and sew in place.
Step 6 Step 6: Sew a Cheek circle on each side of the Nose, just beneath the inner points of the Ears, to round out the muzzle area.
Embroidery In grey, work two small angled straight stitches above the nose for eyes, tilting the outer end of each stitch slightly upward for a cat-like squint.
Embroidery In blush pink, work a tiny straight stitch or small V just below the nose for a mouth.
Embroidery In cream, work 3 straight-stitch whiskers on each cheek, radiating outward from beside the nose.
03 · Before it goes to a childWhat has to be right, and what is allowed to drift
- 💡 Gauge: the finished square is about 6 x 6 inches in Worsted weight yarn with a 5.0 mm hook. Tight crocheters can go up half a hook size; loose ones down half.
- 💡 Color plan: the sample uses cream, grey, blush pink in round order — change colors with a slip-stitch join in the first stitch of the new round.
- 💡 Weave in your color-change tails as you go rather than saving them all for the end — it keeps the back of the square tidy and makes blocking easier.
- 💡 Block the square lightly before sewing on Whiskers' face so the corners lie flat and the appliqué pieces sit smoothly against the background.
04 · Snag listWhat went wrong on the bench, and the fix
Snag 1
Losing track of corner spaces
It's easy to work into the wrong stitch after a corner. Pause after each corner and count your dc group before moving to the next side.
Snag 2
Pulling the magic ring too loose
A loose center leaves a visible gap once the square is finished. Snug up the ring tail firmly before working your first round of stitches.
Snag 3
Sewing the appliqué on unevenly
A crooked face is the first thing anyone notices. Pin the pieces in place and step back to check placement before you sew a single stitch.
Snag 4
Skipping a stitch count check
Rounds that drift off count throw the corners out of alignment. Count your stitches at the end of each round against the pattern before moving on.
05 · VariantsOther ways to issue this one
I designed Whiskers because I wanted a granny square that made me smile every time I picked it up, and this one does. There's something so satisfying about working the plain rounds in cream and grey and blush pink, watching the corners stack up neatly, and then getting to the fun part — sewing on those little pointed ears and rosy cheeks and watching a face appear out of nowhere. It never fails to surprise me how much personality two small ears and a tiny nose can give a square. I love that it stays simple the whole way through, so I can crochet the base while chatting or half-watching something, and save my full attention for the sweet, fiddly bit of putting Whiskers' face together at the end.
06 · QueriesQuestions logged against this build
What weight yarn and hook does this pattern use?
Whiskers is worked in worsted weight yarn with a 5.0 mm hook. Any worsted weight yarn you enjoy working with will give you a nicely proportioned square.
How big is the finished square?
The finished square measures about six by six inches. That makes it a great single motif or a building block for a larger blanket.
Is this pattern good for beginners?
Yes, it's rated easy and uses simple, repeated stitches throughout. If you can work double crochet and single crochet, you're ready to make Whiskers.
Do I need to change colors mid-round?
No, each round is worked in a single color, so you'll only change color between rounds. This keeps the stitching straightforward and the color changes clean.
How do I attach the cat face to the square?
Once all the appliqué pieces are made, pin them in place on the finished square and sew around the edges with a yarn needle. Take your time with placement before stitching so Whiskers' expression looks just right.
07 · Made byWho counted this one

Who writes Amigurumi Addict, how a build gets its number, and why every round on the site carries a stitch count.
08 · Next off the benchThree builds that sit near this one

Animals
Crochet a bunny or frog from one amigurumi base
How do you crochet a bunny and a frog from one base? Share Legs, Body, and Head; swap ears or eyes.

Animals
Crochet giraffe amigurumi pattern with horns and ears
How do you crochet a giraffe amigurumi? Shape head, body, legs, ears and horns in worsted yarn.

Animals
Amigurumi cat crochet pattern with oval muzzle and bow
How do you crochet an amigurumi cat with a flat muzzle? Shape it separately, pinch it, then sew it on.
Join the build log
One message when a build is issued
A drawing and its parts list, when one leaves the bench.