| Shelf | Level | Time | Hook | Yarn |
|---|---|---|---|---|
| Animals | Intermediate | 4-6 hours | 2.25 mm | Fingering/Sport |
Crochet a bunny or frog from one amigurumi base
How do you crochet a bunny and a frog from one base? Share Legs, Body, and Head; swap ears or eyes.
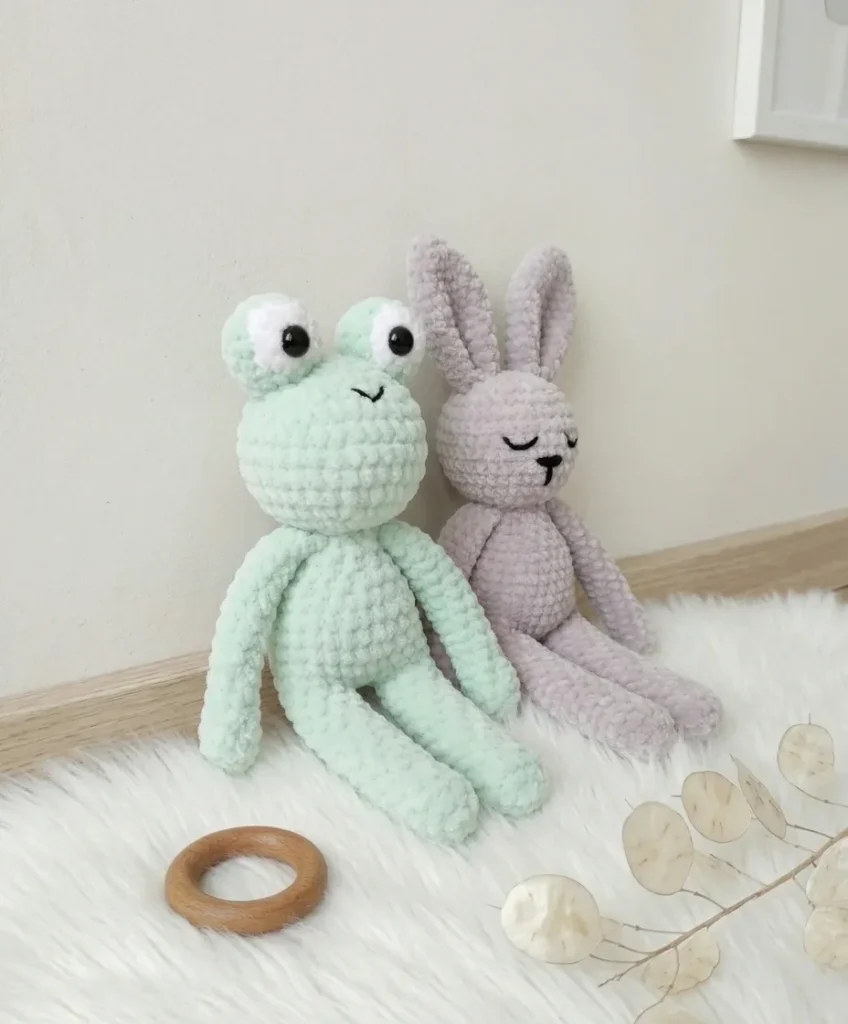
01 · The pieceWhat Crochet a bunny or frog from one amigurumi base actually is
This is one chassis dressed two ways. Legs, Body, and Head are worked identically for either toy; the second Leg is not fastened off but carries its yarn straight into Body Rnd 1 across a ch-2 bridge, so the hip join is built, not sewn. From there the two toys diverge only at the finishing line: Bunny Ears and a Bunny Tail get stitched on for one version, sewn eyes for the other. Arms attach separately, either worked in at Rnd 15 or whipstitched on after.
Two tolerances matter here. The ch-2 bridge at Body Rnd 1 and the decrease at Rnd 10 need an accurate stitch count — miscount either and the shoulder taper skews. Everything else has slack: gauge is not critical, the pattern notes that fabric only needs to be tight enough to hide stuffing, and Legs may be stuffed or left soft — both are stated as acceptable outcomes, not compromises.
This pattern is written in US crochet terminology. Keep your tension tight so stuffing doesn't peek through the fabric; if you're seeing gaps, try going down half a hook size.
02 · The count run44 rounds across 8 parts, each with its count
US terms throughout. Every row below ends with the count that round finishes on.
| Part | Qty | Finishes on |
|---|---|---|
| Arms — Make 2 | 1 | - |
| Legs — Make 2 | 1 | - |
| Body | 1 | - |
| Head | 1 | - |
| Bunny Ears — Make 2 | 1 | - |
| Bunny Tail | 1 | - |
| Frog Eyes — Oval Style (Make 2) | 1 | - |
| Frog Eyes — Round with White Sclera (Make 2) | 1 | - |
| Round | Instruction | Count |
|---|---|---|
| Round 1 | MR, 6 sc into ring. Pull ring closed. (6) | - |
| Round 2 | (1 sc, inc) × 3. (9) | - |
| Rounds 3–19 | Sc in each st around. (9) Repeat for 17 rounds.Flatten the arm so the edges align. Crochet through both layers working 4 sc across. Fasten off, leaving a long yarn tail for sewing. Arms are not stuffed. Alternatively, the arms may be crocheted directly into the body at the row indicated below. | - |
| Round | Instruction | Count |
|---|---|---|
| Round 1 | MR, 6 sc into ring. Pull ring closed. (6) | - |
| Round 2 | Inc in each st around. (12) | - |
| Rounds 3–22 | Sc in each st around. (12) Repeat for 20 rounds. For the first leg: fasten off and cut yarn.For the second leg: do not cut yarn. Chain 2, then join to the first leg to begin working the body. Legs may be stuffed with fiberfill or left unstuffed — both work beautifully. | - |
Begin working from the second leg, continuing in a spiral.
| Round | Instruction | Count |
|---|---|---|
| Round 1 | 12 sc across second leg, 2 sc across the ch-2 bridge, 12 sc across first leg, 2 sc across the other side of the ch-2 bridge. (28) | - |
| Rounds 2–9 | Sc in each st around. (28) Repeat for 8 rounds. | - |
| Round 10 | (3 sc, dec) × 5, 3 sc. (23) | - |
| Round 11 | Sc in each st around. (23) | - |
| Round 12 | (dec, 3 sc) × 4, dec, 1 sc. (18) | - |
| Rounds 13–14 | Sc in each st around. (18) | - |
| Round 15 | (1 sc, dec) × 6. (12) | - |
At Rnd 15, either crochet the arms directly into the body (working through the arm’s flattened edge and the body stitch together) or sew them on after the toy is fully assembled. Do not fasten off. Continue directly to the Head section.
Continue from the body without fastening off.
| Round | Instruction | Count |
|---|---|---|
| Round 16 | Inc in each st around. (24) | - |
| Round 17 | (3 sc, inc) × 6. (30) | - |
| Round 18 | (4 sc, inc) × 6. (36) | - |
| Round 19 | (5 sc, inc) × 6. (42) | - |
| Rounds 20–24 | Sc in each st around. (42) Repeat for 5 rounds. | - |
| Round 25 | (5 sc, dec) × 6. (36) | - |
| Round 26 | (4 sc, dec) × 6. (30) | - |
| Round 27 | (3 sc, dec) × 6. (24)Insert safety eyes at your preferred position between Rnds 20–24. Stuff the head and body firmly with fiberfill. | - |
| Round 28 | (2 sc, dec) × 6. (18) | - |
| Round 29 | (1 sc, dec) × 6. (12) | - |
| Round 30 | Dec × 6. (6)Close the opening. Fasten off and weave in the end. | - |
| Round | Instruction | Count |
|---|---|---|
| Round 1 | MR, 6 sc into ring. Pull ring closed. (6) | - |
| Round 2 | (1 sc, inc) × 3. (9) | - |
| Round 3 | (2 sc, inc) × 3. (12) | - |
| Round 4 | Sc in each st around. (12) | - |
| Round 5 | (2 sc, inc) × 4. (16) | - |
| Round 6 | Sc in each st around. (16) | - |
| Round 7 | (3 sc, inc) × 4. (20) | - |
| Rounds 8–15 | Sc in each st around. (20) Repeat for 8 rounds.Flatten the ear so the edges align. Crochet through both layers working 10 sc across. Fasten off, leaving a long tail for sewing. Sew the ears firmly to the top of the bunny's head. | - |
| Round | Instruction | Count |
|---|---|---|
| Round 1 | MR, 6 sc into ring. Pull ring closed. (6) | - |
| Round 2 | (1 sc, inc) × 3. (9) | - |
| Round 3 | Sc in each st around. (9)Fasten off, leaving a long yarn tail for sewing. Sew the tail to the back of the body. | - |
| Round | Instruction | Count |
|---|---|---|
| Round 1 | MR, 6 sc into ring. Pull ring closed. (6) | - |
| Round 2 | Inc in each st around. (12) | - |
| Rounds 3–7 | Sc in each st around. (12) Repeat for 5 rounds.Fasten off and cut yarn. Insert safety eyes, stuff lightly, and sew onto the top of the frog's head. | - |
Begin with white yarn.
| Round | Instruction | Count |
|---|---|---|
| Round 1 | MR, 6 sc into ring. Pull ring closed. (6) | - |
| Round 2 | Inc in each st around. (12)Switch to green yarn. | - |
| Round 3 | (1 sc, inc) × 6. (18) | - |
| Rounds 4–5 | Sc in each st around. (18) | - |
| Round 6 | (1 sc, dec) × 6. (12) | - |
| Round 7 | Dec × 6. (6)Fasten off and cut yarn. Insert safety eyes, stuff firmly, close the opening, and sew onto the top of the frog's head. | - |
Techniques on this build
- Magic ring start
- Opens both Arms and Legs at Rnd 1 (6 sc into ring); pull the tail fully closed before working Rnd 2 or the center leaves a hole.
- Continuous spiral
- Used throughout Legs, Body, and Head with no slip-stitch join; a stitch marker is the only thing tracking where a round starts.
- Worked-in-place decrease
- Body Rnd 10 shapes with (3 sc, dec) × 5, 3 sc, dropping 28 to 23 in a single round — space the decreases evenly as you go rather than eyeballing at the end.
- Live-yarn joining
- The second Leg is not cut; its yarn feeds directly into Body Rnd 1 across a ch-2 bridge, which stands in for a seam.
- Invisible decrease
- Insert your hook into the front loop only of the next stitch, then the front loop of the following stitch, and complete as a single sc — this keeps decreases smooth and virtually invisible.
- Clean leg join
- When you chain 2 and join the second Leg to the first, treat each of the two chain stitches as a regular stitch when working Body Rnd 1 across the bridge — this produces a tidy, seamless join.
Final fit-up
- Weave in the tail left from the first Leg before it disappears under Body stitches — it is the one end that gets buried early, not at the end.
- Stuff Head and Body firmly to the edge of the opening; leave Arms and Legs unstuffed or lightly stuffed, per the materials note.
- Close the Head opening by working the final decrease rounds tight and cinching through remaining stitches with the yarn needle.
- Attach: sew Bunny Ears and Bunny Tail to the finished Body for one toy, or sew the eyes wide apart on the Head for the other, then whipstitch any Arms not already worked in at Rnd 15.
- Stuff the head firmly before reaching Rnd 28 — once Rnd 27 is complete, it becomes difficult to add stuffing neatly, so pack it solid, not squishy, while you still can.
- When whipstitching parts on, catch only the back loops of the body stitches as you sew around the base of the part — the seam will practically disappear into the fabric.
How the parts fit
- Legs are joined by a two-chain bridge and continued straight into Body Rnd 1 (12 sc + 2 sc + 12 sc + 2 sc = 28), so the hip line carries no seam on either side.
- Only the first Leg is fastened off; the second Leg's live yarn becomes the Body's starting yarn, which is why the pattern specifies which Leg to cut and which to leave open.
- Body shaping is concentrated at a single round — Rnd 10's (3 sc, dec) × 5, 3 sc — taking 28 stitches to 23 in one pass rather than tapering gradually, producing a defined shoulder before the neck join.
Scaling the build
| Smaller | Drop to a finer fingering weight with a smaller hook; the same round counts produce a denser, more compact fabric and a smaller finished toy. |
|---|---|
| Taller body | Repeat Body's straight rounds (Rnds 2–9) an extra time or two before working Rnd 10's decrease, which lengthens the torso without altering the decrease shaping. |
03 · Putting it togetherHow the pieces go together
- S1
If the arms were not crocheted in during Rnd 15, pin them to the sides of the body at that row and sew firmly in place using the yarn tail and a whipstitch.
- S2
For the bunny: sew the ears to the top of the head, slightly toward the back, spacing them evenly. Sew the tail to the center back of the body.
- S3
For the frog: sew the finished eyes to the top of the head, positioning them wide apart for that signature frog expression.
- S4
Weave in all remaining yarn ends securely.
04 · Snag listWhat went wrong on the bench, and the fix
Snag 1
Losing the round start
Continuous spiral has no slip-stitch marker built in. Move the stitch marker up after every round, without exception.
Snag 2
Stuffing Arms and Legs firmly
The materials note leaves them unstuffed or lightly stuffed by design. Reserve firm stuffing for Head and Body only.
Snag 3
Cutting the wrong Leg
The first Leg is fastened off; the second Leg's yarn must stay live to start the Body. Decide which Leg is which before cutting either tail.
Snag 4
Attaching ears or eyes before confirming the toy
Base construction is identical for both animals. Check the assembly steps for Bunny Ears/Tail versus frog eyes before threading a needle.
05 · QueriesQuestions logged against this build
Can I make just the bunny or just the frog?
Yes. Legs, Body, and Head are shared construction; the split happens only at finishing, where Bunny Ears and a Bunny Tail go on one version and sewn eyes go on the other.
Do both toys need safety eyes?
No — the materials list includes white yarn specifically for a frog eye option, while the Bunny finishing steps call for ears and a tail instead of eyes.
Why does the pattern insist on a stitch marker?
Legs, Body, and Head are all worked in a continuous spiral with no joining slip stitch, so there is no other way to tell where one round ends and the next begins.
What skill level is needed for this pattern?
Best suited to confident beginners and intermediate crocheters comfortable with continuous spirals, increases, invisible decreases, and a magic ring.
How long does it take to complete one toy?
Most makers finish one toy in 4–8 hours. The body and head take the longest; ears, tail, and eyes work up quickly.
What is the approximate finished size?
Using fingering weight yarn and a B-1 / 2.25 mm hook, the finished toy stands approximately 15–18 cm (6–7 inches) tall. A larger hook or heavier yarn will give a bigger result.
Can I sell toys made from this pattern?
Yes — finished toys are fine to gift, sell at craft markets, or donate. Ensure safety eyes are secured firmly, and always check local toy safety guidelines for items intended for young children.
06 · Made byWho counted this one

Who writes Amigurumi Addict, how a build gets its number, and why every round on the site carries a stitch count.
07 · Next off the benchThree builds that sit near this one

Animals
Crochet giraffe amigurumi pattern with horns and ears
How do you crochet a giraffe amigurumi? Shape head, body, legs, ears and horns in worsted yarn.

Animals
Amigurumi cat crochet pattern with oval muzzle and bow
How do you crochet an amigurumi cat with a flat muzzle? Shape it separately, pinch it, then sew it on.
Animals
Chubby round cat amigurumi pattern with built-in ears
How do you crochet a chubby round cat amigurumi? Body, built-in ears, and tail assemble in one piece.
Join the build log
One message when a build is issued
A drawing and its parts list, when one leaves the bench.