| Shelf | Level | Time | Hook | Yarn |
|---|---|---|---|---|
| Animals | Intermediate | 4-6 hours | 3.5 mm | DK |
Chubby round cat amigurumi pattern with built-in ears
How do you crochet a chubby round cat amigurumi? Body, built-in ears, and tail assemble in one piece.
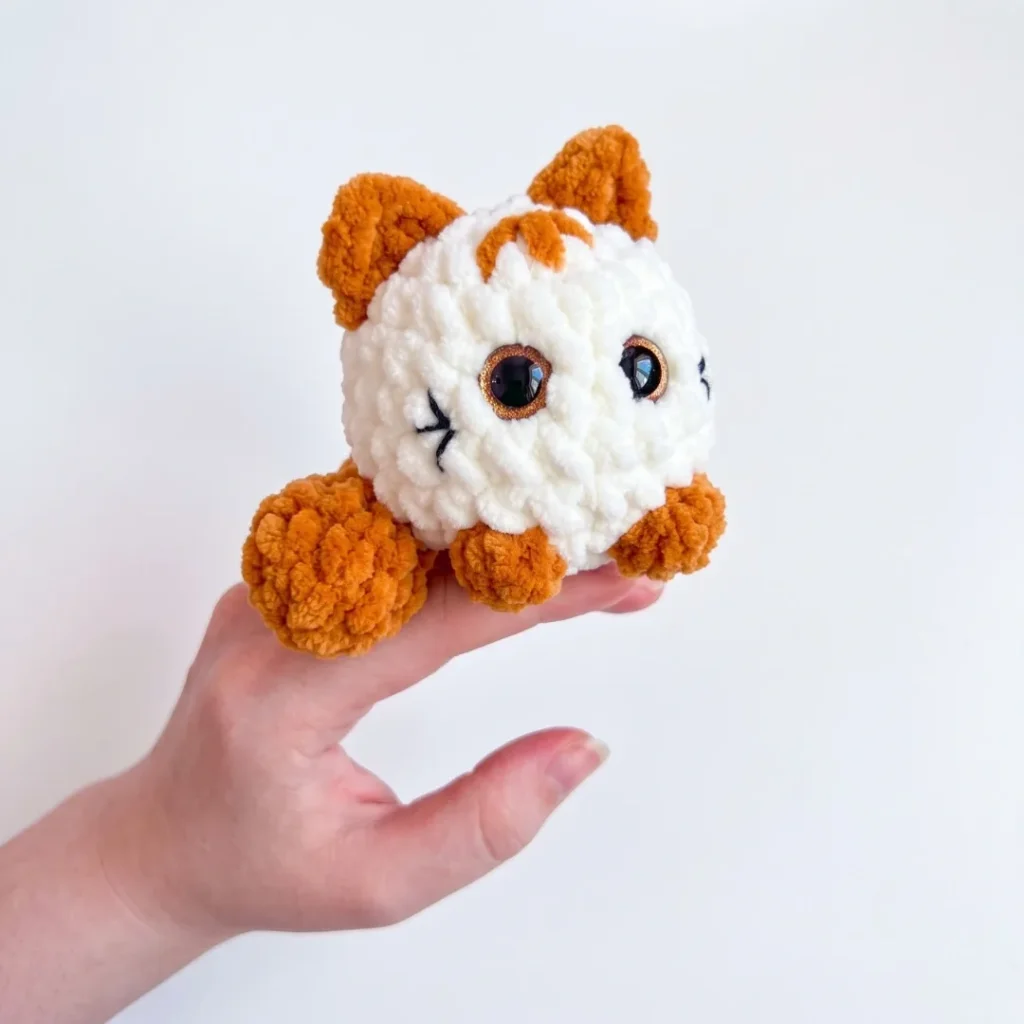
01 · The pieceWhat Chubby round cat amigurumi pattern with built-in ears actually is
The Body carries the whole build: 8 rounds worked top to bottom in a continuous spiral, no seam up the middle to hide. Ears are not a second piece — they are crocheted directly into the Body's existing rounds, anchored between Rounds 1 and 4, which removes a sewing step but ties the ear's position to exact stitch counts. The Tail is the one true separate part, a 6-round spiral stuffed on its own, then whipstitched to the back of the Body at Rounds 7 and 8.
Stitch counting matters most where the Ears attach — counting 4 stitches from the eye and locating the correct round boundary determines whether the pair sits level. It matters less in the spiral rounds of the Body and Tail themselves, where an sc or two of drift disappears once fiberfill rounds out the shape. Tail placement has similar leeway: centered at Rounds 7-8 is the target, but a whipstitch seam forgives minor shifts a stuffed sphere will not show.
This pattern is written in US crochet terminology.
Gauge is not critical for this project, but your fabric should be tight enough that stuffing does not show through. If you can see gaps, go down a hook size.
02 · The count run14 rounds across 3 parts, each with its count
US terms throughout. Every row below ends with the count that round finishes on.
| Part | Qty | Finishes on |
|---|---|---|
| Body (worked top to bottom) | 1 | - |
| Tail | 1 | - |
| Ears | 1 | - |
Work with Cream/Milk yarn throughout, except where Brown is indicated.
| Round | Instruction | Count |
|---|---|---|
| Round 1 | 6 sc in MR. (6) | - |
| Round 2 | inc in each st around. (12) | - |
| Round 3 | sc, inc repeat 6 times around. (18) | - |
| Round 4 | 2 sc, inc repeat 6 times around. (24) | - |
| Rounds 5–8 | sc in each st around. (24) (4 rounds total) Place 12 mm safety eyes between Rounds 5 and 6. Space the eyes 2 sts apart from each other. | - |
| Round 9 | 2 sc, dec, 2 sc, dec, sc — switch to Brown: work 1 bobble stitch (6 incomplete dc closed together at the top to form the paw); switch to Cream: dec, sc — switch to Brown: work 1 bobble stitch (paw); switch to Cream: dec, 2 sc, dec, 2 sc, dec. (18)The two paw bobbles sit at the front of the body, framing the face. The color changes happen within the round — carry the unused color loosely or cut and rejoin as you prefer. | - |
| Round 10 | sc, dec repeat 6 times around. (12)Stuff the body firmly with fiberfill now. | - |
| Round 11 | dec 6 times around. (6)Close the opening, cut yarn, and weave in the end. | - |
Work with Brown yarn.
| Round | Instruction | Count |
|---|---|---|
| Round 1 | 6 sc in MR. (6) | - |
| Round 2 | inc in each st around. (12) | - |
| Round 3 | sc in each st around. (12) | - |
| Round 4 | sc, dec repeat 4 times around. (8) | - |
| Rounds 5–8 | sc in each st around. (8) (4 rounds total) Stuff the tail lightly with fiberfill. | - |
| Round 9 | dec 4 times around. (4)Close the opening, cut yarn, and leave a long tail for sewing. | - |
The ears are worked directly into the body, inserted between existing rounds — no separate pieces to sew on. Use Brown yarn.
First Ear (worked bottom to top — toward the crown)
Count 4 sts away from one eye, moving toward the side of the head. Join Brown yarn with a sl st between Rounds 3 and 4 at that point.
Into the next stitch (between Rounds 2 and 3), work all of the following into that single stitch: hdc, dc, ch 2, dc, hdc.
Into the next stitch (between Rounds 1 and 2), work 1 sl st.
Fasten off, cut yarn, and weave in the end.
Second Ear (worked top to bottom — from the crown downward)
Position the second ear symmetrically on the other side of the head, the same distance from that eye.
Begin by working 1 sl st between Rounds 1 and 2.
Into the stitch between Rounds 2 and 3, work the same 6-element combination: hdc, dc, ch 2, dc, hdc — all into that single stitch.
Into the stitch between Rounds 3 and 4, work 1 sl st.
Fasten off, cut yarn, and weave in the end.
Techniques on this build
- Magic ring
- Opens both Body Rnd 1 and Tail Rnd 1 — pull the tail snug so no gap shows at the center once stuffed.
- Continuous spiral single crochet
- Runs through all 8 Body rounds and all 6 Tail rounds with no joins or turning chains; a stitch marker moved up each round is the only way to track where a round starts.
- Paced increases and decreases
- Body Rounds 2-4 add 6 sts per round to build the curve; Tail shifts from increase (Rnd 2) to flat (Rnd 3) to decrease (Rnd 4) to taper — miscounting here throws off the sphere or the taper shape.
- Direct-to-body embellishment
- Ears are worked as hdc, dc, ch 2, dc, hdc into a single stitch between Rounds 2-3, anchored with a sl st between Rounds 1-2 — mark the target stitch before joining Brown yarn.
Final fit-up
- Stuff the Body firmly before its final round closes, working fill into the crown and base evenly so the sphere holds its shape.
- Close the last round of the Body, then repeat stuffing and closing for the Tail on its own before it leaves your hands.
- Center the stuffed Tail against the back of the Body at Rounds 7-8 and whipstitch it in place all the way around its base opening.
- Weave in all remaining ends on both the Body and the Tail, including the tails left from the Ear joins.
How the parts fit
- Body increases run at a steady +6 per round through Rnd 4 (6, 12, 18, 24) — even spacing that produces a rounded sphere rather than a flattened disc base.
- Ears are built into the Body's Rounds 1-4 rather than crocheted flat and sewn on, which trades a sewing step for exact stitch-counting from the eye position.
- The Tail's round-by-round count (6, 12, 12, 8) shows an increase, then a flat round, then a decrease — a rounded base narrowing to a tip, typical shaping for a small stuffed spiral piece.
Scaling the build
| Larger | Move up to a worsted or aran weight yarn with a larger hook than the E-4/3.5 mm called for; the same round counts scale up in stitch and row height. |
|---|---|
| Smaller | Drop to a fingering or sport weight yarn with a smaller hook; the Body's 8 rounds and Tail's 6 rounds compress into a more compact cat. |
| Longer torso or tail | Repeat a flat round with no increase or decrease — such as Tail Rnd 3 — an extra time to add length without changing the existing shaping curve. |
03 · Putting it togetherHow the pieces go together
- S1
Hold the completed tail against the back of the body, centered, at the level of Rounds 7 and 8.
- S2
Using the long yarn tail and your tapestry needle, sew the tail securely to the body at that position using whipstitch or mattress stitch, working all the way around the base of the tail opening.
- S3
Weave in all remaining ends on both the body and the tail.
04 · Snag listWhat went wrong on the bench, and the fix
Snag 1
Losing the spiral round marker
Move the stitch marker up into the first stitch of every new round on both the Body and Tail; without it, round boundaries blur and the Ear join points become guesswork.
Snag 2
Miscounting stitches to the ear join
Place a temporary marker 4 stitches from the eye before joining Brown yarn, and recount before making the sl st join.
Snag 3
Working the ear cluster into the wrong stitch
The hdc, dc, ch 2, dc, hdc combination must land in one single stitch between Rounds 2-3 — mark that stitch first and check it against the join point already made.
Snag 4
Attaching the tail off-center
Line the Tail up against Rounds 7-8 at the back center of the Body before whipstitching, checking it sits level with the Ears from the front.
05 · QueriesQuestions logged against this build
What yarn weight works best for this chubby round cat pattern?
This pattern is designed for DK or light worsted weight yarn (CYCA weight 3), which gives the cat its dense, smooth fabric and clearly defined stitch lines. A softer fiber like cotton-blend or acrylic works well and holds its shape after stuffing. Avoid very fluffy or textured yarns for your first attempt, as they make it harder to see your stitches and keep an accurate count.
Can I use a different hook size if I want a larger or smaller cat?
Yes, you can adjust the finished size by changing your hook. A 4.0 mm or 4.5 mm hook with the same yarn will produce a noticeably larger cat, while a 2.5 mm or 3.0 mm hook will make a smaller, denser version. Keep in mind that going up in hook size will also loosen your fabric, so consider stuffing a little more firmly to maintain the round shape.
My ears look uneven — how do I get them to match?
The most common cause of uneven ears is miscounting the distance from the eye before joining the yarn. Use a stitch marker to pin both ear positions before you begin crocheting either one, then compare them visually from the front of the cat. It also helps to work both ears in good lighting so you can clearly see the gaps between rounds where you insert your hook.
How do I close the final 4 stitches on the tail neatly?
After working your final 4 decreases, cut the yarn leaving a 6-inch tail. Thread the tail onto your tapestry needle, then pass it through the front loop of each remaining stitch in order, slipping them off the hook as you go. Pull the tail gently but firmly to cinch the opening closed, then pass the needle through the center of the closure and into the body of the tail to hide the knot. Trim any excess after weaving in.
06 · Made byWho counted this one

Who writes Amigurumi Addict, how a build gets its number, and why every round on the site carries a stitch count.
07 · Next off the benchThree builds that sit near this one

Animals
Crochet a bunny or frog from one amigurumi base
How do you crochet a bunny and a frog from one base? Share Legs, Body, and Head; swap ears or eyes.

Animals
Crochet giraffe amigurumi pattern with horns and ears
How do you crochet a giraffe amigurumi? Shape head, body, legs, ears and horns in worsted yarn.

Animals
Amigurumi cat crochet pattern with oval muzzle and bow
How do you crochet an amigurumi cat with a flat muzzle? Shape it separately, pinch it, then sew it on.
Join the build log
One message when a build is issued
A drawing and its parts list, when one leaves the bench.