| Shelf | Level | Time | Yarn |
|---|---|---|---|
| Animals | Intermediate | 4-6 hours | Worsted |
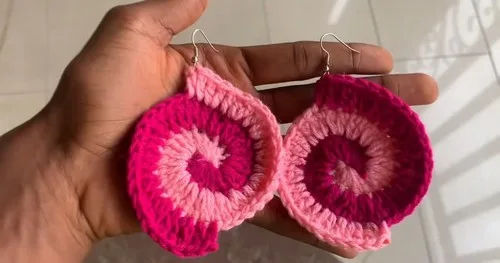
Two-color spiral crochet earrings pattern
How do you crochet spiral earrings? Two colors, 3 rounds, magic circle base — full build guide inside.
01 · The pieceWhat Two-color spiral crochet earrings pattern actually is
Each Spiral Earring is a single disc built outward from one magic circle, with two colors laid side by side rather than stacked in rows. There is no seam and no join between panels — the two halves meet at the color change within each round and are held together only by the working yarn passing from one stitch cluster into the next. The finished disc is a solid, self-supporting piece; the earring hook is the only hardware added after the crochet is done.
Tension at the magic circle center matters more than anywhere else in this build — a loose pull there leaves a visible hole at the exact spot the eye lands on first. Stitch height transitions across Round 1 (single crochet to half double to double) need to be even enough that the spiral reads as a curve, not steps. Past that, the double crochet increases in Rounds 2 and 3 are forgiving: a slightly uneven stitch here or there disappears into the pattern's own irregularity.
02 · The count run5 rounds across 1 part, each with its count
US terms throughout. Every row below ends with the count that round finishes on.
| Part | Qty | Finishes on |
|---|---|---|
| Spiral Earring | 2 | (36) |
| Round | Instruction | Count |
|---|---|---|
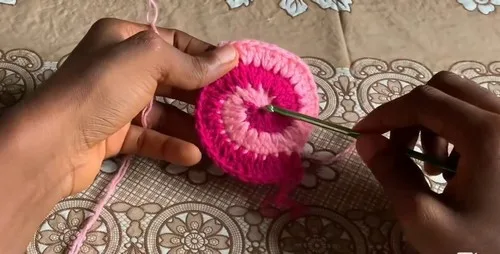
| Round 1 | First Color Start with a magic circle using your first color; chain 1; make 2 single crochets into the magic circle; make 2 half double crochets; make 2 double crochets. | - |
| Round 1 | Second Color Drop the first color; join the second color with a slip knot; repeat the same sequence: 2 single crochets, 2 half double crochets, 2 double crochets.Pull the strand from the first color to tighten and close the center of the magic circle after completing Round 1 with both colors. | - |
| Round 2 | Expand the Spiral - First Color Yarn over and make 2 double crochets into the first single crochet from Round 1; mark the first double crochet with a stitch marker; make 2 double crochets in each of the next 5 stitches. (12 stitches total) | (12) |
| Round 2 | Expand the Spiral - Second Color Repeat the same steps. (24 stitches total) | (24) |
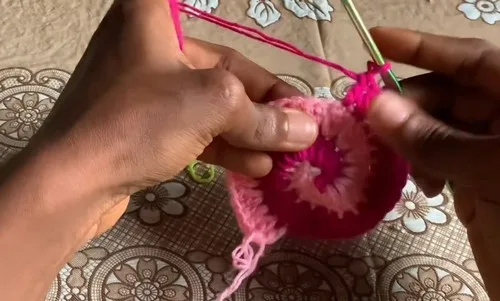
| Round 3 | Form the Final Shape Using both colors separately, work the 2-1 pattern: 2 double crochets in one stitch, 1 double crochet in the next stitch; repeat this 6 times for each color. (36 stitches total) | (36) |
Techniques on this build
- Magic circle
- Foundation of Round 1 for both colors; the pull-tight step at center closes only after both colors are worked into it, so leave the tail accessible until then.
- Graduated stitch heights within a round
- Round 1 moves from single crochet to half double crochet to double crochet in one pass; watch that each height transition sits at the correct 2-stitch mark, not drifted early or late.
- Color change without cutting
- First color is dropped, not cut, before the second color joins with a slip knot in Round 1; keep the dropped strand loose enough to pick up again without puckering the round.
- Stitch marker tracking across increases
- Round 2 places a marker in the first double crochet to hold the round's start point through the 2-dc increases; losing this marker makes the Round 3 stitch count hard to verify.
Final fit-up
- Weave in the four loose ends per earring — two color joins from Round 1, the working tail, and the starting tail from the magic circle — securing each into the back of the disc.
- Confirm the magic circle center is pulled fully closed; if it loosened during later rounds, tighten the starting tail again before weaving it in.
- Steam or lightly finger-block each spiral flat if the disc cups instead of lying even; work from the back side to avoid flattening the stitch texture on the front.
- Attach the earring hook to the back side of the spiral, either through a jump ring or directly through the yarn as specified, then repeat the full finishing sequence on the second earring.
How the parts fit
- The stitch-height climb in Round 1 (2 sc, 2 hdc, 2 dc) is what produces the spiral illusion before any increase round begins — the shape comes from height gradation, not stitch placement.
- Round 2 doubles the stitch count to 12 per color by placing 2 double crochets in each of 6 stitches, all worked in double crochet regardless of the original stitch's height — this evens out Round 1's graduated heights into a flat base for the next increase.
- The two colors are worked as separate, parallel tracks through every round rather than blended stitch-by-stitch, which is why Round 3's 2-1 increase pattern is repeated independently 6 times per color instead of 12 times across the whole round.
Scaling the build
| Smaller | Drop to a finer yarn weight and smaller hook; stitch counts per round stay the same but the finished spiral shrinks in diameter and weight. |
|---|---|
| Bolder color contrast | This doesn't change size, but choosing two high-contrast colors instead of close tones makes the spiral read more clearly at the finished diameter, which matters more on a small piece than on a larger one. |
03 · Putting it togetherHow the pieces go together
- S1
Make a half double crochet to finish the round.
- S2
Chain 1 and cut the yarn.
- S3
Sew in all loose ends securely.
- S4
Repeat the process to make the second earring.
- S5
Connect earring hooks to the back side of each spiral using a jump ring or directly through the yarn.
04 · Snag listWhat went wrong on the bench, and the fix
Snag 1
Loose magic circle center
Hold the tail taut through all of Round 1 and give it a final firm pull once both colors are in place, before moving to Round 2.
Snag 2
Uneven stitch-height jumps in Round 1
Count each pair of stitches out loud or mark the transition points; a single crochet worked at double crochet height (or vice versa) flattens the spiral effect.
Snag 3
Dropped color pulled too tight
Leave the dropped strand with slight slack across the back of the work; pulling it snug distorts the round it's sitting behind.
Snag 4
Losing the Round 2 stitch marker
Re-place the marker immediately if it slips out, since Round 3's 2-1 repeat depends on knowing exactly where each round started.
05 · QueriesQuestions logged against this build
Why does Round 1 use three different stitch heights instead of one?
The climb from single crochet to half double crochet to double crochet is what creates the spiral's rising line before any increases happen. Using one stitch height throughout Round 1 would produce a flat circle, not a spiral.
Do I need to cut the yarn between colors in Round 1?
No — the first color is dropped, not cut, and picked up again later since both colors continue through subsequent rounds. Only cut yarn at the final assembly step after Round 3 is complete.
Can I use the same color for both halves of the spiral?
The pattern is built for two colors worked as parallel tracks, so a single color will still produce the correct shape but without the visible spiral contrast. The construction and stitch counts stay identical either way.
06 · Made byWho counted this one

Who writes Amigurumi Addict, how a build gets its number, and why every round on the site carries a stitch count.
07 · Next off the benchThree builds that sit near this one

Animals
Crochet a bunny or frog from one amigurumi base
How do you crochet a bunny and a frog from one base? Share Legs, Body, and Head; swap ears or eyes.

Animals
Crochet giraffe amigurumi pattern with horns and ears
How do you crochet a giraffe amigurumi? Shape head, body, legs, ears and horns in worsted yarn.

Animals
Amigurumi cat crochet pattern with oval muzzle and bow
How do you crochet an amigurumi cat with a flat muzzle? Shape it separately, pinch it, then sew it on.
Join the build log
One message when a build is issued
A drawing and its parts list, when one leaves the bench.