| Shelf | Level | Time | Hook | Yarn |
|---|---|---|---|---|
| Garden and food | Intermediate | 22-30 hours | 4.0 mm | DK |
Strawberry vine sundress with pleated skirt crochet pattern
How do you crochet a strawberry sundress? Seamless bodice, pleated skirt, sewn appliques in DK cotton.
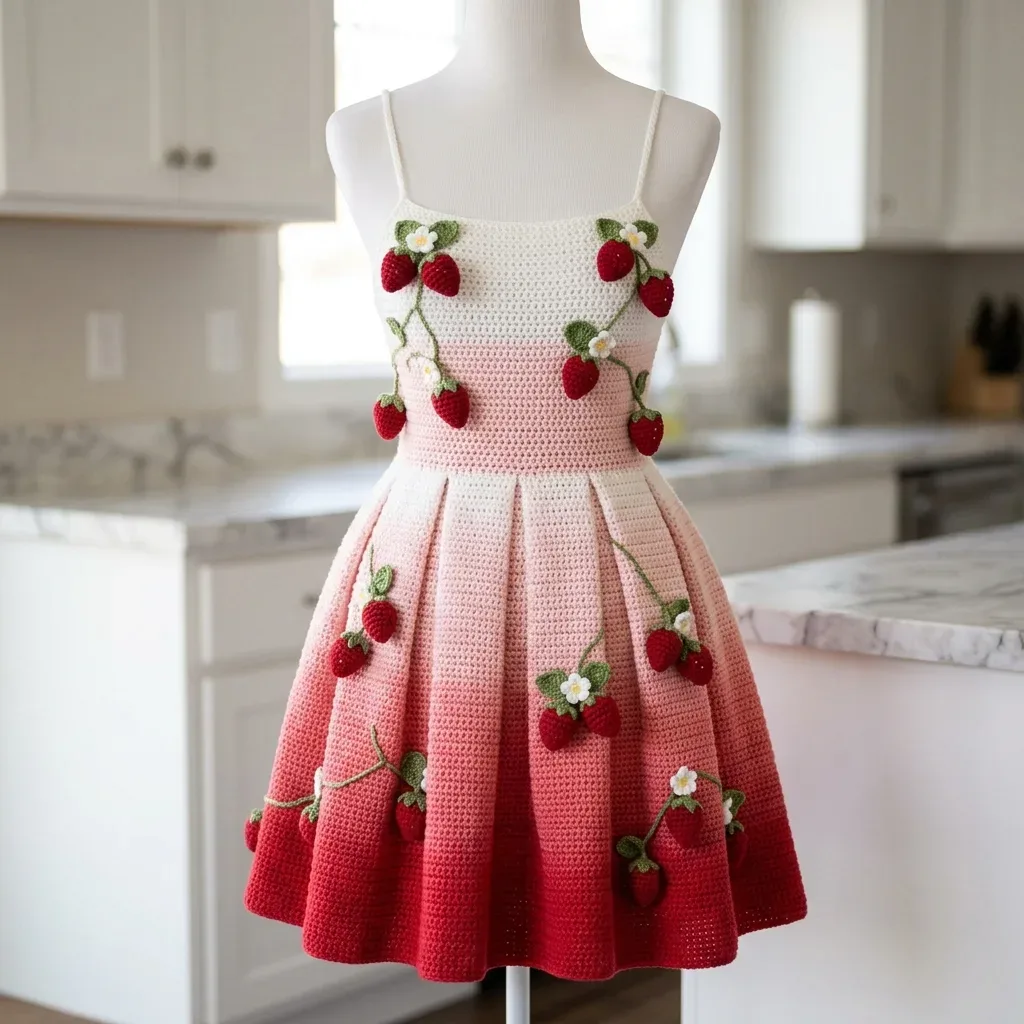
01 · The pieceWhat Strawberry vine sundress with pleated skirt crochet pattern actually is
The dress builds as four separate systems that meet at the finishing table. A seamless tube bodice worked in joined rounds carries the fitted upper body, a top-down pleated skirt hangs from it, and two flat-row straps get sewn on only after fitting. Surface crochet vines and hand-sewn strawberry appliques and blossoms sit on top of all of it, added last so their placement can be checked against the body rather than guessed from a stitch count.
Fit tolerance is tight at the bust and waist, both set to 34 inches with 0 to 1 inch of positive ease, so gauge and hook size are not optional here. The front edge has a narrow acceptable range too: ripple means drop a hook size, pull-in means add 4 to 8 sc. Applique placement is the loose end of the build. Vines, berries, and blossoms are pinned and eyeballed from front, side, and back before sewing, not measured to a fraction.
Time estimate: 22 to 30 hours depending on your applique speed.
Gauge is mandatory for fit: swatch in both single crochet and double crochet, wash or steam the swatch the same way you'll finish the dress, then measure after drying. Bodice gauge is 16 sc and 18 rows per 4 inches (10 cm) with a 4.0 mm hook; skirt gauge is 14 dc and 8 rows per 4 inches (10 cm) with the same hook. If your gauge is off, adjust hook size: too many stitches per inch means a larger hook, too few means a smaller hook.
02 · The count run26 rounds across 7 parts, each with its count
US terms throughout. Every row below ends with the count that round finishes on.
| Part | Qty | Finishes on |
|---|---|---|
| Bodice | 1 | (136) |
| Optional Back Stability | 1 | - |
| Skirt | 1 | (374) |
| Hem | 1 | - |
| Straps and Edging | 1 | (4) |
| Strawberry | 1 | (12) |
| Leaf Cap | 1 | - |
The bodice creates a dense, structured tube using single crochet worked in joined rounds. This gives you that smooth, fitted look that supports the weight of the skirt and appliques beautifully. With cream yarn and your 4.0 mm hook, chain 136. Join with a slip stitch to the first chain, being careful not to twist. The chain count equals your working stitch count because the bodice is worked in joined rounds into each chain.
| Round | Instruction | Count |
|---|---|---|
| Round 1 | Ch 1, sc in each ch around, join. 136 sc | (136) |
| Rounds 2–10 | Ch 1, sc in each st around, join. 136 sc each rnd; cream band approximately 2.25 in / 5.5 cm tall | (136) |
| Round 11 | Change to blush. Ch 1, sc around, join. 136 sc | (136) |
| Rounds 12–18 | Ch 1, sc around, join. 136 sc each rnd | (136) |
| Round 19 | Change to light berry. Ch 1, sc around, join. 136 sc | (136) |
| Rounds 20–24 | Ch 1, sc around, join. 136 sc each rnd; bodice approximately 5.3 in / 13.5 cm tallBodice checkpoint: Your upper and lower circumference should measure about 34 inches / 86.5 cm. Depth after Round 24 should be about 5.3 inches / 13.5 cm before edging. | (136) |
For a wearable version you plan to actually wear out, sew 1/4 inch elastic inside the upper back between the strap points. For display styling only, omit the elastic.
The skirt is where the magic happens. You'll work downward from the bodice, using increase rounds strategically to create fullness for those gorgeous pressed pleats. Join blush yarn at the lower bodice edge.
| Round | Instruction | Count |
|---|---|---|
| Round 1 | Ch 3 (counts as dc), dc in same st, 2 dc in each of next 2 sts, dc in next st; repeat from * around, join to top of ch-3. 238 dc (34 repeats x 7) | (238) |
| Rounds 2–7 | Ch 3, dc in each st around, join. 238 dc each rnd | (238) |
| Round 8 | Ch 3, dc in each st and inc once every 7 sts around; join. 272 dc | (272) |
| Rounds 9–13 | Dc around. 272 dc each rnd | (272) |
| Round 14 | Inc once every 8 sts around. 306 dc | (306) |
| Rounds 15–19 | Dc around. 306 dc each rnd | (306) |
| Round 20 | Inc once every 9 sts around. 340 dc | (340) |
| Rounds 21–25 | Dc around. 340 dc each rnd | (340) |
| Round 26 | Inc once every 10 sts around. 374 dc | (374) |
| Rounds 27–30 | Change to red/berry as desired for ombre. Dc around. 374 dc each rndSkirt checkpoint: Length after Round 30 should be about 15 inches / 38 cm. Steam vertical pleats at every 14 skirt stitches, creating 17 pleats at the upper skirt that open fuller toward the hem. | (374) |
| Round | Instruction | Count |
|---|---|---|
| Round 31 | With berry, ch 1, work reverse sc around OR work (sc, ch 1, skip 1) around for a lighter hem. Join with invisible join. Count will remain 374 stitches for reverse sc, or 187 sc/ch spaces for the lighter hem. | - |
The straps are simple flat pieces that you'll sew to the bodice after fitting. Mark your front strap positions 22 stitches in from each side seam. Mark your back strap positions 18 stitches in from each side seam. Try on or fit to a dress form before sewing.
| Round | Instruction | Count |
|---|---|---|
| Strap Row 1 | With cream, ch 5. Row 1: sc in 2nd ch from hook and each ch across, turn. 4 sc | (4) |
| Strap Rows 2-36 | Ch 1, sc across, turn. 4 sc each row; about 15 in / 38 cm long. Make 2 straps.Attach: Sew straps to inside upper bodice at marked positions. Keep flat, do not twist. | (4) |
| Top Edging | Join cream at back. Ch 1, sc evenly around upper edge, working 1 sc in each bodice st and 4 sc across each strap end. 144 sc approx.; lies flat | - |
| Second Edging | Sl st loosely around top edge and straps. Do not tighten.Square Neckline Tip: For that clean camisole shape, keep the upper front edge straight. If your edge ripples, go down a hook size for the edging. If it pulls inward, add 4 to 8 sc evenly across the front edge only. | - |
Side Seam Marker: Keep a removable marker at each side seam through finishing. These reference points make vine and applique placement symmetrical.
Make 18 strawberries: 8 for the bodice, 8 for the skirt front and sides, 2 for back accents. Make 8 blossoms and 30 to 36 leaves. Sew with matching thread or yarn tails.
With red, make a magic ring.
| Round | Instruction | Count |
|---|---|---|
| Round 1 | 6 sc in ring. | - |
| Round 2 | Inc around (12 sc). | (12) |
| Round 3 | Sc around (12 sc). | (12) |
| Round 4 | (Sc2tog, sc) 4 times (8 sc). Stuff lightly if desired. | - |
| Round 5 | Sc2tog around (4 sc). Fasten off, close tip. Embroider tiny seed dots. | - |
With green, join at berry top: ch 4, sl st in 2nd ch and next 2 ch, sl st to... (the source text is cut off at this point, so the remaining stitch-by-stitch instructions for the leaf cap are not available here).
Techniques on this build
- Magic ring start
- Opens the Strawberry at Rnd 1; pull the tail snug before working the first 6 sc so the center doesn't gap once stuffed.
- Round shaping with inc and sc2tog
- Strawberry goes 6-12-12-8 sc across Rnds 1-4; watch that decreases land evenly around Rnd 4 or the berry pulls lopsided.
- Surface crochet
- Vines are worked over the finished bodice and skirt fabric; keep tension loose enough that the base fabric doesn't pucker under the chain line.
- Reverse sc or picot-style edging
- Round 31's Hem holds at 374 sts (reverse sc) or 187 sc/ch spaces (open version); pick one and keep the count consistent all the way around.
Final fit-up
- Weave all main garment ends on the wrong side before any blocking begins.
- Stuff each Strawberry lightly at Rnd 4, then close the remaining round rather than leaving it open.
- Steam or wet-block the bodice flat without stretching, then pin skirt pleats every 14 upper-skirt stitches and let dry fully before handling.
- Attach the straps and work the upper edging first, then pin vines, berries, and blossoms and sew them down only after checking balance from front, side, and back.
How the parts fit
- The Strawberry's shaping is front-loaded and back-loaded rather than gradual: Rnd 2 doubles the stitch count in one increase round, Rnd 3 holds flat, and Rnd 4 removes a third of the stitches in a single decrease round.
- The straps are worked in flat rows, not joined rounds, because they're fitted and sewn on after the fact — a flat piece can be trimmed or repositioned against a dress form, a joined tube can't.
- The Hem's stitch count is fixed at 374 (or 187 sc/ch spaces) regardless of which edging option is chosen, and it closes with an invisible join so the round finishes flush instead of stepping up at the seam.
Scaling the build
| Larger | Move up from the 4.0 mm hook and/or a heavier cotton within the DK range; this raises both the bodice gauge (16 sc/18 rows per 4 in) and skirt gauge (14 dc/8 rows per 4 in) without altering any stitch count, loosening the fit beyond the 0-1 inch ease target. |
|---|---|
| Smaller | Go down a hook size for the same yarn to tighten gauge on both bodice and skirt; this shrinks the finished bust and waist below 34 inches while keeping every round count as written. |
| Longer skirt | Work additional dc rounds in the skirt body before starting Round 31's Hem, adding to the 15-inch skirt length and the 21-inch total length in gauge-based increments rather than by changing the hem's fixed stitch count. |
03 · Putting it togetherHow the pieces go together
- S1
Finishing Order: 1. Weave all main garment ends on the wrong side. 2. Steam or wet-block the bodice flat without stretching. 3. Pin skirt pleats every 14 upper-skirt stitches. Steam lightly and let dry fully. 4. Attach straps, then work upper edging. 5. Pin vines, berries, leaves, and blossoms. Sew securely after confirming balance from front, side, and back.
- S2
Blocking: Use gentle steam for cotton blends. Do not press strawberries flat. Cup your hand around each applique while steaming nearby fabric. Let the dress dry on a form so the pleats set vertically.
- S3
Care Instructions: Hand wash in cool water with mild soap. Roll in a towel to remove moisture. Reshape on a form or flat surface and dry away from direct heat. Store folded with tissue under appliques, not hanging for long periods.
04 · Snag listWhat went wrong on the bench, and the fix
Snag 1
Front bodice edge ripples
Drop to a smaller hook for the upper edging only; the main body hook stays as specified.
Snag 2
Front bodice edge pulls inward
Add 4 to 8 sc evenly across the front edge only, leaving the back and sides unchanged.
Snag 3
Straps sewn off-center
Mark front strap points 22 sts in from each side seam and back points 18 sts in from each side seam before removing the side-seam markers.
Snag 4
Overstuffed or flattened Strawberries
Stuff lightly at Rnd 4, and during blocking cup a hand around each berry while steaming instead of pressing it flat.
05 · QueriesQuestions logged against this build
Do I need the elastic in the Optional Back Stability step?
Only if the dress will actually be worn. For display or photography styling, that step can be skipped entirely with no change to the rest of the construction.
What if my gauge doesn't match after swatching?
Check both swatches separately, since the bodice (16 sc/18 rows per 4 in) and skirt (14 dc/8 rows per 4 in) use different stitches and gauges. Too many stitches per inch means size up the hook; too few means size down, and always re-measure after washing or steaming the swatch.
How is the yarn split between colors?
The main breakdown runs 520 yards, 420 yards, 600 yards of red/berry for the strawberries, 85 yards for a smaller accent, plus small scraps for the blossoms, totaling roughly 1,550 to 1,850 yards. Substituted yarns should match gauge and block smoothly without excessive stretch.
06 · Made byWho counted this one

Who writes Amigurumi Addict, how a build gets its number, and why every round on the site carries a stitch count.
07 · Next off the benchThree builds that sit near this one
Garden and food
How to Crochet a Rose Bouquet in a Vase
How do you crochet a rose bouquet vase? Roll spiral roses, stuff a round vase, and sew the bouquet together.
Garden and food
How to crochet a fuchsia flower with leaves
How do you crochet a fuchsia flower? Build a 12-sc center, fan the petals, then add leaves.
Garden and food
Little Pumpkin Amigurumi Crochet Pattern
Crochet a cozy Little Pumpkin amigurumi with ribbed BLO texture, spiral stem, and easy edgings. A charming autumn project for cotton yarn lovers.
Join the build log
One message when a build is issued
A drawing and its parts list, when one leaves the bench.