| Shelf | Level | Time | Hook | Yarn |
|---|---|---|---|---|
| Garden and food | Confident Beginner | 4-6 hours | 2.5 mm | Sport |
How to Crochet a Rose Bouquet in a Vase
How do you crochet a rose bouquet vase? Roll spiral roses, stuff a round vase, and sew the bouquet together.
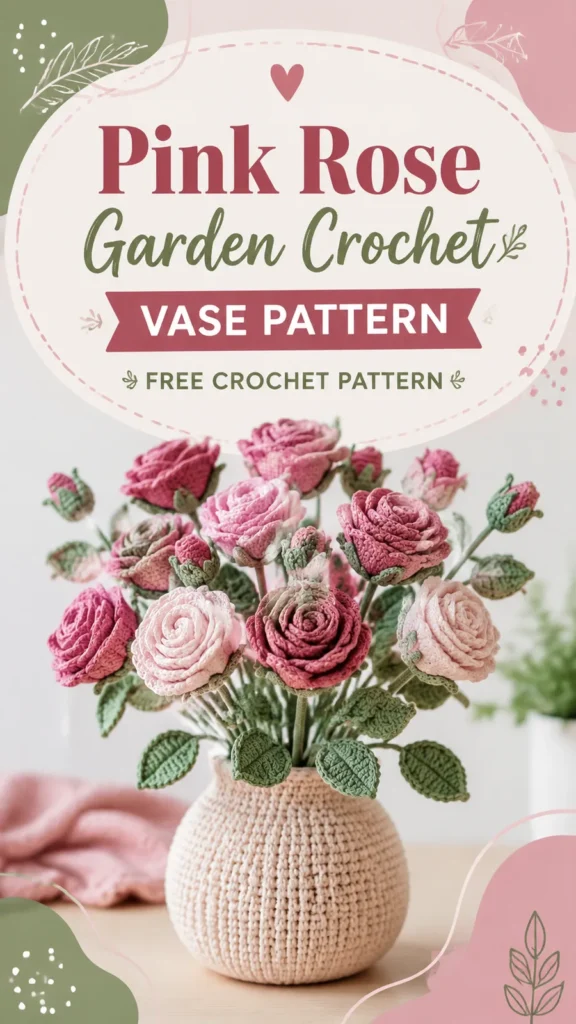
01 · The pieceWhat How to Crochet a Rose Bouquet in a Vase actually is
The bouquet builds from four separate parts joined only at final assembly: rose strips rolled into spiral flowers, oval leaves worked around a folded chain, a vase body worked in continuous rounds from a magic ring, and a special stitch component with no round count of its own. Nothing is joined mid-construction — the rose strip is fastened off and rolled, the leaf is joined with a single slip stitch, and the vase stands alone until stuffed. The piece only becomes one object at the sewing stage, when petals, leaves, and stems are stitched onto the finished vase.
Precision matters at the vase's magic ring and at the increase spacing across rounds 1 through 5 — six new stitches per round keeps the base flat and the walls even before stuffing goes in. Precision matters far less at the rose strip: the row of alternating single and half double crochet is meant to curl unevenly, so a slightly looser or tighter roll only changes how the petals stack, not whether the flower works. Leaf shaping is similarly forgiving, since the small oval hides minor stitch irregularities once blocked and sewn into place.
Finished size is approximately 10 inches tall x 7 inches wide (25 x 18 cm), at a gauge of about 24 sc x 26 rows = 4 inches (10 cm), using sport weight cotton or cotton blend yarn (approximately 350 yards / 320 meters total), a 2.5 mm (US B-1) hook, and written in US crochet terminology. The project suits confident beginners familiar with single crochet and increases.
The pink and light pink palette shown here is only a suggestion — cream, lavender, yellow, or coral yarn can be used for different flower styles, additional petal layers create fuller roses, and thicker yarn with a larger hook produces a larger statement piece.
02 · The count run14 rounds across 4 parts, each with its count
US terms throughout. Every row below ends with the count that round finishes on.
| Part | Qty | Finishes on |
|---|---|---|
| Crochet Vase Pattern | 1 | - |
| Crochet Rose Pattern | 1 | - |
| Leaf Pattern | 1 | - |
| Special Stitch | 1 | - |
Work in continuous rounds. Place a stitch marker at the beginning of each round.
| Round | Instruction | Count |
|---|---|---|
| Round 1 | Make a magic ring, sc 6 into ring. (6) | - |
| Round 2 | Inc in each stitch around. (12) | - |
| Round 3 | (Sc 1, inc) repeat 6 times. (18) | - |
| Round 4 | (Sc 2, inc) repeat 6 times. (24) | - |
| Round 5 | (Sc 3, inc) repeat 6 times. (30) | - |
| Round 6 | Sc around in back loops only. (30) | - |
| Rounds 7–14 | Sc around. (30) | - |
| Round 15 | (Sc 3, dec) repeat 6 times. (24) | - |
| Round 16 | (Sc 2, dec) repeat 6 times. (18)Stuff firmly. | - |
| Round 17 | (Sc 1, dec) repeat 6 times. (12) | - |
| Round 18 | Dec around. (6)Fasten off and close the opening. Add a small amount of extra stuffing if needed before closing. | - |
Make 7 roses for a full bouquet. Chain 32 to start.
| Round | Instruction | Count |
|---|---|---|
| Row 1 | Starting in second chain from hook, sc across. Turn. (31) | - |
| Row 2 | Ch 1, sc in first stitch, hdc in next stitch, 2 dc in next stitch, hdc in next stitch. Repeat this sequence across the row. End with sc. (31)Fasten off leaving a long tail. | - |
Roll the strip tightly from one end to create a spiral rose.
Sew through the bottom layers to secure the flower shape.
Make 12 leaves. Chain 9 to start.
| Round | Instruction | Count |
|---|---|---|
| Row 1 | Sc in second chain from hook, hdc in next 2 chains, dc in next 3 chains, hdc in next chain, 3 sc in last chain.Continue around the opposite side of the chain: hdc, dc in next 3 stitches, hdc in next 2 stitches, sc in last stitch. | - |
Rose Curl Stitch: Work a combination of hdc and dc stitches in one row to create a naturally curling flower strip. The strip is rolled from one end and sewn underneath to hold the rose shape.
Techniques on this build
- Magic ring start
- Opens Round 1 of the vase (sc 6 into ring); pull the tail fully closed or the vase base shows a hole under the stuffing.
- Continuous round increases
- Rounds 1-5 of the vase add six stitches per round (6, 12, 18, 24, 30); mark round start or the spiral drifts and the increase count slips.
- Flat rows with mixed stitch heights
- The rose strip's Row 2 alternates sc, hdc, and 2 dc in the same row; this uneven height is what forces the strip to curl once rolled.
- Working around a foundation chain
- The leaf is built down one side of the chain and back up the other, joined with a slip stitch; keep the chain flat before starting or the join twists.
Final fit-up
- Weave in ends on every rose strip, leaf, and vase piece before assembly begins.
- Stuff the vase body with polyester fiberfill as the continuous rounds near completion, packing firmly enough to hold the rounded shape.
- Close the vase opening by working the final round down and fastening off, cinching any remaining gap with the tail.
- Block the rose petals and leaves flat, then sew each rose and leaf onto the vase and stems in the arranged layout.
- After completing the bouquet, gently shape each flower with your fingers; a light steam blocking method can help petals and leaves lay neatly, but avoid overheating delicate fibers.
- care, keep the bouquet away from excessive moisture and dust and spot clean with a soft damp cloth when needed; cotton yarn usually holds its shape well and makes this handmade decor piece easy to maintain.
How the parts fit
- Rounds 1 through 5 of the vase increase by exactly six stitches per round (6, 12, 18, 24, 30), the standard flat-circle spacing that keeps the base disc even before the remaining six rounds build the walls.
- The rose strip is worked in two flat turning rows rather than in rounds because the fabric needs to lie flat first — the alternating sc/hdc/dc row heights only create curl once the strip is rolled from one end.
- The leaf is built as a single round that travels down one side of a foundation chain and back up the other, joined with a slip stitch instead of started from a magic ring, which is what gives the leaf its pointed ends.
Scaling the build
| Larger | Move up from the 2.5 mm hook while keeping the same yarn; the looser fabric enlarges both the vase and the rose spirals, though stitch definition softens. |
|---|---|
| Fuller bouquet | Make additional rose strips and leaf pieces beyond the pattern quantity; this adds volume to the arrangement without altering the vase's 11 rounds. |
03 · Putting it togetherHow the pieces go together
- S1
Stem Step 1 Cut floral wire or strong yarn strands approximately 8 inches (20 cm) long.
- S2
Stem Step 2 Wrap green yarn around the stem base.
- S3
Stem Step 3 Sew each rose securely onto a stem.
- S4
Stem Step 4 Attach two leaves below each flower using matching yarn.
- S5
Bouquet Step 1 Arrange the seven roses at different heights.
- S6
Bouquet Step 2 Insert stems into the top opening of the vase.
- S7
Bouquet Step 3 Sew or glue the stems together inside the vase opening if additional stability is needed.
- S8
Bouquet Step 4 Adjust flowers and leaves until the bouquet has a balanced rounded shape.
04 · Snag listWhat went wrong on the bench, and the fix
Snag 1
Loose magic ring on vase base
Cinch the ring tightly before starting Round 1 and check the tail again after Round 2; a loose ring leaves a visible hole once stuffing pushes outward.
Snag 2
Losing count in continuous rounds
Place a stitch marker at the start of Round 1 and move it up every round; without it, the increase spacing on Rounds 1-5 is easy to lose track of.
Snag 3
Rolling the rose strip too loosely
Roll the strip snugly from the starting end and sew through several layers at the base, not just the outer edge, so the spiral holds its shape.
Snag 4
Twisted chain before working the leaf
Lay the foundation chain flat before working down one side and back up the other; a twisted chain makes the slip-stitch join pucker.
Snag 5
Vase does not stand upright
Add more stuffing or place a small weighted insert inside the base before closing; firm shaping helps the vase support the bouquet.
Snag 6
Flowers lose their shape
Use light blocking and careful arrangement after assembly to improve petal definition.
05 · QueriesQuestions logged against this build
Why does the rose strip mix single crochet and half double crochet in one row?
The taller hdc and 2-dc stitches on part of the row and the shorter sc on the rest create uneven fabric heights. That imbalance is what makes the strip curl into a spiral once rolled, rather than lying flat.
Can floral wire really be added to the stems?
Yes, it's listed as an optional material for stronger stems. Insert the wire before rolling the rose strip or before sewing the leaf closed so it stays hidden inside the finished fiber.
Why is the vase worked in continuous rounds but the flowers in turning rows?
Continuous rounds avoid a seam line down the vase body, which matters for a smooth stuffed shape. The rose strip and leaf need to lie flat first, so they're worked in turning rows before being rolled or joined.
06 · Made byWho counted this one

Who writes Amigurumi Addict, how a build gets its number, and why every round on the site carries a stitch count.
07 · Next off the benchThree builds that sit near this one
Garden and food
Strawberry vine sundress with pleated skirt crochet pattern
How do you crochet a strawberry sundress? Seamless bodice, pleated skirt, sewn appliques in DK cotton.
Garden and food
How to crochet a fuchsia flower with leaves
How do you crochet a fuchsia flower? Build a 12-sc center, fan the petals, then add leaves.
Garden and food
Little Pumpkin Amigurumi Crochet Pattern
Crochet a cozy Little Pumpkin amigurumi with ribbed BLO texture, spiral stem, and easy edgings. A charming autumn project for cotton yarn lovers.
Join the build log
One message when a build is issued
A drawing and its parts list, when one leaves the bench.