| Shelf | Level | Time | Hook | Yarn |
|---|---|---|---|---|
| Animals | Intermediate | 4-6 hours | 5.0 mm | Worsted |
Star headphone covers with adjustable tie straps
How do you crochet star headphone covers? Build a hdc ring, add five points, tie straps to fit.
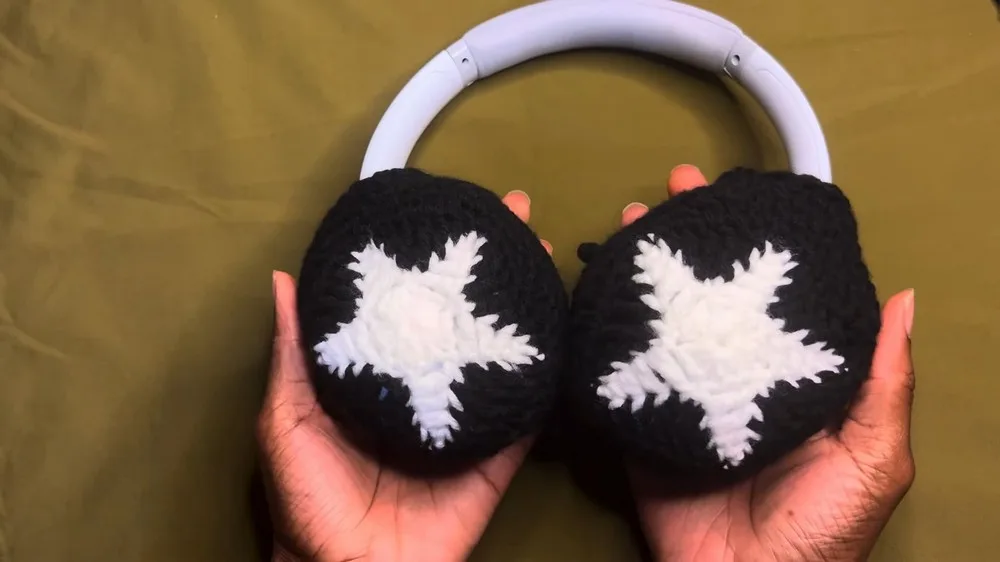
01 · The pieceWhat Star headphone covers with adjustable tie straps actually is
Each star is built from a single hdc circle, closed with a sl st join, then extended by five chain-5 points worked one at a time around the same base round. Two straps run off that ring and meet at a sc seam, closed again with a sl st, forming the tie that clamps the cover to the earcup. Nothing here is stitched to a second panel; the whole cover is one continuous piece from magic ring to strap join. Make two stars for a complete set (one per earcup).
Tolerance is tight at the magic ring and the Round 1 stitch count, since 15 hdc sets the base diameter every point and strap depends on. It loosens considerably at the star points themselves — chain-5 spikes forgive uneven tension far better than a hidden seam does, and slight size drift between the five points won't show once the cover is on the earcup. Fit precision matters more at the strap sc than at the points.
Special notes: unless a round says otherwise, the first ch 2 at the start of a round does not count as a stitch, and each round closes with a sl st into the first stitch of that round.
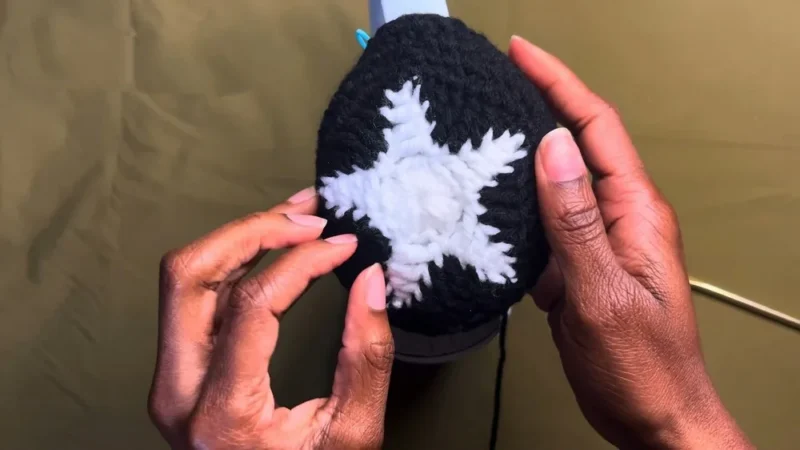
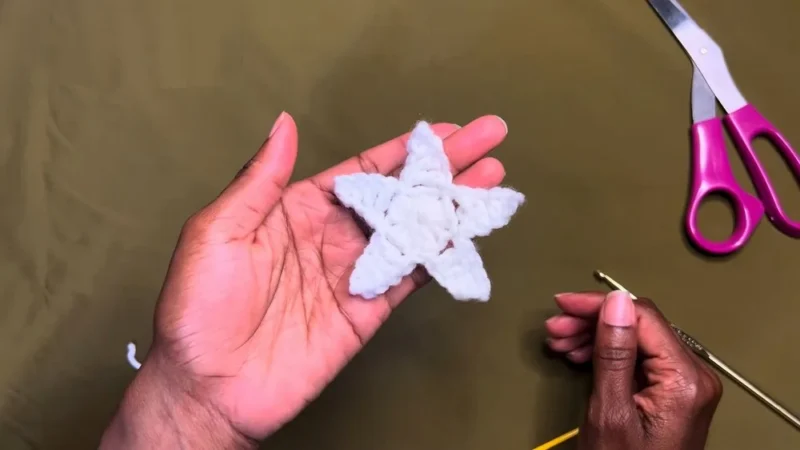
02 · The count run12 rounds across 1 part, each with its count
US terms throughout. Every row below ends with the count that round finishes on.
| Part | Qty | Finishes on |
|---|---|---|
| With Main Color | 1 | (18 sts) |
Star Front (Make 2, one per cover).
| Round | Instruction | Count |
|---|---|---|
| Round 1 | Start with a magic ring, ch 2 (does not count as a stitch). Work 15 hdc into ring. Pull tail to tighten ring. Optional: Place a stitch marker in the first hdc. Sl st to first hdc to join. (15 sts) Star Points (5 total) (worked one at a time around the circle): *Ch 5. Skip the first ch, sc in next ch, hdc in next ch, dc in next ch, tr in last ch (5th ch from hook). Skip next 2 hdc on base circle, sl st in next hdc. Repeat from * a total of 5 times around (for 5 points). After final point, sl st to base of first point or to finish round. Cut yarn leaving a 5 in/12 cm tail, pull through. Weave tail along the back loops of the star for a neat finish.Star Border & Back (Contrasting Color, worked on each star). Join contrast color with a sl st to first sc of any star point. | (15 sts) |
| Round 2 | Same point: sc in same st as sl st (place stitch marker here). hdc in next st (the hdc of the point) dc in next st (the dc of the point) tr in next st (the tr of the point) Now work down the side along the back of the star point/foundation chain, using the "back bumps": tr in first back loop/bump dc in next hdc in next sc in next Skip the small top loop of the star point. Sc in next st over (should be the sc at the base of the next star point). Repeat above sequence for each point (total 5 times around). At end of round, sl st to first sc (move stitch marker as needed).Lay star over headphone to check fit. | - |
Increasing for Headphone Cup
| Round | Instruction | Count |
|---|---|---|
| Round 3 | Ch 1. In same st: sc (place marker if desired), sc in next st, hdc in next, 2 dc in next st, dc in next st, hdc in next, sc in next 2 sts. Rep this sequence 5 times to complete round, ending at marker. Sl st to first sc to join. | - |
| Round 4 | Ch 2 (does not count as stitch). hdc in each st around (approx 40 hdc total). Join with sl st to first hdc. | (approx 40 hdc) |
Fit check: The piece should now begin to "cup" over the headphone and extend just past the edge.
| Round | Instruction | Count |
|---|---|---|
| Rounds 5–6 | Ch 2. Hdc in each st around. Join with sl st to first hdc. (Add up to 2 more hdc rounds as needed for your headphones; you should have about 40 hdc per round.) | - |
Gap for Headband Strap Opening. Mark the center at the top of a star point.
| Round | Instruction | Count |
|---|---|---|
| Opening Row | When ready for the opening (with working yarn at a point 2 cm from the center of a star point), ch 2, turn. Hdc in each st across leaving a gap of ~4 sts (for the headband). | - |
You should have 36 hdc per row if following the instructions.
| Round | Instruction | Count |
|---|---|---|
| Row 2 | Turn, ch 2, and work 2 hdc, hdc dec across (for decreases and to make it snug). Repeat: (2 hdc, hdc dec) across (for a total of 9 times). | - |
| Row 3 | Turn and repeat another row of hdc, alternating hdc and hdc dec for a snug fit. | - |
Strap to Attach
| Round | Instruction | Count |
|---|---|---|
| Strap Row 1 | Ch 20, plus one for turning. Sc in each ch. (Total 20 sc.) | (20 sc) |
| Strap Row 2 | Next row: Sc in each of next 18 sts. | (18 sts) |
| Second Strap | At the other side, ch 20, plus one for turning, sc in each ch. Sl st in first sc of previous edge to anchor both straps. | - |
Edging and Assembly
| Round | Instruction | Count |
|---|---|---|
| Edging | Sc evenly up one side of the straps, around the headband opening, and down the other strap. Sl st to join.Try on headphones, check fit, adjust opening if needed. | - |
Conclusion These Star Headphone Covers are fun, adjustable, and great for personalizing your headphones. The design features a snug cover with a secure tie to keep them in place, and is easy to adjust for different sizes or color combinations.
Pattern Tips Pattern Correction & Tips: The initial number of hdc in your circle determines the star size. Adjust more or fewer points for more/less coverage or fit. Use a soft, slightly elastic yarn for comfort and fit. Always check fit after a couple rounds; frog back and adjust as needed. Weave in ends as you go by working over them whenever possible. The tie can be lengthened to create a bow or to wrap around the entire headphone.
Techniques on this build
- Magic ring
- Opens Round 1; pull the tail snug before working points or the center gaps under the 15 hdc.
- Half double crochet into a ring
- All 15 stitches of Round 1 land in the ring, not in chain spaces — keep them uncrowded so the sl st join sits flush.
- Chain-5 points worked individually
- Each of the 5 star points is built as its own chain off the base circle rather than in one continuous round; tension drifts between points if you don't pace them evenly.
- Single crochet evenly along an edge
- Used up the strap, around the headband opening, and back down — spacing stitches evenly here controls whether the tie lies flat or puckers.
Final fit-up
- Weave in the magic-ring tail first, then the tail left at the Round 1 sl st join, working each into the back of nearby hdc so the star's center stays flat.
- Close the strap with the sl st join called out in the assembly steps, cinching the last strap stitch before trimming.
- Block lightly if the acrylic points curl — press the five chain-5 spikes flat rather than steaming the whole circle, since the base round needs to stay round to fit the earcup.
- Attach the second star to the matching earcup in the contrasting color, then check both ties sit at the same tension before calling the set gift-ready.
How the parts fit
- Round 1 places all 15 hdc in a single pass with no increase rounds after it — the star's diameter is fixed at cast-on rather than built up gradually, so the initial hdc count is the only lever for base size.
- The five points are chain-5 worked one at a time off the same circle instead of a continuous round of chains, which is why the star reads as five separate spikes rather than a scalloped edge.
- The sl st back to the first hdc closes Round 1 before any point is added, meaning that join isn't cosmetic — it's the anchor all five points and both straps ultimately hang from.
Scaling the build
| Larger | Go up a hook size from 5.0 mm; this loosens every stitch and widens the base circle without touching the 15-hdc count, useful for earcups larger than the 8 cm the pattern is based on. |
|---|---|
| Smaller | Drop a hook size below 5.0 mm to tighten the fabric and shrink the base circle for earcups under 8 cm. |
| More or less coverage | Add or subtract hdc from the Round 1 count as the source notes allow, which changes the base diameter and can support more or fewer than 5 star points for a fuller or sparser look. |
03 · Putting it togetherHow the pieces go together
- S1
Sc evenly up one side of the straps, around the headband opening, and down the other strap.
- S2
Sl st to join.
- S3
Try on headphones, check fit, adjust opening if needed.
- S4
Repeat for second star.
04 · Snag listWhat went wrong on the bench, and the fix
Snag 1
Loose magic ring center
Pull the tail tight before working the 15 hdc; a loose ring leaves a visible hole at the star's middle that no amount of point-shaping fixes later.
Snag 2
Miscounting the 15 hdc
Drop a stitch marker in the first hdc as noted and recount before the sl st join — the point count and strap symmetry both depend on this number landing correctly.
Snag 3
Uneven tension across the five points
Chain-5 points worked one at a time can flare or shrink relative to each other if tension shifts mid-star; keep the same hook grip through all five before moving to the straps.
Snag 4
Skipping stitches along the strap edge
Sc evenly up one strap, around the opening, and down the other — eyeballing spacing here puckers the tie; count rows and space sc consistently instead.
05 · QueriesQuestions logged against this build
How do I size the star to my headphones?
Measure the earcup diameter against the pattern's 8 cm reference before starting. If it doesn't match, go up or down a hook size from the 5.0 mm called for, or adjust the hdc count in Round 1 as the source notes allow.
Does the yarn choice actually matter here?
Yes — acrylic is recommended specifically for its stretch, since the cover needs to give slightly to grip the earcup. A less elastic fiber will fit looser and may not hold the tie tension the straps rely on.
Why are the star points made one at a time instead of in a round?
Working each chain-5 point individually off the base circle keeps the five spikes separate and sharp rather than producing a continuous scalloped edge. It's also easier to keep tension consistent per point than across a single unbroken round.
06 · Made byWho counted this one

Who writes Amigurumi Addict, how a build gets its number, and why every round on the site carries a stitch count.
07 · Next off the benchThree builds that sit near this one

Animals
Crochet a bunny or frog from one amigurumi base
How do you crochet a bunny and a frog from one base? Share Legs, Body, and Head; swap ears or eyes.

Animals
Crochet giraffe amigurumi pattern with horns and ears
How do you crochet a giraffe amigurumi? Shape head, body, legs, ears and horns in worsted yarn.

Animals
Amigurumi cat crochet pattern with oval muzzle and bow
How do you crochet an amigurumi cat with a flat muzzle? Shape it separately, pinch it, then sew it on.
Join the build log
One message when a build is issued
A drawing and its parts list, when one leaves the bench.