| Shelf | Level | Time | Hook | Yarn | Size |
|---|---|---|---|---|---|
| Animals | Beginner | 1-1.5 Hours | 5.0 mm | Worsted | 7 x 7 inch |
Peekaboo Fox Granny Square — A Sweet Beginner Applique Pattern
Stitch an adorable Peekaboo Fox Granny Square in cream, rust orange, and soft black — six easy rounds plus a border, perfect for confident beginners.
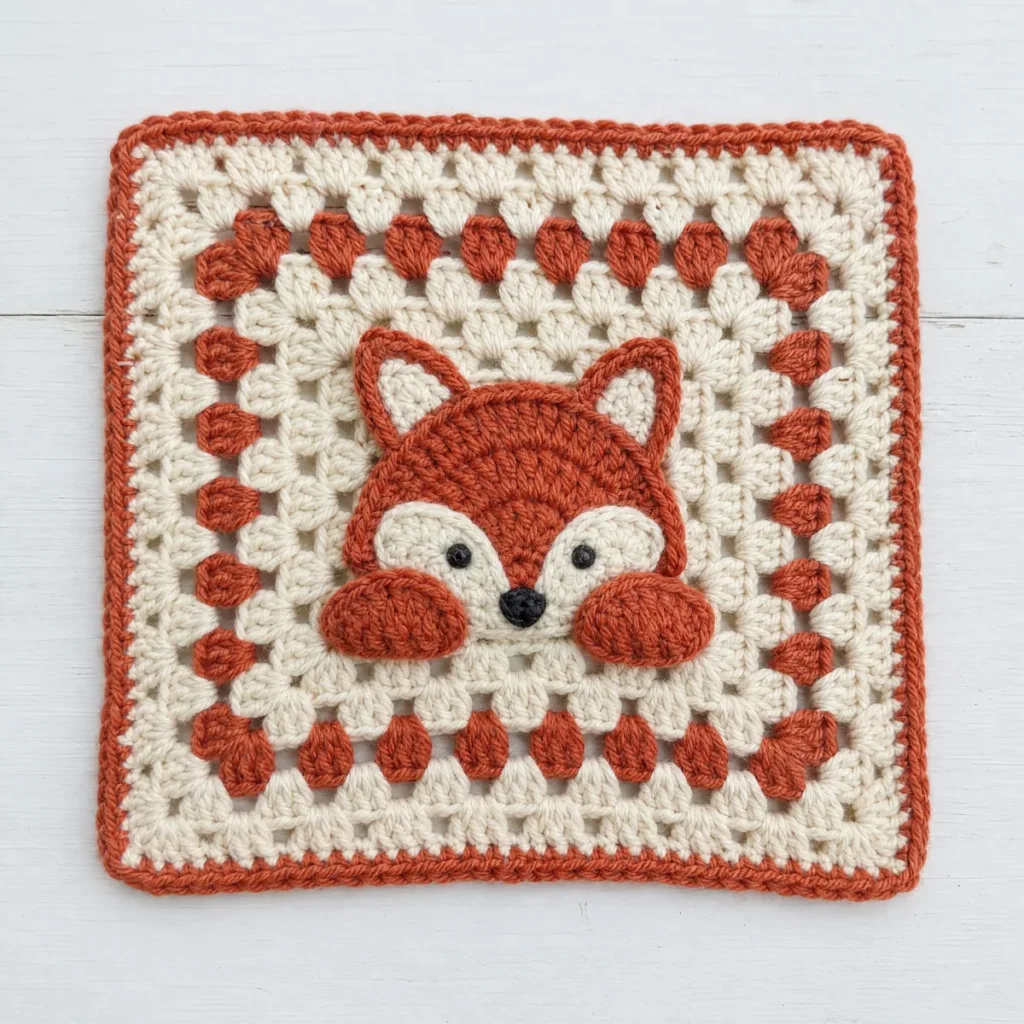
01 · The pieceWhat Peekaboo Fox Granny Square — A Sweet Beginner Applique Pattern actually is
The Peekaboo Fox Granny Square takes the classic granny square you already know and turns it into a little scene: a fox peeking out from her hedgerow with perked ears and a soft cream muzzle. She's built right into the square as a pictorial appliqué — a Head, Muzzle, and two curious Ears — so the whole design reads like a tiny woodland portrait rather than a plain block of color.
You'll work the background in traditional granny square rounds — chain-3 corners, 3-dc groups, and simple chain spaces — before adding the fox pieces on top with basic appliqué shapes and a whipstitch or two to secure them. Every stitch here is foundational: double crochet, chain, and slip stitch, worked across six count-verified rounds plus a tidy single crochet border. If you've made a granny square before, or you're ready to make your very first one, this pattern is an easy, satisfying next step.
Finished up, the square measures about 7 by 7 inches, with the fox's face sitting proudly in the center against soft rounds of cream and rust orange. Make one as a stand-alone coaster or small hanging piece, or stitch up a whole litter of them to join into a blanket, pillow front, or tote bag panel where the little foxes peek out row after row.
02 · The count run18 rounds across 6 parts, each with its count
US terms throughout. Every row below ends with the count that round finishes on.
| Part | Qty | Finishes on |
|---|---|---|
| The Background Square | 1 | - |
| The Head | 1 | - |
| The Muzzle | 1 | - |
| The Ear Left | 1 | - |
| The Ear Right | 1 | - |
| Assembly — Bringing It Together | 1 | - |
Work the plain background square first — the peekaboo fox pieces are sewn on at the end. Every count below is math-verified.
| Round | Instruction | Count |
|---|---|---|
| Round 1 | With cream, in a magic ring: ch 3, 2 dc, ch 2, [3 dc, ch 2] 3 times; sl st to top of ch-3 to join (12)Step by step Step by step: Using cream yarn, in a magic ring: make 3 chain stitches, 2 double crochet, make 2 chain stitches, [3 double crochet, make 2 chain stitches] 3 times; slip stitch to top of ch-3 to join. | - |
| Round 2 | sl st to corner sp, ch 3, 2 dc, ch 2, 3 dc in same corner, ch 1, [(3 dc, ch 2, 3 dc) in corner sp, ch 1, ] 3 times; sl st to join (24)Step by step Step by step: Slip stitch to corner space, make 3 chain stitches, 2 double crochet, make 2 chain stitches, 3 double crochet in same corner, make 1 chain stitch, [(3 double crochet, make 2 chain stitches, 3 double crochet) in corner space, make 1 chain stitch, ] 3 times; slip stitch to join. | - |
| Round 3 | With rust orange, sl st to corner sp, ch 3, 2 dc, ch 2, 3 dc in same corner, ch 1, 3 dc, ch 1, [(3 dc, ch 2, 3 dc) in corner sp, ch 1, 3 dc, ch 1, ] 3 times; sl st to join (36)Step by step Step by step: Using rust orange yarn, slip stitch to corner space, make 3 chain stitches, 2 double crochet, make 2 chain stitches, 3 double crochet in same corner, make 1 chain stitch, 3 double crochet, make 1 chain stitch, [(3 double crochet, make 2 chain stitches, 3 double crochet) in corner space, make 1 chain stitch, 3 double crochet, make 1 chain stitch, ] 3 times; slip stitch to join. | - |
| Round 4 | sl st to corner sp, ch 3, 2 dc, ch 2, 3 dc in same corner, ch 1, 3 dc, ch 1, 3 dc, ch 1, [(3 dc, ch 2, 3 dc) in corner sp, ch 1, 3 dc, ch 1, 3 dc, ch 1, ] 3 times; sl st to join (48) | - |
Step by step Step by step: Slip stitch to corner space, make 3 chain stitches, 2 double crochet, make 2 chain stitches, 3 double crochet in same corner, make 1 chain stitch, 3 double crochet, make 1 chain stitch, 3 double crochet, make 1 chain stitch, [(3 double crochet, make 2 chain stitches, 3 double crochet) in corner space, make 1 chain stitch, 3 double crochet, make 1 chain stitch, 3 double crochet, make 1 chain stitch, ] 3 times; slip stitch to join.
| Round | Instruction | Count |
|---|---|---|
| Round 5 | With cream, sl st to corner sp, ch 3, 2 dc, ch 2, 3 dc in same corner, ch 1, 3 dc, ch 1, 3 dc, ch 1, 3 dc, ch 1, [(3 dc, ch 2, 3 dc) in corner sp, ch 1, 3 dc, ch 1, 3 dc, ch 1, 3 dc, ch 1, ] 3 times; sl st to join (60) | - |
Step by step Step by step: Using cream yarn, slip stitch to corner space, make 3 chain stitches, 2 double crochet, make 2 chain stitches, 3 double crochet in same corner, make 1 chain stitch, 3 double crochet, make 1 chain stitch, 3 double crochet, make 1 chain stitch, 3 double crochet, make 1 chain stitch, [(3 double crochet, make 2 chain stitches, 3 double crochet) in corner space, make 1 chain stitch, 3 double crochet, make 1 chain stitch, 3 double crochet, make 1 chain stitch, 3 double crochet, make 1 chain stitch, ] 3 times; slip stitch to join.
| Round | Instruction | Count |
|---|---|---|
| Border | sl st into the corner ch-2 sp, ch 1, [3 sc in the corner sp, (sc in next 3 sts, sc in next sp) 4 times, sc in next 3 sts] 4 times; sl st to the first sc (88)Step by step Step by step: Slip stitch into the corner ch-2 space, make 1 chain stitch, [3 single crochet in the corner space, (single crochet in next 3 stitches, single crochet in next space) 4 times, single crochet in next 3 stitches] 4 times; slip stitch to the first single crochet. | - |
Worked in rust orange. Leave a long tail for sewing.
| Round | Instruction | Count |
|---|---|---|
| Round 1 | 6 sc in a magic ring (6) | - |
| Round 2 | [inc] repeat 6 times (12) | - |
| Round 3 | [sc, inc] repeat 6 times (18) | - |
| Round 4 | [sc in next 2 sts, inc] repeat 6 times (24) | - |
Worked in cream. Leave a long tail for sewing.
| Round | Instruction | Count |
|---|---|---|
| Round 1 | 6 sc in a magic ring (6) | - |
| Round 2 | [inc] repeat 6 times (12) | - |
Worked in rust orange. Leave a long tail for sewing.
| Round | Instruction | Count |
|---|---|---|
| Round 1 | ch 5, [sc] repeat 4 times (4) | - |
| Round 2 | ch 1, turn, [dec] repeat 2 times (2) | - |
| Round 3 | ch 1, turn, dec (1) | - |
Worked in rust orange. Leave a long tail for sewing.
| Round | Instruction | Count |
|---|---|---|
| Round 1 | ch 5, [sc] repeat 4 times (4) | - |
| Round 2 | ch 1, turn, [dec] repeat 2 times (2) | - |
| Round 3 | ch 1, turn, dec (1) | - |
Step 1 Step 1: Lay the Head circle rust-orange-side up in the center of the background square, leaving even margins on all sides, and pin.
Step 2 Step 2: Tuck the straight base row of each Ear triangle about 1/4 inch under the top edge of the Head, points facing up and angled outward in a 'V'; pin in place.
Step 3 Step 3: Whipstitch around the outer edge of the Head, catching the tucked ear bases as you go so Head and both Ears are secured together, leaving the ear points free.
Step 4 Step 4: Pin the Muzzle circle onto the lower half of the Head, centered, overlapping the Head's bottom edge by about a third of the Muzzle's height.
Step 5 Step 5: Whipstitch around the outer edge of the Muzzle with matching cream yarn.
Step 6 Step 6: Embroider the eyes, nose, mouth, and inner-ear lines as described, then weave in all ends.
Embroidery With soft black yarn, work two small straight stitches (or French knots) for the eyes, about 1/3 of the way down the Head and angled slightly toward the Muzzle.
Embroidery With soft black yarn, stitch a tiny satin-stitch triangle at the top-center edge of the Muzzle for the nose.
Embroidery With soft black yarn, add one short straight stitch (or a small V) directly below the nose for the mouth.
Embroidery With cream yarn, add one short straight stitch down the center of each Ear for a subtle inner-ear highlight.
03 · Before it goes to a childWhat has to be right, and what is allowed to drift
- 💡 Gauge: the finished square is about 7 x 7 inches in Worsted weight yarn with a 5.0 mm hook. Tight crocheters can go up half a hook size; loose ones down half.
- 💡 Color plan: the sample uses cream, rust orange, soft black in round order — change colors with a slip-stitch join in the first stitch of the new round.
- 💡 Weave in your color-change tails as you go rather than saving them all for the end — with three colors in this square, keeping tails tidy from the start keeps you from losing track of which end belongs where.
- 💡 Block the background square lightly before sewing on the fox pieces; a flat, even base makes it much easier to position the Head, Muzzle, and Ears symmetrically.
04 · Snag listWhat went wrong on the bench, and the fix
Snag 1
Pulling corner ch-2 spaces too tight
Those corner chain-2 spaces need to stay open so you can fit 3 dc plus another 3 dc into them on the next round. Keep your tension relaxed right at the corners, even if the rest of your stitches are snug.
Snag 2
Losing track of the color changes
This square shifts colors between rounds, so it's easy to keep going in the wrong shade if you're chatting or watching something. Lay your yarn out in working order before you start so you always know what's next.
Snag 3
Skipping the join slip stitch
Each round starts by slip stitching into the corner space before you chain up — skip it and your corners will drift out of alignment. Take a breath at the join and count your stitches before moving on.
Snag 4
Rushing the fox applique placement
It's tempting to stitch the fox pieces on quickly once the background is done, but pinning the Head, Muzzle, and both Ears in place first lets you check the expression before you commit. A few minutes of pinning saves you from unpicking whipstitches later.
05 · VariantsOther ways to issue this one
Once you've got the fox down, this square is a fun one to play with. Swap the rust orange for a warm caramel or deep chestnut if you want a different fox altogether, or try gray and white for a sweet little wolf pup instead. A DK weight yarn with a 3.5mm hook shrinks the square nicely for smaller projects like coasters or gift tags, while bulky yarn and a larger hook puffs it up into a standout cushion front. You could also swap the cream background for a soft sage or dusty blue if you'd like your fox peeking out of a different kind of scene. However you style it, keep the soft black small and centered so those little details — the muzzle and ears — stay the star of the square.
I fell for this square the moment the fox's ears popped up in my test swatch — there's something so satisfying about turning basic granny stitches into a little face with personality. I love that the background rounds are pure comfort crochet, the kind you can work while chatting or half-watching something, and then the appliqué pieces give you just enough of a creative moment to feel proud. The rust orange against the cream reminds me of autumn hedgerows and the foxes that dart along them at dusk. It's beginner-friendly without being boring, and once you've made one, you'll want to make a whole family of them, each fox with her own perky, peeking expression.
06 · QueriesQuestions logged against this build
Is the Peekaboo Fox Granny Square really beginner-friendly?
Yes — every stitch is a basic double crochet, chain, or slip stitch, and the six rounds are fully count-verified so you always know if you're on track. The fox appliqué pieces are simple shapes, not intricate embroidery, so they're approachable even on your first try.
How much yarn do I need for one square?
This pattern uses worsted weight yarn in three colors — cream, rust orange, and soft black — though soft black is only needed in small amounts for the fox's features. A partial skein of each color is generally enough for a single 7-inch square.
Can I use a different hook size?
The pattern is written for a 5.0mm hook with worsted yarn, but you can size up or down as long as you adjust your yarn weight to match and check your gauge against the 7-inch finished size. Just keep your tension consistent so the corner chain spaces stay easy to work into.
How do I attach the fox pieces to the background?
Once the appliqué pieces are crocheted, pin the Head, Muzzle, and both Ears onto the background square in a peekaboo pose, then whipstitch each piece in place using a matching or blending yarn color. Weaving in ends neatly on the back keeps the front looking clean.
What can I make with a batch of these squares?
A handful of Peekaboo Fox squares joins beautifully into a baby blanket, a pillow cover, or a tote bag panel, with the foxes peeking out across the piece. A single square also works well on its own as a coaster or small hanging piece.
07 · Made byWho counted this one

Who writes Amigurumi Addict, how a build gets its number, and why every round on the site carries a stitch count.
08 · Next off the benchThree builds that sit near this one

Animals
Crochet a bunny or frog from one amigurumi base
How do you crochet a bunny and a frog from one base? Share Legs, Body, and Head; swap ears or eyes.

Animals
Crochet giraffe amigurumi pattern with horns and ears
How do you crochet a giraffe amigurumi? Shape head, body, legs, ears and horns in worsted yarn.

Animals
Amigurumi cat crochet pattern with oval muzzle and bow
How do you crochet an amigurumi cat with a flat muzzle? Shape it separately, pinch it, then sew it on.
Join the build log
One message when a build is issued
A drawing and its parts list, when one leaves the bench.