| Shelf | Level | Time | Hook | Yarn | Size |
|---|---|---|---|---|---|
| Garden and food | Beginner | 45-60 Minutes | 5.0 mm | Worsted | 6 x 6 inch |
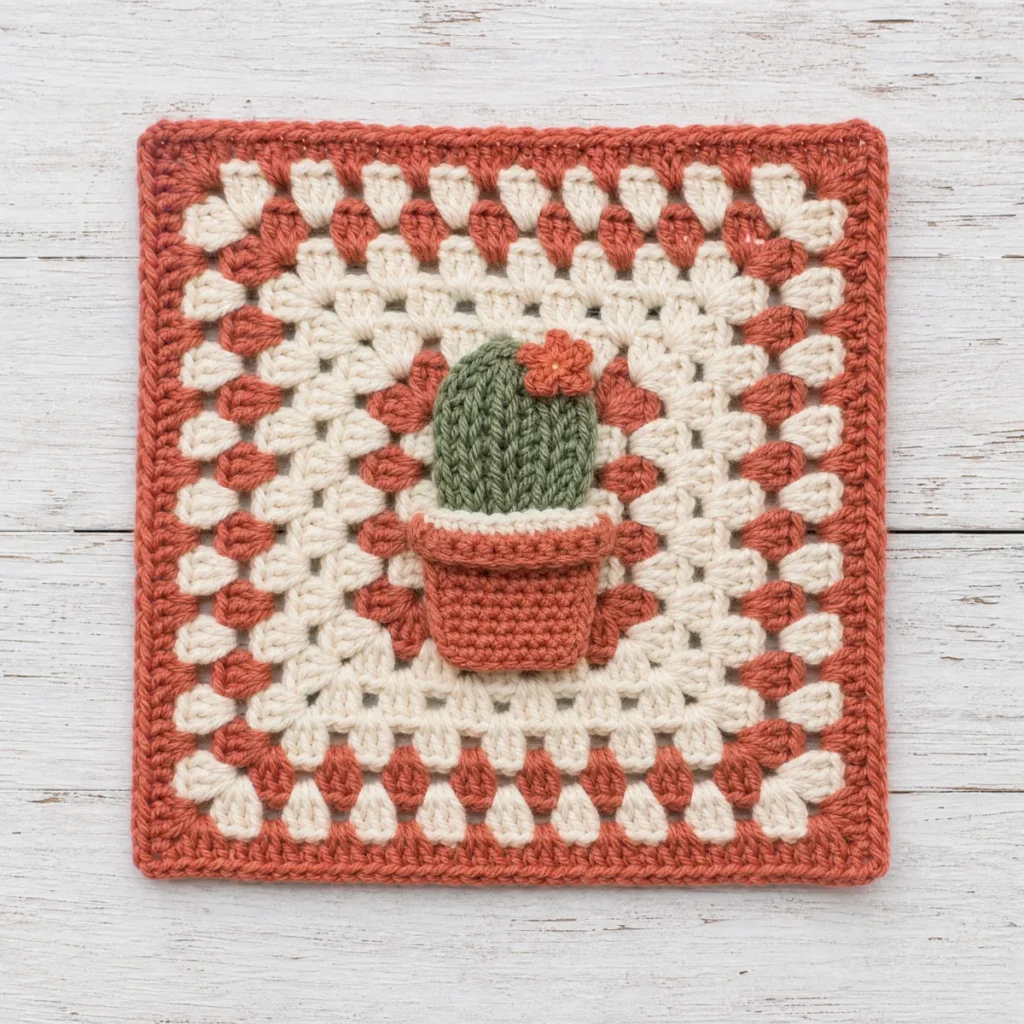
Little Potted Cactus Granny Square — A Cheerful Succulent Motif
Stitch an adorable Little Potted Cactus granny square in five easy rounds of cream, terracotta, and cactus green yarn — a fun beginner appliqué project.
01 · The pieceWhat Little Potted Cactus Granny Square — A Cheerful Succulent Motif actually is
The Little Potted Cactus Granny Square starts out as a classic granny base, worked from a magic ring in soft cream, then grows outward through four rounds and a border, picking up terracotta and cactus green along the way. What makes it special is what happens next: a small cactus appliqué, with its own rounded pot, a chubby body, one little arm, and a bright bloom on top, gets stitched separately and sewn onto the finished square, turning a plain set of granny rounds into a tiny still-life you'd want to frame.
You'll use all the fundamentals of granny square construction here: a magic ring start, corner chain-2 spaces, three-double-crochet groups, and a tidy single crochet border to finish things off cleanly. The appliqué pieces are worked in the same straightforward stitches, just shaped and sewn rather than joined into the round. That combination makes this square a lovely project for beginners who already know their way around a granny square and are ready to try a little needle-and-thread finishing, as well as for more experienced stitchers who want a quick, satisfying make.
Finished, the square measures about 6 by 6 inches, with the cactus sitting proudly in its pot against the colorful granny background. It looks wonderful worked in multiples for a garden-themed blanket or throw pillow, but it's just as charming stitched as a single square for a coaster, a mug rug, or a little framed piece of fiber art on its own.
02 · The count run17 rounds across 6 parts, each with its count
US terms throughout. Every row below ends with the count that round finishes on.
| Part | Qty | Finishes on |
|---|---|---|
| The Background Square | 1 | - |
| The Pot | 1 | - |
| The Cactus Body | 1 | - |
| The Cactus Arm | 1 | - |
| The Flower | 1 | - |
| Assembly — Bringing It Together | 1 | - |
Work the plain background square first — the little potted cactus pieces are sewn on at the end. Every count below is math-verified.
| Round | Instruction | Count |
|---|---|---|
| Round 1 | With cream, in a magic ring: ch 3, 2 dc, ch 2, [3 dc, ch 2] 3 times; sl st to top of ch-3 to join (12)Step by step Step by step: Using cream yarn, in a magic ring: make 3 chain stitches, 2 double crochet, make 2 chain stitches, [3 double crochet, make 2 chain stitches] 3 times; slip stitch to top of ch-3 to join. | - |
| Round 2 | sl st to corner sp, ch 3, 2 dc, ch 2, 3 dc in same corner, ch 1, [(3 dc, ch 2, 3 dc) in corner sp, ch 1, ] 3 times; sl st to join (24)Step by step Step by step: Slip stitch to corner space, make 3 chain stitches, 2 double crochet, make 2 chain stitches, 3 double crochet in same corner, make 1 chain stitch, [(3 double crochet, make 2 chain stitches, 3 double crochet) in corner space, make 1 chain stitch, ] 3 times; slip stitch to join. | - |
| Round 3 | With terracotta, sl st to corner sp, ch 3, 2 dc, ch 2, 3 dc in same corner, ch 1, 3 dc, ch 1, [(3 dc, ch 2, 3 dc) in corner sp, ch 1, 3 dc, ch 1, ] 3 times; sl st to join (36)Step by step Step by step: Using terracotta yarn, slip stitch to corner space, make 3 chain stitches, 2 double crochet, make 2 chain stitches, 3 double crochet in same corner, make 1 chain stitch, 3 double crochet, make 1 chain stitch, [(3 double crochet, make 2 chain stitches, 3 double crochet) in corner space, make 1 chain stitch, 3 double crochet, make 1 chain stitch, ] 3 times; slip stitch to join. | - |
| Round 4 | sl st to corner sp, ch 3, 2 dc, ch 2, 3 dc in same corner, ch 1, 3 dc, ch 1, 3 dc, ch 1, [(3 dc, ch 2, 3 dc) in corner sp, ch 1, 3 dc, ch 1, 3 dc, ch 1, ] 3 times; sl st to join (48) | - |
Step by step Step by step: Slip stitch to corner space, make 3 chain stitches, 2 double crochet, make 2 chain stitches, 3 double crochet in same corner, make 1 chain stitch, 3 double crochet, make 1 chain stitch, 3 double crochet, make 1 chain stitch, [(3 double crochet, make 2 chain stitches, 3 double crochet) in corner space, make 1 chain stitch, 3 double crochet, make 1 chain stitch, 3 double crochet, make 1 chain stitch, ] 3 times; slip stitch to join.
| Round | Instruction | Count |
|---|---|---|
| Border | With cream, sl st into the corner ch-2 sp, ch 1, [3 sc in the corner sp, (sc in next 3 sts, sc in next sp) 3 times, sc in next 3 sts] 4 times; sl st to the first sc (72)Step by step Step by step: Using cream yarn, slip stitch into the corner ch-2 space, make 1 chain stitch, [3 single crochet in the corner space, (single crochet in next 3 stitches, single crochet in next space) 3 times, single crochet in next 3 stitches] 4 times; slip stitch to the first single crochet. | - |
Worked in terracotta. Leave a long tail for sewing.
| Round | Instruction | Count |
|---|---|---|
| Round 1 | ch 7, sc in 2nd ch from hook, sc in next 5 sts (6) | - |
| Round 2 | ch 1, turn, inc in first st, sc in next 4 sts, inc in last st (8) | - |
| Round 3 | ch 1, turn, inc in first st, sc in next 6 sts, inc in last st (10) | - |
| Round 4 | ch 1, turn, inc in first st, sc in next 8 sts, inc in last st (12) | - |
Worked in cactus green. Leave a long tail for sewing.
| Round | Instruction | Count |
|---|---|---|
| Round 1 | 6 sc in a magic ring (6) | - |
| Round 2 | [inc] repeat 6 times (12) | - |
| Round 3 | [sc, inc] repeat 6 times (18) | - |
| Round 4 | [sc in next 2 sts, inc] repeat 6 times (24) | - |
Worked in cactus green. Leave a long tail for sewing.
| Round | Instruction | Count |
|---|---|---|
| Round 1 | ch 5, sc in 2nd ch from hook, sc in next 2 sts, 3 sc in last ch, working back along the underside sc in next 2 sts, inc in last ch (10) | - |
Worked in cream. Leave a long tail for sewing.
| Round | Instruction | Count |
|---|---|---|
| Round 1 | 6 sc in a magic ring (6) | - |
| Round 2 | [inc] repeat 6 times (12) | - |
| Round 3 | [sc, inc] repeat 6 times (18) | - |
Step 1 Pin the Pot to the lower-center of the background square, straight edge down; sew around the side and top edges, leaving the top rim open
Step 2 Set the Cactus Body upright just above the pot rim, tucking its bottom edge slightly behind the rim; sew all around the outer edge
Step 3 Angle the Cactus Arm out from one side of the Cactus Body, pointed end tucked under; tack it down along its full edge
Step 4 Perch the Flower on top of the Cactus Body (or atop the arm), centered; sew around its edge
Step 5 Finish with the spine and flower-center embroidery once all pieces are secured
Embroidery Cactus spines: scatter short straight stitches in cream across the front of the Cactus Body, angled outward like tiny thorns
Embroidery Flower center: work a small cluster of straight stitches in terracotta at the middle of the Flower
03 · Before it goes to a childWhat has to be right, and what is allowed to drift
- 💡 Gauge: the finished square is about 6 x 6 inches in Worsted weight yarn with a 5.0 mm hook. Tight crocheters can go up half a hook size; loose ones down half.
- 💡 Color plan: the sample uses cream, terracotta, cactus green in round order — change colors with a slip-stitch join in the first stitch of the new round.
- 💡 Block your finished square lightly before sewing on the appliqué pieces - it makes the corners crisp and gives you a flat, even surface to stitch onto.
- 💡 Stitch the cactus appliqué with a strand of matching yarn and a tapestry needle, catching just the back loops of your background square so the stitches stay hidden.
04 · Snag listWhat went wrong on the bench, and the fix
Snag 1
Corner spaces pulled too tight
Keep your chain-2 corner spaces relaxed so the next round's stitch groups can nestle into them easily. If corners feel cramped, work your chains a touch looser on every round.
Snag 2
Losing your place at joins
Granny rounds all start and end at a corner space, so mark it with a stitch marker or scrap yarn if you tend to lose track. It saves you from counting back through the whole round to find your spot.
Snag 3
Sewing the appliqué on crooked
Pin all the cactus pieces in place and step back to check the layout before you stitch anything down. A few extra seconds of pinning saves you from unpicking a lopsided cactus later.
Snag 4
Weaving in color-change ends too soon
Leave your tails long enough to weave in securely after each color change, especially around the corners where they get the most handling. Trimming too close can let a stitch work loose over time.
05 · VariantsOther ways to issue this one
This square is easy to play with once you've made it once. Try swapping terracotta for a soft clay pink or rust, or make the cactus body in a deeper forest green for more contrast against the background rounds. A pastel version with dusty rose, sage, and cream feels gentler, while bold colors like mustard, teal, and cream give it a modern pop. You can also size the whole thing up by using a bulkier yarn and larger hook for a bigger square, perfect for fewer seams in a throw, or drop down to a lighter weight yarn for a dainty coaster-sized version. However you color it, the little potted cactus keeps its charm and personality.
I designed this square because I wanted a granny pattern that made me smile every time I picked it up, and this little cactus does exactly that. There's something so satisfying about building the plain, sturdy granny base first, then watching a tiny potted plant take shape as you add the pot, the rounded body, that one perky arm, and a little bloom on top. It feels like a small sculpture rather than just another stitch pattern. I love that it stays true to classic construction the whole way through, so even on days when I want to work without thinking too hard, my hands already know what to do. It's become one of my favorite squares to keep in my project bag.
06 · QueriesQuestions logged against this build
What yarn weight and hook size does this pattern use?
This square is worked in worsted weight yarn with a 5.0 mm hook, which gives you nicely defined stitches for both the granny background and the cactus appliqué. Any worsted weight yarn you enjoy working with will do.
How many colors do I need?
Just three: cream, terracotta, and cactus green. Cream forms the background rounds and border, while terracotta and cactus green build up the middle rounds and the cactus appliqué pieces.
Is this a good square for a beginner?
Yes, it's rated beginner level and uses standard granny square construction throughout. The only new skill is sewing on the small appliqué pieces at the end, which is simple straight stitching.
How do I attach the pot, cactus, and flower pieces?
Pin each piece in place first to check your layout, then whipstitch or sew around the edges with a matching strand of yarn and a tapestry needle. Take your time on the small arm piece since it has the least surface area to anchor.
What's the finished size of this square?
It finishes at about 6 by 6 inches, which makes it easy to combine with other same-sized granny squares for a blanket, or to use on its own for a small project.
07 · Made byWho counted this one

Who writes Amigurumi Addict, how a build gets its number, and why every round on the site carries a stitch count.
08 · Next off the benchThree builds that sit near this one
Garden and food
How to Crochet a Rose Bouquet in a Vase
How do you crochet a rose bouquet vase? Roll spiral roses, stuff a round vase, and sew the bouquet together.
Garden and food
Strawberry vine sundress with pleated skirt crochet pattern
How do you crochet a strawberry sundress? Seamless bodice, pleated skirt, sewn appliques in DK cotton.
Garden and food
How to crochet a fuchsia flower with leaves
How do you crochet a fuchsia flower? Build a 12-sc center, fan the petals, then add leaves.
Join the build log
One message when a build is issued
A drawing and its parts list, when one leaves the bench.