| Shelf | Level | Time | Hook | Yarn |
|---|---|---|---|---|
| Animals | Intermediate | 4-6 hours | 2 mm | DK |
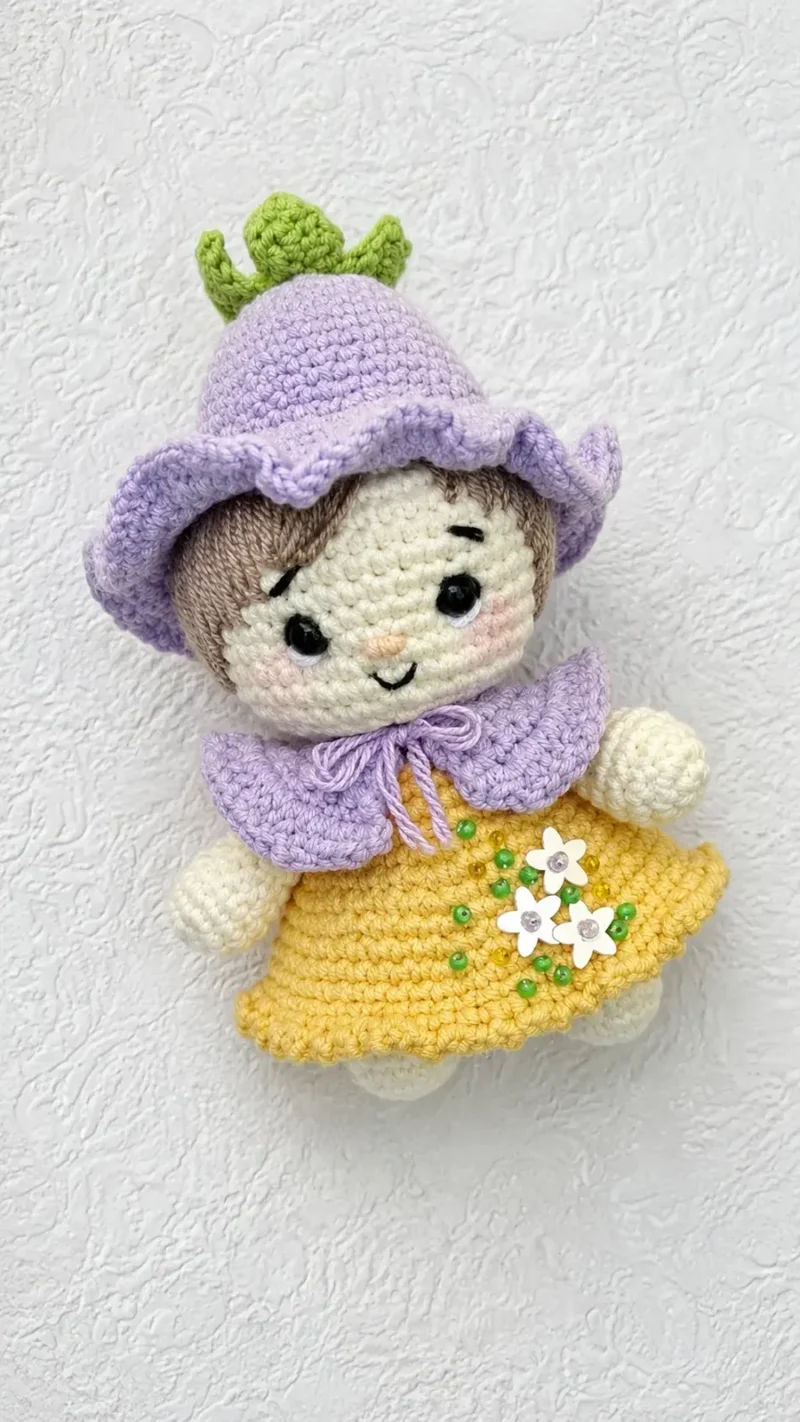
Little gnome girl doll amigurumi with a floral cap
How do you crochet a gnome girl doll? Join two Legs, shape the torso, then attach a floral Cap and Collar.
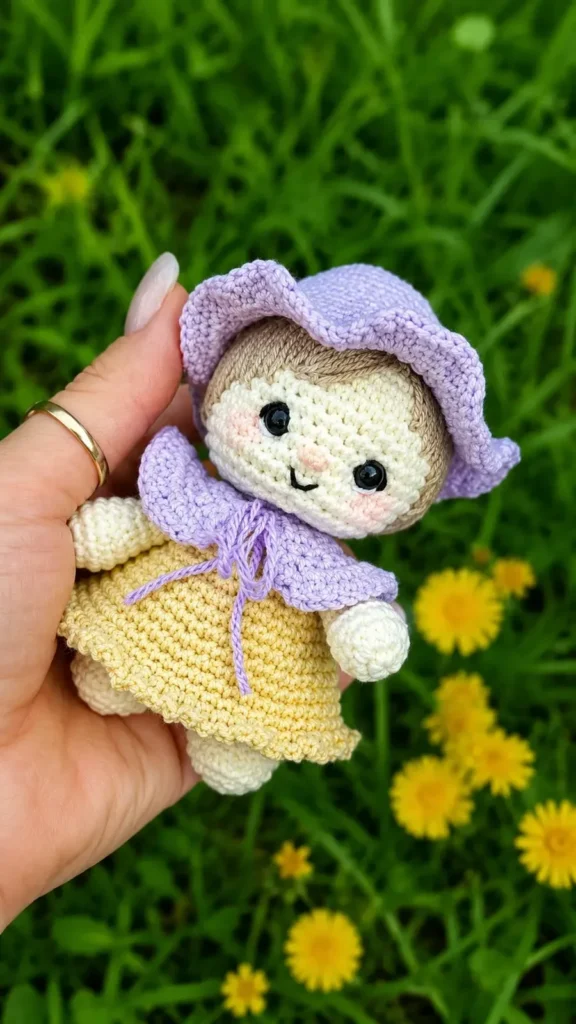
01 · The pieceWhat Little gnome girl doll amigurumi with a floral cap actually is
The doll builds from nine separate pieces that meet at four seams. Two Legs crochet independently, then join in a single round — 15 sc along each leg plus a chain stitch on each side — to form the Body's base at round 8. The Body continues in continuous spiral rounds through a color change to yellow before round 19, where the Dress attaches into the front loops. Arms sew between rounds 18 and 19; the Head, Cap, and Collar close the construction, with Sepal Leaves and Stem sewn to the Cap last.
Shaping rounds carry the tolerance load: Leg increases across rounds 1 to 3, Body decreases from round 14 onward, and Head shaping all need stitch counts to land exactly, or the round 8 join and the neck taper pull crooked. Decorative stages allow more give — the embroidered hairstyle, facial sculpting, and Sepal placement on the Cap rely on visual judgment rather than counted stitches, so minor asymmetry there reads as charm rather than error.
02 · The count run65 rounds across 9 parts, each with its count
US terms throughout. Every row below ends with the count that round finishes on.
| Part | Qty | Finishes on |
|---|---|---|
| Legs | 2 | - |
| Dress | 1 | - |
| Arms | 2 | - |
| Head | 1 | - |
| Cap | 1 | - |
| Sepal Leaves | 5 | - |
| Stem | 1 | - |
| Collar | 1 | - |
| Body | 1 | - |
Fasten off and cut the yarn on the first leg. Crochet the second leg in the same way, do not cut the yarn.
| Round | Instruction | Count |
|---|---|---|
| Round 1 | 6 sc in MR. (6) | - |
| Round 2 | 6 inc. (12) | - |
| Round 3 | (3 sc, inc) x 3. (15) | - |
| Round 4-7 | 15 sc. (15) | - |
Attach yellow yarn to the front loops of round 19 of the Body to begin the Dress.
Fasten off and cut the yarn after Round 14.
| Round | Instruction | Count |
|---|---|---|
| Round 1 | 18 sc. (18) | - |
| Round 2 | (2 sc, inc) x 6. (24) | - |
| Round 3 | 24 sc. (24) | - |
| Round 4 | (3 sc, inc) x 6. (30) | - |
| Round 5 | 30 sc. (30) | - |
| Round 6 | (4 sc, inc) x 6. (36) | - |
| Round 7 | 36 sc. (36) | - |
| Round 8 | (5 sc, inc) x 6. (42) | - |
| Round 9 | 42 sc. (42) | - |
| Round 10 | (6 sc, inc) x 6. (48) | - |
| Round 11-13 | 48 sc. (48) | - |
| Round 14 | (1 sc, ch 2, 1 sc, ch 2)* to the end of the round. | - |
| Round | Instruction | Count |
|---|---|---|
| Round 1 | 6 sc in MR. (6) | - |
| Round 2 | 6 inc. (12) | - |
| Round 3-5 | 12 sc. (12) | - |
| Round 6 | (2 sc, dec) x 3. (9) | - |
| Round 7-11 | 9 sc. (9) | - |
| Round 12 | (1 sc, dec) x 3. (6)Cinch the opening closed. Fasten off and cut the yarn. | - |
| Round | Instruction | Count |
|---|---|---|
| Round 1 | 6 sc in MR. (6) | - |
| Round 2 | 6 inc. (12) | - |
| Round 3 | (1 sc, inc) x 6. (18) | - |
| Round 4 | (2 sc, inc) x 6. (24) | - |
| Round 5 | (3 sc, inc) x 6. (30) | - |
| Round 6 | (4 sc, inc) x 6. (36) | - |
| Round 7 | (5 sc, inc) x 6. (42) | - |
| Round 8-17 | 42 sc. (42)Insert safety eyes between rounds 14 and 15 at a distance of 6 sc. | - |
| Round 18 | (5 sc, dec) x 6. (36) | - |
| Round 19 | (4 sc, dec) x 6. (30) | - |
| Round 20 | (3 sc, dec) x 6. (24) | - |
| Round 21 | (2 sc, dec) x 6. (18) | - |
| Round 22 | (1 sc, dec) x 6. (12)Fasten off. Leave a tail for sewing. | - |
| Round | Instruction | Count |
|---|---|---|
| Round 1 | 6 sc in MR. (6) | - |
| Round 2 | 6 inc. (12) | - |
| Round 3 | (1 sc, inc) x 6. (18) | - |
| Round 4 | (2 sc, inc) x 6. (24) | - |
| Round 5 | 24 sc. (24) | - |
| Round 6 | (3 sc, inc) x 6. (30) | - |
| Round 7 | 30 sc. (30) | - |
| Round 8 | (4 sc, inc) x 6. (36) | - |
| Round 9-11 | 36 sc. (36) | - |
| Round 12 | (5 sc, inc) x 6. (42) | - |
| Round 13 | 42 sc. (42) | - |
| Round 14 | (6 sc, inc) x 6. (48) | - |
| Round 15-18 | 48 sc. (48) | - |
| Round 19 | sl st, ch 3, 2 dc in the same stitch, (2 dc in 1 st, 3 dc in 1 st)* to the end of the round.Fasten off and cut the yarn. | - |
| Round | Instruction | Count |
|---|---|---|
| Round 1 | Ch 6. From the 2nd ch from hook: 1 sc, 1 hdc, 1 dc, 1 hdc, 3 sc in the stitch, 1 hdc, 1 dc, 1 hdc, 1 sc. (11)Fasten off and cut the yarn. | - |
| Round | Instruction | Count |
|---|---|---|
| Round 1 | 6 sc in MR. (6) | - |
| Round 2-6 | 6 sc. (6)Fasten off and cut the yarn. | - |
Crochet in turning rows.
Fasten off and cut the yarn after Row 6.
| Round | Instruction | Count |
|---|---|---|
| Round 1 | Ch 15. From the 2nd ch from hook, 14 inc. (28) | - |
| Round 2-4 | 28 sc. (28) | - |
| Round 5 | (3 sc, inc) x 7. (35) | - |
| Round 6 | 1 sc, 2 hdc in 1 st, (2 dc in 1 st) x 31, 2 hdc in 1 st, 1 sc. | - |
Continue crocheting on the second leg: ch 1, join to the first leg before starting Round 8.
Change color to yellow before Round 19.
Fasten off and cut the yarn after Round 20.
| Round | Instruction | Count |
|---|---|---|
| Round 8 | 15 sc along the first leg, 1 sc in ch, 15 sc along the second leg, 1 sc in ch. (32) | - |
| Round 9-13 | 32 sc. (32) | - |
| Round 14 | (6 sc, dec) x 4. (28) | - |
| Round 15 | 28 sc. (28) | - |
| Round 16 | (5 sc, dec) x 4. (24) | - |
| Round 17 | 24 sc. (24) | - |
| Round 18 | (2 sc, dec) x 6. (18) | - |
| Round 19 | Crochet in BLO. 18 sc. (18) | - |
| Round 20 | (1 sc, dec) x 6. (12) | - |
Techniques on this build
- Two-piece leg join
- Rounds 1-7 build each Leg separately; round 8 combines both with chain stitches into one 32-stitch Body round. Keep tension even across the join or the crotch line puckers.
- Front-loop attachment
- The Dress starts by working into the front loops of Body round 19 only. Skipping into both loops erases the ridge that defines the waistline.
- Continuous spiral shaping
- Legs, Body, Head, and Cap all work in continuous rounds with regular inc/dec sequences such as (6 sc, dec) x 4. A stitch marker keeps the round start visible through the color change at round 19.
- Surface embroidery for hair
- The hairstyle is embroidered directly over the finished Head in tight circular rows with no gaps, after the face is sculpted — treat it as a finishing stage, not a crochet round.
Final fit-up
- Weave in ends after each fastened-off piece — Legs, Arms, Dress, Cap, Sepal Leaves, and Stem all finish separately before assembly.
- Stuff Legs, Body, Head, and Arms firmly before closing, packing the neck taper from Body round 16 onward so the Head sits level.
- Close final decrease rounds at the Head crown and Cap point, drawing the last stitches tight and securing with a few overlapping stitches.
- Attach in sequence: Arms between Body rounds 18 and 19, Head to the Body, Collar over the neck with its round 1 ties knotted, then Cap with Sepal Leaves and Stem last.
How the parts fit
- Leg increases front-load the shaping: 6 sc to 12 to 15 across rounds 1-3, then hold at 15 sc through round 7, producing a straight cylinder before the join.
- Round 8 absorbs both Legs plus two chain stitches into a single 32-stitch Body round, which is why the count jumps from 15 per leg to 32 with no gradual increase.
- Body decreases arrive in two stages — (6 sc, dec) x4 at round 14, then (5 sc, dec) x4 at round 16 — tapering the torso ahead of the round 19 color change and Dress attachment.
Scaling the build
| Larger | Swap to a heavier yarn with a larger hook than the stated 2 mm. Every part grows past the 4 to 5 inch finished height, and stuffing needs increase accordingly. |
|---|---|
| Smaller | Drop to a finer fiber with a smaller hook while keeping the same round counts. Stitches tighten and the finished doll comes in under the 4 to 5 inch range, though the 4 mm safety eyes may look oversized. |
| Taller torso | Repeat one of the held 32-sc Body rounds (rounds 9 to 13) an extra time before the round 14 decreases begin. This lengthens the torso only; Legs, Arms, and Head stay at their stated round counts. |
03 · Putting it togetherHow the pieces go together
- S1
First sew the leaves to the cap, then sew the stem to the leaves.
- S2
Make ties in round 1 of the collar on both sides.
- S3
Sew the arms between rounds 18 and 19 of the body.
- S4
Sew on the head.
- S5
Put on the collar.
- S6
Sew on the cap.
- S7
Create the hairstyle: embroider the entire head in a circle, working tightly without gaps.
- S8
Do facial sculpting and decorate the face.
04 · Snag listWhat went wrong on the bench, and the fix
Snag 1
Miscounting the round 8 leg join
Mark each Leg's last stitch before joining; the round should total 32 (15 + 1 ch + 15 + 1 ch). A miscount here throws off every Body round after it.
Snag 2
Working the Dress into both loops
Round 19 calls for front loops only. Working into both loops removes the ridge separating Body from Dress and leaves no back loop for the waistline detail.
Snag 3
Uneven decrease spacing on the Body
Count the sc segment before each dec (6 sc, then 5 sc, and so on) rather than estimating; skewed spacing pulls the neck taper off-center.
Snag 4
Gapping the embroidered hairstyle
Work the surface embroidery in tight, touching circular rows from the crown outward. Leaving gaps shows the Head fabric underneath.
05 · QueriesQuestions logged against this build
Can I use acrylic yarn instead of cotton blend yarn?
Yes, you can use any yarn fiber you prefer. Cotton blend yarn gives a smooth finish and great stitch definition, but acrylic yarn works nicely and gives the gnome a slightly softer feel.
What skill level is needed to complete this pattern?
This project is very beginner friendly. It uses basic single crochet stitches, simple increases and decreases, and standard joining techniques.
How do I make sure the safety eyes are secure?
Make sure to snap the back washer firmly into place on the inside of the head before you begin the decrease rounds. If making this toy for a baby, you can embroider the eyes with dark yarn instead.
How do I attach the hair neatly?
Take long strands of embroidery or acrylic yarn and stitch around the top section of the head using long straight stitches, packing them closely together so no skin color shows through.
06 · Made byWho counted this one

Who writes Amigurumi Addict, how a build gets its number, and why every round on the site carries a stitch count.
07 · Next off the benchThree builds that sit near this one

Animals
Crochet a bunny or frog from one amigurumi base
How do you crochet a bunny and a frog from one base? Share Legs, Body, and Head; swap ears or eyes.

Animals
Crochet giraffe amigurumi pattern with horns and ears
How do you crochet a giraffe amigurumi? Shape head, body, legs, ears and horns in worsted yarn.

Animals
Amigurumi cat crochet pattern with oval muzzle and bow
How do you crochet an amigurumi cat with a flat muzzle? Shape it separately, pinch it, then sew it on.
Join the build log
One message when a build is issued
A drawing and its parts list, when one leaves the bench.