| Shelf | Level | Time | Hook | Yarn |
|---|---|---|---|---|
| Animals | Intermediate | 4-6 hours | 3.0 mm | Worsted |
How to crochet a jointed bulldog amigurumi
How do you crochet a jointed bulldog amigurumi? Build six pieces, shape paw pads, join with a 45mm joint.
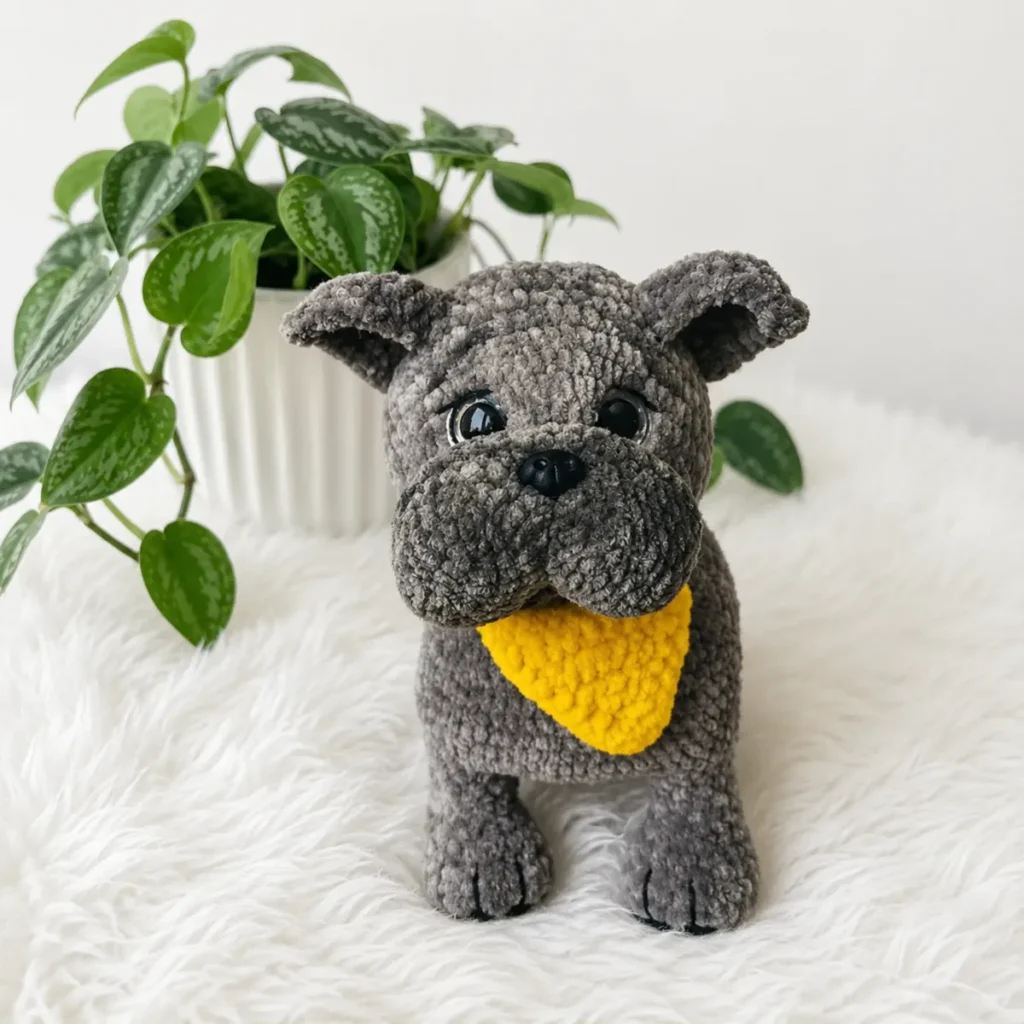
01 · The pieceWhat How to crochet a jointed bulldog amigurumi actually is
The Bulldog assembles from six worked pieces: two Front Legs, two Back Legs, a Tail, a Body, two Ears, and a Head built from two Muzzle pieces joined together. The 45mm joint set connects Head to Body, giving the finished piece a pivoting neck instead of a fixed seam. Front Legs, Back Legs, Tail, and Body work in continuous spiral rounds; Ears turn in flat rows. Fiberfill stuffing fills legs and body as rounds close, while the Tail stays unstuffed to keep its narrower, flatter profile.
Precision matters at the paw pads: Round 3 of each leg carries black yarn without cutting it, alternating hdc in black with sc in gray, and Round 4 works back through the resulting concave stitches to set the paw shape - a stitch out of place there shows immediately in velour yarn. Placement of the 18mm safety eyes, 18mm safety nose, and joint set likewise needs exact centering. Plain rounds on the Body and the Tail's Rounds 4-5 tolerate looser tension, since no shaping happens there.
02 · The count run77 rounds across 6 parts, each with its count
US terms throughout. Every row below ends with the count that round finishes on.
| Part | Qty | Finishes on |
|---|---|---|
| Front Leg (make 2) | 2 | - |
| Back Leg (make 2) | 2 | - |
| Tail | 1 | - |
| Body | 1 | - |
| Ear (make 2) | 2 | - |
| Head (Muzzle, make 2 pieces, then joined) | 1 | - |
Worked in black yarn first; stuff firmly as you go.
Cut black yarn and weave in the end now.
Fasten off, leaving a long tail for attaching to the body later. Repeat for the second front leg.
| Round | Instruction | Count |
|---|---|---|
| Round 1 | 8 sc in MR. (8) | - |
| Round 2 | Switch to gray yarn; do not cut black. 8 inc. (16) | - |
| Round 3 | Work the paw pad here. (1 sc, inc) x2, (1 hdc in black, inc using sc in gray) x4, (1 sc, inc) x2. (24) | - |
| Round 4 | 24 sc, worked through the indented/concave stitches to define the paw shape. (24) | - |
| Round 5 | 24 sc. (24) | - |
| Round 6 | 3 sc, (1 sc, dec) x6, 3 sc. (18) | - |
| Round 7 | 18 sc. (18) | - |
| Round 8 | 3 sc, 6 dec, 3 sc. (12) | - |
| Rounds 9–13 | 12 sc around, no shaping (5 rounds). (12) | - |
Worked in black yarn first; stuff firmly as you go.
Cut black yarn and weave in the end now.
Fasten off, leaving a long tail for attaching to the body later. Repeat for the second back leg.
| Round | Instruction | Count |
|---|---|---|
| Round 1 | 8 sc in MR. (8) | - |
| Round 2 | Switch to gray yarn; do not cut black. 8 inc. (16) | - |
| Round 3 | Work the paw pad here. (1 sc, inc) x2, (1 hdc in black, inc in gray) x4, (1 sc, inc) x2. (24) | - |
| Round 4 | 24 sc, worked through the indented/concave stitches to define the paw shape. Keep your stitch marker centered at the heel — shift it slightly if it drifts. (24) | - |
| Round 5 | 3 sc, (1 sc, dec) x6, 3 sc. (18) | - |
| Round 6 | 2 inc, 14 sc, 2 inc. (22) | - |
| Round 7 | 5 sc, 6 dec, 5 sc. (16) | - |
| Round 8 | 3 dec, (1 sc, inc) x2, 3 dec. (12) | - |
| Round 9 | 12 sc. (12) | - |
| Round 10 | 4 sc, (1 sc, inc) x2, 4 sc. (14) | - |
| Round 11 | 5 sc, inc, 2 sc, inc, 5 sc. (16) | - |
| Round 12 | 1 sc, dec, 11 sc, 1 dec. (14) | - |
| Round 13 | 14 sc. (14) | - |
Worked in light gray (main color). Do not stuff this piece.
Fasten off, leaving a tail for attaching to the body.
| Round | Instruction | Count |
|---|---|---|
| Round 1 | 6 sc in MR. (6) | - |
| Round 2 | 6 sc. (6) | - |
| Round 3 | (2 sc, inc) x2. (8) | - |
| Rounds 4–5 | 8 sc around, no shaping (2 rounds). (8) | - |
Worked in light gray (main color). Stuff firmly as you go.
Place a stitch marker at the exact back-center before continuing — the legs attach in the next round.
Keep checking that your stitch marker sits at the back-center through this entire section — shift with offset stitches if it drifts.
The tail attaches over the next three rounds. Confirm your marker is still centered at the back before starting.
Move your start-of-round marker onto the tail itself.
Next, you'll divide the upper body into the back panel and the neck opening.
Stuff the entire rear section of the body firmly before closing.
Fasten off, cinch the opening closed, and weave in the end inside the toy.
Rejoin yarn at the neck opening, in the first stitch marked by your stitch marker.
Stuff the neck area well, then insert the safety joint here.
Fasten off, cinch the opening closed, and weave in the end inside the toy.
| Round | Instruction | Count |
|---|---|---|
| Round 1 | Ch 11. | - |
| Round 2 | Starting in the 2nd ch from the hook: inc, 8 sc, 4 sc in the last ch, then working back along the opposite side of the foundation chain: 8 sc, inc. (24) | - |
| Round 3 | 2 inc, 8 sc, 4 inc, 8 sc, 2 inc. (32) | - |
| Round 4 | (1 sc, inc) x2, 8 sc, (1 sc, inc) x4, 8 sc, (1 sc, inc) x2. (40) | - |
| Round 5 | (2 sc, inc) x2, 8 sc, (2 sc, inc) x4, 8 sc, (2 sc, inc) x2. (48) | - |
| Round 6 | 4 sc, 4 sc joining a back leg, 8 sc, 4 sc joining a front leg, 8 sc, 4 sc joining a front leg, 8 sc, 4 sc joining a back leg, 4 sc. (48) | - |
| Round 7 | Across body: (1 sc, inc) x2; across the back leg's free loops: 6 sc, 4 inc; across body: (1 sc, inc) x4; across the front leg's free loops: (2 sc, inc) x2, 2 sc; across body: (1 sc, inc) x4; across the front leg's free loops: (2 sc, inc) x2, 2 sc; across body: (1 sc, inc) x4; across the back leg's free loops: 4 inc, 6 sc; across body: (1 sc, inc) x2. (96) | - |
| Round 8 | 96 sc. (96) | - |
| Round 9 | 12 sc, 4 dec, 56 sc, 4 dec, 12 sc. (88) | - |
| Rounds 10–14 | 88 sc around, no shaping (5 rounds). (88) | - |
| Round 15 | (2 sc, dec) x4, 15 sc, dec, (2 sc, dec) x6, 15 sc, (dec, 2 sc) x4. (73) | - |
| Round 16 | 26 sc, 3 dec, 9 sc, 3 dec, 26 sc. (67) | - |
| Round 17 | (1 sc, dec) x4, 42 sc, (1 sc, dec) x4, 1 sc. (59) | - |
| Round 18 | 57 sc, 2 sc joining the tail. (59) | - |
| Round 19 | 2 sc joining the tail, 3 sc, dec, (5 sc, dec) x2, 17 sc, (dec, 5 sc) x2, dec, 3 sc, 2 sc across the tail's free loops. (53) | - |
| Round 20 | 2 sc across the tail's free loops, 2 sc, dec, (4 sc, dec) x2, 17 sc, (dec, 4 sc) x3. (47) | - |
| Round 21 | (3 sc, dec) x3, 17 sc, (dec, 3 sc) x3. (41) | - |
| Round 22 | 13 sc, (1 sc, dec) x5, 13 sc. (36) | - |
| Round 23 | (2 sc, dec) x3, ch 6, skip 12 sc across the body, then starting at the 13th stitch work (dec, 2 sc) x3. (24) | - |
| Round 24 | Across body: (1 sc, dec) x3; across the chain stitches: (1 sc, dec) x2; across body: (1 sc, dec) x3. (16) | - |
| Round 25 | 8 dec. (8) | - |
| Neck Round 1 | 12 sc across the body, 6 sc across the chain stitches. (18) | - |
| Neck Round 2 | 18 sc. (18) | - |
| Neck Round 3 | 9 dec. (9) | - |
Worked in turned flat rows using light gray (main color).
From here, begin each row with ch 1 as your turning chain.
Fasten off, leaving a tail for sewing the ear to the head. Repeat for the second ear.
| Round | Instruction | Count |
|---|---|---|
| Round 1 | Ch 2. | - |
| Round 2 | Starting in the 2nd ch from the hook: inc. (2) | - |
| Round 3 | 2 inc. (4) | - |
| Round 4 | inc, 2 sc, inc. (6) | - |
| Round 5 | 6 sc. (6) | - |
| Round 6 | inc, 4 sc, inc. (8) | - |
| Rounds 7–9 | 8 sc across, no shaping (3 rows). (8) | - |
| Round 10 | Edging Work 1 ch as a turning chain, then work a round of sc evenly around both side edges of the ear, working 3 sc into the pointed tip. | - |
Begin in dark gray (contrast color).
Fasten off on the first muzzle piece. Work the second piece identically, but don't fasten off this one — you'll use it to join both pieces together.
Work 5 sc on the second piece to offset the seam, then hold both pieces together and work 5 sc through both layers at once to join them.
Mark the next stitch on the first piece as your new start of round.
Work 9 sc to offset the seam again, and mark a new start of round.
Switch to light gray (main color) here.
Place the safety nose centered on the muzzle, snug against the seam. Stuff the muzzle firmly now. Find the center point between Rounds 16 and 17 — this is where the neck joint goes. Attach the head to the safety joint here, then continue stuffing the head evenly as you work the remaining rounds.
| Round | Instruction | Count |
|---|---|---|
| Round 1 | Ch 6. | - |
| Round 2 | Starting in the 2nd ch from the hook: 4 sc, 3 sc in the last ch, then along the opposite side of the chain: 3 sc, inc. (12) | - |
| Round 3 | inc, 3 sc, 3 inc, 3 sc, 2 inc. (18) | - |
| Round 4 | 1 sc, inc, 3 sc, (1 sc, inc) x3, 3 sc, (1 sc, inc) x2. (24) | - |
| Round 5 | 19 sc across the first piece, 19 sc across the second piece. (38) | - |
| Round 6 | 38 sc. (38) | - |
| Round 7 | 20 sc, 18 sc worked through the front loops only (FLO). (38) | - |
| Round 8 | 8 sc, 4 inc, 26 sc. (42) | - |
| Round 9 | 24 sc, 18 sc joined through the back loops only (BLO) of Rnd 6. (42) | - |
| Round 10 | (2 sc, dec) x6, 18 sc. (36) | - |
| Round 11 | (1 sc, dec) x6, 18 sl st. (30) | - |
| Round 12 | (1 sc, inc) x6, 18 inc worked in hdc. Place the safety eyes in this round: the first eye into the 7th hdc increase, the second eye into the 13th hdc increase, leaving 12 sc between the eye posts. (54) | - |
| Round 13 | (5 sc, inc) x9. (63) | - |
| Rounds 14–19 | 63 sc around, no shaping (6 rounds). (63) | - |
| Round 20 | (7 sc, dec) x7. (56) | - |
| Round 21 | 3 sc, dec, (6 sc, dec) x6, 3 sc. (49) | - |
| Round 22 | (5 sc, dec) x7. (41) | - |
| Round 23 | 2 sc, dec, (4 sc, dec) x6, 2 sc. (35) | - |
| Round 24 | (3 sc, dec) x7. (28) | - |
Techniques on this build
- Working through concave stitches
- Front Leg and Back Leg Round 4: sc worked back through the indented stitches from Round 3 to pop the paw pad forward - skip this and the pad sits flat.
- Safety joint installation
- Head-to-Body join uses the 45mm joint set; wash discs and washer seat before stuffing closes around them, or the neck won't pivot cleanly.
- Flat turned rows on a spiral piece
- Ear (8 rounds) turns in flat rows while every other part spirals continuously; watch for the turning chain at the start of each row so the ear doesn't curl.
Final fit-up
- Weave in the black yarn end left from the paw pad rounds on each Front Leg and Back Leg before any stuffing goes in - it's harder to bury once the pad is closed over.
- Stuff Front Legs, Back Legs, and Body firmly as rounds close, working stuffing into the paw pad area by hand; leave the Tail unstuffed.
- Fasten off each piece leaving a long tail as specified, then close remaining openings with the tapestry needle before attaching.
- Attach Front Legs, Back Legs, Tail, and Ears to the Body and Head with the long tails and sewing pins to check placement before stitching down; install the joint set to connect Head to Body last.
How the parts fit
- Round 4 of both legs is worked through the concave stitches left by Round 3's shaping rather than through the standard loop, which is what pushes the paw pad forward instead of leaving it flush with the leg.
- Back Leg runs 13 rounds against Front Leg's 9, with Round 5 adding a decrease sequence the Front Leg does not have - the extra length and taper shape the leg for a seated or standing base rather than a straight column.
Scaling the build
| Larger | Move to a thicker worsted or bulky chenille yarn with a larger hook than the US D-3 (3.0 mm) called for; stitch counts stay the same but each round grows, sizing the whole Bulldog up proportionally. |
|---|---|
| Smaller | Drop to a lighter-weight yarn with a smaller hook while keeping the same round counts; the tighter gauge already recommended for this pattern becomes even tighter, shrinking the finished piece without changing shaping. |
| Longer legs | Repeat one of the plain sc rounds on the Back Leg or Front Leg (the rounds with no shaping, worked at constant stitch count) to add length before the paw shaping or taper begins. |
03 · Putting it togetherHow the pieces go together
- S1
Using black yarn and a long yarn needle, shape the eyes by tucking a stitch beneath each eye to create the deep-set bulldog expression. Secure the yarn ends with a few firm knots and bury them inside the head.
- S2
Add the facial details to the muzzle using the safety nose placement and eye-tuck shaping from the previous step as your guide.
- S3
Position both ears at the level of Rounds 17–18 on the head, leaving 12 sc of space between their inner edges. Fold the inner edge of each ear slightly inward before sewing for a more natural, floppy look.
- S4
Sew each ear in place using the yarn tail left from that ear’s last round, securing firmly and weaving the end inside the head.
- S5
Using dark gray yarn, embroider the eyebrows above the eyes for the classic furrowed bulldog brow.
- S6
Using black yarn, embroider small claws onto each paw for a finished, detailed look.
- S7
Tie the finished bandana around the dog’s neck and tack it lightly in place with a few stitches if you’d like it to stay put.
- S8
Weave in any remaining yarn ends throughout the body, legs, and head until none are visible.
04 · Snag listWhat went wrong on the bench, and the fix
Snag 1
Cutting black yarn too soon
Leave the black yarn attached through Round 3 as instructed - it's needed again for the hdc paw pad segments before the pattern tells you to cut and weave it in.
Snag 2
Losing the heel stitch marker
the Back Leg, the marker centered at the heel can drift during the paw pad rounds; check it against the concave stitches each round and nudge it back to center rather than leaving it where it lands.
Snag 3
Working Round 4 through the wrong loop
Round 4 must go through the indented stitches from Round 3, not a standard full-stitch pass - working it as a plain round leaves the paw pad flat instead of shaped.
Snag 4
Stuffing after the joint is seated
Pack fiberfill around the joint set's washer before closing the Head opening; stuffing added afterward won't reach the disc and the neck joint will feel loose.
05 · QueriesQuestions logged against this build
Why is the Head worked as two Muzzle pieces instead of one?
The pattern builds the Head from two Muzzle pieces (20 rounds total) that are joined together rather than shaped as a single continuous piece. This lets the muzzle project forward as its own worked shape before the halves meet, giving the flatter, broader bulldog profile.
Why does the pattern recommend a tighter gauge than usual?
The main yarn is a velour/chenille-style worsted, which is thicker and less dense than standard acrylic, so a looser gauge lets the fiberfill show through the fabric. Working tighter than your usual gauge keeps the stitches closed over the stuffing.
Can the finished Bulldog's head move after assembly?
Yes. The Head attaches to the Body with a 45mm joint set rather than being sewn on directly, which lets the head pivot at the neck once installed.
06 · Made byWho counted this one

Who writes Amigurumi Addict, how a build gets its number, and why every round on the site carries a stitch count.
07 · Next off the benchThree builds that sit near this one

Animals
Crochet a bunny or frog from one amigurumi base
How do you crochet a bunny and a frog from one base? Share Legs, Body, and Head; swap ears or eyes.

Animals
Crochet giraffe amigurumi pattern with horns and ears
How do you crochet a giraffe amigurumi? Shape head, body, legs, ears and horns in worsted yarn.

Animals
Amigurumi cat crochet pattern with oval muzzle and bow
How do you crochet an amigurumi cat with a flat muzzle? Shape it separately, pinch it, then sew it on.
Join the build log
One message when a build is issued
A drawing and its parts list, when one leaves the bench.