| Shelf | Level | Time | Hook | Yarn |
|---|---|---|---|---|
| Animals | Intermediate | 4-6 Hours | 2 mm | Sport |
How to Crochet a Polar Bear Amigurumi for Winter
Crochet a soft polar bear amigurumi with this free winter pattern. Sport weight yarn, 2mm hook, and simple shaping make a cuddly handmade keepsake.
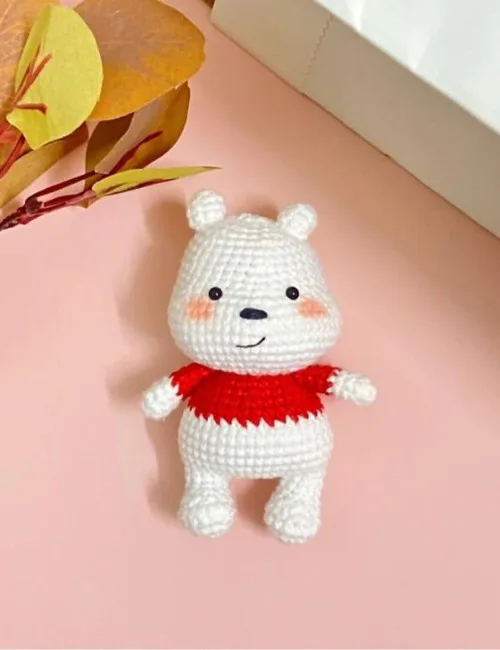
01 · The pieceWhat How to Crochet a Polar Bear Amigurumi for Winter actually is
This pattern creates a small, snow-white chibi polar bear amigurumi dressed in a sweet red sweater made with simple color changes. The bear is built from a handful of pieces — two legs that are joined together and crocheted straight into the body, a head worked continuously on top of the body, plus two arms and two little ears sewn on at the end. The proportions do the charming work: a generous 21-round head rising out of a 13-round body gives the bear that chubby, top-heavy baby look that makes amigurumi so irresistible. It is perfect for crocheters who want a winter-themed make that feels finished and polished without demanding weeks of work or a mountain of yarn.
You will work almost everything in continuous spiral rounds, using increases to shape the curves and decreases to close them again. The techniques are familiar amigurumi staples — magic ring starts, single crochet in the round, simple color changes for the red sweater, careful stuffing as you go, and seaming the small pieces onto a curved surface. The face is finished with 5-6mm safety eyes and black embroidery thread for the nose and mouth. Written in US crochet terms and rated intermediate, it comfortably fits into a weekend, roughly four to six hours of relaxed hooking.
Worked in sport or DK cotton like Yarnart Jeans on a 2mm-2.5mm hook, the finished bear comes out small, dense, and beautifully firm — the tight gauge means no fiberfill peeks through and the little arms and ears hold their shape. The cotton gives a smooth, matte, slightly cool finish that feels wonderfully solid in the hand. He sits upright on his two short legs, stares back with those tiny eyes, and makes a charming winter gift, desk companion, or shelf friend for anyone who loves arctic animals.
- Start with the two legs, working each in continuous rounds through round 7 — the first leg ends after 7 sc and the second after 2 sc so they line up for joining.
- Stuff the legs and body firmly enough to stand, keeping the shape rounded and even as you fill.
- Insert the safety eyes between rounds 10 and 11 of the head, six stitches apart, while it is still open, then stuff firmly and close the remaining gap with the yarn tail.
- Pin the arms and ears in place and check symmetry from the front before sewing anything down.
- Sew each piece on with its long yarn tail, then embroider the nose and mouth with black thread to finish.
02 · The count run41 rounds across 5 parts, each with its count
US terms throughout. Every row below ends with the count that round finishes on.
| Part | Qty | Finishes on |
|---|---|---|
| LEG – 2 | 1 | - |
| BODY | 1 | - |
| HEAD | 1 | - |
| ARM – 2 | 1 | - |
| EAR – 2 | 1 | - |
| Round | Instruction | Count |
|---|---|---|
| Round 1 | 6sc in MR (6) | - |
| Round 2 | 6-inc (12) | - |
| Round 3 | (3sc, inc) * 3 (15) | - |
| Round 4 | 15sc (15) | - |
| Round 5 | 3sc, 4-dec, 4sc (11) | - |
| Round 6 | 4sc, dec, 5sc (10)Rnd 7. 7sc (7), end round here for first leg. Crochet the second leg in the same way until round 6. Rnd 7. 2sc (2), end round here for second leg. | - |
| Round | Instruction | Count |
|---|---|---|
| Round 1 | 30sc (30) | - |
| Round 2 | 10sc, 5-inc, 15sc (35) | - |
| Round 3 | 35sc (35) | - |
| Round 4 | 4sc, 2-inc, 18sc, 2-inc, 10sc (39) | - |
| Round 4-7 | (4 rnds) 39sc (39)Switch to red yarn | - |
| Round 8 | 10sc, (dec, sc) * 5, dec, 12sc (33) | - |
| Round 9 | 33sc (33) | - |
| Round 10 | 31sc, dec (32) | - |
| Round 11 | (2sc, dec) * 8 (24) | - |
| Round 12 | 24sc (24) | - |
| Round 13 | (sc, dec) * 8 (16)Switch to white yarn. Keep crocheting the head. | - |
| Round | Instruction | Count |
|---|---|---|
| Round 1 | 16-inc (32) | - |
| Round 2 | (sc, inc) * 16 (48) | - |
| Round 3 | 48sc (48) | - |
| Round 4 | (5sc, inc) * 8 (56) | - |
| Round 5-8 | (4 rnds) 56sc (56) | - |
| Round 9 | (5sc, dec) * 8 (48) | - |
| Round 10 | 12sc, 2-dec, 6sc, dec, 6sc, 2-dec, 14sc (43)Insert the safety eyes between rnds 10&11, 6sts apart. | - |
| Round 11 | 12sc, dec, 5sc, 2-dec, 4sc, dec, 14sc (39) | - |
| Round 12-13 | (2 rnds) 39sc (39) | - |
| Round 14 | 11sc, dec, (5sc, dec) * 2, 12sc (36) | - |
| Round 15-16 | (2 rnds) 36sc (36) | - |
| Round 17 | (4sc, dec) * 6 (30) | - |
| Round 18 | (3sc, dec) * 6 (24) | - |
| Round 19 | (2sc, dec) * 6 (18) | - |
| Round 20 | (sc, dec) * 6 (12) | - |
| Round 21 | 6-dec (6)Cut the yarn, leave a long tail. Thread a needle with your yarn tail and close the remaining gap. | - |
| Round | Instruction | Count |
|---|---|---|
| Round 1 | 6sc in MR (6) | - |
| Round 2 | (2sc, inc) * 2 (8) | - |
| Round 3-4 | (2 rnds) 8sc (8)Switch to red yarn. | - |
| Round 5-8 | (4 rnds) 8sc (8)Cut the yarn, leave a long tail. Thread a needle with your yarn tail and sew the arms to the body. | - |
| Round | Instruction | Count |
|---|---|---|
| Round 1 | 6sc in MR (6) | - |
| Round 2 | (sc, inc) * 3 (9) | - |
| Round 3 | 9sc (9) | - |
| Round 4 | 7sc, dec (8)Cut the yarn, leave a long tail. Thread a needle with your yarn tail and sew the ears to the head. | - |
03 · Before it goes to a childWhat has to be right, and what is allowed to drift
- 💡 Use the smaller end of the hook range for a denser fabric. A 2mm hook with Yarnart Jeans gives a very tight stitch that hides fiberfill completely, while 2.5mm works up faster but you may need to stuff a little more gently to avoid gaps.
- 💡 All instructions are written in US crochet terms, so a single crochet here is the shorter stitch, not the UK version. If you normally follow UK patterns, translate before you start rather than halfway through the head.
- 💡 Stuff the legs and arms as you go, not at the end. The legs run seven rounds and the arms eight, and the openings are tiny, so once a piece is closed or sewn down you will struggle to push fiberfill into the tips with anything short of a chopstick or the blunt end of a yarn needle.
- 💡 Keep a marker in every piece, not just the one you are working on. If you set the work down partway, an unmarked spiral is almost impossible to pick back up in solid white cotton.
- 💡 Leave a long tail — at least 12 inches — when you fasten off the arms and ears. You will use that same tail to sew each piece on, which means fewer ends to weave in and a much tidier finish.
- 💡 The head is crocheted continuously from the body, so there is no separate head piece to attach later. Insert the safety eyes between rounds 10 and 11 of the head, six stitches apart, while the head is still open, and consider embroidering the nose and mouth before you stuff and close the final rounds so you can still reach inside to anchor the thread.
04 · Snag listWhat went wrong on the bench, and the fix
Snag 1
Losing track of the round in
Place a stitch marker in the first stitch of every round and move it up as you go. The pattern lists stitch markers in the materials for exactly this reason. With white cotton on a 2mm hook the stitches are tiny and nearly invisible, so counting after every single round — and jotting the round number on paper — will save you from a lopsided head that you only notice ten rounds later.
Snag 2
Starting with a loose magic ring
Pull the magic ring tail firmly closed before you finish the first round, then give it one more tug after round two once the stitches have settled. Weave the tail back through the centre stitches rather than snipping it short. On a bear worked at this tight gauge, even a two-millimetre gap will show white fiberfill through the fabric.
Snag 3
Attaching the 5-6mm safety eyes after
Safety eye backings can only be pushed on from inside, so position and secure both eyes while the head is still open and unstuffed. The pattern places them between rounds 10 and 11 of the head, six stitches apart. Pin them in place first, look at the head from the front and from arm's length, and only click the washers on once you are happy. Once that backing snaps down it is effectively permanent.
Snag 4
Under-stuffing the head
Stuff the head firmly and evenly so it holds a round shape without flattening at the neck, but keep the body slightly softer and shape it with your fingers as you fill. Add fiberfill in small pinches rather than large clumps, which is what creates lumpy amigurumi. The two short legs need to support that big head, so a slightly firmer lower body helps him balance.
Snag 5
Sewing the arms and ears on crookedly
Pin every piece before you thread a single stitch, then set the bear on a table and check symmetry from the front and from both sides. Count stitches from the centre front to place each ear and arm the same distance out. Sew with matching yarn using small whip stitches into the stitch bumps, working all the way around so the joins are secure and invisible.
Snag 6
Embroidering the nose and mouth
Use only two or three strands of the black embroidery thread rather than the full six, and keep your tension light so the stitches sit on the surface instead of denting the head. Bury the starting knot inside the head by entering at the back and coming out at the nose. If you dislike the placement, unpick it before the fibres fuzz — white cotton shows every stray black fibre.
05 · VariantsOther ways to issue this one
The obvious swap is colour — the same shapes work beautifully as a brown grizzly in a warm chocolate cotton, a black bear, or a soft caramel teddy. For a pastel nursery version, try dusty blue, blush pink, or mint, all of which Yarnart Jeans carries in the same sport weight so your gauge stays identical. The little sweater is another easy place to play: swap the red for any contrast shade you like, since the colour changes stay in exactly the same rounds. For a bigger bear, simply move up in yarn and hook while keeping every stitch count exactly as written: worsted weight on a 3.5mm hook, or chunky yarn on a 5mm hook, will roughly double the finished size with no maths at all. Just remember to stuff more firmly and consider larger 8-9mm safety eyes so the face stays in proportion. Going the other way, a 1.75mm hook with thread-weight cotton makes a tiny keychain bear. Texture is another easy variation: a soft chenille or velvet yarn turns him into a plush, snuggly toy, though you will want a stitch marker in every round because velvet stitches are hard to read. Add personality with accessories — a chain-stitch scarf in red, a tiny crocheted hat worked from a small magic ring, or a bow tie sewn under the chin. You can also embroider a heart on the chest, add rosy cheeks with a little blush or pink thread, or make a whole family by working the same pattern in three sizes.
I have a real soft spot for this little bear. There is something so satisfying about the moment the head reaches round 21 and you finally close it up — that smooth white dome in your palm is pure amigurumi joy. I love that the pieces are small enough to finish in one sitting each, so you always feel like you are making progress. The legs are only seven rounds, the arms eight, and the ears just four, which means the fiddly bits are over almost before they begin. Working in Yarnart Jeans on a 2mm hook gives such a tight, dense fabric that the bear feels weighty and well-made, not floppy. My favourite part is the face: two tiny 5-6mm safety eyes and a few stitches of black embroidery thread, and suddenly a pile of white cotton shapes becomes a personality. Placing the ears is the moment it all clicks — move them a stitch forward or back and you get a completely different expression. It is a small, honest, deeply relaxing make, and I have never given one away without someone asking me to make another.
06 · QueriesQuestions logged against this build
What size does this polar bear turn out?
Worked in sport or DK cotton on a 2mm-2.5mm hook, this is a small amigurumi — the head is worked over 21 rounds and the body over 13, and the finished bear sits comfortably in the palm of your hand. Your exact size will depend on your tension and hook choice, so your bear may come out slightly larger or smaller.
Can I use acrylic yarn instead of Yarnart Jeans?
Yes, any smooth sport or DK weight yarn will work, though cotton blends like Jeans give crisper stitch definition and a firmer finished bear. Acrylic is softer and a little stretchier, so you may want to drop half a hook size to keep the fabric tight enough to hide the stuffing.
Is this pattern suitable for a beginner?
It is rated intermediate, mostly because of the small hook, the tiny stitches, the colour changes for the sweater, and the small pieces that need to be assembled symmetrically. If you have already made one or two amigurumi and are comfortable with continuous rounds, increases, and decreases, you will manage this one just fine.
Can I make this safe for a baby or young child?
Safety eyes are not recommended for children under three, so replace the 5-6mm eyes with embroidered French knots or simple satin stitches in the black embroidery thread. Also make sure every seam is sewn securely and all ends are woven in tightly so nothing can be pulled loose.
How much yarn will I need?
This is a small project, so a single ball of sport or DK cotton in white is generally plenty for the whole bear, plus a small amount of red for the sweater rounds on the body and arms. Keep the ball band in case you want to make a matching set later, since dye lots in white can vary more than you would expect.
Original pattern: https://redagapeblog.com/crochet-polar-bear-amigurumi/
07 · Made byWho counted this one

Who writes Amigurumi Addict, how a build gets its number, and why every round on the site carries a stitch count.
08 · Next off the benchThree builds that sit near this one

Animals
Crochet a bunny or frog from one amigurumi base
How do you crochet a bunny and a frog from one base? Share Legs, Body, and Head; swap ears or eyes.

Animals
Crochet giraffe amigurumi pattern with horns and ears
How do you crochet a giraffe amigurumi? Shape head, body, legs, ears and horns in worsted yarn.

Animals
Amigurumi cat crochet pattern with oval muzzle and bow
How do you crochet an amigurumi cat with a flat muzzle? Shape it separately, pinch it, then sew it on.
Join the build log
One message when a build is issued
A drawing and its parts list, when one leaves the bench.