| Shelf | Level | Time | Hook | Yarn |
|---|---|---|---|---|
| Animals | Easy | 2-4 Hours | 8 mm | Sport |
How to Crochet an Adorable Fish Amigurumi
Learn how to crochet an adorable fish amigurumi with single crochet, sweet fins, and a colorful body — a quick, cozy handmade gift for little ones.
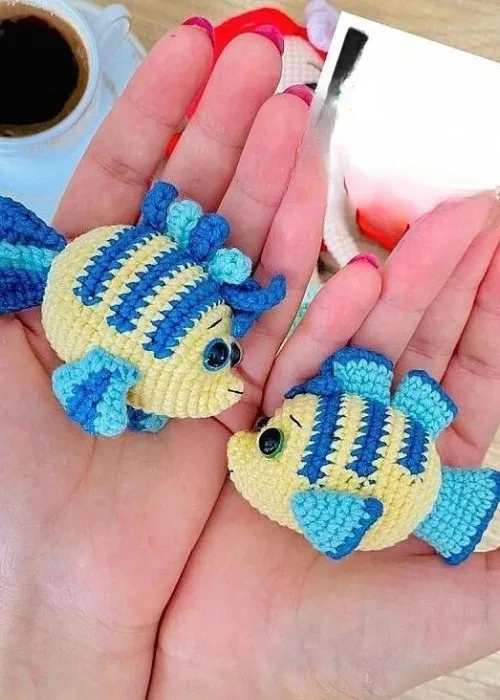
01 · The pieceWhat How to Crochet an Adorable Fish Amigurumi actually is
This sweet little fish amigurumi is exactly the kind of project I reach for when I want maximum cuteness for minimal effort. Worked in three cheerful shades of Yarn Art Jeans — sunny yellow, dark blue, and light blue — it becomes a plump, huggable sea friend with a flared tail, perky dorsal fins, and the sweetest pair of pectoral fins on its sides. It is perfect for anyone who loves ocean-themed makes, needs a quick handmade gift, or wants to use up small amounts of leftover yarn.
Skill-wise, this one is wonderfully approachable. Everything grows from a magic ring in simple single crochet worked in a spiral, with basic increases and decreases shaping the body over seventeen rounds. There is one lovely front-loop-only detail that adds a crisp line of texture, plus slip stitches and a little chain stitch — nothing beyond confident-beginner territory. Because the pieces are small and the 2.00 mm hook keeps the stitches tight, most crocheters can finish the entire fish in one relaxed evening, roughly two to four hours.
The finished fish is a palm-sized cutie with a firm, squishy body, a tail that fans out beautifully, and fins that give it personality from every angle. The tight gauge from the small hook keeps the stuffing hidden and makes the fabric smooth and durable — ideal for little hands. With its 8mm safety eyes and bright color-blocked look, it makes a darling gift for toddlers, aquarium lovers, or anyone who needs a pocket-sized friend; for babies, simply embroider the eyes instead.
- Start the body in a magic ring and work single crochet in a spiral, increasing steadily to shape the fish's round belly.
- Add the 8mm safety eyes, then stuff the body firmly while the decrease rounds gradually close it toward the tail end.
- Crochet the tail in six quick rounds, leaving a long yarn end so you can sew it on later.
- Make the two little pectoral fins, only four rounds each, which come together in just a few minutes.
- Work the pair of dorsal fins in three rounds apiece, keeping your tension snug so they hold their shape.
- Sew the tail and all four fins onto the stuffed body with your needle, checking the placement from every angle first.
- Weave in every remaining end securely so your finished fish is smooth, sturdy, and ready for little hands.
02 · The count run30 rounds across 4 parts, each with its count
US terms throughout. Every row below ends with the count that round finishes on.
| Part | Qty | Finishes on |
|---|---|---|
| BODY | 1 | - |
| PECTORAL FIN x 2 | 1 | - |
| TAIL | 1 | - |
| DORSAL FIN x 2 | 1 | - |
| Round | Instruction | Count |
|---|---|---|
| Round 1 | 5 sc in magic ring = 5 Tug the tail to tighten the ring. Put your stitch marker here and move it each round | - |
| Round 2 | 2 sc, inc, 2 sc = 6 | - |
| Round 3 | inc, sc, 2 inc, sc, inc = 10 | - |
| Round 4 | sc, 7 inc, 2 sc = 17 | - |
| Round 5 | 4 sc, [ inc, sc 1*5 times, 3 sc = 22 Rnd 6: 5 sc, [ inc, sc 1*6 times, 5 sc = 28 | - |
| Round 7 | 6 sc, [ inc, sc ]*8 times, 6 sc = 36 | - |
| Round 8-9 | 36 sc = 36(2 rounds) | - |
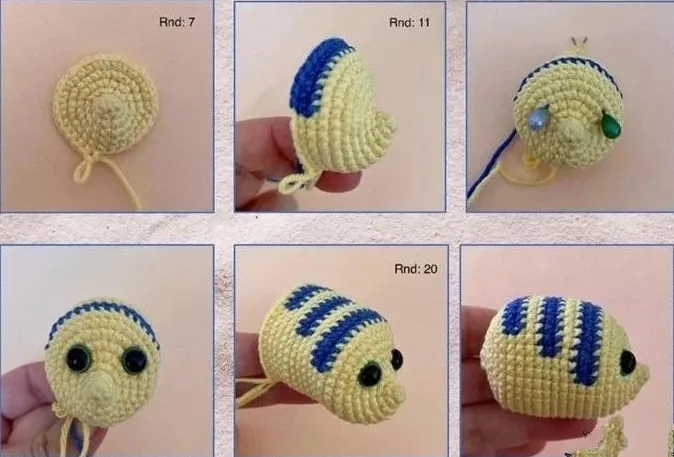
| Round 10-11 | 8 sc, change to dark blue color, 20 sc, change to yellow color, 8 sc = 36 (2 rounds) | - |
| Round 12-13 | 36 sc = 36 (2 rounds) Place the safety eyes (8mm) 8 sts apart. The eyes positions are about 3 rounds from the dark blue part ( on the face) | - |
If you mark the position of the eyes with pins beforehand, it will be more assured.
| Round | Instruction | Count |
|---|---|---|
| Round 14-15 | 10 sc, change to dark blue color, 16 sc, change to yellow color, 10 sc 36 (2 rounds) | - |
| Round 16-17 | 36 sc = 36 (2 rounds) | - |
| Round 18-19 | 12 sc, change to dark blue color, 12 sc, change to yellow color, 12 sc 36 (2 rounds) | - |
| Round 20 | 36 sc = 36 Stuff the body tightly | - |
| Round 21 | [4 sc, 1 dec]*6 times 30 | - |
| Round 22 | [3 sc, 1 dec]*6 times = 24 | - |
| Round 23 | [2 sc, 1 dec]*6 times = 18 | - |
| Round 24 | [1 sc, 1 dec] 6 times = 12 Rnd 25: 6 dec 6, close the opening. | - |
| Round | Instruction | Count |
|---|---|---|
| Round 1 | 4 sc in magic ring = 4 Rnd 2: [ sc, inc]* 2 times = 6 | - |
| Round 3 | [ sc, inc]* 3 times = 9 | - |
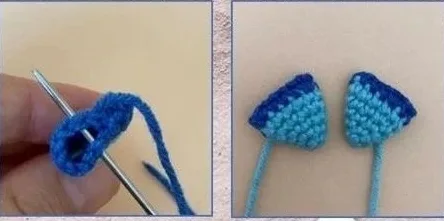
| Round 4 | [ 2 sc, inc]* 3 times = 12 Rnd 5: 12 sc = 12 Change to dark blue color | - |
| Round 6 | [ 3 sc, inc]* 3 times = 15 Cut the yarn and sew the opening with a tapestry needle | - |
| Round | Instruction | Count |
|---|---|---|
| Round 2 | starting from the second chain from the hook; 8 sc, 3 sc in the last chain, 7 sc, inc = 20Change to light blue color (YarnArt Jeans 81) | - |
| Round 3 | 20 sc = 20 | - |
| Round 4 | [ dec, 8 sc]*2 times = 18 | - |
| Round 5 | [ dec, 7 sc]*2 times | - |
| Round 6 | 16 sc = 16 = 16 | - |
| Round 7 | [ dec, 6 sc]*2 times = 14 Cut the yarn leaving long to sew later. | - |
| Round | Instruction | Count |
|---|---|---|
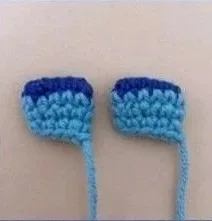
| Round 2 | : 4 sc, 3 sc in the last chain, 3 sc, inc = 12 Change to light blue color (YarnArt Jeans 81) Rnd 3: 12 sc = 12 | - |
| Round 4 | [dec, 4 sc]*2 times = 10 | - |
| Round 5 | 10 sc = 10 Cut the yarn leaving long to sew later. | - |
03 · Before it goes to a childWhat has to be right, and what is allowed to drift
- 💡 The 2.00 mm hook is deliberately smaller than the yarn label suggests — that tight fabric is what keeps stuffing invisible on a stuffed toy. If you can see gaps between your single crochet stitches, go down another hook size rather than fighting your tension.
- 💡 Stuff the body as you go, in small tufts, once the decrease rounds begin. The opening gets very tight near the end, and it is nearly impossible to firm up the belly through a tiny gap — under-stuffed fish develop wrinkles where the decreases sit.
- 💡 Keep a stitch marker in the first stitch of every round from the magic ring onward. The body, tail, and all four fins are worked in a spiral with no visible seam, so the marker is your only honest record of where a round begins.
- 💡 Leave a long starting or finishing tail on the tail piece and each of the four fins before cutting the yarn. Those tails become your sewing thread, which means fewer ends to weave and a color that always matches the piece you are attaching.
- 💡 Install the 8mm safety eyes before the body decreases close, and pin the tail and fins in place before sewing anything. Looking at the fish from the front, top, and both sides first saves you from a wonky fin that only shows up after the last stitch.
- 💡 With three colors of Yarn Art Jeans in play, cut the old color at each change and leave generous tails to weave in later, tying them loosely inside the body. Carrying the unused strand up the inside can peek through this tight gauge, so clean cuts give a sharper color-blocked finish.
04 · Snag listWhat went wrong on the bench, and the fix
Snag 1
Leaving the magic ring loose at the start of the body or fins, which lets a hole open up once the piece is stuffed.
After the first round, pull the yarn tail firmly until the center closes completely, then work over the tail for a few stitches and weave it in on the inside. Stuffing pushes outward, so a ring that looks fine now will gap later — tighten it more than you think you need to.
Snag 2
Losing your place in the continuous spiral, especially across the seventeen rounds of the body.
Drop a stitch marker or a scrap of contrasting yarn into the first stitch of every round and move it up as you go. If your fish looks lopsided, count your stitches at the end of the round before continuing — catching a missed increase one round late is easy; ten rounds late means frogging.
Snag 3
Working the front-loop-only section through both loops out of habit.
When the pattern says front loop only, insert your hook under just the loop closest to you. That leftover back loop is what creates the neat ridge detail, so if your fish is missing its crisp line, pull back to that round and rework it — it is worth the do-over.
Snag 4
Gappy decreases that let white stuffing peek through the tail end of the body.
Use the invisible decrease: insert your hook under the front loops only of the next two stitches, then pull through both at once. Pair that with the tight 2.00 mm gauge and stuff with small tufts rather than one big wad, and the decrease rounds will close smoothly with nothing showing.
Snag 5
Closing the body before installing the 8mm safety eyes.
Safety eyes lock with a backing washer from the inside, so they must go in while the body is still open — after the increase rounds but before the final decreases. Count the stitches between the eyes so they sit symmetrically, then press each backing on until it snaps firmly.
Snag 6
Stuffing the fins and crocheting them at a loose tension so they flop.
The pectoral fins (four rounds) and dorsal fins (three rounds) are meant to stay flat and unstuffed. Keep your tension snug, pinch each fin flat when finished, and sew through both edges at once so they stand up crisply against the body.
05 · VariantsOther ways to issue this one
Color is the fastest way to make this fish your own. For a goldfish, work the body and tail in orange with cream fins; for a koi look, keep the body white and add a red-orange tail and matching dorsal fins. A dramatic betta reads beautifully in deep teal with a purple tail. If you are making a whole school, keep the pattern identical and change only the palette — the original sunny yellow with dark and light blue, then a coral version, a mint version, a lilac version — and hang them as an ocean mobile for a nursery. Pastel shades of the same Yarn Art Jeans line turn the fish soft and baby-sweet, while bold primaries keep it playful. For size, leave the stitch counts alone and change the yarn instead. The same pattern in a worsted-weight cotton like 24/7 Cotton or Paintbox Simply Cotton Aran with a 3.5 mm or 4 mm hook grows into a chunky, cuddly fish, and holding two strands of the original yarn together goes bigger still. Dropping down to a fine cotton such as Scheepjes Catona with a smaller hook shrinks it into an adorable keychain or backpack charm — just embroider the eyes instead of using the 8mm safety eyes at that tiny scale. You can also play with texture: a velvet yarn like Himalaya Dolphin Baby makes an ultra-plush, bath-toy-style fish (size your hook up and stuff lightly), while a speckled sock yarn gives the body a naturally mottled, tropical look with zero color changes.
I will be honest: I finished this fish and immediately chained on a second one. The body is pure meditative crochet — one magic ring, then round after round of single crochet in a smooth spiral, with the increases and decreases doing all the shaping for you. No seams on the body, no fiddly joins, just seventeen satisfying rounds. The front-loop-only moment is my favorite little trick in the whole pattern; it creates a crisp ridge of texture that makes the fish look far more polished than the effort involved. And the fins! The pectoral fins are only four rounds each and the dorsal fins just three, so every piece feels like instant gratification. The six-round tail flares into that classic fishy silhouette the moment you sew it on. Add the 8mm safety eyes and the three-color Yarn Art Jeans palette, and you get a toy that looks store-bought but feels wonderfully handmade. It is the kind of pattern you have memorized by your second fish, which is exactly when the school starts growing.
06 · QueriesQuestions logged against this build
Can I substitute a different yarn for Yarn Art Jeans?
Absolutely — any sport-weight cotton or cotton-acrylic blend with good stitch definition works, like Scheepjes Catona or Ricorumi DK. Keep your hook small relative to the yarn so the fabric stays tight, and expect the finished size to shift slightly with the substitution.
How big will the finished fish be?
The source does not list a finished measurement, but with sport-weight yarn and a 2.00 mm hook, a seventeen-round body works up to a palm-sized toy. Using a heavier yarn and larger hook will scale the whole fish up proportionally without changing the pattern.
Is this a good first amigurumi project?
Yes — it only uses the magic ring, single crochet, increases, decreases, front loops, and slip stitch, all core amigurumi skills. The pieces are small, so even if you need to redo a fin, you are only frogging three or four rounds.
Are the safety eyes okay for a baby gift?
children under three, skip the 8mm safety eyes and embroider the eyes with a scrap of dark blue yarn or embroidery floss instead. If you do use safety eyes for older kids, press the backings on until they snap firmly and give them a hard tug test before gifting.
Why does the pattern have me work in the front loop only?
Working into just the front loop leaves the back loop free on the surface, creating a clean ridge line that helps define the fish's shape. It is a small detail, but it is what separates a polished fish from a plain stuffed oval, so do not skip it.
Original pattern: https://redagapeblog.com/how-to-crochet-fish-amigurumi/
07 · Made byWho counted this one

Who writes Amigurumi Addict, how a build gets its number, and why every round on the site carries a stitch count.
08 · Next off the benchThree builds that sit near this one

Animals
Crochet a bunny or frog from one amigurumi base
How do you crochet a bunny and a frog from one base? Share Legs, Body, and Head; swap ears or eyes.

Animals
Crochet giraffe amigurumi pattern with horns and ears
How do you crochet a giraffe amigurumi? Shape head, body, legs, ears and horns in worsted yarn.

Animals
Amigurumi cat crochet pattern with oval muzzle and bow
How do you crochet an amigurumi cat with a flat muzzle? Shape it separately, pinch it, then sew it on.
Join the build log
One message when a build is issued
A drawing and its parts list, when one leaves the bench.