| Shelf | Level | Time | Hook | Yarn |
|---|---|---|---|---|
| Animals | Beginner | 3-5 Hours | 2 mm | Sport |
How to Crochet a Teddy Bear Amigurumi for Gift-Giving
Crochet an adorable teddy bear amigurumi with this easy pattern — basic stitches, sport yarn, and a tiny scarf make it the perfect handmade gift.
01 · The pieceWhat How to Crochet a Teddy Bear Amigurumi for Gift-Giving actually is
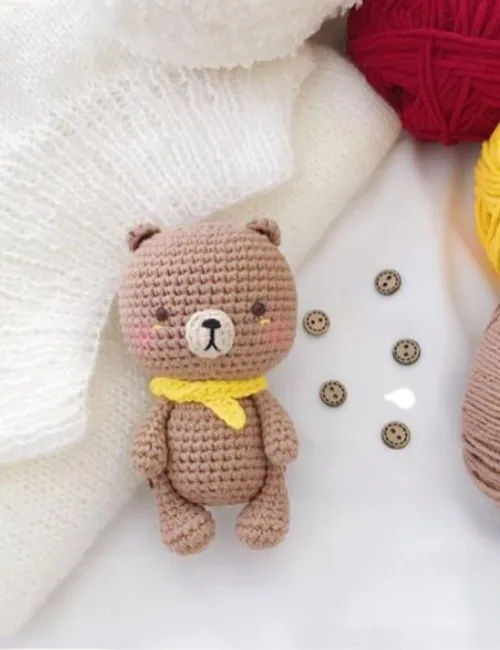
This pattern creates a sweet little teddy bear amigurumi, worked piece by piece — a round head, two tiny ears, a soft body, stubby arms and legs, a button of a nose, and a miniature scarf to tie it all together. What makes it special is how approachable it is: every component is small, the shaping is gentle, and the whole bear comes together from simple joined rounds. It's perfect for anyone who wants a handmade gift that says 'I made this for you' without demanding weeks of work, and for newer crocheters ready for their first full amigurumi character.
You'll lean on the classic amigurumi toolkit here: a magic ring to start each piece, single crochet as the main fabric, increases and decreases for shaping, slip stitches to join the rounds, plus a touch of double crochet and one back-loops-only round that the body is later worked straight into. If you can hold your tension steady with a 2mm–2.5mm hook, you can absolutely make this bear. The head is the largest piece at twenty-five rounds, so expect a comfortable few hours of stitching — most crocheters can finish in a single relaxed weekend afternoon or two cozy evenings.
The finished bear is petite and huggable — a palm-friendly companion with a firm, smooth head, softly stuffed limbs, an embroidered expression around 5mm safety eyes, and that irresistible sewn-on nose. Worked in a cotton or cotton-acrylic blend like Yarnart Jeans, the fabric feels dense and cuddly with beautiful stitch definition. Tie on the little scarf and it instantly looks like something from a boutique toy shop. Tuck it into a gift box for a new baby's nursery shelf, a friend who collects bears, or anyone who needs a small, soft reminder that someone loves them.
- Begin with the head, working single crochet rounds from a magic ring and shaping the curve with gentle increases and decreases.
- Set the safety eyes in place, stuff the head with fiberfill, and embroider the bear's expression using black thread.
- Crochet the tiny nose separately and sew it onto the face to give the muzzle its sweet, rounded shape.
- Work the body straight from the head — insert your hook into the leftover loops of the head's round 23 (the BLO round) and continue in joined rounds, stuffing firmly as you go.
- Make both little arms, both legs, and the two tiny ears, adding just a pinch of fiberfill to the limbs so they stay soft and huggable.
- Sew the ears to the head and the arms and legs to the body with a yarn needle, pinning everything in place before stitching — the legs attach to the body with a button.
- Finish by crocheting the simple scarf and tying it snugly around your bear's neck for a cozy final touch.
02 · The count run38 rounds across 7 parts, each with its count
US terms throughout. Every row below ends with the count that round finishes on.
| Part | Qty | Finishes on |
|---|---|---|
| Head | 1 | - |
| Nose | 1 | - |
| Arm – 2 | 1 | - |
| Leg – 2 | 1 | - |
| Body | 1 | - |
| Scarf | 1 | - |
| Ear – 2 | 1 | - |
| Round | Instruction | Count |
|---|---|---|
| Round 1 | 8sc in MR (8) | - |
| Round 2 | 8-inc (16) | - |
| Round 3 | (sc, inc) * 8 (24) | - |
| Round 4 | (2sc, inc) * 8 (32) | - |
| Round 5 | sc, inc, (3sc, inc) * 7, 2sc (40) | - |
| Round 6 | (4sc, inc) * 8 (48) | - |
| Round 7-18 | (12 rnds) 48sc (48)Insert the safety eyes at round 13, 14. 8sc apart | - |
| Round 19 | (6sc, dec) * 6 (42) | - |
| Round 20 | (5sc, dec) * 6 (36) | - |
| Round 21 | (4sc, dec) * 6 (30) | - |
| Round 22 | (3sc, dec) * 6 (24) | - |
| Round 23 | BLO (2sc, dec) * 6 (18) | - |
| Round 24 | (sc, dec) * 6 (12) | - |
| Round 25 | 6-dec (6)cut the yarn and weave in the end | - |
| Round | Instruction | Count |
|---|---|---|
| Round 1 | Make 3 chains, inc, 4sc in last chain, inc (8) | - |
| Round 2 | inc, 2sc, 2-inc, 2sc, inc (12)cut the yarn, leave long tail for sewing | - |
| Round | Instruction | Count |
|---|---|---|
| Round 1 | 6sc in MR (6) | - |
| Round 2 | (sc, inc) * 3 (9) | - |
| Round 3-10 | (8 rnds) 9sc (9)cut the yarn, leave long tail for sewing | - |
| Round | Instruction | Count |
|---|---|---|
| Round 1 | 8sc in MR (8) | - |
| Round 2 | 8-inc (16) | - |
| Round 3-4 | (2 rnds) 16sc (16) | - |
| Round 5 | 5sc, 3-dec, 5sc (13) | - |
| Round 6 | 5sc, dec, 6sc (12) | - |
| Round 7-11 | (5 rnds) 12sc (12) | - |
| Round 12 | 6-dec (6)fasten off, leave long tail for sewing to the body with a button. | - |
Insert the hook into round 23 of the head (BLO round)
| Round | Instruction | Count |
|---|---|---|
| Round 1 | 24sc (24) | - |
| Round 2 | (3sc, inc) * 6 (30) | - |
| Round 3 | 30sc (30) | - |
| Round 4 | (4sc, inc) * 6 (36) | - |
| Round 5-7 | (3 rnds) 36sc (36) | - |
| Round 8 | (6sc, dec) * 4, 4sc (32) | - |
| Round 9-11 | (3 rnds) 32sc (32) | - |
| Round 12 | (2sc, dec) * 8 (24) | - |
| Round 13 | (sc, dec) * 8 (16) | - |
| Round 14 | 8-dec (8)cut the yarn and weave in the end | - |
make 51 chains, sc, 48-hdc, sc (50) fasten off
| Round | Instruction | Count |
|---|---|---|
| Round 1 | 6sc in MR (6) | - |
| Round 2 | Turn your hook, 1-chain, 6sc (6)cut the yarn, leave long tail for sewing. Baby Teddy is ready. | - |
03 · Before it goes to a childWhat has to be right, and what is allowed to drift
- 💡 Pick your exact hook within the 2mm–2.5mm range based on your natural tension: if you crochet tightly, start at 2.5mm; if your stitches run loose, go down to 2mm so the stuffed pieces stay opaque.
- 💡 Move your stitch marker up to the first stitch of every new round right after the slip-stitch join — with this many small pieces, a marker is the difference between a symmetrical bear and a lopsided one.
- 💡 Snap the 5mm safety eyes in place before you stuff and close the head. The backing washers lock permanently, so double-check the placement and make sure both eyes sit level before pressing them on.
- 💡 Stuff as you go rather than at the end: the head firmly for a smooth embroidery surface, the body medium-firm so it sits nicely, and the arms and legs only lightly so they stay soft and easy to sew.
- 💡 Leave a long yarn tail on the nose, both ears, both arms, and both legs when you fasten off — those tails become your sewing yarn, and threading them straight onto the yarn needle gives invisible, matching seams.
- 💡 Embroider the mouth and nose details with black thread while you can still reach inside the head — anchoring and hiding your thread ends is much easier before the head is stuffed and closed.
- 💡 The designer's bear wears a little yellow scarf and gets extra charm from softly blushed cheeks — a small touch of pink on the face after assembly completes the look.
04 · Snag listWhat went wrong on the bench, and the fix
Snag 1
Leaving the magic ring loose, so a hole
After completing your first round of single crochet, pull the ring's tail firmly until the center closes completely, then weave the tail through the back stitches a few times to lock it before you continue — stuffing pressure will reopen a ring that's only pulled snug once.
Snag 2
Miscounting stitches in the joined
Place a stitch marker in the first true stitch of every round, never in the slip stitch itself, and count your stitches at the end of each round. If your head or body starts ruffling or leaning, an invisible extra stitch at the join is almost always the culprit.
Snag 3
Working through both loops
The back loop is the one farther from you as you crochet. On head round 23, marked BLO, slide your hook under just that far loop — the unworked front loops should form a visible ridge line around the head. That ridge matters: the body's first round is worked directly into round 23, so if you don't see the ridge, you've worked both loops.
Snag 4
Standard decreases leaving little gaps
Use the invisible decrease: insert your hook under only the front loops of the next two stitches, then complete the single crochet as usual. It pulls the two stitches together flat, so your twenty-five-round head shapes down smoothly with no dimples or holes.
Snag 5
Overstuffing the small pieces
Stuff the head firmly so it holds a smooth round shape for the face, but add only a pinch of fiberfill to the arms and legs. Overstuffed limbs stretch the stitches open, show white filling through the fabric, and become too stiff to sew neatly against the body.
Snag 6
Using a hook larger
Stay within 2mm–2.5mm for this bear. If you can see fiberfill through your stitches, drop down a hook size rather than trying to stuff less — amigurumi fabric should be noticeably tighter than what the yarn label suggests.
05 · VariantsOther ways to issue this one
Once you've made one bear, this pattern practically begs for a whole den of variations. Start with color: the classic look is a honey-brown or caramel bear with a cream nose and a mustard scarf, but a dusty-rose bear with an ivory scarf is darling for a new baby, and a soft grey bear with a forest-green scarf feels wonderfully modern. Because the nose is a separate two-round piece, it's the easiest place to add contrast — try a cocoa nose on a tan bear, or match the nose to the scarf for a coordinated set. You can even go panda-style: work the head and body in white and the arms, legs, and nose in black. For yarn, Yarnart Jeans is the designer's choice, but any sport-weight cotton or cotton-acrylic blend behaves beautifully — Scheepjes Catona and DMC Natura Just Cotton both give crisp stitch definition, while Alize Cotton Gold is a budget-friendly stand-in. To change the size without touching the pattern, simply change the yarn: the same rounds worked in DK or worsted yarn with a proportionally larger hook produce a noticeably bigger bear, while crochet thread and a tiny steel hook create a miniature keychain-sized version. For seasonal gifting, a snow-white bear with an icy-blue scarf makes a lovely winter present, a rust-and-pumpkin combo suits autumn birthdays, and a bear in confetti-speckled yarn with a rainbow scarf is pure party. For the sweetest bedtime version, skip the safety eyes and embroider sleepy closed lashes with black thread instead.
I have a soft spot for tiny bears, and this one stole my heart before I'd even finished the head. Everything begins with a magic ring and honest single crochet, so the fabric grows quickly under a 2mm–2.5mm hook, and joining each round with a slip stitch keeps every piece tidy and symmetrical. The head is the most substantial part at twenty-five rounds, and shaping it with gentle increases and decreases is genuinely soothing — you watch a flat circle bloom into a round little face. Then come the small victories: a two-round nose you can finish in minutes, stubby little arms, and sturdy legs that stand up to serious hugging. My favorite moment is embroidering the expression with black thread around those 5mm safety eyes — two tiny stitches and suddenly the bear has a whole personality. And the scarf! Wrapping that last piece around the finished neck feels like tucking someone in. This is the kind of project you finish smiling, already planning who gets the next one.
06 · QueriesQuestions logged against this build
Can I use a different yarn than Yarnart Jeans?
Absolutely — any sport-weight or lightweight cotton, acrylic, or cotton-acrylic blend works well. Scheepjes Catona and DMC Natura Just Cotton are lovely substitutes with crisp stitch definition. Just keep your hook in the 2mm–2.5mm range so the stuffing doesn't show through.
Is this bear safe to give to a baby?
children under three, skip the 5mm safety eyes and embroider the eyes with black thread instead, using small satin stitches. Also sew the scarf ends down securely rather than leaving it loose, so it can't be pulled off.
I've never made amigurumi before — can I handle this pattern?
Yes, this is a great first character project. The stitches are basic — single crochet, increases, decreases, and a magic ring — and the largest piece is the twenty-five-round head. Practice the magic ring a couple of times on scrap yarn first and the rest will follow.
How do I attach the head so it doesn't wobble?
You don't sew the head on at all — this pattern attaches the body by crocheting it directly onto the head. After finishing the head, insert your hook into round 23 (the BLO round) and work the body's first round of 24 sc right into those leftover loops. That built-in join is far more stable than a sewn seam, so a firmly stuffed head and body will never wobble.
Original pattern: https://redagapeblog.com/crochet-teddy-bear-amigurumi/
07 · Made byWho counted this one

Who writes Amigurumi Addict, how a build gets its number, and why every round on the site carries a stitch count.
08 · Next off the benchThree builds that sit near this one

Animals
Crochet a bunny or frog from one amigurumi base
How do you crochet a bunny and a frog from one base? Share Legs, Body, and Head; swap ears or eyes.

Animals
Crochet giraffe amigurumi pattern with horns and ears
How do you crochet a giraffe amigurumi? Shape head, body, legs, ears and horns in worsted yarn.

Animals
Amigurumi cat crochet pattern with oval muzzle and bow
How do you crochet an amigurumi cat with a flat muzzle? Shape it separately, pinch it, then sew it on.
Join the build log
One message when a build is issued
A drawing and its parts list, when one leaves the bench.