| Shelf | Level | Time | Hook | Yarn |
|---|---|---|---|---|
| Animals | Beginner | 2-3 Hours | 4 mm | Chunky |
Free Crochet Koi Fish Amigurumi Pattern for Beginners
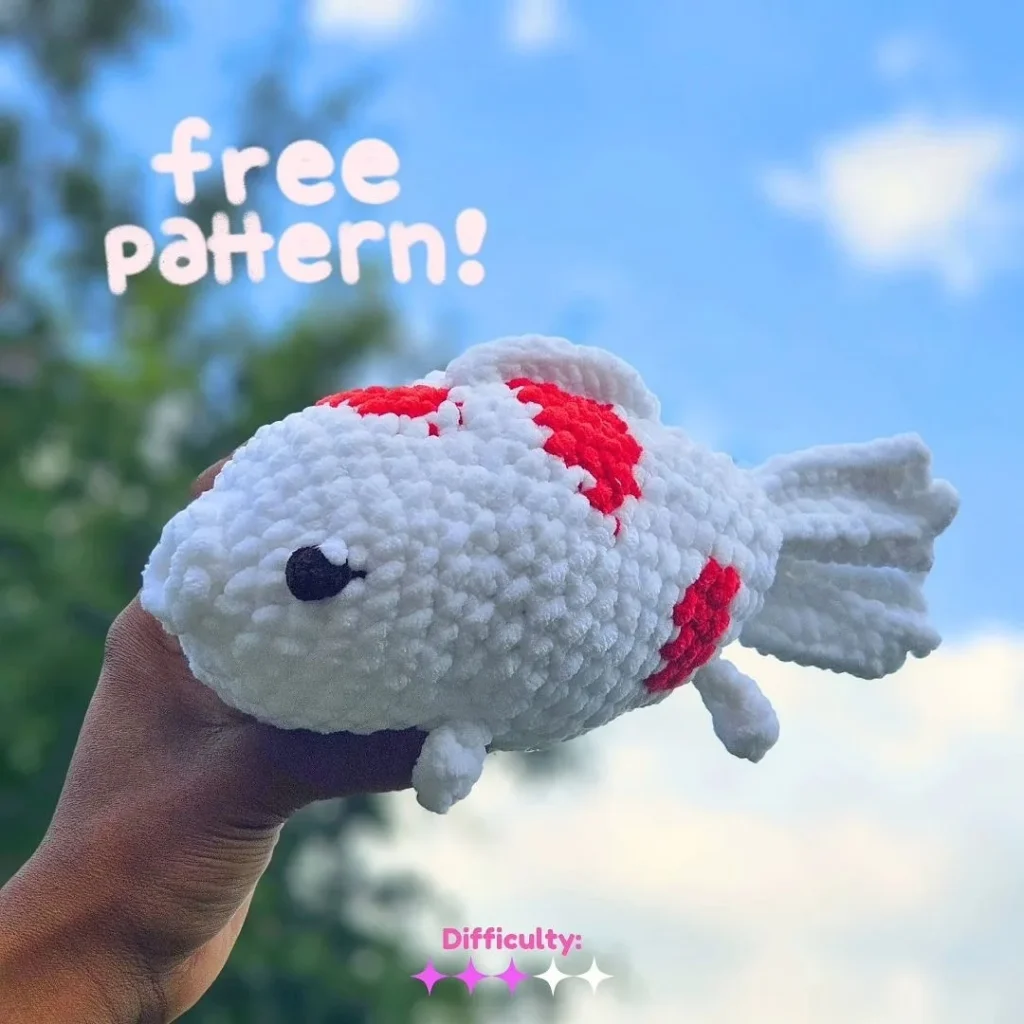
Free crochet koi fish pattern for beginners — a chunky amigurumi koi with two back fins and a soft stuffed body you can make in a single evening.
01 · The pieceWhat Free Crochet Koi Fish Amigurumi Pattern for Beginners actually is
This free crochet koi fish pattern turns half a skein of White and half a skein of Poppy into a plump little koi with two small back fins and a softly tapered tail. What makes it special is how few pieces there are: one body worked in the round, plus a pair of three-round fins. That means a finished, huggable fish with barely any seaming. It is perfect for absolute beginners, for crocheters who want a same-day win, and for anyone who loves chunky amigurumi that works up fast.
The techniques stay friendly all the way through. You start with a magic ring, work single crochet in continuous spiral rounds, shape the body with straightforward increases and decreases across its 24 rounds, and make one color change from White to Poppy for the koi's markings. The back fins are only three rounds each, so they are finished before you have time to lose interest. If you can keep a spiral round from twisting, you can make this fish. Expect roughly two to three hours start to finish.
Worked in Premier Yarns Parfait Chunky on a 4mm hook, the fabric comes out dense and squishy with no stuffing peeking through and a satisfying weight in the hand. The finished koi is a comfortable palm-sized companion with a rounded belly, softly flared back fins, and optional 3mm safety eyes that give it a sweet, slightly startled expression. It makes a lovely desk buddy, a nursery shelf-sitter, or a quick handmade gift for anyone who loves fish, ponds, or simply adorable little things.
- Begin the body at a magic ring and work single crochet in continuous rounds, increasing to round out the belly.
- Slide a stitch marker into the first stitch of each round so the spiral never wanders off course.
- Change from White to Poppy where the pattern directs to create the koi's bright colored markings.
- Fit the optional safety eyes while the body is still open and easy to reach inside.
- Stuff firmly with polyester filling as you decrease toward the tail, keeping the shape plump and smooth.
- Close the body, weave the tail end in, then crochet the two small back fins.
- Sew the fins onto the back with a sewing needle, following the assembly steps to place them evenly.
- Shape the tail gently with your fingers and give the finished koi a final tidy of ends.
02 · The count run27 rounds across 2 parts, each with its count
US terms throughout. Every row below ends with the count that round finishes on.
| Part | Qty | Finishes on |
|---|---|---|
| Back Fin(make 2) | 1 | - |
| Body | 1 | (12) |
| Round | Instruction | Count |
|---|---|---|
| Round 1 | Sc in the second ch away from hook. Sc in the remaining 10 sts (11 sts). Ch 1, and turn. | - |
| Round 2 | Sc 10. Leave the remaining st unworked (10 sts). Ch 1, and turn. | - |
| Round 3 | sl st in each st (10 sts). Fasten off, and leave a 6-in/15-cm tail for sewing. | - |
| Round | Instruction | Count |
|---|---|---|
| Round 1 | in the BLO, inc 8 (16 sts). Place a stitch marker on the FL of the first st of Rnd 1. | - |
| Round 2 | (Inc, sc) 8 times (24 sts). | (24) |
| Round 3 | sc 6, (inc, sc 2) 4 times, sc 6 (28 sts). | (28) |
| Round 4 | sc 6, (inc, sc 3) 4 times, sc 6 (32 sts). | (32) |
| Round 5 | Sc in each st (32 sts). | (32) |
| Round 6 | With MC, sc 17. With C1, sc 4. With MC, sc 11 (32 sts). | (32) |
| Round 7 | With MC, sc 17. With C1 sc 5. With MC, sc 10 (32 sts). | (32) |
| Round 8 | With MC, (dec, sc 2) 4 times, dec. With C1, sc 2, dec. With MC, (sc 2, dec) 2 times, sc 2 (24 sts). | (24) |
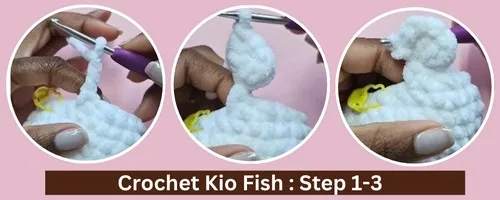
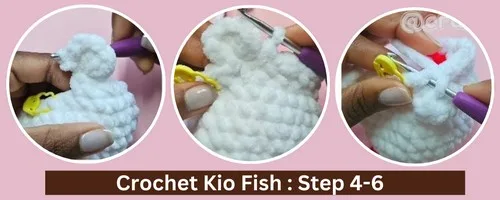
| Round 9 | With MC, ch 3 (image 1), 3 dc in the third ch away from hook (image 2), ch 2 (image 3). Sl st in the same st the 3 dc were worked in (image 4). In the next sts of the Body, in the FLO, inc, sc 2, inc, sc. Ch 3, 3 dc in the third ch away from hook, ch 2. Sl st in the same st same st the 3 dc were worked in. In the next sts of the Body, in the FLO, sc, (inc, sc 2) 6 times (32 sts; The 3 dc clusters do not count in the final st count.). | - |
| Round 10 | With MC, sc in each st (32 sts). When crocheting around the 3 dc clusters, make sure that when working around them, they stay on the right side of the Body (images 5-8). These are the Front Fins. | - |
| Round 11 | With MC, sc 16. With C1, sc 9. With MC, sc 7 (32 sts). Attach Safety Eyes to Rnd 3, 14 sts apart. | - |
| Round 12 | With MC, sc 15. With C1, sc 12. With MC, sc 5 (32 sts). | (32) |
| Round 13 | With MC, sc 16. With C1, sc 11. With MC, sc 5 (32 sts) | - |
| Round 14 | With MC, (dec, sc 6) 2 times, dec. With C1, sc 6, dec. With MC, sc 6 (28 sts). | (28) |
| Round 15 | With MC, sc in each st (28 sts). | (28) |
| Round 16 | With MC, dec, sc 5, dec. With C1, sc 3. With MC, sc 2, dec, sc 5, dec, sc 3. With C1, sc 2 (24 sts). | (24) |
| Round 17 | With C1, sc. With MC, sc 6. With C1, sc 4. With MC, sc 11. With C1, sc 2 (24 sts). | (24) |
| Round 18 | With C1, sc 2. With MC, sc 6. With C1, sc 3. With MC, sc 12. With C1, sc (24 sts). Start to stuff the Body. | - |
| Round 19 | With C1, dec. With MC, sc 4, (dec, sc 4) 3 times (20 sts). Break C1. | - |
| Round 20 | With MC, sc 2. Ch 6, 2 dc in the 3rd ch away from hook, hdc in the next ch, sc in the next ch, and sl st in the last ch. In the next sts of the Body sc 4. Ch 6, 2 dc in the 3rd ch away from hook, hdc in the next ch, sc in the next ch, and sl st in the last ch. In the next sts of the Body, sc 14 (20 sts). Depending on your yarn/tension, you may need to adjust the Fins as needed. | - |
| Round 21 | (Dec, sc 3) 4 times (16 sts). In the same way we worked Rnd 10, when crocheting around the dc/hdc/sc clusters, make sure that when working around them, they stay on the right side of the Body. These are the Side Fins. Finish stuffing the Body. | - |
| Round 22 | Sc in each st (16 sts). | (16) |
| Round 23 | (Dec, sc 2) 4 times (12 sts). | (12) |
| Round 24 | Dec 6 (6 sts). Fasten off, and sew the hole closed. To finish off the Body, we’ll start on the Mouth: Place your hook into the FLO on the first st of Rnd 1 (image 9). Draw up a loop (image 10), ch 1, and sc into the same st (image 11). Working from right to left, sc into the remaining 7 sts (image 12). Sl st into the first sc.Fasten off, and weave in the remaining ends. | - |
03 · Putting it togetherHow the pieces go together
- S1
Save
- S2
Sew the Top Fin vertically across the Body, spanning from Rnd 9-16. Sew the bottom of the Back Fins vertically across the Body, spanning from Rnd 22-24. If you opted out of Safety Eyes, embroider Eyes on Rnd 3 of the Body, 14 sts apart.
- S3
Pin 11
- S4
Share
- S5
11 Shares
04 · Before it goes to a childWhat has to be right, and what is allowed to drift
- 💡 The 4mm hook is deliberately small for Parfait Chunky — that tight gauge is what keeps the fabric dense enough to hide the polyester filling. If your stitches feel loose or you can see white fluff through the body, go down a hook size rather than adding less stuffing.
- 💡 Half a skein each of White (MC) and Poppy (C1) is plenty, but pull both from the same dye lot if you can. Chunky yarn shows lot variation clearly, and a subtle shade shift right at the color change line will bother you every time you look at the finished koi.
- 💡 Use a locking stitch marker rather than a scrap of yarn. Parfait Chunky is grabby, and a yarn marker tends to felt into the stitches and pull the fabric when you move it. Reset it into the first stitch of each new round as you go, not afterwards.
- 💡 Stuff in small pinches rather than big handfuls, and roll each pinch between your palms first so it goes in smooth instead of clumped. The handle of your 4mm hook is the perfect tool for easing filling into the narrow tail end without poking it through a stitch.
- 💡 The 3mm safety eyes are optional for a reason. If this koi is heading to a baby or a toddler, skip them entirely and embroider the eyes with a few tight satin stitches or French knots in black yarn — no small parts, same sweet expression.
- 💡 When you finish the color change, leave a long Poppy tail before cutting. You can use that same tail later to sew the back fins on, which saves you weaving in two extra ends and keeps the fin attachment color-matched to the back.
05 · Snag listWhat went wrong on the bench, and the fix
Snag 1
Joining each round with a slip stitch instead of working a continuous spiral
The body is worked in a spiral, so joining creates a visible seam ridge running the length of the fish and throws off the round count. Do not slip stitch or chain up between rounds — just keep working single crochet into the next stitch and let the marker tell you where the round begins. If you have already joined several rounds, it is faster to frog back than to try to disguise the ridge on a dense chunky fabric.
Snag 2
Losing track of the round start and drifting the increases out of line
In chunky yarn the stitches are big, so one misplaced increase noticeably lumps the belly. Move your stitch marker into the first stitch of the new round the moment you make it, not at the end of the round when you are already unsure. Count the round total before moving on — 24 rounds sounds like a lot, but each one is quick, and a 20-second count beats unpicking six rounds of Parfait Chunky.
Snag 3
Attaching the 3mm safety eyes after the body is closed
Safety eyes need their backings pushed on from the inside, which is impossible once you have decreased the opening shut. Place them while the body is still open and your fingers can reach in, and dry-fit both eyes first by poking them through without the washers so you can judge the spacing. Aim for symmetry against a round of stitches rather than by eye alone — count the same number of stitches out from center on each side.
Snag 4
Stuffing all at once at the very end
Waiting until the body is nearly closed means you are cramming polyester filling through a narrow hole, which creates a lumpy belly and a hollow nose. Add filling in small pinches as you work through the decrease rounds, using the handle end of your 4mm hook to push it gently into the tapered tail area. Stop when the fish holds its round shape but still gives when squeezed — dense chunky fabric will not stretch to hide over-stuffing.
Snag 5
Changing from White to Poppy on the wrong stitch, leaving a jog or a knot
Make the color change by pulling the new Poppy strand through on the final yarn over of the stitch before the change, not after the stitch is already finished. That gives you a clean transition instead of a half-white loop sitting on the wrong side of the line. Never knot the two colors together on the outside — carry or cut, leave a generous tail, and weave it into the inside of the body before you stuff.
Snag 6
Sewing the two back fins on unevenly or squashing them flat
Each fin is only three rounds, so a couple of stitches of misplacement is very visible. Pin or thread-baste both fins in place first, look at the fish head-on to check they sit at the same height and angle, and only then sew them down with the sewing needle. Stitch around the base of each fin rather than through it, so the fin keeps its little flared shape instead of flattening against the body.
06 · VariantsOther ways to issue this one
The classic koi look is White with Poppy, but this little fish is a blank canvas. Try a black-and-white bekko koi by swapping Poppy for a charcoal or true black, or go for a butterfly koi in cream and deep gold. A soft mint body with a dusty pink back reads sweetly nursery-ish, while an all-over deep orange with a white belly gives you the goldfish everyone recognizes. If you want a whole pond, make five in five colors and change only the C1 shade — the White MC keeps the set looking like a family. For size, the shaping is easy to scale. Add two extra stitches to your starting magic ring and mirror those two extras in every increase and decrease round for a noticeably bigger fish, or subtract two for a tiny keychain koi. Keeping the same 4mm hook while sizing up gives you a firm, sculptural body that holds its shape on a shelf. Yarn substitutions are forgiving here. Wool-Ease Thick and Quick gives a bigger, chunkier fish with a rustic texture. Bernat Blanket makes a plushie-soft version, though the pile hides stitch definition, so count carefully. For a smaller, tidier koi, drop to a worsted yarn like Paintbox Simply Aran and go down a hook size or two to keep the fabric dense. Seasonal spins are fun too: an icy blue and silver koi for winter shelves, a sunset ombre body using a self-striping chunky yarn, or a glow-in-the-dark blend for a nightlight-adjacent bedroom fish. Swap the safety eyes for embroidered French knots and you have a completely different, softer face.
I have a soft spot for amigurumi that comes together in one sitting, and this little koi is exactly that. The whole make is really just one body worked in a continuous spiral plus two three-round back fins, so there is almost no seaming — six quick assembly steps and you are done. What I love most is the moment the color changes from White to Poppy: the fish stops being a plain white blob and suddenly reads as a koi, with that bold splash of red across its back. The Parfait Chunky on a 4mm hook is the other quiet win. It is a tight gauge for chunky yarn, which means the stitches pack in dense and smooth, no stuffing shows through the fabric, and the finished fish has real weight in your palm. Adding the tiny 3mm safety eyes is my favorite part — one second it is a stuffed shape, the next it is looking right back at you. If you have been nervous about starting amigurumi, this is the pattern I would hand you first.
07 · QueriesQuestions logged against this build
Can I make this koi with worsted weight yarn instead of chunky?
Absolutely — the shaping works at any weight, you will just get a smaller fish. Drop down a hook size or two from what the yarn label suggests so the fabric stays tight enough to hold the stuffing in, and expect the finished koi to be roughly two-thirds the size.
Do I have to use the 3mm safety eyes?
No, they are listed as optional. Embroidered eyes in black yarn look just as charming and are the safer choice for anyone under three years old. If you do use safety eyes, fit them while the body is still open so you can secure the backings from the inside.
How much yarn will I actually use?
About half a skein of Premier Yarns Parfait Chunky in White for the main body and half a skein of Poppy for the colored section and the fins. One full skein of each is enough to make two koi with leftovers for a third.
Why does my fish look lumpy instead of smooth and round?
Lumpiness almost always comes from stuffing too much at once or stuffing only at the end. Add filling gradually through the decrease rounds, and roll each pinch smooth before it goes in. If the surface still looks bumpy, gently massage the body between your palms to redistribute the filling.
Is this pattern really suitable for a complete beginner?
Yes — you only need a magic ring, single crochet, increases, decreases, and one color change. The two back fins are three rounds each and the assembly is just six steps, so there is very little sewing to intimidate you. It is a great first amigurumi.
Original pattern: https://redagapeblog.com/crochet-koi-fish-pattern/
08 · Made byWho counted this one

Who writes Amigurumi Addict, how a build gets its number, and why every round on the site carries a stitch count.
09 · Next off the benchThree builds that sit near this one

Animals
Crochet a bunny or frog from one amigurumi base
How do you crochet a bunny and a frog from one base? Share Legs, Body, and Head; swap ears or eyes.

Animals
Crochet giraffe amigurumi pattern with horns and ears
How do you crochet a giraffe amigurumi? Shape head, body, legs, ears and horns in worsted yarn.

Animals
Amigurumi cat crochet pattern with oval muzzle and bow
How do you crochet an amigurumi cat with a flat muzzle? Shape it separately, pinch it, then sew it on.
Join the build log
One message when a build is issued
A drawing and its parts list, when one leaves the bench.