| Shelf | Level | Time | Hook | Yarn |
|---|---|---|---|---|
| Animals | Intermediate | 4-6 Hours | 2.0 mm | DK/Sport |
Cute Crochet Sheep Amigurumi Head Pattern
Make an adorable amigurumi sheep head with this crochet pattern featuring a textured hair topper and light beige yarn. Beginner-friendly fun!
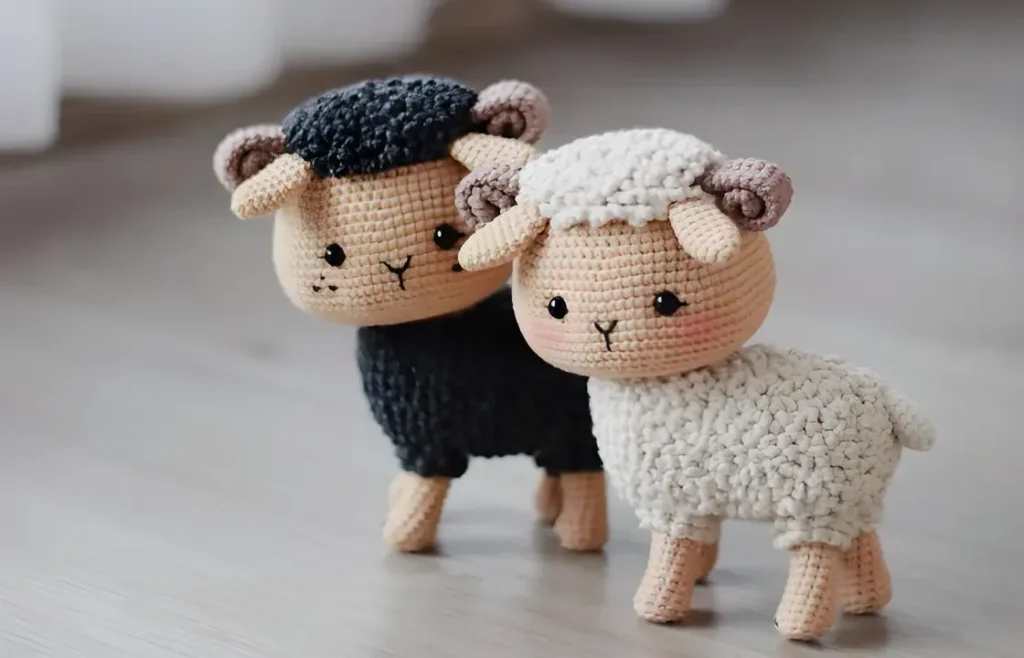
01 · The pieceWhat Cute Crochet Sheep Amigurumi Head Pattern actually is
This pattern brings to life the most endearing part of any amigurumi sheep — its round, rosy-cheeked head, topped with a textured wool-like hairstyle that makes it instantly recognizable. Worked in soft light beige yarn, the head has that classic amigurumi charm: big glossy safety eyes, a gentle curve to the face, and just the right amount of pudge to make it squeezable. It's perfect for crocheters who love creating sweet farmyard characters, and for anyone shopping for a first amigurumi animal project that feels achievable but still rewarding.
You'll work primarily in continuous rounds using single crochet, shaping the head through a series of increases and decreases across all 21 rounds to build that signature sphere shape before it's ready for finishing touches. The separate hair piece adds a layer of textured detail that gives this sheep its fluffy, wool-like personality. This project sits comfortably in intermediate territory — not because any single stitch is difficult, but because tracking stitch counts through 21 rounds and placing features neatly takes a little patience and practice.
When finished, you'll have a plush, rounded sheep head sized perfectly for cradling in one hand — sturdy enough to become a beloved shelf companion or the star piece in a nursery mobile. The light beige yarn gives it a soft, natural wool look that pairs beautifully with the black safety eyes for a sweet, wide-eyed expression. Whether you keep it as a solo amigurumi bust or build out a full body later, this little sheep head makes a heartfelt handmade gift for baby showers, birthdays, or anyone who just needs something soft to smile at.
- Start the head with a magic ring in light beige yarn and begin working single crochet in continuous rounds.
- Increase steadily over the first several rounds to widen the head into a full, rounded sphere shape.
- Insert the black safety eyes once the widest point of the face is visible and well shaped.
- Continue working even rounds without increasing or decreasing to build the depth of the head.
- Begin decreasing in the later rounds to gently curve the shape back inward toward the top.
- Stuff the head firmly and evenly with fiberfill as you approach the final closing rounds.
- Fasten off invisibly and weave in all ends for a smooth, seamless finish on the head.
- Crochet the separate hair piece, then pin and sew it neatly onto the top of the head.
02 · The count run26 rounds across 2 parts, each with its count
US terms throughout. Every row below ends with the count that round finishes on.
| Part | Qty | Finishes on |
|---|---|---|
| HEAD (Use light beige yarn) | 1 | - |
| HAIR | 1 | - |
Make a chain of 15 ch, start in second ch from the hook
| Round | Instruction | Count |
|---|---|---|
| Round 1 | Inc, 12 sc, 4 sc into the last stitch, work on a long the other side: 12 sc, inc (32) | - |
| Round 2 | (BLO) 2 inc, 12 sc, 4 inc, 12 sc, 2 inc (40) | - |
| Round 3 | (BLO) 1 sc, inc, 16 sc, inc, 2 sc, inc, 16 sc, inc, 1 sc (44) | - |
| Round 4 | (BLO) 44 sc (44) | - |
| Round 5 | (BLO) 2 sc, inc, 16 sc, inc, 4 sc, inc, 16 sc, inc, 2 sc (48) | - |
| Round 6 | 7 sc, (BLO) 11 sc, 30 sc (48) | - |
| Round 7 | (7 sc, inc) x 6 (54) | - |
| Round 8 | 54 sc (54) | - |
| Round 9 | (inc, 6 sc) x 4, (inc, 12 sc) x 2 (60) | - |
| Round 10 | 60 sc (60) | - |
| Round 11 | (inc, 7 sc) x 4, (inc, 13 sc) x 2 (66) | - |
| Round 12 | 66 sc (66) | - |
| Round 13 | (inc, 8 sc) x 4, (inc, 14 sc) x 2 (72) | - |
| Round 14 | 72 sc (72) | - |
| Round 15 | (17 sc, inc) x 4 (76) | - |
| Round 16 | 76 sc (76) | - |
| Round 17 | (18 sc, inc) x 4 (80) | - |
| Round 18-19 | (2 rounds) 80 sc (80) | - |
| Round 20 | (8 sc, dec) x 8 (72) | - |
| Round 21 | (10 sc, dec) x 6 (66) | - |
| Round 22 | (9 sc, dec) x 6 (60) | - |
| Round 23 | (8 sc, dec) x 6 (54) | - |
| Round 24 | (7 sc, dec) x 6 (48) | - |
| Round 25 | BLO (2 sc, dec) x 12 (36) | - |
| Round 26 | (4 sc, dec) x 6 (30) | - |
| Round 27 | (3 sc, dec) x 6 (24)Fasten off and weave in ends. | - |
Embroider the nose and mouth with black embroidery thread.
Hold the head up, on the back side of the head join off-white (black) yarn into the first front loop of round 5, work in a spiral: (Ch 4, slst in next stitch) repeat over all front loops from round 5 to the top of the head.
In front loops of round 6: (Ch 4, slst in next stitch) x 10
03 · Before it goes to a childWhat has to be right, and what is allowed to drift
- 💡 Stick with a 2.0mm, 2.25mm, or 2.5mm hook and light/sport or DK weight yarn — going too far outside this range will change your gauge and throw off how the hair piece fits the head.
- 💡 Place a stitch marker in the first stitch of round 1 and move it up every round so you never lose your place across all 21 rounds of the head.
- 💡 Add fiberfill gradually as you work the later rounds rather than stuffing everything at the very end — it's much easier to shape evenly this way.
- 💡 Test your black safety eyes' placement by holding the head up and looking at it from multiple angles before pushing the backs on, since they're permanent once secured.
- 💡 Keep your yarn tail from the magic ring long enough to weave in securely, and consider leaving a slightly longer tail on the hair piece for easy attachment to the head.
- 💡 Block or lightly steam the hair piece if it curls or won't lay flat before sewing it onto the head, giving you a neater, more polished finished look.
04 · Snag listWhat went wrong on the bench, and the fix
Snag 1
Losing track of stitch count
Use a stitch marker to mark the first stitch of every round and count your stitches out loud after each round before moving on — catching an error early saves you from unraveling multiple rounds later.
Snag 2
Placing the safety eyes too early
Wait until you've worked several rounds past the halfway point of the head so the widest part of the face is established, then temporarily insert the eyes and step back to check spacing before locking them in place.
Snag 3
Stuffing the head unevenly, leaving
Add fiberfill in small pinches throughout your rounds rather than one large handful at the end, working it toward the edges with your fingers or the end of your yarn needle for a smooth, evenly firm shape.
Snag 4
Attaching the hair piece with visible
Pin or use stitch markers to hold the hair piece in place at several points around its edge before sewing, checking front and side views to confirm even, centered placement before you commit to stitching it down.
Snag 5
Working too loosely with sport or DK
Keep tension snug and consistent — if you notice gaps between stitches, size down slightly within the recommended hook range or crochet a bit tighter until the fabric feels dense enough to hide fiberfill.
Snag 6
Rushing through the final closing
Slow down on the last few decrease rounds, stuff fully before closing, and use the invisible fasten-off technique, weaving your tail through the remaining stitches twice and pulling snug for a seamless finish.
05 · VariantsOther ways to issue this one
This little sheep head is begging for a color makeover! Try working the head in a soft heather gray (like Heartland in Yosemite or Cascade 220 in Silver Grey) for a more realistic wool look, or go playful with pastel pink or lavender for a whimsical nursery version. For the hair piece, experiment with a fuzzy textured yarn like Baby Hugs or a bouclé-style yarn to amplify that curly wool texture even more — the contrast between smooth head and fluffy hair is where the magic happens. If you want a mini version, drop down to a 1.75mm hook and use fingering weight yarn, which will shrink the finished head to about half size, perfect for keychains or earrings (just size your safety eyes down to 5mm or embroider the eyes instead). Going bigger? Bump up to worsted weight yarn with a 3.5mm-4mm hook for a huggable oversized sheep head pillow — just know your stitch counts will naturally expand to fill a larger circumference, so let the piece guide you round by round. Seasonal variations are fun too: add tiny embroidered flowers around the hair for a spring sheep, or work the hair in white with subtle gray-tipped strands for a 'sheep in winter' vibe. You could also skip the hair topper entirely and leave the head smooth for a more modern, minimalist amigurumi aesthetic — it works surprisingly well as a simple round-faced character on its own. For gift-giving, personalize with a tiny crocheted flower or bow stitched near the ear area, or embroider a name or initial in tiny chain stitch on the back of the head for a truly one-of-a-kind keepsake.
There's something so satisfying about watching a simple magic ring transform into a perfectly round sheep face over 21 rounds — every increase and decrease round feels like a small victory as the shape rounds out beneath your hook. I love how the light beige yarn gives this sheep such a gentle, natural look right from the start, long before the hair even goes on. Placing those 8mm safety eyes is my favorite moment in any amigurumi project, and this one is no exception — it's the second the piece truly comes to life and starts staring back at you with personality. The separate hair piece is such a clever touch, letting you add texture and dimension without complicating the main head shaping. It's the kind of detail that makes people ask, 'wait, how did you DO that?' This pattern is compact enough to finish in a weekend but detailed enough to feel like a real accomplishment, and I promise the moment you stuff that head and feel it go firm and round in your hands, you'll be hooked on making a whole flock.
06 · QueriesQuestions logged against this build
What size will the finished sheep head be?
sport or DK weight yarn and a 2.0mm-2.5mm hook worked over 21 rounds, expect a compact head roughly palm-sized, perfect for holding or displaying on a shelf. Exact size will vary slightly based on your personal tension.
Can I use worsted weight yarn instead of sport or DK weight?
Yes, but you'll need to size up your hook accordingly (try a 3.5mm-4mm) and expect a noticeably larger finished head since the stitch counts stay the same. This works great if you want a bigger, huggable version of the sheep.
Do I need to use safety eyes, or can I embroider the eyes instead?
Safety eyes give this sheep its classic wide-eyed amigurumi look and are securely locked in place, which is great for toys given to children. If you prefer, you can absolutely embroider the eyes with black embroidery thread using a simple satin stitch for a softer, more heirloom look.
How do I attach the hair piece to the head?
Once both pieces are complete, pin the hair piece to the top of the head in your desired position, checking it looks centered from the front and sides. Sew it in place using a yarn needle and matching yarn with small, even whip stitches around the edge.
Is this pattern suitable for a beginner crocheter?
This pattern works best if you're already comfortable with magic rings, single crochet, increases, and decreases, since the head involves 21 rounds of careful shaping. A confident beginner who has completed a smaller amigurumi project before should be able to tackle this successfully.
Original pattern: https://onrecip.com/free-crochet-patterns-tutorials-cute-crochet-sheep-amigurumi/
07 · Made byWho counted this one

Who writes Amigurumi Addict, how a build gets its number, and why every round on the site carries a stitch count.
08 · Next off the benchThree builds that sit near this one

Animals
Crochet a bunny or frog from one amigurumi base
How do you crochet a bunny and a frog from one base? Share Legs, Body, and Head; swap ears or eyes.

Animals
Crochet giraffe amigurumi pattern with horns and ears
How do you crochet a giraffe amigurumi? Shape head, body, legs, ears and horns in worsted yarn.

Animals
Amigurumi cat crochet pattern with oval muzzle and bow
How do you crochet an amigurumi cat with a flat muzzle? Shape it separately, pinch it, then sew it on.
Join the build log
One message when a build is issued
A drawing and its parts list, when one leaves the bench.