| Shelf | Level | Time | Hook | Yarn |
|---|---|---|---|---|
| Animals | Intermediate | 4-6 hours | 4.0 mm | Bulky |
How to crochet a plush lamb amigurumi toy
How do you crochet a plush lamb amigurumi? Build the head, ears, and body, then whip-stitch to assemble.
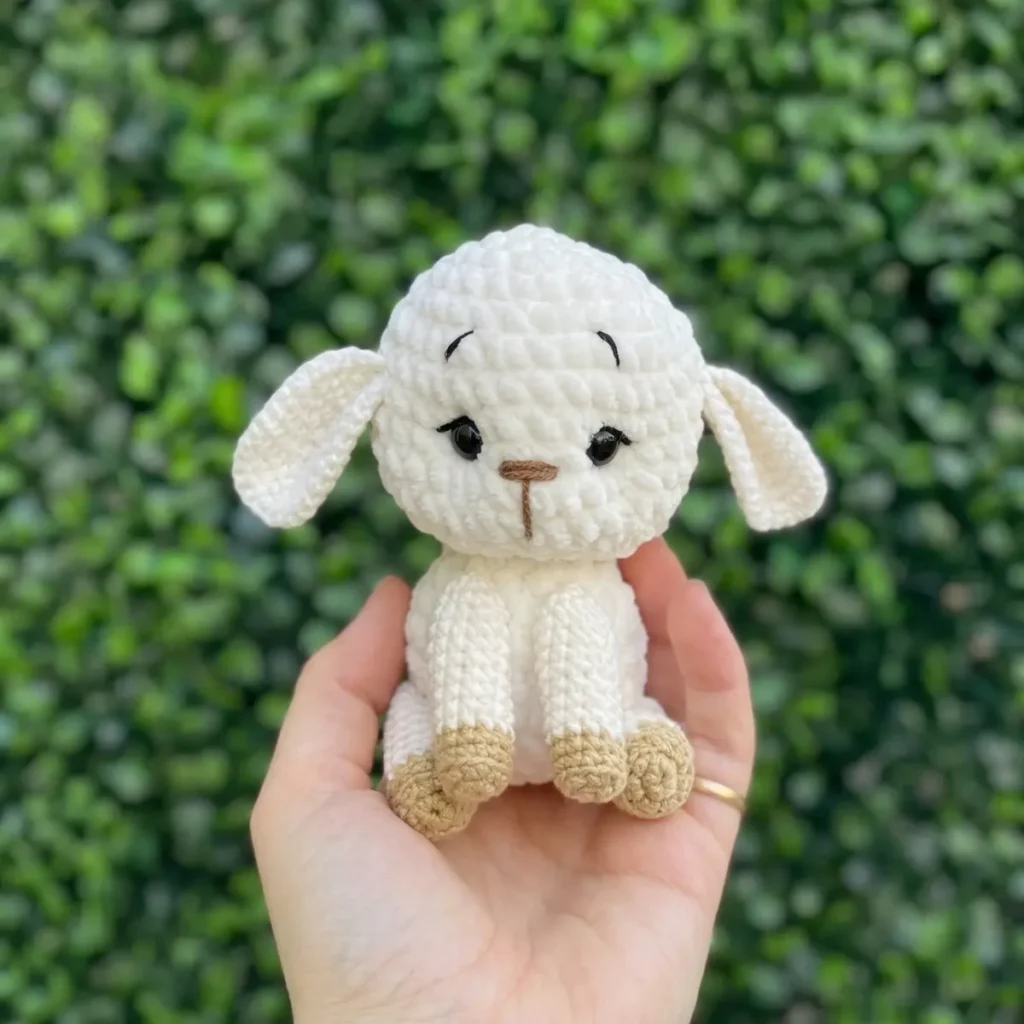
01 · The pieceWhat How to crochet a plush lamb amigurumi toy actually is
The lamb builds from three worked pieces: a head shaped over 14 rounds from a 6-stitch magic ring, two ears crocheted separately in a thinner cotton-blend yarn, and a body. Polyfill stuffing gives the plush yarn its volume from the inside, while a whip stitch closes the head onto the body at assembly and secures each ear in place. Nothing about the join is decorative — it is the only thing holding the three pieces together as one figure.
Gauge is not fixed to a number here, but tension is: a loose hand lets stuffing show through the plush yarn, so rounds should sit tight. Round tracking matters more than usual since the piece works in continuous spirals with no joining slip stitch — a stitch marker is not optional. Ear placement, by contrast, is exact: 5 stitches out from the safety eye and 1 stitch up, measured on both sides for symmetry, matters far more than the round count used to get there.
02 · The count run23 rounds across 3 parts, each with its count
US terms throughout. Every row below ends with the count that round finishes on.
| Part | Qty | Finishes on |
|---|---|---|
| Head | 1 | (12) |
| Ears (Make 2) | 1 | - |
| Body | 1 | (18) |
Work with white plush yarn and 4.0 mm hook.
| Round | Instruction | Count |
|---|---|---|
| Round 1 | 6 sc in magic ring (6) | - |
| Round 2 | (inc) \*6 (12) | - |
| Round 3 | (1 sc, inc) \*6 (18) | - |
| Round 4 | 1 sc, inc, (2 sc, inc) \*5, 1 sc (24) | - |
| Round 5 | (3 sc, inc) \*6 (30) | - |
| Round 6 | 2 sc, inc, (4 sc, inc) \*5, 2 sc (36) | - |
| Rounds 7–10 | 36 sc each round (4 rounds) | (36) |
| Round 11 | 2 sc, dec, (4 sc, dec) \*5, 2 sc (30)Insert safety eyes between Rnds 8 and 9, leaving 4 visible stitches between them. | - |
| Round 12 | (3 sc, dec) \*6 (24)Begin stuffing the head firmly at this point. | - |
| Round 13 | 1 sc, dec, (2 sc, dec) \*5, 1 sc (18) | - |
| Round 14 | (1 sc, dec) \*6 (12), sl stFasten off, leaving a long tail for sewing. | (12) |
Work with white cotton-blend yarn and 2.0 mm hook.
| Round | Instruction | Count |
|---|---|---|
| Round 1 | 6 sc in magic ring (6) | - |
| Round 2 | (inc) \*6 (12) | - |
| Round 3 | (1 sc, inc) \*6 (18) | - |
| Round 4 | (2 sc, inc) \*6 (24) | - |
| Round 5 | (3 sc, inc) \*6 (30) | - |
| Round 6 | (4 sc, inc) \*6 (36)Fold the ear in half so the edges meet. Work 2 sl st across the open edge to close the flat base of the ear. | - |
Work with white plush yarn and 4.0 mm hook.
| Round | Instruction | Count |
|---|---|---|
| Round 1 | 6 sc in magic ring (6) | - |
| Round 2 | (inc) \*6 (12) | - |
| Round 3 | (1 sc, inc) \*6 (18) | - |
| Round 4 | 1 sc, inc, (2 sc, inc) \*5, 1 sc (24) | - |
| Rounds 5–8 | 24 sc each round (4 rounds)Stuff the body firmly before closing. | (24) |
| Round 9 | 1 sc, dec, (2 sc, dec) \*5, 1 sc (18), sl stFasten off. | (18) |
Techniques on this build
- Magic ring start
- Opens Rnd 1 of the head at 6 sc; keep the tail taut so the center hole closes fully once stuffed.
- Continuous spiral rounds
- The head works without joining or turning across all 14 rounds; drift in the round start is easy to miss without a stitch marker.
- Whip stitch seaming
- Joins the head to the body and each ear to the head; uneven spacing here shows as a lumpy or crooked seam on a plush surface.
- Facial embroidery
- Nose, lashes, and brows go on in black embroidery thread after stuffing; pull too tight and the plush fabric puckers around the stitches.
Final fit-up
- Weave in ends: secure all yarn tails except the head's long tail, which stays free for the whip-stitch join to the body.
- Stuff: pack the head and body firmly with polyfill before closing, working filler toward the outer curve so the plush yarn doesn't show gaps.
- Close: work the head's final round to a close, cinch the opening tight, and fasten off before positioning it against the body.
- Attach: whip stitch the head onto the body, sew the ears using the eye-relative placement, then embroider the nose, lashes, and brows.
How the parts fit
- Rnd 2 doubles the 6-stitch magic ring foundation to 12 stitches through single increases, the standard opening shape for a rounded amigurumi head worked in continuous spiral.
- Ears are worked separately in cotton-blend yarn on a 2.0 mm hook, a finer setup than the 4.0 mm plush-yarn hook used for the head and body, producing a denser fabric that holds a flatter shape against the plush surface.
- Head and body are worked as two closed pieces and united only at assembly, where a whip stitch runs the full circumference of the head's base rather than through a shared round.
Scaling the build
| Larger | Move to a bulkier plush yarn with a correspondingly larger hook above 4.0 mm; the head and body grow in diameter while the stitch counts as written stay the same. |
|---|---|
| Smaller | Drop to a lighter-weight yarn and a smaller hook than 4.0 mm; the same stitch counts produce a more compact lamb. |
| Taller head or body | Repeat one round in the straight, non-increasing section of the head or body before the decreases begin; this adds height without changing the width the increase rounds already set. |
03 · Putting it togetherHow the pieces go together
- S1
Attach the head to the body. Thread the long tail from the head onto your tapestry needle. Align the head on top of the body, centering it carefully. Use a whip stitch to sew all the way around the base of the head, joining it securely to the top of the body. Weave in the end invisibly inside the body.
- S2
Attach the ears. Position each ear on the side of the head between Rnds 7 and 8, measuring 5 stitches out from the nearest safety eye and shifting 1 stitch upward for a natural look. Sew each ear down firmly with the long tail, stitching through the base of the folded ear and catching multiple stitches on the head.
- S3
Finish embroidery. Once all pieces are attached, complete any remaining facial embroidery — nose, vertical nose line, lashes, and brows. Use black Iris thread or similar embroidery thread for crisp, defined lines. Knot and bury thread ends inside the head to hide them.
- S4
Final check. Gently squeeze and shape all parts to ensure stuffing is even. Trim any loose yarn ends.
04 · Snag listWhat went wrong on the bench, and the fix
Snag 1
Losing the round start
Place a stitch marker in the first stitch of Rnd 1 and move it up each round; the spiral has no join to signal where a round begins.
Snag 2
Loose magic ring center
Pull the starting tail tight before working Rnd 2 so no hole remains at the top of the head once stuffed.
Snag 3
Positioning ears before the eyes
Set the safety eyes first, then measure each ear 5 stitches out from the nearest eye and 1 stitch up for a matched, symmetrical placement.
05 · QueriesQuestions logged against this build
Is this Lamb pattern suitable for beginners?
This pattern is best suited for confident beginners or intermediate crocheters. You should be comfortable working single crochet in continuous spirals, performing increases and decreases, and working with two different yarn weights. The embroidery and assembly steps are straightforward but do require a little patience to achieve a neat finish.
Can I substitute the plush yarn for a different brand?
Yes, any bulky or super-bulky plush chenille yarn will work as a substitute for the Himalaya Dolphin Baby. Look for a yarn with a similar weight and texture, and adjust your hook size as needed to maintain a firm gauge. Keep in mind that different plush yarns vary in how much the fibers obscure the stitches, so your finished Lamb may look slightly different depending on the brand you choose.
How big will the finished Lamb be?
Using the recommended Himalaya Dolphin Baby plush yarn with a 4.0 mm hook, the finished Lamb is approximately 10–12 cm (4–5 inches) tall. If you use a thicker plush yarn or a larger hook, the Lamb will be proportionally larger. Swapping to a thinner yarn with a smaller hook will produce a miniature version.
How long does this Lamb take to crochet?
Most crocheters with intermediate experience can complete this Lamb in 2–4 hours, including assembly and embroidery. The head is the most time-intensive piece due to the increase and decrease rounds, while the body and ears are quick to finish. Setting aside a relaxed afternoon is usually enough to complete the whole project in one sitting.
06 · Made byWho counted this one

Who writes Amigurumi Addict, how a build gets its number, and why every round on the site carries a stitch count.
07 · Next off the benchThree builds that sit near this one

Animals
Crochet a bunny or frog from one amigurumi base
How do you crochet a bunny and a frog from one base? Share Legs, Body, and Head; swap ears or eyes.

Animals
Crochet giraffe amigurumi pattern with horns and ears
How do you crochet a giraffe amigurumi? Shape head, body, legs, ears and horns in worsted yarn.

Animals
Amigurumi cat crochet pattern with oval muzzle and bow
How do you crochet an amigurumi cat with a flat muzzle? Shape it separately, pinch it, then sew it on.
Join the build log
One message when a build is issued
A drawing and its parts list, when one leaves the bench.