| Shelf | Level | Time | Hook | Yarn |
|---|---|---|---|---|
| Animals | Intermediate | 4-6 hours | 5 mm | Worsted |
Crochet hippo lovey: a soft amigurumi baby gift
How do you crochet a hippo lovey? Work head, ears, arms and legs in spiral rounds, finished at 45cm.
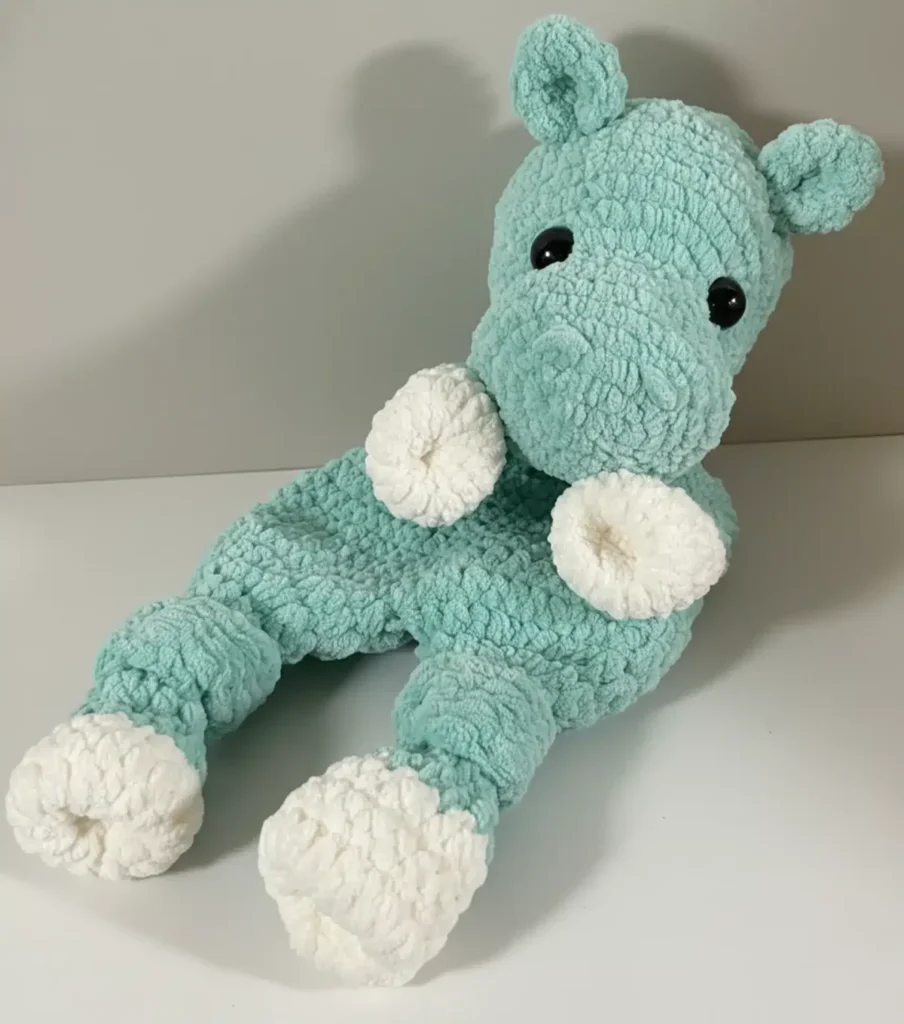
01 · The pieceWhat Crochet hippo lovey: a soft amigurumi baby gift actually is
Precision matters at two points: the 8-stitch gap left between the ears when pinning them between rounds 16 and 17 of the head, and the 3-stitch spacing marked for the nostril embroidery between rounds 4 and 5 of the muzzle — both set the hippo's expression and symmetry. Elsewhere tolerance is looser; because the piece works in continuous spiral without joining or turning, minor stitch drift in the increase rounds is absorbed into the curve of the fabric and will not show once stuffed.
Maintaining consistent tension throughout your project is key to achieving a professional-looking finished product. If you're a tight crocheter, consider going up a hook size. If you crochet loosely, drop down a hook size to ensure your stitches don't show gaps where the stuffing could peek through.
While the pattern calls for gray and dark gray, feel free to get creative! Pink, blue, purple, or even a rainbow-colored hippo can be just as adorable. Just make sure any yarn you choose is baby-safe and washable.
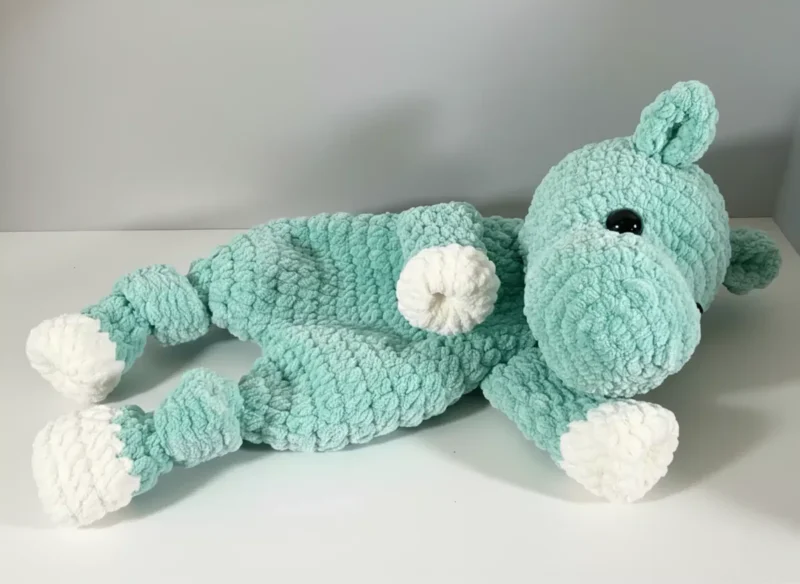
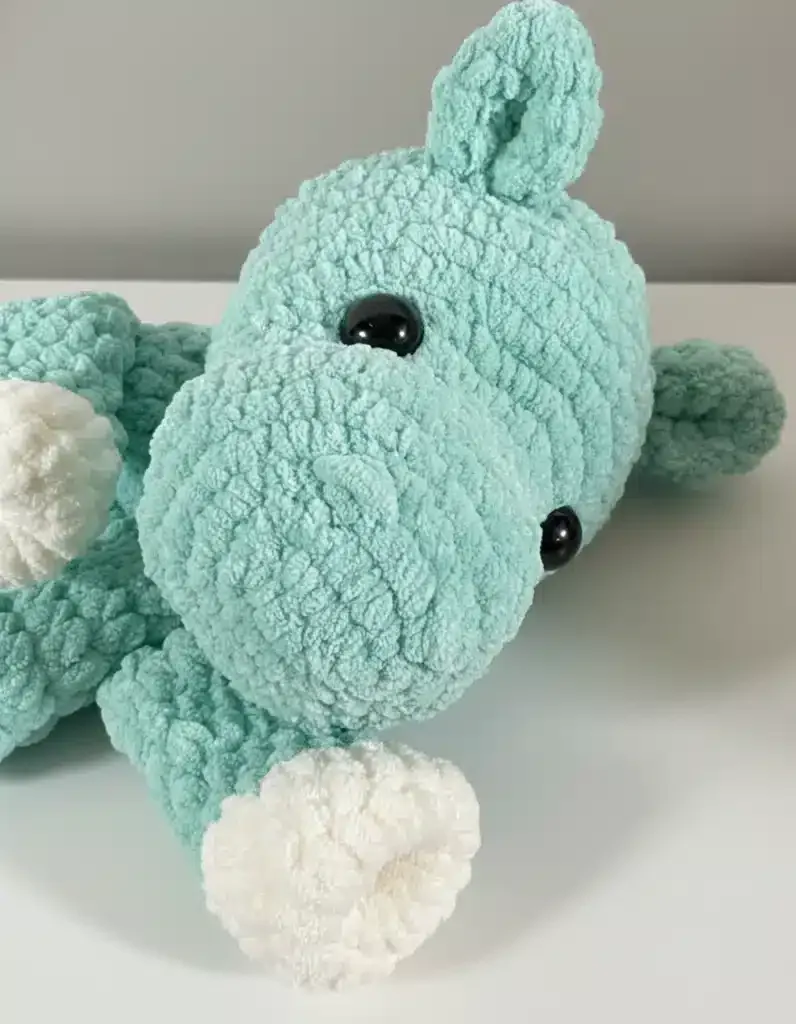
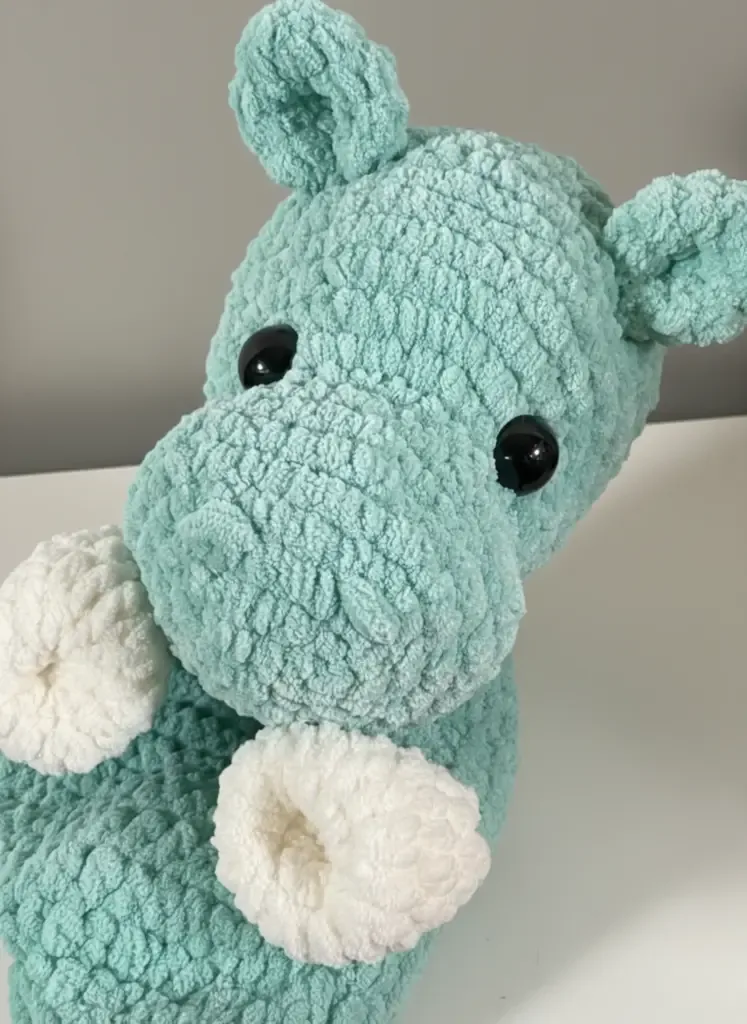
02 · The count run21 rounds across 4 parts, each with its count
US terms throughout. Every row below ends with the count that round finishes on.
| Part | Qty | Finishes on |
|---|---|---|
| Creating the Hippo Head | 1 | - |
| Crafting the Ears (Make 2) | 1 | (15) |
| Making the Arms (Make 2) | 1 | - |
| Constructing the Legs and Body | 1 | - |
Start with your gray yarn and 5mm hook.
Foundation: Begin with a chain of 6 stitches.
| Round | Instruction | Count |
|---|---|---|
| Round 1 | Starting in the second chain from the hook, work 4 single crochets, then place 3 single crochets into the last chain. Turn your work and continue on the other side of the foundation chain with 3 single crochets, finishing with 2 single crochets into the last loop. You should have 12 stitches total.Rounds 2-5: Continue working in continuous spirals, increasing strategically: | - |
| Round 2 | Increase to 18 stitches | - |
| Round 3 | Increase to 24 stitches | - |
| Round 4 | Increase to 30 stitches | - |
| Round 5 | Increase to 36 stitchesRounds 6-7: Work 36 single crochets around for 2 rounds (no increases). | - |
Shaping the Muzzle:
Rounds 8-12 involve strategic increases and decreases to create the hippo's distinctive rounded muzzle:
| Round | Instruction | Count |
|---|---|---|
| Round 8 | Decrease to 30 stitchesRound 9: Work even at 30 stitches | - |
| Round 10 | Increase to 35 stitches (focusing increases on the muzzle area) | - |
| Round 11 | Increase to 41 stitches | - |
| Round 12 | Increase to 45 stitchesMaintaining Shape: Rounds 13-18: Work 45 single crochets for 6 rounds. | - |
Installing the Eyes:
Between rounds 10 and 11, position the safety eyes 12 stitches apart. Before continuing, stuff the head lightly with fiberfill. Take your time with this step, adding small amounts of stuffing at a time to achieve the perfect shape.
Closing the Head:
| Round | Instruction | Count |
|---|---|---|
| Rounds 19–26 | gradually decrease: Work your way down from 42 stitches to just 6 stitches Cut the yarn leaving a few inches, thread through the outside loops of the remaining 6 stitches, and pull tight to close | - |
Use your fingers to gently press the eyes inward so they sit slightly sunken for a more realistic appearance
Using gray yarn:
| Round | Instruction | Count |
|---|---|---|
| Round 1 | Create 5 single crochets in a magic ring | - |
| Round 2 | Increase each stitch (10 stitches) | (10) |
| Round 3 | Work increase pattern (15 stitches)Rounds 4-5: Work 15 single crochets for 2 rounds To finish, fold the ear in half and crochet through both layers with 7 single crochets. Leave a long tail for sewing. | (15) |
Start with dark gray yarn: Rounds 1-3: Create the paw
| Round | Instruction | Count |
|---|---|---|
| Round 1 | 6 half double crochets in magic ring | - |
| Round 2 | Increase to 12 stitches | - |
| Round 3 | Increase to 18 stitchesRounds 4-5: Work 18 half double crochets for 2 rounds Switch to gray yarn: | - |
| Round 6 | Decrease to 12 stitchesRounds 7-11: Work 12 half double crochets for 5 rounds The arms should not be stuffed. Fold each arm in half and crochet through both layers with 6 single crochets. Leave a long tail for sewing. | - |
This is where your hippo lovey comes together! Start with dark gray yarn: Creating the First Leg: Rounds 1-5: Follow the same pattern as the arms (rounds 1-5) Switch to gray yarn
| Round | Instruction | Count |
|---|---|---|
| Rounds 6–7 | Decrease and shape the leg (12 stitches, then 9 stitches)Rounds 8-19: Work 9 half double crochets for 12 rounds | - |
| Rounds 20–22 | Increase to create the body opening (12, then 18, then 24 stitches) Fasten off the first leg. The legs should not be stuffed.Creating the Second Leg: Repeat rounds 1-22 for the second leg, but do not fasten off. | - |
Connecting the Legs:
| Round | Instruction | Count |
|---|---|---|
| Round 23 | Connect both legs by working 1 half double crochet, then 23 half double crochets around the first leg and 24 half double crochets around the second leg (48 stitches total). You may notice a small hole between the legs—this can easily be sewn closed later. Gently tie a loose knot in each leg to define them.Shaping the Body: Rounds 24-29: Work 48 half double crochets for 6 rounds | - |
| Rounds 30–37 | Gradually decrease from 42 stitches down to 18 stitches | - |
Finishing the Body:
If needed, work additional stitches to position yourself at the side of your work. Fold the body detail in half and crochet 9 single crochets through both layers. Leave a long tail for sewing.
Techniques on this build
- Magic ring start
- Opens round 1 of both the ears (5 sc) and the arm paws (6 hdc) — cinch the center closed fully or a hole will show at the tip.
- Continuous spiral (no join, no turn)
- Used throughout the head, ears, arms and legs/body — place a stitch marker in the first stitch of each round since there is no slip stitch to mark it for you. The toy is crocheted in continuous spirals without joining the rounds; do not turn or slip stitch unless specifically instructed in the pattern.
- Working both sides of a foundation chain
- Head round 1 works 4 sc + 3 sc into the last chain, turns, then 3 sc + 2 sc down the other side to reach 12 stitches — miscounting either side throws off every increase round after it.
Final fit-up
- Weave in ends on the head, ears, and paw color-change points before any assembly begins.
- When stuffing the head, less is more — add small amounts of fiberfill at a time, distributing it evenly as the spiral rounds narrow toward the top. Overstuffing can distort the shape and make it difficult to close the opening neatly.
- Close the head's final rounds by cinching the last stitches tight, and close each ear by folding it in half and single crocheting through both layers with 7 sc.
- Pin and sew the ears between rounds 16 and 17 with 8 stitches of space between them, then attach the arms and legs/body in the same pinned-then-sewn order.
- Hand wash in cool water with mild detergent. Gently squeeze out excess water (do not wring). Lay flat to dry, reshaping as needed. Avoid machine washing, as it may felt the yarn or damage the safety eyes.
How the parts fit
- The head starts from a chain-6 foundation instead of a magic ring, giving round 1 an oval count (4 sc + 3 sc, turn, 3 sc + 2 sc = 12 stitches) that sets the elongated muzzle shape before the spiral increases take over.
- The ears increase for two rounds (5 → 10 → 15 stitches), then work flat for rounds 4-5 before being folded and seamed shut with 7 sc — a fold-and-seam closure rather than a decreased, closed sphere.
- The arm's color change from dark gray to gray falls exactly where the paw's stitch count stops increasing and holds steady at 18 for rounds 4-5, keeping the join on a plain round instead of mid-increase.
Scaling the build
| Smaller | Drop to a finer yarn with a hook smaller than 5mm; every listed round tightens, shrinking the finished size below 45cm while keeping the same stitch counts. |
|---|---|
| Adjust proportions | Repeat the flat rounds an extra time — the 15-sc rounds on the ears or the 18-hdc rounds on the arm — to lengthen those parts slightly without altering the increase rounds that set their stitch counts. |
03 · Putting it togetherHow the pieces go together
- S1
Attaching the Ears: Position the ears between rounds 16 and 17 of the head, with 8 stitches of space between them. Secure with pins first to ensure proper placement, then sew them in place. Weave in all yarn ends.
- S2
Creating the Nostrils: Add character to your hippo by embroidering nostrils: Mark points with pins between rounds 4 and 5 of the muzzle
- S3
Space the points 3 stitches apart
- S4
Using black embroidery thread, make 3-4 stitches from one pin to the other
- S5
Weave in the ends
- S6
Embroidering the Eyebrows: Using black embroidery thread: Mark points with pins between rounds 13 and 14
- S7
Space them 8 stitches apart
- S8
Embroider simple eyebrows above each eye
- S9
Weave in all ends
- S10
Attaching the Head: This is the most crucial assembly step: Position the head on the body between rounds 13 and 14
- S11
Ensure the eyes are facing straight ahead
- S12
Make sure the right side of the lovey is facing you
- S13
Pin securely, then sew the head to the body
- S14
Weave in all yarn ends
- S15
Adding the Arms: Finally, attach the arms between rounds 31 and 35 of the body. Secure them with pins first, ensuring they're symmetrically placed, then sew them on. Weave in all remaining yarn ends.
04 · Snag listWhat went wrong on the bench, and the fix
Snag 1
Losing track of the spiral round
Place a stitch marker in the first stitch of every round and move it up each time, since the piece has no slip stitch join to mark the boundary.
Snag 2
Miscounting the second side of the foundation chain
Count stitches on each side of the chain-6 separately before continuing, to confirm round 1 of the head lands on exactly 12 stitches.
Snag 3
Loose or uneven ear fold seam
Pin the fold before working the 7 sc through both layers, and keep the tension of those stitches matched to the rest of the piece.
Snag 4
Nostril placement drifting off-center
Mark both pin points before embroidering, spacing them 3 stitches apart between rounds 4 and 5 of the muzzle, so the two nostrils land symmetrically.
05 · QueriesQuestions logged against this build
Are the safety eyes appropriate for a newborn gift?
The pattern calls for 16mm plastic safety eyes that lock in place, but any small hard part carries risk for very young infants. Some makers substitute embroidered eyes in black thread for a fully soft alternative.
Why does the head start from a chain instead of a magic ring?
The chain-6 foundation lets round 1 build an oval base (12 stitches) rather than a circle, which gives the head and muzzle their elongated shape before the spiral increases begin.
06 · Made byWho counted this one

Who writes Amigurumi Addict, how a build gets its number, and why every round on the site carries a stitch count.
07 · Next off the benchThree builds that sit near this one

Animals
Crochet a bunny or frog from one amigurumi base
How do you crochet a bunny and a frog from one base? Share Legs, Body, and Head; swap ears or eyes.

Animals
Crochet giraffe amigurumi pattern with horns and ears
How do you crochet a giraffe amigurumi? Shape head, body, legs, ears and horns in worsted yarn.

Animals
Amigurumi cat crochet pattern with oval muzzle and bow
How do you crochet an amigurumi cat with a flat muzzle? Shape it separately, pinch it, then sew it on.
Join the build log
One message when a build is issued
A drawing and its parts list, when one leaves the bench.