| Shelf | Level | Time | Hook | Yarn |
|---|---|---|---|---|
| Animals | Beginner | 3-4 Hours | 2 mm | DK |
How to Crochet a Hippo Amigurumi for Your Baby
Crochet an adorable hippo amigurumi with DK yarn and a 2.5mm hook. This baby-safe softie works up in separate pieces you sew together with love.
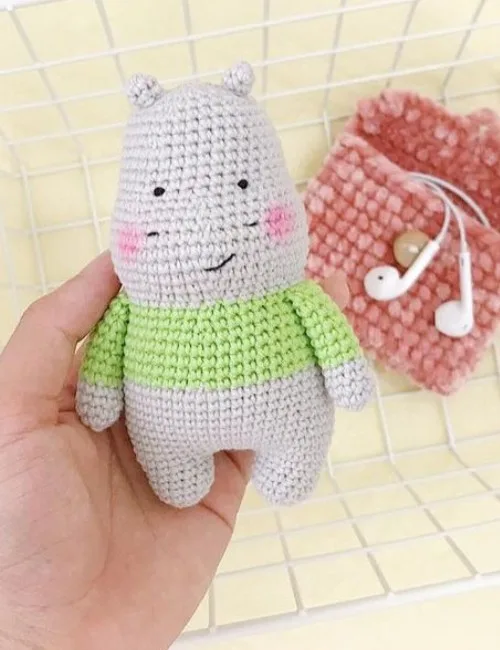
01 · The pieceWhat How to Crochet a Hippo Amigurumi for Your Baby actually is
This pattern brings to life the sweetest little hippo amigurumi, worked in soft sport or DK weight yarn and finished with tiny 5mm safety eyes and hand-embroidered details. What makes it so charming is its simplicity — a plump 21-round body surrounded by adorably small legs, arms, and ears, each crocheted separately and sewn into place. It's perfect for anyone who loves quick, satisfying animal makes, and especially for crocheters preparing a handmade gift for a new baby or a toddler who needs a pocket-sized friend.
Skill-wise, this is a wonderfully approachable make. You'll work standard amigurumi rounds with a small 2mm-2.5mm hook, which keeps the fabric dense so no fiberfill peeks through. The tiny legs, arms, and ears are each just three rounds, so they practically fly off the hook, while the 21-round body gives you a longer, relaxing stretch of rhythmic stitching. If you're comfortable with basic increases and decreases worked in the round, you're completely ready. Most crocheters will finish this hippo in a single cozy evening — roughly three to four hours from first loop to final seam.
The finished hippo is a compact, huggable softie with a rounded belly that's just right for little hands to hold. Worked in Yarnart Jeans or a similar cotton-blend DK, the fabric feels smooth, squishy, and gently structured — sturdy enough for daily cuddles yet soft against delicate skin. The small safety eyes and embroidered face details give it a calm, friendly expression that suits a nursery shelf beautifully. It makes an unforgettable baby-shower or first-birthday gift, and it looks adorable posed beside your other amigurumi animals too.
- Gather your sport or DK yarn, a 2mm to 2.5mm hook, safety eyes, fiberfill, black embroidery thread, and a yarn needle.
- Start with the two little legs, finishing each one in just three quick rounds.
- Crochet the body over twenty-one rounds, shaping the hippo's plump belly as you work.
- Set the small safety eyes in place and lock their backings while you can still reach inside the body.
- Stuff the body firmly with fiberfill, adding small pinches at a time for a smooth, even shape.
- Make the two tiny arms and two ears, each complete in only three rounds.
- Pin every piece onto the stuffed body, check the hippo from all angles, then sew each one on securely.
- Embroider the face details with black thread, weave in your ends, and your hippo is ready for cuddles.
02 · The count run30 rounds across 4 parts, each with its count
US terms throughout. Every row below ends with the count that round finishes on.
| Part | Qty | Finishes on |
|---|---|---|
| Leg – 2 | 1 | - |
| Body | 1 | - |
| Arm – 2 | 1 | - |
| Ear – 2 | 1 | - |
| Round | Instruction | Count |
|---|---|---|
| Round 1 | 7sc in MR (7) | - |
| Round 2 | 7-inc (14) | - |
| Round 3-4 | (4 rnds) 14sc (14)make the 2nd leg in the same way. | - |
| Round | Instruction | Count |
|---|---|---|
| Round 1 | (5sc, inc) * 6 (42) | - |
| Round 2 | (6sc, inc) * 6 (48)Rnd 3-11. (9 rnds) 48sc (48) change to green | - |
| Round 12 | (10sc, dec) * 4 (44) Rnd 13-15. (3 rnds) 44sc (44) | - |
| Round 16 | (9sc, dec) * 4 (40) Rnd 17. 40sc (40)change to grey, | - |
| Round 18 | (8sc, dec) * 4(36) | - |
| Round 19 | 9sc, inc, (3sc, inc) * 4, 10sc (41) | - |
| Round 20 | 10sc, inc, (4sc, inc) * 4, 10sc (46) | - |
| Round 21 | 46sc (46) | - |
| Round 22 | 17sc, inc, (5sc, inc) * 2, 16sc (49) Rnd 23-24. (2rnds) 49sc (49) | - |
| Round 25 | 17sc, dec, (5sc, dec) * 2, 16sc (46) | - |
| Round 26 | 46sc (46) | - |
| Round 27 | 11sc, dec, (4sc, dec) * 4, 9sc (41) | - |
| Round 28 | 16sc, dec, 8sc, dec, 13sc (39) insert the eyes at round 28,29. 6sc apart. | - |
| Round 29-32 | (4rnds) 39sc (39) | - |
| Round 33 | (11sc, dec) * 3 (36) | - |
| Round 34-35 | (2rnds) 36sc (36) | - |
| Round 36 | (4sc, dec) * 6 (30) | - |
| Round 37 | (3sc, dec) * 6 (24) | - |
| Round 38 | (2sc, dec) * 6 (18) | - |
| Round 39 | (sc, dec) * 6 (12) | - |
| Round 40 | 6-dec (6)cut the yarn and weave in the end | - |
| Round | Instruction | Count |
|---|---|---|
| Round 1 | 5sc in MR (5) Rnd 2.5-inc (10) | - |
| Round 3-5 | (3 rnds) 10sc (10)change to green | - |
| Round 6-12 | (7 rnds) 10sc (10)slst. Cut the yarn, leave long tail for sewing | - |
| Round | Instruction | Count |
|---|---|---|
| Round 1 | 5sc in MR (5) | - |
| Round 2 | 5sc (5) | - |
| Round 3 | 4sc, slst in the last stitch cut the yarn, leave long tail for sewing Little Hippo is ready. | - |
03 · Before it goes to a childWhat has to be right, and what is allowed to drift
- 💡 Test your tension before starting: work a few rounds with your 2mm-2.5mm hook and make sure the fabric is dense with no gaps. Your amigurumi gauge is usually much tighter than your normal crochet tension, so give your hands a few rounds to adjust.
- 💡 Keep a stitch marker in the first stitch of every round, especially through the long 21-round body — spirals have no visible round joins, and the marker is the only honest record of where you are.
- 💡 Stuff the body gradually as the opening narrows rather than all at once at the end. Push fiberfill in with small pinches, filling the base and belly firmly so the hippo sits up nicely.
- 💡 Insert the 5mm safety eyes and secure their backings before the body opening gets too small to reach inside — once it's closed, there's no going back without frogging.
- 💡 Leave a long yarn tail when you fasten off each leg, arm, and ear. Those tails become your sewing yarn, which saves you from joining new strands and gives cleaner, sturdier seams.
- 💡 If this hippo is for a baby under three, replace the safety eyes with eyes embroidered in the black embroidery thread, and tug firmly on every sewn-on piece after assembly to confirm nothing can come loose.
04 · Snag listWhat went wrong on the bench, and the fix
Snag 1
Using a hook that's too large for the yarn, so stuffing shows through the fabric.
Stick with the recommended 2mm-2.5mm hook even though it feels small for sport or DK yarn — that mismatch is intentional. Amigurumi fabric should be tight enough that you can't see fiberfill between stitches. If white flecks still peek through, drop down to the 2mm end of the range.
Snag 2
Losing your place in the 21-round body because amigurumi is worked in continuous spirals.
Place a stitch marker in the first stitch of every round and move it up as you go. With 21 rounds of shaping, one miscounted round throws off the hippo's proportions, and a marker plus a simple tally on paper keeps you exactly on track.
Snag 3
Stuffing and closing the body before inserting the 5mm safety eyes.
Safety eyes lock with a backing washer from the inside, so they must go in while you can still reach into the body — before it's fully stuffed and closed. Position them, check the face from the front, then snap the backs on firmly before you continue.
Snag 4
Overstuffing the tiny three-round legs, arms, and ears.
These pieces are only three rounds each and need just a whisper of fiberfill — or none at all for the ears, which look best flattened. Overstuffing stretches the stitches and makes the limbs look lumpy instead of chubby and cute.
Snag 5
Sewing the limbs and ears on without pinning first, ending up with a lopsided hippo.
Pin all six pieces — both legs, both arms, both ears — onto the stuffed body and look at it from the front, sides, and top before threading your yarn needle. Symmetry is everything on a face this simple, so adjust the pins until it feels right, then sew.
Snag 6
Embroidering the face details with regular yarn instead of the black embroidery thread.
DK yarn is far too bulky for delicate features on a small toy and will overwhelm the face. Use the black embroidery thread from the materials list, keep your stitches small, and anchor the ends securely inside the body so nothing can be picked loose.
05 · VariantsOther ways to issue this one
I have a soft spot for patterns built from small, separate pieces, and this hippo is exactly that kind of joy. The two legs, two arms, and two ears are only three rounds each — you finish one before your tea even cools, and that little rush of completion keeps you reaching for the next piece. Then the 21-round body settles you into that meditative amigurumi rhythm I love, round after round of dense, even stitches on a small hook. The Yarnart Jeans yarn the designer used is one of my favorites for baby toys: it's a smooth cotton blend that shows every stitch crisply and washes beautifully. My favorite moment, though, is assembly. Pinning those chubby limbs and sweet round ears onto the stuffed body is where the hippo's personality suddenly appears — shift an ear a few millimeters and the whole expression changes. Add the 5mm eyes and a few strands of black embroidery thread, and you've made a real little character.
06 · QueriesQuestions logged against this build
Can I use a different yarn than Yarnart Jeans?
Absolutely — any sport or DK weight yarn works beautifully here. Cotton-acrylic blends like Scheepjes Catona or Paintbox Cotton DK give the same smooth stitch definition, and a soft acrylic works too. Just keep the small hook so the fabric stays tight.
Why does the pattern call for such a small 2mm-2.5mm hook with DK yarn?
Amigurumi is always worked at a much tighter gauge than garments. The undersized hook creates a dense fabric that holds its shape and hides the fiberfill completely, which is exactly what you want for a stuffed toy.
Is this hippo actually safe to give to a baby?
Yes, with one adjustment: for children under three, embroider the eyes with the black embroidery thread instead of using the 5mm safety eyes. Sew every limb and ear on very securely, and choose a machine-washable yarn so the toy can be cleaned easily.
How big will my finished hippo be?
the recommended sport or DK yarn and small hook, this is a compact, hand-sized softie — the body is the largest piece at 21 rounds, with tiny three-round limbs and ears. Your exact size will vary a little with your yarn choice and personal tension.
Do I need advanced skills for the assembly since everything is made separately?
Not at all — sewing is honestly the friendliest part. You'll whip-stitch each piece on with a yarn needle using the tails you left when fastening off. Pin everything in place first, check the symmetry, and take your time; there's no crochet skill involved at that stage.
Original pattern: https://redagapeblog.com/crochet-hippo-amigurumi/
07 · Made byWho counted this one

Who writes Amigurumi Addict, how a build gets its number, and why every round on the site carries a stitch count.
08 · Next off the benchThree builds that sit near this one

Animals
Crochet a bunny or frog from one amigurumi base
How do you crochet a bunny and a frog from one base? Share Legs, Body, and Head; swap ears or eyes.

Animals
Crochet giraffe amigurumi pattern with horns and ears
How do you crochet a giraffe amigurumi? Shape head, body, legs, ears and horns in worsted yarn.

Animals
Amigurumi cat crochet pattern with oval muzzle and bow
How do you crochet an amigurumi cat with a flat muzzle? Shape it separately, pinch it, then sew it on.
Join the build log
One message when a build is issued
A drawing and its parts list, when one leaves the bench.