| Shelf | Level | Time | Yarn |
|---|---|---|---|
| Animals | Intermediate | 4-6 Hours | Worsted |
Crochet Giraffe Amigurumi — Free Pattern
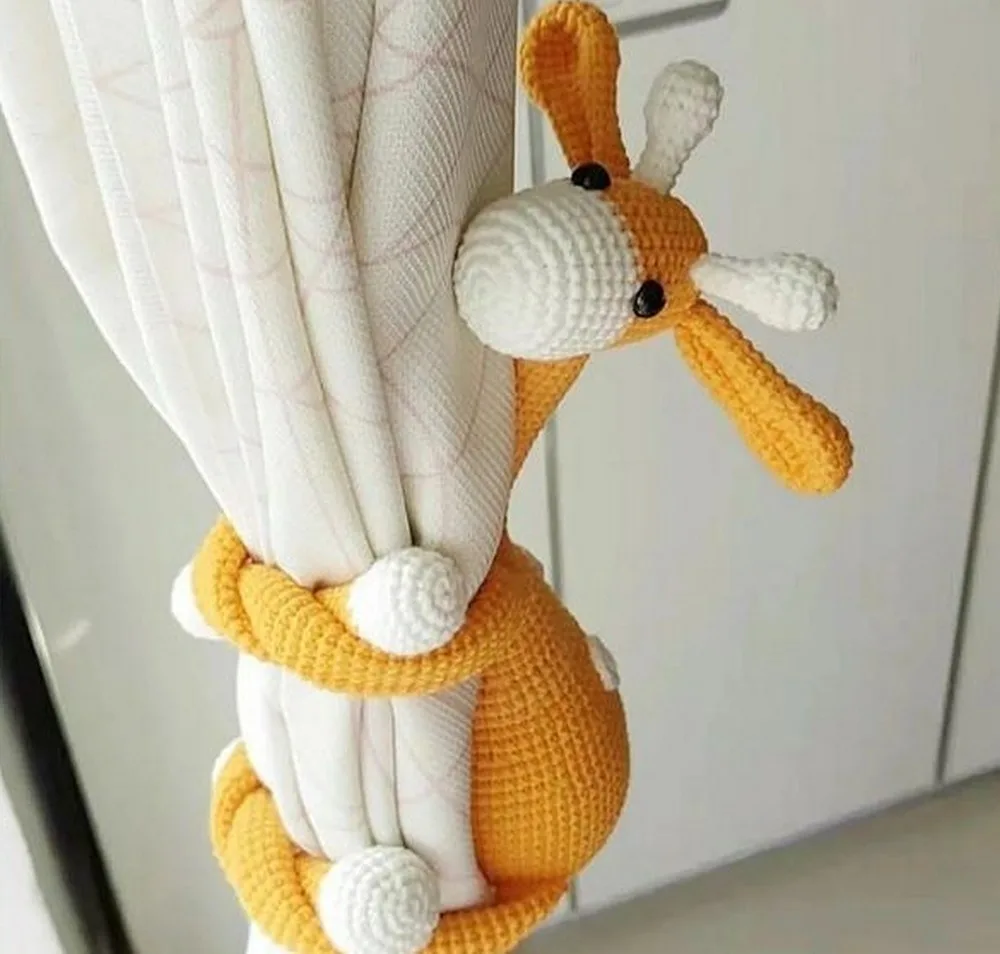
Free crochet giraffe amigurumi pattern in yellow and white yarn — antlers, ears, spots, arms, legs, head and body worked in continuous rounds with safety eyes.
01 · The pieceWhat Crochet Giraffe Amigurumi — Free Pattern actually is
This pattern makes a charming little giraffe with a soft, cuddly texture — a vibrant yellow body set off by white hands, feet, mouth and adorable antlers. It is written in US crochet terminology and worked entirely in continuous rounds, so there is no turning, no joining and no chart to follow: just a stitch marker and a running stitch count. Almost every round is single crochet with well-spaced increases and decreases, which is why it suits beginners and experienced makers equally well.
There are seven sets of instructions here: two antlers (9 rounds each), two ears (15 rounds), three little spots (2 rounds), two arms (42 rounds), two legs (49 rounds), the head (22 rounds) and the body (60 rounds). The arms and legs are not sewn on at the end — they are crocheted straight into the body, the legs at Rnd 11 and the arms at Rnd 36, so work and stuff those pieces before you begin the body. Several pieces start in white and change to yellow partway through: the head at Rnd 11, the arms at Rnd 9 and the legs at Rnd 11, which is what gives the giraffe its white muzzle, hands and feet.
The safety eyes go in between Rnd 11-12 of the head, 6 stitches apart, and the ears are sewn on between Rnd 18-19, also 6 stitches apart — those two placements do most of the work in giving the face its expression, so pin before you commit. Stuffing is added as you go rather than all at the end; the arm, leg and body instructions each mark the point where the piece starts to close and the stuffing should go in. The result is a super cute, elegant addition to collection, and a lovely baby shower gift or nursery shelf piece.
- Work the two white antlers over 9 rounds each, and the two yellow ears over 15 rounds — leave the ears unstuffed and flat.
- Make the head: white from the magic ring, increasing to 30 stitches, changing to yellow at Rnd 11.
- Fit the safety eyes between Rnd 11-12, 6 stitches apart, while the head is still open, then stuff and decrease it closed.
- Sew the ears on between Rnd 18-19, 6 stitches apart, and sew the two antlers to the top of the head.
- Crochet the two arms and two legs — white hands and feet, then long yellow tubes — stuffing at the marked point and closing each with 6sc.
- Start the yellow body, increasing to 60 stitches over ten rounds, then work the legs straight into Rnd 11.
- Stuff from Rnd 20 onward as you decrease, joining the arms into Rnd 36 and carrying on up the neck to Rnd 60.
- Sew the head to the top of the neck and add the three white spots to finish your giraffe.
02 · The count run67 rounds across 7 parts, each with its count
US terms throughout. Every row below ends with the count that round finishes on.
| Part | Qty | Finishes on |
|---|---|---|
| Antler x2 | 2 | (6) |
| Head | 1 | (6) |
| Ear x2 | 2 | (12) |
| Spot x3 | 3 | (12) |
| Arm x2 | 2 | (12) |
| Leg x2 | 2 | (12) |
| Body | 1 | (18) |
Make two antlers, both worked entirely in white from a magic ring. They are the giraffe's little ossicones and take only 9 rounds each, so they work up in a few minutes. Leave a long tail on each one for sewing them to the top of the head.
| Round | Instruction | Count |
|---|---|---|
| Round 1 | White, 6sc in MR [6] | (6) |
| Round 2 | 6inc [12] | (12) |
| Round 3-5 | 12sc [12] | (12) |
| Round 6 | 6dec [6] | (6) |
| Round 7-9 | 6sc [6] | (6) |
The head starts in white for the muzzle and changes to yellow at Rnd 11. Rounds 1-5 increase to 30 stitches, rounds 6-19 hold that count straight, and rounds 20-22 decrease it back down to close.
| Round | Instruction | Count |
|---|---|---|
| Round 1 | White, 6sc in MR [6] | (6) |
| Round 2 | 6inc [12] | (12) |
| Round 3 | (sc, inc) * 6 [18] | (18) |
| Round 4 | (sc, inc, sc) * 6 [24] | (24) |
| Round 5 | (3sc, inc) * 6 [30] | (30) |
| Round 6-10 | 30sc [30] | (30) |
| Round 11-19 | Yellow, 30sc [30] | (30) |
Step by step: put the safety eyes in between Rnd 11-12, 6sts apart. Do this while the head is still open and unstuffed — the washers cannot be removed once they are pushed on.
| Round | Instruction | Count |
|---|---|---|
| Round 20 | (3sc, dec) * 6 [24] | (24) |
| Round 21 | (sc, dec, sc) * 6 [18] | (18) |
| Round 22 | (sc, dec) * 6 [12] | (12) |
| Round 22 (cont.) | 6dec [6]Step by step: stuff the head firmly before the final decrease round closes it, keeping it round and even. The source numbers both closing rounds as Rnd 22 — work them in the order shown, decreasing from 18 to 12 stitches and then to 6. | (6) |
Make two ears, worked in yellow throughout. They increase to 18 stitches, run straight for four rounds, then decrease to 12 and carry on as a soft flat tube. Do not stuff them — they should stay flat enough to sew neatly against the head.
| Round | Instruction | Count |
|---|---|---|
| Round 1 | Yellow, 6sc in MR [6] | (6) |
| Round 2 | 6inc [12] | (12) |
| Round 3 | (sc, inc) * 6 [18] | (18) |
| Round 4-7 | 18sc [18] | (18) |
| Round 8 | (sc, dec) * 6 [12] | (12) |
| Round 9-15 | 12sc [12]Step by step: sew the ears to the head between Rnd 18-19, 6sts apart. Pin both in place and check them from the front before you stitch, so they sit level either side of the face. | (12) |
Make three little white spots. Each is just two rounds — a magic ring and one increase round — giving a flat circle of 12 stitches. Leave a tail long enough to sew each one on.
| Round | Instruction | Count |
|---|---|---|
| Round 1 | White, 6sc in MR [6] | (6) |
| Round 2 | 6inc [12] | (12) |
The pattern does not state where the spots go, so pin all three onto the yellow body and step back before sewing — spacing them unevenly usually looks more natural than lining them up.
Make two arms. Each starts in white for the hand, widens to 18 stitches, decreases to 12, and then runs as a long yellow tube up to Rnd 42. The arms are joined into the body at Rnd 36, so finish both before you begin the body.
| Round | Instruction | Count |
|---|---|---|
| Round 1 | White, 6sc in MR [6] | (6) |
| Round 2 | 6inc [12] | (12) |
| Round 3 | (sc, inc) * 6 [18] | (18) |
| Round 4-6 | 18sc [18] | (18) |
| Round 7 | (sc, dec) * 6 [12] | (12) |
| Round 8 | 12sc [12] | (12) |
Step by step: stuffing step by step — stuff the white hand end now, while the opening is still wide enough to reach into. Keep the rest of the arm lightly stuffed or unstuffed so it stays soft and bendable.
| Round | Instruction | Count |
|---|---|---|
| Round 9-42 | Yellow, 12sc [12]Step by step: close the arm with 6sc. Flatten the top of the tube and work 6sc through both layers, then fasten off leaving a short tail — those 6 stitches are what you crochet into at body Rnd 36. | (12) |
Make two legs. Each starts in white for the foot and widens to 24 stitches, decreases back to 12, then runs as a long yellow tube up to Rnd 49. The legs are joined into the body at Rnd 11, so both need to be finished and closed before you start the body.
| Round | Instruction | Count |
|---|---|---|
| Round 1 | White, 6sc in MR [6] | (6) |
| Round 2 | 6inc [12] | (12) |
| Round 3 | (sc, inc) * 6 [18] | (18) |
| Round 4 | (sc, inc, sc) * 6 [24] | (24) |
| Round 5-7 | 24sc [24] | (24) |
| Round 8 | (sc, dec, sc) * 6 [18] | (18) |
| Round 9 | (sc, dec) * 6 [12] | (12) |
Step by step: stuffing step by step — stuff the white foot now, before the tube narrows. Shape it into a rounded hoof rather than packing it hard, and leave the long yellow section soft.
| Round | Instruction | Count |
|---|---|---|
| Round 10 | 12sc [12] | (12) |
| Round 11-49 | Yellow, 12sc [12]Step by step: close the leg with 6sc. Flatten the top of the tube and work 6sc through both layers, then fasten off — those 6 stitches are what you crochet into at body Rnd 11. | (12) |
The body is worked in yellow throughout, increasing over ten rounds to 60 stitches, then decreasing gradually all the way up to a 18-stitch neck at Rnd 60. Have both legs and both arms finished and closed before you start: the legs are worked in at Rnd 11 and the arms at Rnd 36.
| Round | Instruction | Count |
|---|---|---|
| Round 1 | Yellow, 6sc in MR [6] | (6) |
| Round 2 | 6inc [12] | (12) |
| Round 3 | (sc, inc) * 6 [18] | (18) |
| Round 4 | (sc, inc, sc) * 6 [24] | (24) |
| Round 5 | (3sc, inc) * 6 [30] | (30) |
| Round 6 | (2sc, inc, 2sc) * 6 [36] | (36) |
| Round 7 | (5sc, inc) * 6 [42] | (42) |
| Round 8 | (3sc, inc, 3sc) * 6 [48] | (48) |
| Round 9 | (7sc, inc) * 6 [54] | (54) |
| Round 10 | (4sc, inc, 4sc) * 6 [60] | (60) |
| Round 11 | 14sc, add 1st leg 6sc, 20sc, add 2nd leg 6sc, 14sc [60]Step by step: at Rnd 11 the legs are worked straight into the body. Crochet across 14 stitches, then work 6sc through the closed top of the first leg, 20sc across the body, 6sc through the second leg, and 14sc to finish the round — the stitch count stays at 60 because the leg stitches replace body stitches rather than adding to them. Check both legs face the same way before you go on. | (60) |
| Round 12-19 | 60sc [60]Step by step: stuffing step by step — start stuffing the body here, before the decrease rounds begin to close it in. Add fibrefill in small pinches and keep topping it up as you work through the decreases, so the body stays evenly firm and holds its shape without the stitches gaping. | (60) |
| Round 20 | (4sc, dec, 4sc) * 6 [54] | (54) |
| Round 21-22 | 54sc [54] | (54) |
| Round 23 | (7sc, dec) * 6 [48] | (48) |
| Round 24-25 | 48sc [48] | (48) |
| Round 26 | (3sc, dec, 3sc) * 6 [42] | (42) |
| Round 27-28 | 42sc [42] | (42) |
| Round 29 | (5sc, dec) * 6 [36] | (36) |
| Round 30-31 | 36sc [36] | (36) |
| Round 32 | (2sc, dec, 2sc) * 6 [30] | (30) |
| Round 33-34 | 30sc [30] | (30) |
| Round 35 | (3sc, dec) * 6 [24] | (24) |
| Round 36 | 3sc, add 1st arm 6sc, 6sc, add 2nd arm 6sc, 3sc [24]Step by step: at Rnd 36 the arms go in the same way the legs did. Work 3sc, then 6sc through the flattened top of the first arm, 6sc across the body, 6sc through the second arm, and 3sc to close the round — still 24 stitches. Make sure both arms sit level and point outwards before you carry on up the neck. | (24) |
| Round 37 | 24sc [24] | (24) |
| Round 38 | (sc, dec) * 6 [18] | (18) |
| Round 39-60 | 18sc [18]Step by step: rounds 39-60 form the giraffe's long neck at a steady 18 stitches. Stuff it as you go, keeping it firm enough to stand but not so hard that it cannot bend. Fasten off leaving a long tail, then sew the finished head onto the top of the neck. | (18) |
03 · Before it goes to a childWhat has to be right, and what is allowed to drift
- 💡 This pattern is written in US crochet terminology. If you normally work in UK terms, remember that US single crochet (sc) is UK double crochet.
- 💡 Go down a hook size from what your yarn label recommends. For worsted-weight yellow yarn, a 3.5 mm or 4 mm hook gives the tight, dense fabric amigurumi needs so the stuffing never peeks through.
- 💡 Every piece here is worked in a continuous spiral from a magic ring. Mark the first stitch of each round and move the marker as you go — the 42-round arms, 49-round legs and 60-round body will quietly lose count otherwise, and the body has to meet the legs at Rnd 11 and the arms at Rnd 36.
- 💡 Put the safety eyes in between Rnd 11-12 of the head, 6 stitches apart, before you stuff and close it. Once the washers are on they're permanent, so check the spacing and height while the head is still open and you can reach inside.
- 💡 Sew the ears to the head between Rnd 18-19, 6 stitches apart, and leave them unstuffed so they lie flat. The antlers and the three white spots are sewn on too — pin all of them and look at the giraffe head-on before committing.
- 💡 Don't skip past the "stuffing step by step" points — they appear in the arm after Rnd 8, in the leg after Rnd 9 and in the body after Rnd 19, at exactly the moment each piece is still open enough to reach into. Adding polyester fibrefill in small pinches and shaping as you go is the single biggest difference between a smooth giraffe and a lumpy one.
- 💡 The colour changes are what make the giraffe read correctly: white to yellow at head Rnd 11 for the muzzle, at arm Rnd 9 for the hands and at leg Rnd 11 for the feet. Change colour at the start of the round, carry the unused shade loosely inside where the stuffing will hide it, and weave the ends in on the wrong side before you close anything up.
- 💡 Leave a generous tail — around 12 inches — on any piece you'll be sewing on: the antlers, the ears, the spots and the head. Having plenty of yarn for pinning, positioning and stitching is far easier than joining a fresh length halfway through a tiny seam.
- 💡 If this giraffe is for a baby or a young toddler, leave out the safety eyes and embroider the face in black yarn instead. It's just as expressive and removes the only choking hazard in the whole make.
- 💡 Designer credit: this giraffe amigurumi was designed by Kalynn.amigurumi on Instagram.
04 · Snag listWhat went wrong on the bench, and the fix
Snag 1
Starting a piece with a chain-2 ring
Every piece here begins with 6sc in MR, so use a proper magic ring each time. Work all six stitches into the loop, then pull the tail firmly to close it before you carry on. If you've already gone too far to redo it, weave the tail across the gap on the wrong side with a tapestry needle and cinch it shut before you stuff — once the stuffing is in, that hole will show.
Snag 2
Losing track of the round
Place a stitch marker in the first stitch of every round and move it up as you begin the next one. The antlers are only 9 rounds so they're forgiving, but the 42-round arms, the 49-round legs and the 60-round body will drift badly if you guess — and the body has to line up with the legs at Rnd 11 and the arms at Rnd 36. A scrap of contrast yarn looped through the stitch works just as well as a clip marker and won't fall out mid-round.
Snag 3
Crocheting too loosely, so the stuffing
Amigurumi wants a hook one to two sizes smaller than the yarn label suggests — for worsted, that's usually a 3.5 mm or 4 mm rather than a 5 mm. Work a few rounds and hold the fabric up to a light. If you can see daylight through the stitches, go down a hook size and start again. It's five minutes lost now versus a lumpy giraffe forever.
Snag 4
Inserting the safety eyes
The eyes go in between Rnd 11-12 of the head, 6 stitches apart, and safety eye backs cannot be removed once they click on. Position both eyes while the head is still open and empty, step back and check they're level and evenly spaced from the centre, then push the washers on and stuff afterwards. Pin them in place first if you want to audition the placement.
Snag 5
Ignoring the stuffing markers
The arm, the leg and the body each say "stuffing step by step" at the exact point where the piece narrows and you can still reach inside — after Rnd 8 on the arm, after Rnd 9 on the leg, and after Rnd 19 on the body. Stop there and stuff. Add fibrefill in small pinches and shape as you go rather than pushing in one big lump, which creates hard lumps and soft hollows. The head should feel firm and hold its round shape when squeezed.
Snag 6
Starting the body before the arms
The limbs are worked into the body, not attached afterwards: the legs are joined at Rnd 11 and the arms at Rnd 36, both closed flat with 6sc first. Finish and stuff all four before you cast on the body, or you'll be stuck mid-round. For the pieces that are sewn — ears between Rnd 18-19, 6 stitches apart, plus the antlers, the spots and the head — pin everything, stand back a metre and look at it straight on before you sew a single stitch. A face that's five degrees off looks noticeably wrong.
05 · VariantsOther ways to issue this one
The classic yellow-and-white combination is lovely, but this shape takes recolouring beautifully. For a soft nursery version, swap the yellow for a buttery cream or a dusty peach and keep the white contrast — think Paintbox Simply DK in Vanilla Cream, or Basic Stitch Anti-Pilling in Ecru. For something bolder that reads well from a distance, try a deep mustard body with cream hands and feet, or go completely unrealistic with mint green, blush pink or lavender for a fantasy giraffe. Kids rarely object to a purple giraffe. You can also work the antlers and the three little spots in a contrast shade rather than matching, which gives the whole thing a hand-illustrated look. For size, the easiest lever is your hook and yarn rather than the stitch counts. Move to a chunky yarn like Bernat Blanket with a 5.5 mm hook and you'll get a chunky cuddle-sized giraffe from the exact same rounds; drop to a 4 ply cotton such as Paintbox Cotton DK with a 2.5 mm hook and you'll get a tiny keyring-sized one. Keeping the rounds identical means the proportions stay right, which is much safer than adding rounds and hoping. Cotton gives crisper stitch definition and a firmer body; acrylic gives you softness and a squashier cuddle. If you're making it for a baby under three, skip the safety eyes entirely and embroider them in black yarn instead — the face is just as sweet and it's completely secure.
I have a soft spot for amigurumi that reads as the right animal from across the room, and this one does it with almost no fuss — a yellow body, white hands and feet, a white muzzle and two stubby antlers, and everyone knows immediately it's a giraffe. No colourwork chart, no fiddly spot embroidery, no intarsia. Just a colour change partway up each piece, which is the easiest shaping trick there is. I also love how honestly the construction is laid out. The legs are joined into the body at Rnd 11 and the arms at Rnd 36, so instead of a pile of limbs to sew on at the end — the part where most amigurumi goes crooked — the body grows around them and they come out straight by design. That single decision removes the hardest step from a project like this. The stuffing markers are the other quiet kindness. Most patterns say "stuff firmly" once and leave you to it, which is exactly where beginner amigurumi turns lumpy. Here the arm, the leg and the body each tell you when to stop and stuff, so the shaping is guided rather than guessed. And the moment you press the safety eyes in between Rnd 11-12 and the blank ball suddenly becomes a face with an expression? That never gets old.
06 · QueriesQuestions logged against this build
Can a beginner make this, or do I need experience?
If you can work a magic ring, single crochet in continuous rounds, increase and decrease, you can absolutely make this giraffe — the source calls it easy to follow for beginners and experts alike. The only genuinely fiddly parts are joining the legs and arms into the body at Rnd 11 and Rnd 36, and sewing the head, ears and antlers on neatly. Pinning everything before you stitch solves most of that.
Why does it have antlers instead of horns?
The pattern calls the little head pieces antlers, and they're the giraffe's ossicones — those small stubby horns real giraffes have on top of their heads. They're only 9 rounds each and worked in white, so they take a few minutes apiece and give the face its unmistakable giraffe silhouette.
Do I sew the arms and legs on at the end?
No — and this is the part to read before you start the body. Both legs and both arms are finished first, closed flat with 6sc, and then crocheted directly into the body: the legs at Rnd 11 and the arms at Rnd 36. The stitch count doesn't change at those rounds because the limb stitches replace body stitches. Make all four pieces before you cast on the body.
Where do the three white spots go?
The pattern gives you three little white circles worked over two rounds each but doesn't say where to place them. Pin them onto the yellow body or the neck and look at the giraffe from a distance before sewing — scattering them unevenly reads more naturally than lining them up in a row.
Is it safe for a baby to play with?
Made with embroidered eyes instead of safety eyes and sewn together securely, yes — it's a good nursery toy. If you do use safety eyes, tug them hard once the washers are on to check they're locked, and keep it as a decorative piece for children under three rather than a play toy.
Original pattern: https://redagapeblog.com/crochet-giraffe-amigurumi-hugging-the-curtains-pattern/
07 · Made byWho counted this one

Who writes Amigurumi Addict, how a build gets its number, and why every round on the site carries a stitch count.
08 · Next off the benchThree builds that sit near this one

Animals
Crochet a bunny or frog from one amigurumi base
How do you crochet a bunny and a frog from one base? Share Legs, Body, and Head; swap ears or eyes.

Animals
Crochet giraffe amigurumi pattern with horns and ears
How do you crochet a giraffe amigurumi? Shape head, body, legs, ears and horns in worsted yarn.

Animals
Amigurumi cat crochet pattern with oval muzzle and bow
How do you crochet an amigurumi cat with a flat muzzle? Shape it separately, pinch it, then sew it on.
Join the build log
One message when a build is issued
A drawing and its parts list, when one leaves the bench.