| Shelf | Level | Time | Hook | Yarn |
|---|---|---|---|---|
| Animals | Intermediate | 4-6 Hours | 5 mm | Worsted |
Crochet Cow Doll for the Baby Nursery: Free Amigurumi Pattern
Crochet a chunky cow doll for the baby nursery with this free step-by-step amigurumi pattern, complete with horns, snout, ears, arms and a cozy scarf.
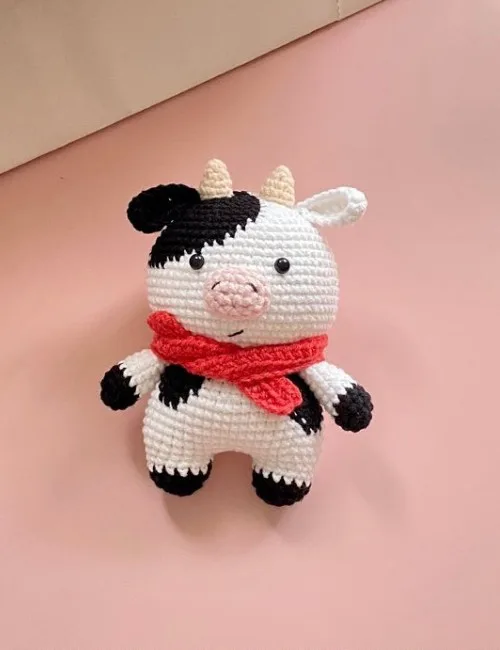
01 · The pieceWhat Crochet Cow Doll for the Baby Nursery: Free Amigurumi Pattern actually is
This pattern turns chunky yarn into a soft, huggable cow doll built for a baby nursery shelf. Every piece that gives a cow its personality is here: stubby black-and-white legs, a patched body, an oversized head, a pair of little tan horns, a pink snout, floppy ears, two arms and a small red scarf tied at the neck. It suits anyone who wants a fast, satisfying amigurumi with real character, and it is a lovely make for new parents, farm-themed rooms and toy baskets that need one standout friend.
The legs, body and head are worked as one continuous spiral of single crochet: the two legs are joined with a chain of 3, the body grows straight out of them in black and white colour blocks, and after round 14 you stuff the body and carry on into the head without ever cutting the yarn. The horns, snout, ears and arms are made separately and sewn on. Chunky yarn on the small 2.0mm to 2.5mm hook gives a dense fabric that hides the fiberfill completely, which is exactly what those little pieces need. Safety eyes, embroidered nostrils and a fair amount of pinning and sewing put this squarely at the intermediate skill level the designer lists. Most crocheters finish it across a weekend, roughly four to six hours.
The finished cow is chunky and squat, with the twenty-four-round head sitting proudly on a shorter fourteen-round body, exactly the top-heavy proportion that makes amigurumi read as cute rather than realistic. It sits comfortably in two hands, squishes when hugged and holds its shape thanks to firm stuffing through the neck. The little scarf gives it a finished, boutique look that photographs beautifully against a plain nursery wall. It makes a genuinely special baby-shower gift, a shelf sitter or a first handmade friend.
- Chain 3, join the second leg to the first, and work the body upward in black and white colour blocks.
- Stuff the body tight at round 14, then carry straight on into the head without cutting the yarn.
- Work head round 1 in the front loops only, increasing out to 64 stitches for a wide face.
- Set the black safety eyes between rounds 11 and 12, 8 stitches apart, then decrease, stuff firmly and close the head.
- Make the tan horns, pink snout, two ears and two arms separately, leaving a long tail on each.
- Embroider the nostrils, then pin and sew the snout to head rounds 6 to 8, the horns to rounds 17 to 19 and the ears across rounds 18 and 19.
- Sew the arms to body rounds 13 and 14, then finish by tying the little red scarf around the neck.
02 · The count run51 rounds across 8 parts, each with its count
US terms throughout. Every row below ends with the count that round finishes on.
| Part | Qty | Finishes on |
|---|---|---|
| LEGS | 1 | - |
| BODY | 1 | - |
| HEAD | 1 | - |
| HORNS | 1 | - |
| SNOUT | 1 | - |
| ARMS | 1 | - |
| EARS | 1 | - |
| SCARF | 1 | - |
Start with black yarn (make two)
| Round | Instruction | Count |
|---|---|---|
| Round 1 | 6sc in MR (6) | - |
| Round 2 | 6-inc (12) | - |
| Round 3 | (3sc, inc) * 3 (15) | - |
| Round 4 | 15sc (15)Switch to white yarn | - |
| Round 5-6 | (2 rnds) 15sc (15)Cut the yarn. Crochet leg 2 in the same way till round 6. | - |
With black and white yarn.
| Round | Instruction | Count |
|---|---|---|
| Round 1 | start with white (5sc, inc) * 6 (42) | - |
| Round 2 | (6sc, inc) * 6 (48) | - |
| Round 3-4 | (2 rnds) 48sc (48) | - |
| Round 5 | (white) 11sc, (black) 3sc, (white) 34sc (48) | - |
| Round 6 | (white) 10sc, (black) 5sc, (white) 33sc (48) | - |
| Round 7 | (white) 9sc, (black) 7sc, (white) 12ssc, (black) 3sc, (white) 17sc (48) | - |
| Round 8 | (white) 8sc, (black) 9sc, (white) 10sc, (black) 5sc, (white) 16sc (48) | - |
| Round 9 | (white) 4sc, dec, 2sc, (black) 2sc, dec, 4sc, dec, (white) 4sc, dec, 2sc, (black) 2sc, dec, 3sc. (white) sc, dec, (4sc, dec) * 2 (40) | - |
| Round 10-11 | (white) 7sc, (black) 8sc, (white) 7sc, (black) 6sc, (white) 12sc (40) | - |
| Round 12 | (white) 3sc, dec, 3sc, (black) dec, 3sc, dec, (white) 3sc, dec, 3sc, (black) dec, 2sc, (white) sc, dec, (3sc, dec) * 2 (32) | - |
| Round 13 | (white) 8sc, (black) 3sc, (white) 21sc (32)Switch to white yarn | - |
| Round 14 | (2sc, dec) * 8 (24)Stuff the body tight with fiberfill. | - |
Do not cut the yarn. Switch to white yarn. Keep crocheting the head.
With brown and white yarn.
| Round | Instruction | Count |
|---|---|---|
| Round 1 | start with white FLO 24-inc (48) | - |
| Round 2 | (5sc, inc) 8 (56) | - |
| Round 3 | 56sc (56) | - |
| Round 4 | (6sc, inc) * 8 (64) | - |
| Round 5-10 | (6 rnds) 64sc (64) | - |
| Round 11 | (white) 42sc, (black) 5sc, (white) 17sc (64)Insert the safety eyes between rounds 11 & 12, 8sts apart | - |
| Round 12 | (white) (6sc, dec) * 5, (black) (6sc, dec), sc, (white) 5sc, dec, 6sc, dec (56) | - |
| Round 13 | (white) 33sc, (black) 12sc, (white) 11sc (56) | - |
| Round 14 | (white) 31sc, (black) 15sc, (white) 10sc (56) | - |
| Round 15 | (white) 30sc, (black) 17sc, (white) 9sc (56) | - |
| Round 16 | (white) 29 sc, (black) 19sc, (white) 8sc (56) | - |
| Round 17 | (white) (5sc, dec) * 4, (black) (5sc, dec) * 3, sc, (white) 4sc, dec (48) | - |
| Round 18 | (white) (6sc, dec) * 3. (black) (6sc, dec) * 2, 2sc, (white) 4sc, dec (42) | - |
| Round 19 | (white) (5sc, dec) * 3, (black) (5sc, dec) * 2, 2sc, (white) 3sc, dec (36) | - |
| Round 20 | (white) (4sc, dec) * 3, (black) (4sc, dec) * 2, 2sc, (white) 2sc, dec (30) | - |
| Round 21 | (white) (3sc, dec) * 3. (black) (3sc, dec) * 2, 2sc, (white) sc, dec (24) | - |
| Round 22 | (white) (2sc, dec) 2sc, * 3, (black) (2sc, dec) * 2, (white) dec (18) | - |
| Round 23 | (white) (sc, dec) * 3, (black) (sc, dec) * 3 (12) | - |
| Round 24 | 6-dec (6)Stuff the head tight with fiberfill. | - |
With tan yarn (make two)
| Round | Instruction | Count |
|---|---|---|
| Round 1 | 4sc in MR (4) | - |
| Round 2 | (sc, inc)* 2 (6) | - |
| Round 3 | (sc, inc)* 3 (9) | - |
| Round 4 | 9sc (9)Cut the yarn. Leave a long tail. Thread a needle with your yarn tail and sew to the head at rounds 17 to 19. | - |
With pink yarn
| Round | Instruction | Count |
|---|---|---|
| Round 1 | ch 4, inc, sc in next chain, 4sc in last chain, sc, inc (10) | - |
| Round 2 | inc, 3sc, 2-inc, 3sc, inc (14) | - |
| Round 3 | 14sc (14)Cut the yarn. Leave a long tail. Thread a needle with your yarn tail and sew the snout to round 6 to round 8 of the head. | - |
With brown and white yarn (make two)
| Round | Instruction | Count |
|---|---|---|
| Round 1 | start with brown yarn 6sc in MR (6) | - |
| Round 2 | 6-inc (12) | - |
| Round 3-4 | (2 rnds) 12sc (12) | - |
| Round 5-12 | (8 rnds) switch to white yarn 12sc (12)Cut the yarn. Leave a long tail. Thread a needle with your yarn tail and sew to the body at rounds 13 & 14. | - |
One in white and one in black
| Round | Instruction | Count |
|---|---|---|
| Round 1 | ch 8, 3sc, 3-hdc, 4-hdc in the last chain, 3-hdc, 3sc (20) | - |
| Round 2 | 20sc, slst (20)Cut the yarn. Leave a long tail. Thread a needle with your yarn tail and sew the ears to the head spanning round 18 & 19. | - |
With red yarn.
Chain 62, insert your hook to the 2nd stitch from your hook.
| Round | Instruction | Count |
|---|---|---|
| Round 1 | 60-hdc (60) | - |
| Round 2 | Turn your hook, FLO 60-hdc, (60)Cut the yarn. Hide your yarn tail. | - |
03 · Before it goes to a childWhat has to be right, and what is allowed to drift
- 💡 The supply list pairs chunky yarn with a small 2.0mm to 2.5mm hook, which is deliberately tight for that weight. That tightness is the whole point: it gives a dense fabric so no fiberfill peeks through. Use the same hook for every piece so the legs, body, head and small parts all match in density.
- 💡 Stuff in stages rather than all at once. The body is stuffed tight at round 14, before the head begins, and the head is filled as you work the closing decreases from round 17 onward, pushing fiberfill in through the shrinking opening with the blunt end of a hook so the ball stays round instead of pointed at the top.
- 💡 Place a stitch marker in the very first stitch of each round and shift it up as you go. It costs a second per round and saves you from unpicking half a head later.
- 💡 Leave a generous tail, at least an arm's length, when you fasten off the horns, snout, ears and arms. The pattern has you sew each piece on with that same tail, which means no extra knots and no visible join.
- 💡 Embroider the nostrils and mouth onto the snout with black yarn or embroidery thread while the snout is still off the head. Working on a flat, unattached piece is far easier than trying to stitch neatly against a stuffed, curved face.
- 💡 If this cow is for a baby under three, skip the 6mm safety eyes entirely and embroider the eyes with black yarn instead. Also make sure every sewn-on piece is anchored securely all the way around, and give the arms and horns a firm tug to test them before gifting.
- 💡 Skill level: intermediate. This cow amigurumi was designed by beary_bearnita_.
04 · Snag listWhat went wrong on the bench, and the fix
Snag 1
Snapping the 6mm safety eye backs
Safety eye washers are permanent once seated. The pattern places them between rounds 11 and 12, 8 stitches apart, while the head is still open and unstuffed. Push the posts through, step back and look at the face from the front, and only click the backs on when the spacing looks right. If you are unsure, hold them in place with a scrap of yarn first and live with the face for a few minutes before committing.
Snag 2
Working the horns, snout and ears
Those little pieces are only two to four rounds each, so any gap in the fabric shows stuffing immediately. Stay on the small 2.0mm to 2.5mm hook the supply list calls for, even though it feels tight in chunky yarn, and keep your tension firm. The stitches will be dense, the horns will hold their shape without wire, and the snout will sit flat against the head instead of puckering.
Snag 3
Losing track of the start of the round
Nothing here is joined with a slip stitch, so without a marker your increases drift and the head goes lopsided. Drop a stitch marker into the first stitch of every round and move it up as you begin the next one. If you notice a piece leaning, count back to the last round you are sure of and rip to there rather than trying to correct it later.
Snag 4
Using a standard decrease on the head
A regular sc2tog leaves a raised bump every time it repeats, and on a twenty-four-round head those bumps line up into a visible ridge across the face. Work the invisible decrease by inserting your hook into the front loops only of the next two stitches, then yarn over and pull through both loops at once, then yarn over and through the remaining two. The closing rounds 17 to 24 will look smooth.
Snag 5
Understuffing the fourteen-round body
The head is much larger than the body, and because they are worked as one piece the neck has to carry real weight. Stuff the body tight at round 14, before you start the head, adding small pinches of fiberfill at a time and pushing them right down into the corners near the legs. Pack the neck area extra firmly. The fabric should feel solid but the stitches should not gape open.
Snag 6
Sewing the ears, horns and arms
Asymmetry is instantly obvious on a face this round. Pin all the pieces on, set the cow on a table, and look at it straight on and from above before threading a needle. The horns belong at head rounds 17 to 19, the ears spanning rounds 18 and 19, and the arms at body rounds 13 and 14, so count the stitches out from the centre so both sides match. Sew with the yarn needle using small whipstitches into the body fabric, not just the edge stitches.
05 · VariantsOther ways to issue this one
The classic Holstein look, a white body with irregular black patches, is only the beginning. For a softer nursery palette, try a Jersey cow in warm caramel with a cream snout and pale butter horns, or go full strawberry cow with a blush pink body, deep rose patches, a cream snout and a mint green scarf. A charcoal grey body with a mustard scarf reads modern and looks lovely on a neutral shelf, and a ginger Highland cow with a few long loop stitches worked across the forehead gives you a shaggy fringe over the eyes. For the yarn itself, Wool-Ease Thick and Quick or Bernat Blanket give you a very plush, oversized cow, while Paintbox Simply Aran or Drops Paris keep the stitches tidy and the fabric firm. For the small pieces, a cotton like Scheepjes Catona keeps the horns and snout crisp. Want a bigger cow? Hold two strands together and move up a hook size, adding one more increase round to the head before the straight rounds 5 to 10 so the proportions stay top-heavy. For a mini version, drop to sport weight throughout and stop the head increases one round early. Seasonal swaps are easy too: a rust and pumpkin scarf for autumn, pastel stripes for spring, or a cotton cow with no scarf at all for summer. You can also skip the safety eyes entirely and embroider closed sleepy eyes with black yarn, which is the safest choice for a baby under three and gives the cow a completely different, dreamy expression.
I have made a lot of amigurumi, and this cow is one of the few where every single piece stays fun. The legs are done almost before you settle into your chair, the body builds fast in chunky yarn with those black patches appearing round by round, and then you reach the head, which is where the whole personality happens. Because you never cut the yarn at the neck, watching those 24 body stitches double out into a wide round face over twenty-four rounds never stops being satisfying to me. My favorite moment is setting the black safety eyes between rounds 11 and 12 and suddenly having something look back at you. The snout is the detail I love most: it is only three rounds, but once you embroider the nostrils and sew it to rounds 6 through 8, right under the eyes, the cow goes from a shape to a character. The tiny horns and the two-round ears are the kind of pieces you can make while chatting, and the little red scarf is such a smart finishing touch because it sits neatly at the neck while adding colour. It is a project that rewards care without demanding perfection, and that is exactly what I want on a slow weekend.
06 · QueriesQuestions logged against this build
How big will the finished cow be?
The designer does not give a gauge or a finished size, so it depends entirely on your yarn and hook. The pattern pairs chunky yarn with a small 2.0mm to 2.5mm hook, which keeps the fabric dense and the cow compact; going up a hook size or two gives you a noticeably larger, softer doll. Expect a squat, two-hands-sized cow with a head that is clearly bigger than the body. Work a small swatch first if you need to match a specific size.
Can I make this cow without safety eyes?
Absolutely, and it is the better choice for a baby under three. Embroider the eyes with black yarn or embroidery thread once the head is stuffed and closed, using a few tight satin stitches for each eye. A pair of closed, curved sleepy eyes also looks adorable on this face.
Why does my head look lopsided?
Almost always it is because the increases drifted in the continuous spiral, either from losing the start of the round or from placing two increases too close together. Use a stitch marker religiously, count each round as you finish it, and rip back to your last confident round rather than trying to fix it with extra decreases.
What yarn works best for a nursery doll?
A soft acrylic or acrylic blend in worsted to chunky weight is ideal because it is machine washable, holds stitch definition and stays plush after hugging. Cotton also works beautifully and gives crisper stitches, but it is heavier and less forgiving on the tight small pieces.
Do I have to make the scarf?
The scarf is optional, but it does more than decorate. It is only a chain of 62 and two rows of half double crochet, and it sits neatly at the neck where the head meets the body, which is the busiest area on the whole doll. If you skip it, take extra care that the neck rounds are stuffed firmly and evenly.
Original pattern: https://redagapeblog.com/how-to-crochet-cow-doll-for-baby-nursery/
07 · Made byWho counted this one

Who writes Amigurumi Addict, how a build gets its number, and why every round on the site carries a stitch count.
08 · Next off the benchThree builds that sit near this one

Animals
Crochet a bunny or frog from one amigurumi base
How do you crochet a bunny and a frog from one base? Share Legs, Body, and Head; swap ears or eyes.

Animals
Crochet giraffe amigurumi pattern with horns and ears
How do you crochet a giraffe amigurumi? Shape head, body, legs, ears and horns in worsted yarn.

Animals
Amigurumi cat crochet pattern with oval muzzle and bow
How do you crochet an amigurumi cat with a flat muzzle? Shape it separately, pinch it, then sew it on.
Join the build log
One message when a build is issued
A drawing and its parts list, when one leaves the bench.