| Shelf | Level | Time | Hook | Yarn |
|---|---|---|---|---|
| Animals | Intermediate | 6-8 hours | 3.5 mm | Bulky |
Crochet baby elephant amigurumi with a curled trunk
How do you crochet a baby elephant with a curled trunk? Body and head work as one spiral piece.
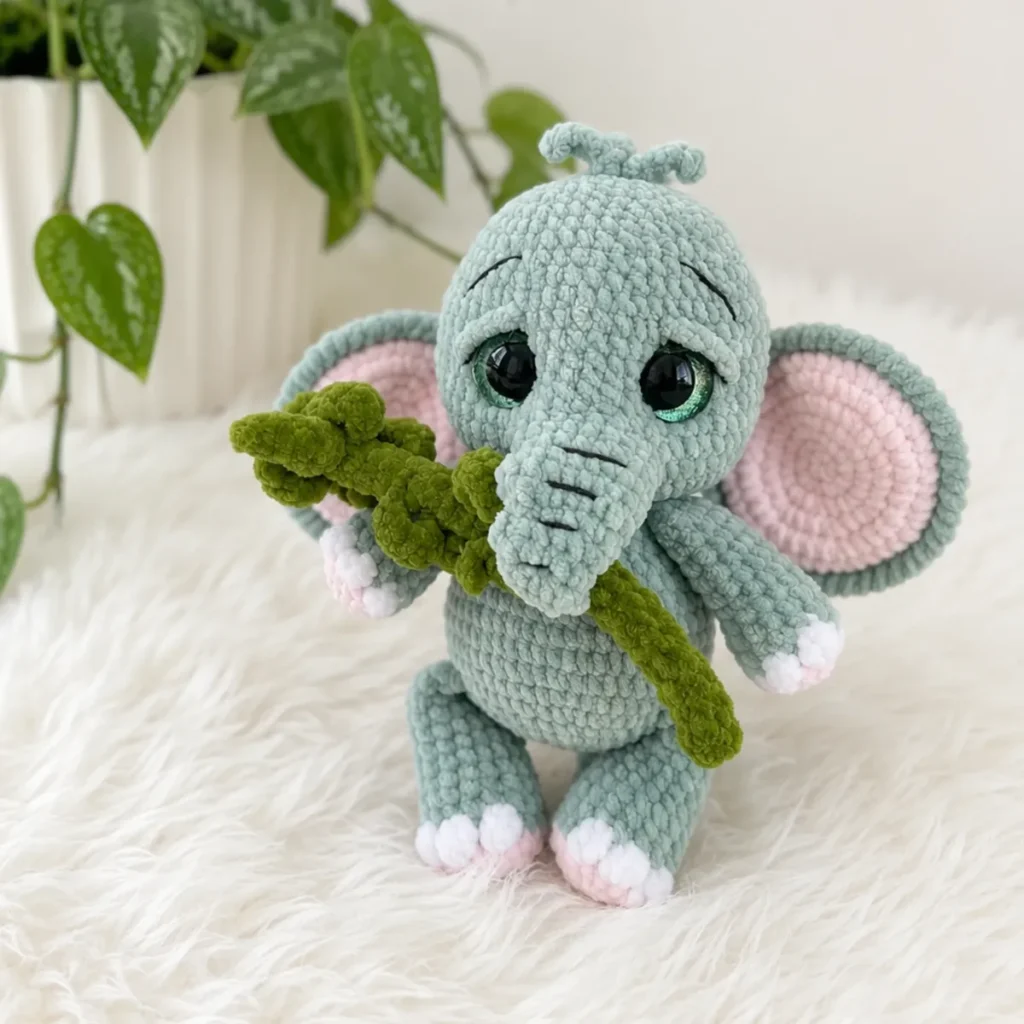
01 · The pieceWhat Crochet baby elephant amigurumi with a curled trunk actually is
The elephant assembles from seven worked parts: two Ears (each a pair of joined flat circles in Main Color and Contrast Color), two Arms, two Legs, a Trunk worked over eleven rounds, and a Stem with Leaves worked separately in green. Body and Head form a single continuous piece, so limbs and ears are set into the shell as the rounds progress rather than sewn on afterward. Eyelids go on last, tacked to one interior point instead of stitched around their full edge.
Gauge is not critical here — the pattern notes call for tight, consistent tension over hitting a target size. Where precision does matter: the back-loop-only round on each Leg and Arm, which sets the color break for the white toenail bobbles, and the eye-cinching step, where uneven pull between the two passes shows immediately on a head this small. Stuffing density inside Body and Head carries more weight than any single round count.
This pattern is written in US crochet terminology, with stitch counts shown in parentheses at the end of each round. Stuff to medium firmness, beginning from the sides to shape the cheeks and belly before filling the center; the trunk is stuffed at the base only.
02 · The count run79 rounds across 8 parts, each with its count
US terms throughout. Every row below ends with the count that round finishes on.
| Part | Qty | Finishes on |
|---|---|---|
| Ears — Make 2 (4 Pieces Total) | 4 | - |
| Legs — Make 2 | 1 | - |
| Arms — Make 2 | 1 | - |
| Body | 1 | - |
| Head | 1 | - |
| Trunk | 1 | - |
| Stem with Leaves | 1 | - |
| Eyelids — Make 2 | 1 | - |
Each ear is two flat circles — one CC, one MC — joined together.
| Round | Instruction | Count |
|---|---|---|
| Round 1 | MR, 8 sc. (8) | - |
| Round 2 | inc in each st around. (16) | - |
| Round 3 | (1 sc, inc) x8. (24) | - |
| Round 4 | (2 sc, inc) x8. (32) | - |
| Round 5 | (3 sc, inc) x8. (40) | - |
| Round 6 | (4 sc, inc) x8. (48) | - |
| Round 7 | 5 sc. These 5 sts are the attachment edge. Fasten off CC. Do not fasten off MC.Hold both circles together, CC side facing you. Using MC, work 48 sc around the outer edge through both layers starting at the attachment edge. Work 1 sc into the first sc of the edging to close. Work 43 reverse sc (crab stitch) around. Flip ear; work 5 regular sc across the attachment edge. Fold ear in half; work 3 sl st through both layers. These 3 sl sts join the ears to the head. | - |
| Round | Instruction | Count |
|---|---|---|
| Round 1 | MR, 6 sc in CC. (6) | - |
| Round 2 | inc x6. (12) | - |
| Round 3 | (1 sc, inc) x6. (18)Fasten off CC. Join MC. Rnd 4 is worked BLO. Bobble stitches are worked in white yarn; all other sts in MC. | - |
| Round 4 | 7 sc, 1 bob-L, (1 sc, 1 bob-L) x2, 6 sc. Fasten off white. (18) | - |
| Rounds 5–13 | (9 rnds) 18 sc, shift sm x2. (18)Stuff slightly past halfway. Flatten sole. Fold in half with toenails forward. Work 9 sc through both layers. Fasten off. | - |
| Round | Instruction | Count |
|---|---|---|
| Round 1 | MR, 5 sc in CC. (5) | - |
| Round 2 | inc x5. (10) | - |
| Round 3 | (1 sc, inc) x5. (15)Fasten off CC. Join MC. Rnd 4 is worked BLO. Bobble stitches in white; all other sts in MC. | - |
| Round 4 | 5 sc, 1 bob-A, (1 sc, 1 bob-A) x2, 5 sc. Fasten off white. (15) | - |
| Rounds 5–13 | (9 rnds) 15 sc, shift sm x2. (15)Stuff slightly past halfway. Fold in half with toenails forward. Work 7 sc through both layers. Fasten off. | - |
Work entirely in MC.
| Round | Instruction | Count |
|---|---|---|
| Round 1 | MR, 8 sc. (8) | - |
| Round 2 | inc x8. (16) | - |
| Round 3 | (1 sc, inc) x8. (24) | - |
| Round 4 | (2 sc, inc) x8. (32) | - |
| Round 5 | (7 sc, inc) x4. (36) | - |
| Round 6 | (5 sc, inc) x6. (42)Place marker at center back. To join a leg: insert hook into next leg st then next body st; complete sc. | - |
| Round 7 | 6 sc, [9 sc joining Leg 1], (1 sc, inc) x6, [9 sc joining Leg 2], 6 sc. (48) | - |
| Round 8 | 48 sc. (48)Tail for Rnd 9: ch 11; from 2nd ch from hook back along chain: 5 sl st, 5 sc, sl st into 1st sc. | - |
| Round 9 | 1 sc, [TAIL], 6 sc, inc, (7 sc, inc) x5. (54) | - |
| Rounds 10–11 | (2 rnds) 54 sc. (54) | - |
| Round 12 | (7 sc, dec) x6, sm. (48) | - |
| Round 13 | (6 sc, dec) x6. (42) | - |
| Round 14 | 42 sc. (42) | - |
| Round 15 | (5 sc, dec) x6. (36) | - |
| Round 16 | (4 sc, dec) x6, sm. (30) | - |
| Rounds 17–18 | (2 rnds) 30 sc. (30)Stuff as you go. To join an arm: insert hook into next arm st then next body st; complete sc. | - |
| Round 19 | 5 sc, [7 sc joining Arm 1], 6 sc, [7 sc joining Arm 2], 5 sc. (30) | - |
| Round 20 | (3 sc, dec) x6, sm. (24)Do not fasten off. Continue to Head — rounds restart at Rnd 1. | - |
Continued from Body; no break in yarn.
| Round | Instruction | Count |
|---|---|---|
| Round 1 | inc x24. (48) | - |
| Round 2 | (7 sc, inc) x6. Place marker at center back of head. (54) | - |
| Round 3 | 15 sc, (5 sc, inc) x4, 15 sc. (58) | - |
| Rounds 4–5 | (2 rnds) 58 sc. (58) | - |
| Round 6 | 25 sc, ch 8, skip 8 sc, 25 sc. (58) | - |
| Round 7 | 25 sc, 8 sc across ch-8 space, 25 sc. (58) | - |
| Round 8 | 58 sc. (58)To join an ear: insert hook into next ear sl st then next head st; complete sc. | - |
| Round 9 | 7 sc, [3 sc joining Ear 1], 38 sc, [3 sc joining Ear 2], 7 sc. (58) | - |
| Rounds 10–12 | (3 rnds) 58 sc, shift sm x2. (58)Insert 25 mm safety eyes between Rnds 9 and 10, centered on either side of trunk opening. Distance between eye posts: 11 sts. | - |
| Round 13 | 14 sc, dec, 26 sc, dec, 14 sc. (56) | - |
| Round 14 | (5 sc, dec) x8. (48) | - |
| Round 15 | 48 sc. (48) | - |
| Round 16 | (6 sc, dec) x6. (42) | - |
| Round 17 | 42 sc. (42) | - |
| Round 18 | (5 sc, dec) x6. (36) | - |
| Round 19 | (4 sc, dec) x6. (30)Begin stuffing. Fully stuff cheeks now — fiberfill can escape through the trunk opening during later rounds. | - |
| Round 20 | (3 sc, dec) x6. (24) | - |
| Round 21 | (2 sc, dec) x6. (18) | - |
| Round 22 | (1 sc, dec) x6. (12) | - |
| Round 23 | dec x6. (6) | - |
| Round 24 | 1 sc, [ch 5, 4 sc back along chain, sl st into 1st sc], 2 sc, [ch 5, 4 sc back along chain, sl st], 2 sc, [ch 5, 4 sc back along chain, sl st], 1 sc. (6)Close opening. Fasten off and weave in end. | - |
Join MC to trunk opening at Head Rnd 6. Work right to left. Work 1 sc into each of the 2 seam junctions between Rnds 6 and 7.
| Round | Instruction | Count |
|---|---|---|
| Round 1 | 8 sc, 1 sc in seam, rotate toy upside down, 8 sc along Rnd 7, 1 sc in seam. (18) | - |
| Rounds 2–3 | (2 rnds) 18 sc. (18)Tuck Fold technique — each fold = 3 rounds. Fold Rnd 1: sc through FLO only at fold zone. Fold Rnd 2: sc through both loops normally. Fold Rnd 3: sc through FLO of Fold Rnd 2 AND BLO of Fold Rnd 1 simultaneously, locking the fold. | - |
| Round 4 | [Fold 1–1]: 5 sc, 5 sc FLO, 8 sc. (18) | - |
| Round 5 | [Fold 1–2]: 18 sc. (18) | - |
| Round 6 | [Fold 1–3]: 5 sc, (1 sc in FLO of Rnd 5 and BLO of Rnd 4) x5, 8 sc. (18) | - |
| Round 7 | (1 sc, dec) x6. (12) | - |
| Round 8 | [Fold 2–1]: 3 sc, 4 sc FLO, 5 sc. (12) | - |
| Round 9 | [Fold 2–2]: 12 sc. (12) | - |
| Round 10 | [Fold 2–3]: 3 sc, (1 sc in FLO of Rnd 9 and BLO of Rnd 8) x4, 5 sc. (12)Stuff trunk at base only. | - |
| Round 11 | dec x6. (6) | - |
| Round 12 | dec x3. (3)Fasten off and weave in end. | - |
Make wire frame: fold 2 mm wire to 14.5 cm doubled. Wrap with medical tape. Use E-4 / 3.5 mm hook and green yarn.
LEAF stitch: ch 8; from 2nd ch from hook back toward stem: 1 sl st, 1 sc, 2 hdc, 3 dc, sl st into 1st sc, 3 sc.
| Round | Instruction | Count |
|---|---|---|
| Round 1 | MR, 6 sc. (6) | - |
| Rounds 2–10 | (9 rnds) 6 sc. (6) | - |
| Round 11 | 1 sc, LEAF, 2 sc. (6) | - |
| Rounds 12–15 | (4 rnds) 6 sc. (6) | - |
| Round 16 | 1 sc, LEAF, 2 sc. (6) | - |
| Rounds 17–20 | (4 rnds) 6 sc. (6) | - |
| Round 21 | 1 sc, LEAF, 2 sc. (6) | - |
| Rounds 22–25 | (4 rnds) 6 sc. (6)Insert wire frame. Continue crocheting over wire. | - |
| Round 26 | 1 sc, LEAF, 2 sc. (6) | - |
| Round 27 | 6 sc. (6) | - |
| Round 28 | dec x3. (3) | - |
| Round 29 | (1 sc, LEAF) x3. (3)Fasten off and weave in end. Shape stem as desired. | - |
Row 1: Ch 4. Leave long tails on both ends for attachment. Thread both tails to a single interior point, tie several overhand knots, and hide inside the head.
Techniques on this build
- Magic ring start
- Opens Rnd 1 of every Ear, Leg, Arm, and the Head — keep the pull tight so the center hole doesn't leave a gap under the fiber.
- Continuous spiral rounds
- Runs through all pieces with no joining slip stitch or turning chain — a stitch marker at the round start prevents drift over the Head's 21 rounds.
- Eye cinching through Head Rnd 1
- Both eyes are set with the same thread-path technique — match tension on the two passes so the eyes read level.
Final fit-up
- Weave in every color-change tail — CC-to-MC on Legs and Arms, the white bobble toenails, and the two-circle Ear joins — before any stuffing goes in.
- Stuff Body and Head to a firm, even density, working fiber into the Trunk root and each limb as it's captured by the spiral rather than after the fact.
- Cinch both eyes through the Head using the pattern's thread path, pulling each pass to matching tautness before knotting off.
- Attach the Eyelids by threading tails to a single interior point and knot securely, then embroider the eyebrows in black to finish the face.
How the parts fit
- Each Ear starts as two separate flat circles (CC and MC), increasing by 8 sts every round through Rnd 4 — 8, 16, 24, 32 — the standard flat-disk progression, before the layers are joined at the rim; that's why the Ears sit flat rather than domed like the limbs.
- Body and Head run as one uninterrupted spiral across 18 rounds into 21 rounds with no fasten-off between them, which is what allows limbs and Ears to be captured directly in the working round instead of needing a whip-stitched seam afterward.
Scaling the build
| Larger | Move up from the E-4 / 3.5 mm hook and pair it with a bulkier fiber than the listed velvet/chenille — the same round counts produce a proportionally bigger elephant. |
|---|---|
| Smaller | Drop to a lighter worsted-weight yarn with a smaller hook than E-4 / 3.5 mm — stitches tighten and the whole piece shrinks without altering any round. |
| Wider belly | Repeat one round at the Body's widest point before shaping resumes — this adds circumference to the torso only, leaving Head and limb rounds untouched. |
03 · Putting it togetherHow the pieces go together
- S1
Limbs and ears are joined during body and head construction — no separate sewing required for the main structure.
- S2
Cinch eyes with strong thread: insert needle into center of Head Rnd 1, bring out at eye-center height, re-insert at the same height, exit 1 st from original entry, pull taut. Pass thread under each eye and pull firmly. Repeat for the second eye.
- S3
Attach eyelids by threading tails to a single inside point; knot securely and hide ends.
- S4
Embroider eyebrows in black cotton yarn: stitch the brow line, wrap approximately 9 times for volume, secure with knots, and hide ends. Repeat for second brow.
- S5
Embroider horizontal stripes across the trunk.
- S6
Sew the trunk to the face using MC, bending it toward the fold side before stitching.
- S7
Weave in all remaining ends.
04 · Snag listWhat went wrong on the bench, and the fix
Snag 1
Losing the round in the spiral
Drop a stitch marker at the start of every round, especially through the Head's 21 rounds, and move it up as you go.
Snag 2
Working both loops on Rnd 4
The Leg and Arm Rnd 4 is Back Loop Only — catching both loops flattens the ridge the bobble toenails rely on for definition.
Snag 3
Loose bobble tails after fastening off white
Weave in the white toenail tail immediately after each bobble round rather than leaving it for a final pass, or stuffing will work it loose.
Snag 4
Uneven tension between the two eye passes
Pull both cinching passes to the same tautness and check the eyes are level before knotting off — asymmetry is obvious on a head this size.
05 · QueriesQuestions logged against this build
Can the Body and Head be crocheted as two separate pieces instead of one continuous spiral?
The pattern is written as a single continuous piece from Body into Head so limbs and Ears get captured directly in the round. Splitting it would mean substituting a whip-stitched closure the pattern's assembly notes don't cover.
Does each Ear really need two joined circles?
Yes — the Ear is specified as one CC circle and one MC circle joined together because it's built as a flat piece. A single layer would leave the back-loop join with no second surface to attach to.
06 · Made byWho counted this one

Who writes Amigurumi Addict, how a build gets its number, and why every round on the site carries a stitch count.
07 · Next off the benchThree builds that sit near this one

Animals
Crochet a bunny or frog from one amigurumi base
How do you crochet a bunny and a frog from one base? Share Legs, Body, and Head; swap ears or eyes.

Animals
Crochet giraffe amigurumi pattern with horns and ears
How do you crochet a giraffe amigurumi? Shape head, body, legs, ears and horns in worsted yarn.

Animals
Amigurumi cat crochet pattern with oval muzzle and bow
How do you crochet an amigurumi cat with a flat muzzle? Shape it separately, pinch it, then sew it on.
Join the build log
One message when a build is issued
A drawing and its parts list, when one leaves the bench.