| Shelf | Level | Time | Hook | Yarn |
|---|---|---|---|---|
| Animals | Intermediate | 4-6 hours | 3.5 mm | Bulky |
Chubby cat amigurumi: a one-piece body build
How is the chubby cat amigurumi body constructed? Legs, body and head join in one continuous spiral—no separate seams.
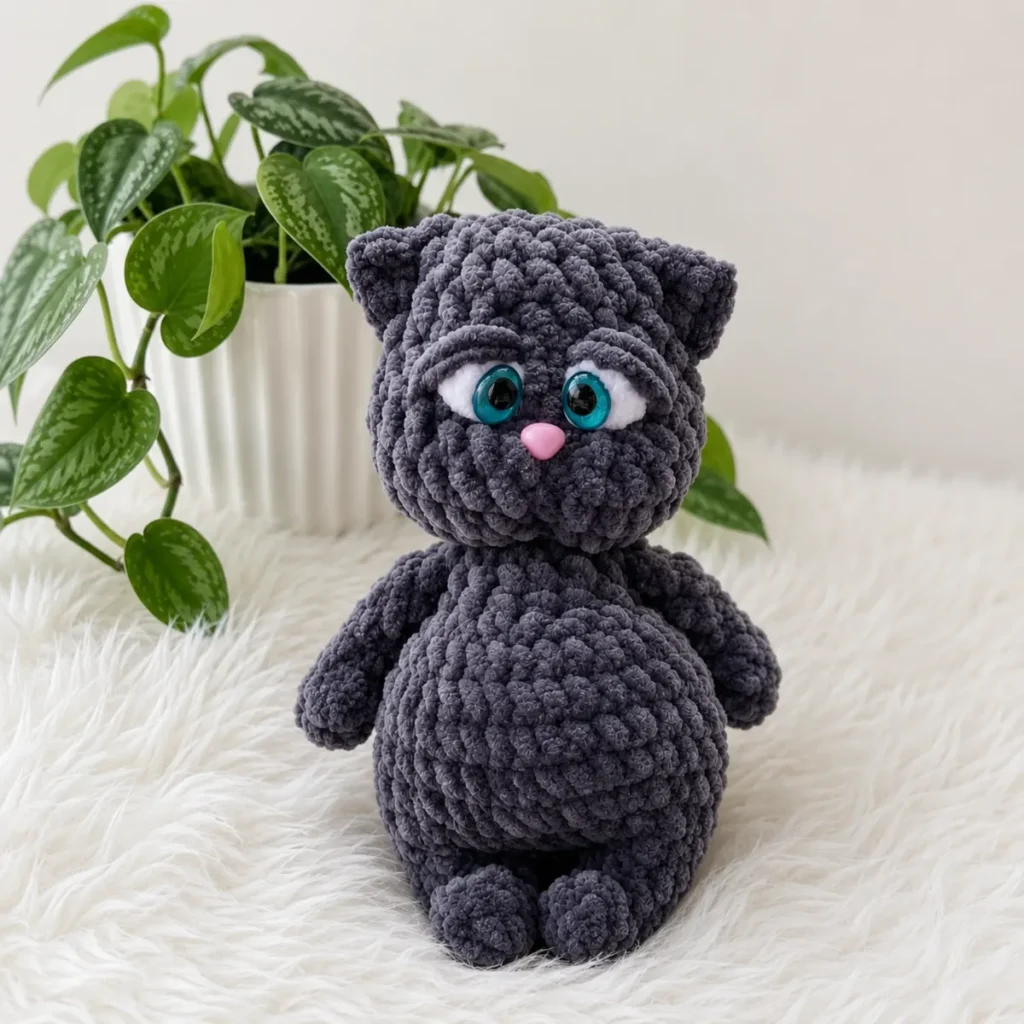
01 · The pieceWhat Chubby cat amigurumi: a one-piece body build actually is
The body is one continuous piece: two legs are worked separately, then joined on a single round (Rnd 7) and carried upward through the body into the head — eleven more rounds (Rnds 8–18) bridge leg-top to shoulder before the head shaping takes over for eleven rounds (Rnds 19–29). Arms are made flat and closed with a two-direction seam, then joined directly into the body at Rnd 16 rather than stuffed and sewn on as spheres afterward. Ears are built directly onto the head, and the tail directly onto the body, so neither exists as a separate piece to track or misplace.
Tolerance is loose in the chenille body itself — bulky plush yarn hides minor tension shifts, and the pattern says as much: gauge is not critical, only firm enough that stuffing doesn't show. Precision matters where the pattern says it does: leg-to-body joining round, the shift of round-start to center back at Rnd 20, and the sl st seam running center-front through Rnds 21–23. Those rounds set the face plane and leg symmetry; everything else is forgiving.
Written in US crochet terminology and worked in continuous spiral rounds — do not join rounds unless a step specifically says to. Each round's stitch count is given in parentheses at the end of the round, e.g. (18).
02 · The count run31 rounds across 5 parts, each with its count
US terms throughout. Every row below ends with the count that round finishes on.
| Part | Qty | Finishes on |
|---|---|---|
| Arms (Make 2) | 1 | - |
| Legs + Body + Head (One Continuous Piece — Make 2 Legs) | 1 | - |
| Head | 1 | - |
| Ears (Worked Directly onto Head — No Separate Pieces) | 1 | (1) |
| Tail (Worked Directly onto Body) | 1 | - |
| Round | Instruction | Count |
|---|---|---|
| Round 1 | 6 sc in MR. (6) | - |
| Rounds 2–7 | sc in each st around — work 5 rounds total. (6)Do not stuff. Flatten the piece and sc 3 sts through both layers to close. Without chaining, rotate work and sc 3 back through both layers in the opposite direction. Fasten off, leaving a long tail. Arms will be joined directly during body assembly. | - |
First Leg:
| Round | Instruction | Count |
|---|---|---|
| Round 1 | 8 sc in MR. (8) | - |
| Round 2 | sc in each st around. (8) | - |
| Round 3 | 2 dec, 4 sc. (6) | - |
| Round 4 | 2 sl st, 4 sc. (6) | - |
| Round 5 | sc in each st around. (6) | - |
| Round 6 | (inc, 1 sc) repeat 3 times. (9)Work 2–3 sl sts to shift the end of round toward the toe. Stuff lightly — do not stretch lengthwise. Fasten off first leg. | - |
Second Leg:
Work identical to First Leg through Rnd 6. Do not fasten off. Continue directly to body joining round.
Joining Legs + Body:
Position both legs so toes point inward (slightly pigeon-toed). Ch 3 and join to first leg.
| Round | Instruction | Count |
|---|---|---|
| Round 7 | 9 sc across second leg, 3 sc across one side of ch-3, 9 sc across first leg, 3 sc across opposite side of ch-3. (24) | - |
| Round 8 | (1 sc, inc) repeat 12 times. (36) | - |
| Rounds 9–13 | sc in each st around — work 5 rounds total. (36) | - |
| Round 14 | 18 dec. (18) | - |
| Round 15 | sc in each st around. Shift end of round to center back. (18)The piece is oriented with the back facing you throughout the body section. | - |
| Round 16 | Arms Joined 3 sc, [3 sc joining first arm through both body and arm edge simultaneously], 6 sc, [3 sc joining second arm through both body and arm edge simultaneously], 3 sc. (18)Stuff body firmly, pulling outward widthwise to create a round, chubby shape. | - |
| Round 17 | (1 sc, dec) repeat 6 times. (12) | - |
| Round 18 | sc in each st around. End round at center back of neck. (12)Stuff neck firmly. Continue directly into head without fastening off. | - |
| Round | Instruction | Count |
|---|---|---|
| Round 19 | inc in each st around. (24) | - |
| Round 20 | (5 sc, inc) repeat 4 times. Shift end of round to center back of head. (28) | - |
| Round 21 | 13 sc, 2 sl st (at center front), 13 sc. (28) | - |
| Round 22 | 13 sc, 2 sl st (at center front), 13 sc. (28) | - |
| Round 23 | 13 sc, 2 sl st (at center front), 13 sc. (28) | - |
| Round 24 | (2 sc, dec) repeat 3 times, 4 sc (center front), (dec, 2 sc) repeat 3 times. (22)The next round incorporates the white eye whites using a bobble stitch. Begin color change to white starting with the yarn over; draw final loops through with main color. Keep bobble stitches snug — do not pull tall. | - |
| Round 25 | 5 sc, 2 dec, [white: dc bobble of 3–4 dc in same st, change to MC], 2 sc, [white: dc bobble of 3–4 dc in same st, change to MC], 2 dec, 5 sc. (18) | - |
| Round 26 | sc in each st around. (18) | - |
| Round 27 | sc in each st around. (18)Insert safety eyes into the white bobbles now. Angle oval eyes slightly. To prevent eyes sinking too deep, snap backing on in reverse orientation for a shallower set. For extra security, lightly melt the eye post from inside. | - |
| Round 28 | (1 sc, dec) repeat 6 times. (12) | - |
| Round 29 | 6 dec. (6)Sl st, cut yarn leaving a long tail. Do not close the crown opening — it will be used for cinching. | - |
Position toy sideways, muzzle facing you. Three rounds are engaged per ear.
| Round | Instruction | Count |
|---|---|---|
| Round 1 | Right Ear Attach yarn with sl st at Rnd 25. In same st: 1 sc. | (1) |
| Round 2 | Moving diagonally upward, work into next st (insert hook horizontally): hdc, ch 1, hdc. | - |
| Round 3 | Work 1 sc into next st one round up. | (1) |
| Round 4 | Fasten with sl st into Rnd 29 fabric.Left Ear: Work identically on opposite side with the back of toy facing you. | - |
Turn toy upside down, head pointing toward you. At Rnd 9 on the back, mark 2 center points.
Attach yarn with sl st at first marked st.
Ch 8. Starting from 2nd ch from hook: 2 sl st, 3 sc, 2 hdc.
Fasten with sl st into second marked st.
Fasten off and weave in end.
Techniques on this build
- Magic ring (MR)
- Opens every piece — arms, legs, head. Watch for a fully closed center; chenille fiber can mask a loose ring until stuffing pushes through.
- Flat panel closure (opposing sc rows)
- Used on Arms — 3 sc through both layers, then 3 sc back in the opposite direction without chaining. Keep tension even across both passes or the seam will pucker to one side.
- Round-start relocation
- Rnd 20 of the Head shifts the round's end to center back. Mark the new start point immediately — losing track here throws off the Rnd 21–23 sl st placement.
- In-round slip stitch seaming
- Rnds 21–23 place 2 sl st at center front to form a facial seam. Keep these stitches snug; loose sl sts here read as a visible gap once the face is embroidered.
- Crocheted-in limb joins
- Rnd 7 fuses the two leg tubes into one body cylinder via a ch-3 bridge; Rnd 16 works both arm edges directly into the body stitches as you go. Neither join is sewn on afterward — both happen inline while working the round.
Final fit-up
- Weave in all fastened-off tails from Arms and Head first, working them through the plush fiber rather than trimming flush — chenille sheds at cut ends if left short.
- Stuff the Legs + Body + Head piece firmly as you go, especially the neck and cheeks, keeping tension even through the joining round so the seated posture holds; shape the body wide rather than tall to get the chubby silhouette.
- Close the Arms using the flat two-direction sc seam, leaving the long tail for attaching rather than fastening it off separately.
- Arms are joined directly into Rnd 16 of the body — worked through both the arm edge and body stitches simultaneously — rather than sewn on afterward. Set safety eyes and nose, then complete the Face — Cinch 1 and Cinch 2 steps to shape the muzzle before final embroidery.
How the parts fit
- The leg-to-body join happens on a single transition round (Rnd 7), converting two independent 8-sc leg tubes into one continuous body cylinder — this is what makes the piece read as 'one continuous piece' rather than three sewn parts.
- Arms are worked flat and closed with a two-pass sc seam instead of stuffed as a tube; this keeps them thin and unstuffed by design, which is why the pattern instructs not to stuff them.
- Rnd 20 relocates the round start to center back specifically so the Rnd 21–23 sl st pair lands at center front — the shaping and the seam placement are set up two rounds in advance of the sl st appearing.
Scaling the build
| Larger | Move to a heavier bulky or super-bulky chenille with a hook one size up from E-4 (3.5 mm); the existing round counts hold but each stitch grows, scaling the whole cat up. |
|---|---|
| Smaller | Drop to a worsted-weight chenille with a smaller hook (closer to a standard worsted gauge); stitches tighten and the same round counts produce a more compact body. |
| Rounder body | Repeat one straight round in the Legs + Body + Head section (any 'sc in each st around' round) before the head shaping begins, adding height to the torso without changing the leg or head counts. |
03 · Putting it togetherHow the pieces go together
- S1
Face — Cinch 1 (Eye Spacing): Thread tapestry needle with matching yarn. Insert from front at base of neck, exit at lower outer edge of one eye white. Re-enter at lower outer edge of opposite eye white. Exit 1 sc away from the starting point. Pull firmly to draw eyes together naturally. Repeat once more if desired.
- S2
Face — Cinch 2 (Muzzle Lift): Thread is at the bottom of the head. Insert needle between eyes (thread runs along the sl st seam on the face) and exit through the open crown. Re-enter through the same crown opening and bring needle to the base of the neck, exiting 1 sc from the starting point. Pull firmly upward to lift the muzzle. Tie several secure knots. If eyes spread too far apart after cinching, gently push apart with fingers while redistributing stuffing.
- S3
Crown: After cinching, add extra fiberfill to the crown area through the open hole. Close the crown using the remaining yarn tail. Weave in end.
- S4
Nose: Glue the pink safety nose centered between the eyes.
- S5
Face Details: Embroider a vertical dividing line below the nose and two small eyebrows using black cotton thread. Embroider eyelids using two strands of plush yarn. Add blush to cheeks with cosmetic chalk or blush if desired.
- S6
Final Step: Weave in all remaining yarn tails.
04 · Snag listWhat went wrong on the bench, and the fix
Snag 1
Losing the round-start marker at Rnd 20
Place a stitch marker the instant the start shifts to center back. Without it, the center-front sl st in Rnds 21–23 will drift off-axis.
Snag 2
Stuffing the Arms
Leave them unstuffed and flatten before closing — the flat sc-through-both-layers seam only works on an empty panel.
Snag 3
Uneven tension on the opposing seam passes
Work both directions of the 3-sc closure at matching tightness; check the seam lies flat before fastening off.
Snag 4
Rushing the face cinches
Pull Cinch 1 and Cinch 2 gradually, checking eye spacing and muzzle lift after each pass rather than after both are complete.
05 · QueriesQuestions logged against this build
Why are the legs, body, and head worked as one piece?
It removes the need to sew the body to the head or legs to the body — the joining round fuses two leg tubes into a single cylinder that flows straight into the head shaping. Fewer seams also means less risk of stuffing showing at a join.
Why aren't the Arms stuffed?
The pattern flattens the Arms and closes them with a two-direction sc seam through both layers, which only lies flat on an empty panel. Stuffed arms would bulge at that seam instead of closing cleanly.
What do the two face cinches actually do?
Cinch 1 pulls the eye whites toward each other for spacing; Cinch 2 runs from between the eyes up through the open crown to lift the muzzle. Both are worked with matching thread after stuffing, before the crown closes.
06 · Made byWho counted this one

Who writes Amigurumi Addict, how a build gets its number, and why every round on the site carries a stitch count.
07 · Next off the benchThree builds that sit near this one

Animals
Crochet a bunny or frog from one amigurumi base
How do you crochet a bunny and a frog from one base? Share Legs, Body, and Head; swap ears or eyes.

Animals
Crochet giraffe amigurumi pattern with horns and ears
How do you crochet a giraffe amigurumi? Shape head, body, legs, ears and horns in worsted yarn.

Animals
Amigurumi cat crochet pattern with oval muzzle and bow
How do you crochet an amigurumi cat with a flat muzzle? Shape it separately, pinch it, then sew it on.
Join the build log
One message when a build is issued
A drawing and its parts list, when one leaves the bench.