| Shelf | Level | Time | Hook | Yarn |
|---|---|---|---|---|
| Animals | Intermediate | 4-6 hours | 6.0 mm | Worsted |
Striped shell lace tank with pompom hem trim
Want a striped crochet tank with texture rows? This five-color pattern pairs hdc panels with shell lace and pompom hem.
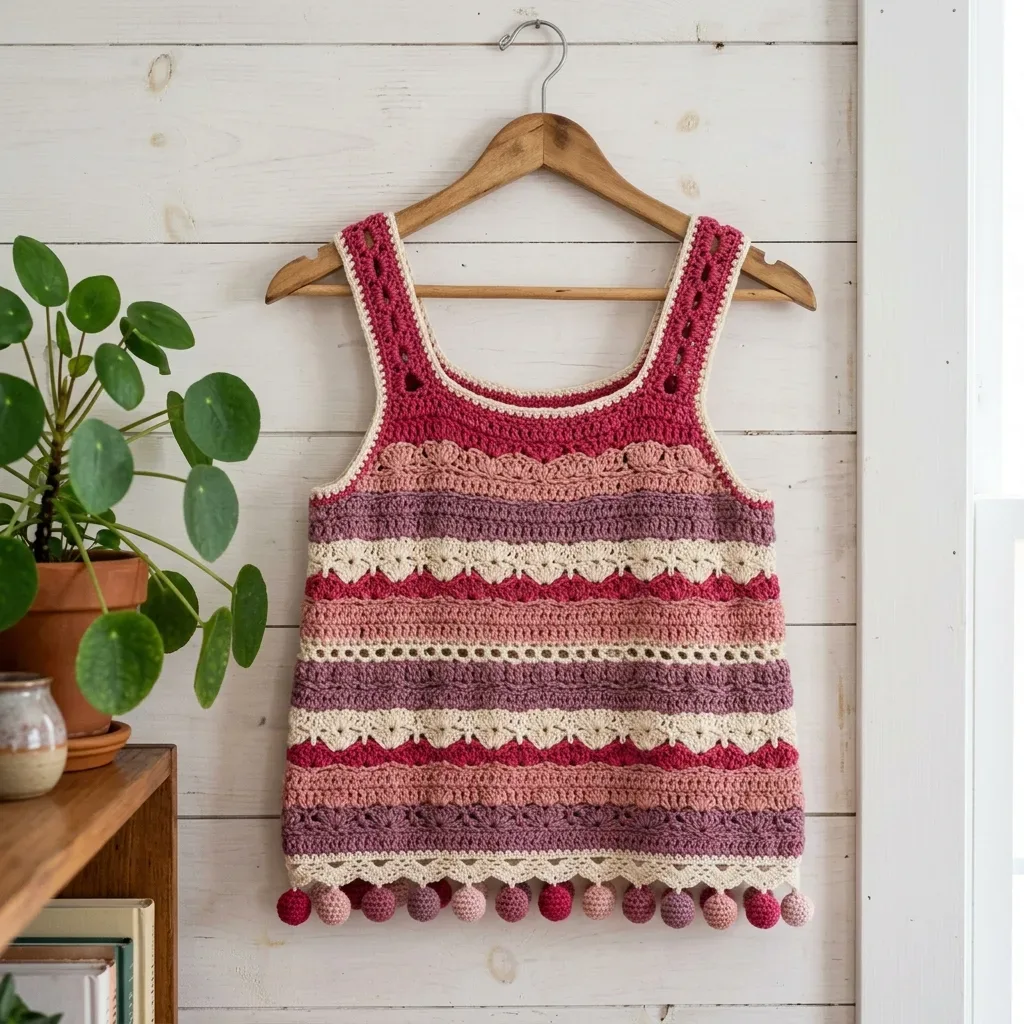
01 · The pieceWhat Striped shell lace tank with pompom hem trim actually is
Two flat panels, Front and Back, built from the hem up in hdc rows interrupted by paired shell lace rows in Color E. Straps are shaped by working armhole and neckline decreases directly into the panel, then splitting the remaining stitches into Left Strap and Right Strap sections worked separately in rows. Shoulder seams join the strap tops; side seams close the body below the armholes. Small crocheted balls, made in the round and stuffed, hang off the hem as a separate attached component.
Stitch counts across the hdc rows are fixed and must land on 60 (66, 72) every time — the shell lace rows deliberately push that number up and the following hdc row restores it, so miscounting there compounds fast. Tension on the shell lace fans matters less; a slightly looser or tighter 5-dc shell still reads as a fan. Pompom shaping in Round 5 tolerates an imperfect pull-through since stuffing fills the gaps, but the magic ring start in Round 1 needs to cinch fully closed or the ball leaks fiberfill.
02 · The count run30 rounds across 12 parts, each with its count
US terms throughout. Every row below ends with the count that round finishes on.
| Part | Qty | Finishes on |
|---|---|---|
| Front Panel | 1 | - |
| Shell Lace Rows 4 and 5 (Color E) | 1 | - |
| Main Pattern | 1 | - |
| Armhole Shaping (Rows 41 to 48) | 1 | - |
| Left Strap | 1 | - |
| Right Strap | 1 | - |
| Rows 6, 7, 8 (Color B, hdc) | 1 | - |
| Neckline Shaping and Straps (Rows 49 to 55) | 1 | - |
| Back Panel | 1 | - |
| Armhole Edging (work on each armhole) | 1 | - |
| Neckline Edging | 1 | - |
| Lower Hem Edging | 1 | - |
Foundation chain setup: With Color A and US J hook, chain 62 (68, 74).
| Round | Instruction | Count |
|---|---|---|
| Round 1 | (RS): Hdc into 3rd chain from hook and into each chain across. Turn. (60, 66, 72 hdc) | - |
| Round 2 | Chain 2 (counts as hdc). Hdc into each stitch across to end. Turn. (60, 66, 72 hdc) | - |
| Round 3 | Chain 2. Hdc into each stitch across. Turn. (60, 66, 72 hdc) Color A section complete. Change to Color E on last stitch of Row 3. | - |
| Round | Instruction | Count |
|---|---|---|
| Round 4 | Shell Lace Row A, RS Chain 3 (counts as dc). Work 2 dc into first stitch. Skip 2 stitches. Sc into next stitch. Skip 2 stitches, work 5 dc shell into next stitch, skip 2 stitches, sc into next stitch. Repeat from to across until 3 stitches remain. Skip 2 stitches. Work 3 dc into last stitch. Turn. | - |
| Round 5 | Shell Lace Row B, WS Chain 1. Sc into first dc. Chain 2, work 5 dc shell into sc of previous row, chain 2, sc into center dc of next shell. Repeat from to across, ending with chain 2, work 5 dc into last sc, chain 2, sc into top of turning chain. Turn. Change to Color B on last stitch of Row 5. | - |
| Round | Instruction | Count |
|---|---|---|
| Round 9 | and 10 (Color E, shell lace unit): Repeat Rows 4 and 5. Change to Color C on last stitch of Row 10. | - |
| Round 11 | , 12, 13 (Color C, hdc): Chain 2, hdc into each stitch across. Restore 60 (66, 72) stitches on Row 11. Turn. (60, 66, 72 hdc) | - |
| Round 14 | and 15 (Color E, shell lace unit): Repeat Rows 4 and 5. Change to Color D on last stitch of Row 15. | - |
| Round 16 | , 17, 18 (Color D, hdc): Chain 2, hdc into each stitch across. Restore 60 (66, 72) stitches on Row 16. Turn. (60, 66, 72 hdc) | - |
| Round 19 | and 20 (Color E, shell lace unit): Repeat Rows 4 and 5. Change to Color A on last stitch of Row 20. | - |
| Round 21 | , 22, 23 (Color A, hdc): Chain 2, hdc into each stitch across. Restore 60 (66, 72) stitches on Row 21. Turn. (60, 66, 72 hdc) | - |
| Round 24 | and 25 (Color E, shell lace unit): Repeat Rows 4 and 5. Change to Color B on last stitch of Row 25. | - |
| Round 26 | , 27, 28 (Color B, hdc): Chain 2, hdc into each stitch across. Restore count on Row 26. Turn. (60, 66, 72 hdc) | - |
| Round 29 | and 30 (Color E, shell lace unit): Repeat Rows 4 and 5. Change to Color C on last stitch of Row 30. | - |
| Round 31 | , 32, 33 (Color C, hdc): Chain 2, hdc into each stitch across. Restore count on Row 31. Turn. (60, 66, 72 hdc) | - |
| Round 34 | and 35 (Color E, shell lace unit): Repeat Rows 4 and 5. Change to Color D on last stitch of Row 35. | - |
| Round 36 | , 37, 38 (Color D, hdc): Chain 2, hdc into each stitch across. Restore count on Row 36. Turn. (60, 66, 72 hdc) | - |
| Round 39 | and 40 (Color E, shell lace unit): Repeat Rows 4 and 5. Change to Color A on last stitch of Row 40.Checkpoint: After Row 40, your panel should measure approximately 16 inches / 40.5 cm from the foundation chain edge to the current row. | - |
| Round | Instruction | Count |
|---|---|---|
| Round 41 | Color A, RS Sl st across first 5 (5, 6) stitches. Chain 2. Hdc into each stitch across until 5 (5, 6) stitches remain. Leave remaining stitches unworked. Turn. (50, 56, 60 hdc) | - |
| Round 42 | Color A Chain 2. Hdc into each stitch across. Turn. (50, 56, 60 hdc) | - |
| Round 43 | Color A Chain 2. Hdc into each stitch across. Turn. (50, 56, 60 hdc) | - |
| Round 44 | and 45 (Color E, shell lace unit): Work shell lace rows across the 50 (56, 60) working stitches. Adjust partial edge shells as needed to maintain width. Change to Color B on last stitch of Row 45. | - |
| Round 46 | , 47, 48 (Color B, hdc): Restore 50 (56, 60) stitches on Row 46. Chain 2, hdc across. Turn. (50, 56, 60 hdc)Checkpoint: After Row 48, your panel from foundation to current row should measure approximately 19 inches / 48.5 cm. | - |
| Round | Instruction | Count |
|---|---|---|
| Round 49 | RS, Color B Chain 2. Hdc into next 14 (16, 17) stitches only. Turn, leaving remaining stitches unworked. (15, 17, 18 hdc) | - |
| Round 50 | Chain 2. Hdc across. Turn. (15, 17, 18 hdc) | - |
| Round 51 | and 52 (Color E, shell lace): Work shell lace unit across 15 (17, 18) stitches. Change to Color C on last stitch of Row 52. | - |
| Round 53 | Color C Chain 2. Hdc across. Restore 15 (17, 18) stitches. Turn. (15, 17, 18 hdc) | - |
| Round 54 | Chain 2. Hdc across. Turn. (15, 17, 18 hdc) | - |
| Round 55 | Chain 2. Hdc across. Turn. (15, 17, 18 hdc) Fasten off Color C, leaving a 12 inch / 30.5 cm tail for shoulder seaming. | - |
With RS facing, skip the center 20 (22, 24) stitches after the left strap. Rejoin Color B in the next stitch.
| Round | Instruction | Count |
|---|---|---|
| Round 49 | RS, Color B Chain 2. Hdc into each remaining stitch across. Turn. (15, 17, 18 hdc)Work Rows 50 through 55 exactly as for Left Strap. Fasten off with a 12 inch / 30.5 cm tail. | - |
Chain 2, hdc into each stitch across. Work the first hdc of Row 6 into each stitch and chain space of Row 5 evenly to restore 60 (66, 72) stitches. Turn at end of each row. (60, 66, 72 hdc)
Neckline opening widths: Small: center 20 stitches left unworked, each strap is 15 stitches wide Medium: center 22 stitches left unworked, each strap is 17 stitches wide
Large: center 24 stitches left unworked, each strap is 18 stitches wide
Work the back panel identically to the front panel, following all rows from the foundation chain through Row 55. The back neckline and shoulder straps are worked the same. Fasten off with tails for seaming.
Join Color E with a sl st at the base of the armhole at the side seam. Work sc evenly around the entire armhole opening, placing 1 sc per row end along vertical edges and 1 sc per stitch along horizontal edges. At corners, work 3 sc into the corner stitch. Join with sl st to first sc. Do not turn. Work 1 round of sl st loosely into the back loop of each sc around. Fasten off and weave in end.
Join Color E with sl st at any point along the neckline edge. Work sc evenly around the entire neckline, placing 1 sc per row end along strap edges, 1 sc per stitch along the bound-off neckline edges. At inner corners, work sc2tog to prevent flaring. Work 2 rounds of sc around the neckline, then 1 round of sl st in back loops. Fasten off and weave in end.
Join Color E with sl st at any point along the lower foundation edge. Work 1 round of sc into each foundation chain stitch around the full lower edge. Join with sl st. Fasten off.
Techniques on this build
- Shell stitch (5 dc into one space)
- Rows 4 and 5 and every Color E repeat; keep all 5 dc in the same stitch or chain space or the fan skews.
- Color changes on the last stitch
- Happens at the end of Row 3, Row 5, and each hdc block; pull the new color through the final yarn-over so the join sits at the edge, not mid-row.
- Armhole and neckline shaping via decreases and unworked stitches
- Rows 41-48 and 49-55; leaving stitches unworked at the row end is intentional shaping, not a missed row.
- Continuous spiral single crochet for the pompoms
- Rounds 1-5 of each ball; no join or turn, so mark the round start or lose track of the decrease rounds.
Final fit-up
- Weave in color-change ends from the Front Panel, Shell Lace Rows, and Main Pattern stripes before seaming — buried ends hold better under the shell texture than left loose.
- Stuff each pompom firmly with yarn scraps or fiberfill at Round 4, before working the final decrease round.
- Close each pompom by pulling the Round 5 tail through the remaining stitches, pulling tight, and securing; leave that tail long for hem attachment rather than trimming it.
- Block Front and Back Panels to finished measurements first, then whipstitch or mattress-stitch the shoulder straps and side seams, and finally attach the pompoms along the lower hem using their reserved tails.
How the parts fit
- The stitch count rises above 60 (66, 72) during Shell Lace Rows 4 and 5 because each 5-dc shell and its flanking single crochets add stitches beyond a plain hdc row; the following hdc row (Rows 11, 16, and onward) is worked to restore the base count, so the increase is temporary by design, not a shaping increase.
- Front Panel and Back Panel are worked flat in rows rather than in the round because the shell lace pattern requires a right-side and wrong-side alternation (Row 4 RS, Row 5 WS) to keep the shell motif facing outward on both sides of the fabric.
- Shoulder seams join only the strap-top stitch widths — 15 (17, 18) stitches — rather than the full panel width, which is what leaves the wide shoulder coverage from Left Strap and Right Strap while keeping the neckline open in the center.
Scaling the build
| Larger | Work the largest bracketed size throughout (74-chain foundation, 72 hdc rows, 18-stitch shoulder width) and use the higher yardage figures listed for each color. |
|---|---|
| Smaller | Work the smallest bracketed size (62-chain foundation, 60 hdc rows, 15-stitch shoulder width); this also reduces yarn needed per color to the lowest listed yardage. |
03 · Putting it togetherHow the pieces go together
- S1
Step 1: Block both panels before seaming. Wet block by soaking in cool water for 15 minutes. Squeeze gently without wringing. Pin to finished measurements and let dry completely.
- S2
Step 2: Shoulder seams. Hold front and back panels with wrong sides together, aligning shoulder straps. With Color A and yarn needle, whipstitch or mattress stitch through both layers across the top 15 (17, 18) stitch widths of each strap. Fasten off and weave in ends.
- S3
Step 3: Side seams. With wrong sides together, align front and back panels at side edges. Beginning at the lower hem edge, use mattress stitch with Color A to seam up each side, stopping when you reach Row 40. The armhole opening is the unseamed portion above Row 40 through Row 48. Fasten off and weave in ends.
04 · Snag listWhat went wrong on the bench, and the fix
Snag 1
Losing the 60/66/72 count after shell rows
Count stitches at the end of every hdc row (11, 12, 13, and similar). If the number does not match the size column, recheck the shell row above before continuing.
Snag 2
Magic ring not pulled tight on pompoms
Cinch the ring closed before working Round 1's 6 sc. A loose ring leaves a visible hole at the pompom center even after stuffing.
Snag 3
Treating unworked stitches as a mistake
In Armhole Shaping and Neckline Shaping, stitches left unworked at a row's end are the shaping method, not a dropped row. Leave them and turn as directed.
05 · QueriesQuestions logged against this build
Can I substitute a different yarn weight for this tank?
Stick to worsted weight (category 4) cotton or cotton blend as listed, since the stitch counts and shell lace proportions assume that gauge. A lighter yarn like DK held as light worsted works if held to match gauge, but plain DK will shrink the finished measurements.
Why does the stitch count change between rows?
Shell Lace Rows 4 and 5 add stitches through the 5-dc shells and connecting single crochets, pushing the count above 60/66/72. The next hdc row restores the base count, so the fluctuation is expected, not an error.
How many pompoms does the hem need?
The pattern does not fix a number in the excerpt shown; work as many as needed to space evenly along the Lower Hem Edging, using the long tail left after Round 5's closure to attach each one.
06 · Made byWho counted this one

Who writes Amigurumi Addict, how a build gets its number, and why every round on the site carries a stitch count.
07 · Next off the benchThree builds that sit near this one

Animals
Crochet a bunny or frog from one amigurumi base
How do you crochet a bunny and a frog from one base? Share Legs, Body, and Head; swap ears or eyes.

Animals
Crochet giraffe amigurumi pattern with horns and ears
How do you crochet a giraffe amigurumi? Shape head, body, legs, ears and horns in worsted yarn.

Animals
Amigurumi cat crochet pattern with oval muzzle and bow
How do you crochet an amigurumi cat with a flat muzzle? Shape it separately, pinch it, then sew it on.
Join the build log
One message when a build is issued
A drawing and its parts list, when one leaves the bench.