| Shelf | Level | Time | Hook | Yarn |
|---|---|---|---|---|
| Sea friends | Intermediate | 4-6 hours | 3.5 mm | Bulky |
How to crochet a baby seahorse amigurumi
How do you crochet a baby seahorse amigurumi? Build the Body and Head, Nose, six Horns, Belly, and two Wings, then sew
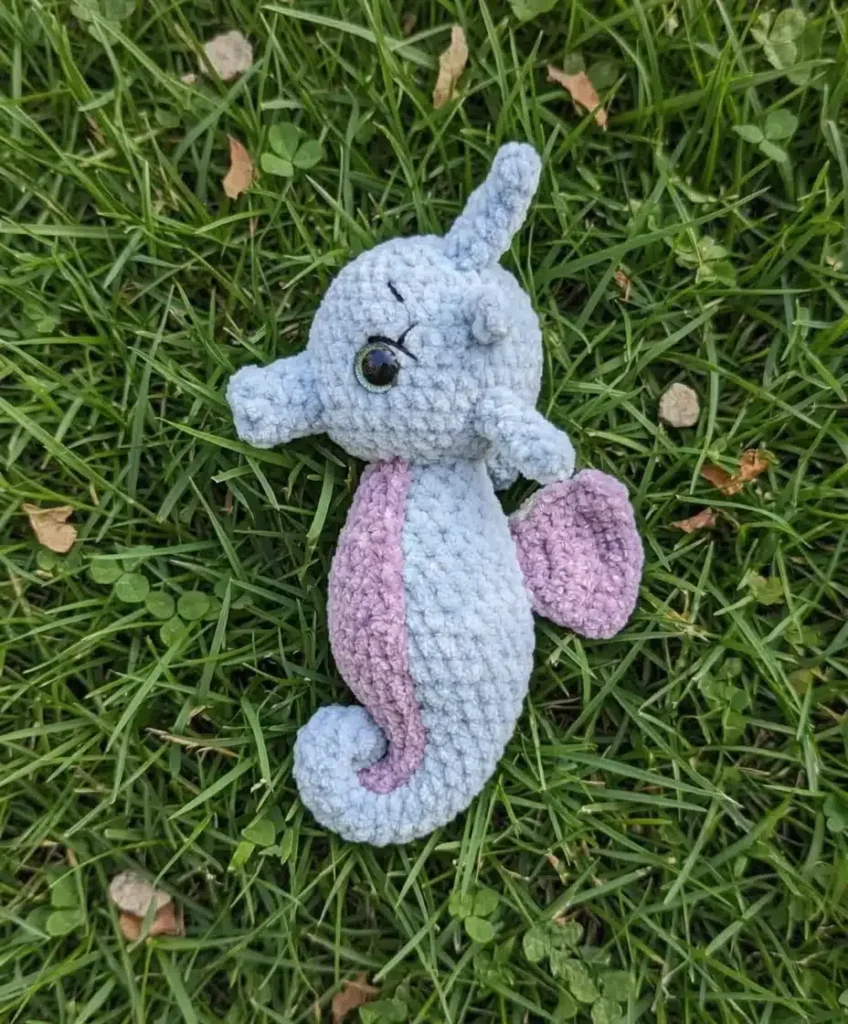
01 · The pieceWhat How to crochet a baby seahorse amigurumi actually is
The seahorse builds from five separate pieces: a Body and Head worked as one continuous 18-round spiral, a five-round Nose, six two-round Horns, a nineteen-row Belly worked flat, and two Wings. Fiberfill stuffing gives the Body and Head their shape before the fasten-off tail closes the top. Nose, Horns, Belly, and Wings are each finished separately, then sewn on with their own tails, so the join lines sit where sewing thread crosses chenille rather than where stitches meet.
Precision matters at the eyes: the 16 mm safety eyes and the facial sculpting thread anchored at the head's marked round set the seahorse's expression, so placement should be pinned and checked before committing. Horn spacing along the head benefits from even gaps across six identical pieces. Stuffing density, exact stitch tension in the Nose's increase rounds, and the Belly's row count are more forgiving — the chenille fiber hides minor unevenness, and a slightly plumper Nose reads as personality, not error.
This pattern is written in US crochet terms. Gauge isn't critical for amigurumi, but working tight stitches keeps the stuffing from showing through; at this tension, using the specified yarns and a 3.5 mm hook, the finished seahorse stands about 18 cm (7 inches) tall, not including the horns.
02 · The count run61 rounds across 6 parts, each with its count
US terms throughout. Every row below ends with the count that round finishes on.
| Part | Qty | Finishes on |
|---|---|---|
| Body (and Head) | 1 | - |
| Head | 1 | - |
| Nose | 1 | - |
| Horns (Make 6) | 1 | - |
| Belly | 1 | - |
| Wings (Make 2) | 1 | - |
Work with Main Color yarn and 3.5 mm hook.
| Round | Instruction | Count |
|---|---|---|
| Round 1 | 6 sc in MR (6) | - |
| Rounds 2–8 | (7 rounds) 6 sc (6) | - |
You're creating the start of the body, which will form a cute little tail!
| Round | Instruction | Count |
|---|---|---|
| Round 9 | (1 sc, inc) x 3 (9) | - |
Now you can start adding a little stuffing to the tail part. Don't overstuff it, just enough to give it shape.
| Round | Instruction | Count |
|---|---|---|
| Rounds 10–12 | (3 rounds) 9 sc (9) | - |
| Round 13 | (2 sc, inc) x 3 (12) | - |
| Round 14 | 6 sc, (1 sc, inc) x 3 (15) | - |
| Round 15 | 15 sc (15) | - |
| Round 16 | 6 sc, (2 sc, inc) x 3 (18) | - |
| Round 17 | 18 sc (18) | - |
| Round 18 | 6 sc, (3 sc, inc) x 3 (21) | - |
Your stitch marker will be on the side as you work. The increases here are starting to form the lovely round belly!
| Round | Instruction | Count |
|---|---|---|
| Round 19 | 6 sc, (4 sc, inc) x 3 (24) | - |
| Rounds 20–21 | (2 rounds) 24 sc (24) | - |
| Round 22 | (6 sc, dec) x 3 (21) | - |
| Round 23 | 21 sc (21) | - |
| Round 24 | (5 sc, dec) x 3 (18) | - |
Keep stuffing as you go, shaping that sweet belly.
| Round | Instruction | Count |
|---|---|---|
| Round 25 | (4 sc, dec) x 3 (15) | - |
| Rounds 26–29 | (4 rounds) 15 sc (15) | - |
| Round 30 | (3 sc, dec) x 3 (12) | - |
| Round 31 | 12 sc (12) | - |
Don't cut your yarn! We're moving straight into the head now.
Continue with Main Color yarn and 3.5 mm hook.
| Round | Instruction | Count |
|---|---|---|
| Round 32 | inc x 12 (24) | - |
| Round 33 | (1 sc, inc) x 12 (36) | - |
| Rounds 34–39 | (6 rounds) 36 sc (36)Your stitch marker might shift a bit, that's perfectly fine. Just keep track of your first stitch in each round. | - |
| Round 40 | (4 sc, dec) x 6 (30) | - |
Now it's time to place the safety eyes! To find the center, gently flatten the head so the front aligns with where the belly will be. Mark the center point between Rnd 4 and Rnd 5 (counting from Rnd 32 as Rnd 1 of the head). From this central marker, count 5 stitches to the right and 5 stitches to the left, and insert your safety eyes. Secure them firmly.
Continue to stuff the head as you crochet.
| Round | Instruction | Count |
|---|---|---|
| Round 41 | (3 sc, dec) x 6 (24) | - |
| Rounds 42–43 | (2 rounds) 24 sc (24) | - |
| Round 44 | (2 sc, dec) x 6 (18) | - |
| Round 45 | (1 sc, dec) x 6 (12) | - |
| Round 46 | dec x 6 (6)Carefully close the remaining hole. Fasten off, weave in the end, and hide it inside the head. Your seahorse's head and body are looking so wonderful! | - |
Work with Main Color yarn and 3.5 mm hook.
| Round | Instruction | Count |
|---|---|---|
| Round 1 | 6 sc in MR (6) | - |
| Round 2 | (1 sc, inc) x 3 (9) | - |
| Rounds 3–6 | (4 rounds) 9 sc (9) | - |
| Round 7 | 4 sc, inc, 4 sc (10) | - |
| Round 8 | 10 sl st (10)Fasten off, leaving a long tail for sewing. The increase on Rnd 7 will be the top of the nose, giving it a sweet little curve. | - |
Work with Main Color yarn and 3.5 mm hook.
| Round | Instruction | Count |
|---|---|---|
| Round 1 | 5 sc in MR (5) | - |
| Rounds 2–7 | (6 rounds) 5 sc (5)Fasten off, leaving a medium-length tail for sewing. You've made so many cute little horns! | - |
Work with Accent Color yarn and 2 mm hook. This piece is worked in turning rows. Start with a ch 2, then work into the second ch from hook for Row 1.
| Round | Instruction | Count |
|---|---|---|
| Round 1 | 1 sc (1) ch 1, turn | - |
| Round 2 | inc (2) ch 1, turn | - |
| Round 3 | 2 sc (2) ch 1, turn | - |
| Round 4 | inc x 2 (4) ch 1, turn | - |
| Round 5 | 4 sc (4) ch 1, turn | - |
| Round 6 | 1 sc, inc x 2, 1 sc (6) ch 1, turn | - |
| Rounds 7–8 | (2 rows) 6 sc (6) ch 1, turn | - |
| Round 9 | 2 sc, inc x 2, 2 sc (8) ch 1, turn | - |
| Round 10 | 8 sc (8) ch 1, turn | - |
| Round 11 | 2 sc, inc, 2 sc, inc, 2 sc (10) ch 1, turn | - |
| Round 12 | 10 sc (10) ch 1, turn | - |
| Round 13 | 2 sc, inc, 4 sc, inc, 2 sc (12) ch 1, turn | - |
| Rounds 14–17 | (4 rows) 12 sc (12) ch 1, turn | - |
| Round 18 | 2 sc, dec, 4 sc, dec, 2 sc (10) ch 1, turn | - |
| Round 19 | 10 sc (10) ch 1, turn | - |
| Round 20 | 2 sc, dec, 2 sc, dec, 2 sc (8) ch 1, turn | - |
| Rounds 21–24 | (4 rows) 8 sc (8) ch 1, turn | - |
| Round 25 | 2 sc, dec x 2, 2 sc (6) ch 1, turn | - |
| Rounds 26–27 | (2 rows) 6 sc (6) ch 1, turn Now, single crochet around the entire edge of the belly to give it a neat finish. Fasten off, leaving a long tail for sewing. Your seahorse's belly is ready for cuddles! | - |
Work with Accent Color yarn and 2 mm hook. This piece is worked in turning rows. Start with a ch 3, then work into the second ch from hook for Row 1.
| Round | Instruction | Count |
|---|---|---|
| Round 1 | 2 sc (2) ch 1, turn | - |
| Round 2 | inc x 2 (4) ch 1, turn | - |
| Round 3 | 1 sc, inc x 2, 1 sc (6) ch 1, turn | - |
| Round 4 | 2 sc, inc x 2, 2 sc (8) ch 1, turn | - |
| Round 5 | 3 sc, inc x 2, 3 sc (10) ch 1, turn | - |
| Round 6 | 4 sc, inc x 2, 4 sc (12) ch 1, turn | - |
| Round 7 | 5 sc, inc x 2, 5 sc (14) ch 1, turnSingle crochet around the entire edge of the wing to give it a neat finish. Fasten off, leaving a long tail for sewing. Your seahorse is almost ready to take flight! | - |
Techniques on this build
- Magic ring start
- Opens the Body/Head, Nose, and each of the six Horns; pull the tail snug or the center hole shows through the chenille fiber.
- Continuous spiral single crochet
- Used for the Body and Head across 18 rounds; a stitch marker is not optional here since chenille masks the round boundary.
- Flat rows with turning chains
- The Belly is worked in 19 turning rows from a ch 2 start; the chain-1 turn at each row end keeps the panel flat instead of spiraling.
- Facial sculpting with sculpting thread
- Anchored into the head's marked round and looped under the safety eyes to carve the eye sockets; work after the eyes are seated, not before.
Final fit-up
- Stuff the Body and Head firmly before closing, packing fiberfill down through the neck so the Nose end sits taut against the stuffing.
- Close the final round of the Body/Head by cinching the fasten-off tail through the remaining stitches and pulling flush.
- Attach Nose, Horns, Belly, and Wings using the sewing tails left on each piece, pinning placement before committing any stitches.
- Weave in all remaining ends and trim them close to the surface so no tail shows through the chenille fiber at the seams.
How the parts fit
- The Body and Head are worked as a single unbroken spiral rather than as two joined pieces — the pattern lists 18 rounds for Body-and-Head combined, with the Head's own shaping occupying 9 of those rounds.
- The Nose front-loads its shaping: 6 sc in the magic ring increases to 9 sc by Rnd 2, holds flat at 9 sc for four rounds, then adds one more increase at Rnd 7 — the widest point sits near the base, not the tip.
- The Horns carry no shaping at all: 5 sc in the magic ring, then six rounds worked even at 5 sc. Their tapered look comes from stuffing and gathering at the fasten-off, not from stitch count changes.
Scaling the build
| Larger | Move from the 3.5 mm hook to a larger hook with the same bulky chenille; the looser gauge enlarges the Body, Head, and Nose proportionally without altering any stitch count. |
|---|---|
| Longer horns | Extend the Horns' even rounds beyond the 6 rounds specified (Rnd 2-7) to lengthen them, or work fewer rounds to shorten them, adjusting stuffing to match the new length. |
03 · Putting it togetherHow the pieces go together
- S1
Now for the magical part – bringing all your wonderful pieces together! Take your time with these steps, and don't be afraid to use pins to position everything just right before you commit to sewing.
- S2
Facial Sculpting: This step adds so much character!
- S3
Thread your strong sculpting thread onto a tapestry needle.
- S4
Insert the needle into the center of the first round of the head (Rnd 32), then bring it out at the lower inner corner of one safety eye.
- S5
Insert the needle into the upper inner corner of the same eye, and bring it back out at the starting point (center of Rnd 32). Gently pull to create a subtle indentation, then knot the thread securely and hide the ends inside the head.
- S6
Repeat this process for the second eye, starting from the same central point.
- S7
For a little bridge between the eyes, insert the needle from the back of the head (around Rnd 32) and bring it out at the upper outer corner of the first eye.
- S8
Insert the needle into the upper inner corner of the same eye, then bring it out at the upper inner corner of the other eye.
- S9
Insert the needle into the upper outer corner of the second eye, then bring it back out at the back of the head, one stitch away from your initial insertion point. Gently pull to create a subtle indentation, knot, and hide the ends.
- S10
Attach the Nose: Pin the nose between the eyes, making sure the slightly increased edge (from Rnd 7) is facing upwards. Sew it securely in place using the tail you left.
- S11
Position the Horns: This seahorse has six horns! Arrange them in three pairs.
- S12
The central pair should be placed on top of the head, about 3 rows apart, roughly 5 stitches back from each eye towards the back of the head.
- S13
Then, place two more horns slightly in front and to the sides of the central pair, and the final two horns slightly behind and to the sides. Use pins to get the placement just right, then sew them firmly.
- S14
Embroider Facial Features:
- S15
Using your sport weight cotton yarn and a tapestry needle, embroider a sweet little mouth just below the nose. A simple "V" shape or a gentle curve works beautifully.
- S16
For the eye whites, cut two small ovals from white plush yarn and carefully glue or stitch them onto the lower part of the safety eyes for an extra touch of cuteness.
- S17
Attach the Belly: Pin the accent-colored belly piece to the front of your seahorse's body, centering it over the increases you made from Rnd 14 onwards. Sew it neatly all around.
- S18
Attach the Wings: Pin one wing to each side of the seahorse's back, positioning them slightly above the belly and towards the center of the back. Sew them securely.
- S19
Final Touches: Position the narrowest part of the body (the first few rounds) as a cute, stubby tail at the back. You can gently bend it into a slight curl and secure it with a few stitches if you like.
04 · Snag listWhat went wrong on the bench, and the fix
Snag 1
Losing track of the round start
Chenille hides the spiral seam that other yarns show, so move the stitch marker up every round without exception rather than relying on sight to find round start.
Snag 2
Working the Belly in the round
The Belly uses turning rows with a ch 1 at each end; skipping the turn twists the increase rows and the panel will not lie flat against the Body.
Snag 3
Overstuffing the Horns
The Horns have zero shaping rounds, so heavy stuffing turns them into stiff tubes; stuff lightly or leave them empty and pinch flat when sewing to get a horn silhouette instead of a sausage.
Snag 4
Sculpting before the eyes are set
The facial sculpting thread anchors into the head's marked round and loops under the safety eyes, so seat the 16 mm eyes first, then run the sculpting thread.
05 · QueriesQuestions logged against this build
Why is the Belly worked flat instead of in the round?
The Belly is a panel meant to sit against the curved underside of the Body, and turning rows with a chain-1 turn keep that panel flat rather than twisting into a spiral. Working it in rounds would pull the shape into a tube instead of a flat strip.
How many Horns does this pattern need, and how big are they?
Six Horns, each just two rounds: 5 sc into a magic ring, then six rounds worked even at 5 sc with no increases. They are sewn along the head and back once stuffed and closed.
What size safety eyes does the pattern call for?
Two 16 mm safety eyes, inserted into the Head before the facial sculpting thread is worked through the marked round. Their placement is checked with pins first since the sculpting stitches anchor around them.
06 · Made byWho counted this one

Who writes Amigurumi Addict, how a build gets its number, and why every round on the site carries a stitch count.
07 · Next off the benchThree builds that sit near this one
Sea friends
Crochet a strawberry whale plushie with leaf crown
How do you crochet a strawberry whale? Build a red sc body, add fins, tail, and a leaf-and-stem crown.
Sea friends
Little Kitty Amigurumi Crochet Pattern (Free & Beginner-Friendly)
Crochet an adorable Little Kitty amigurumi with this free pattern featuring continuous body-to-head construction and two cute ear options. Just 12-13 cm ta
Sea friends
Sea Turtle Amigurumi Pattern — Easy Crochet Tutorial
Crochet an adorable sea turtle amigurumi with this easy pattern featuring a plush shell, cute head, and simple joining techniques for beginners.
Join the build log
One message when a build is issued
A drawing and its parts list, when one leaves the bench.