| Shelf | Level | Time | Hook | Yarn |
|---|---|---|---|---|
| Animals | Intermediate | 4-6 hours | 3.5 mm | Light Worsted |
Amigurumi pencil toy with a mustard eraser band
How do you crochet an amigurumi pencil? Spiral body, safety eyes, and a mustard eraser band edging.
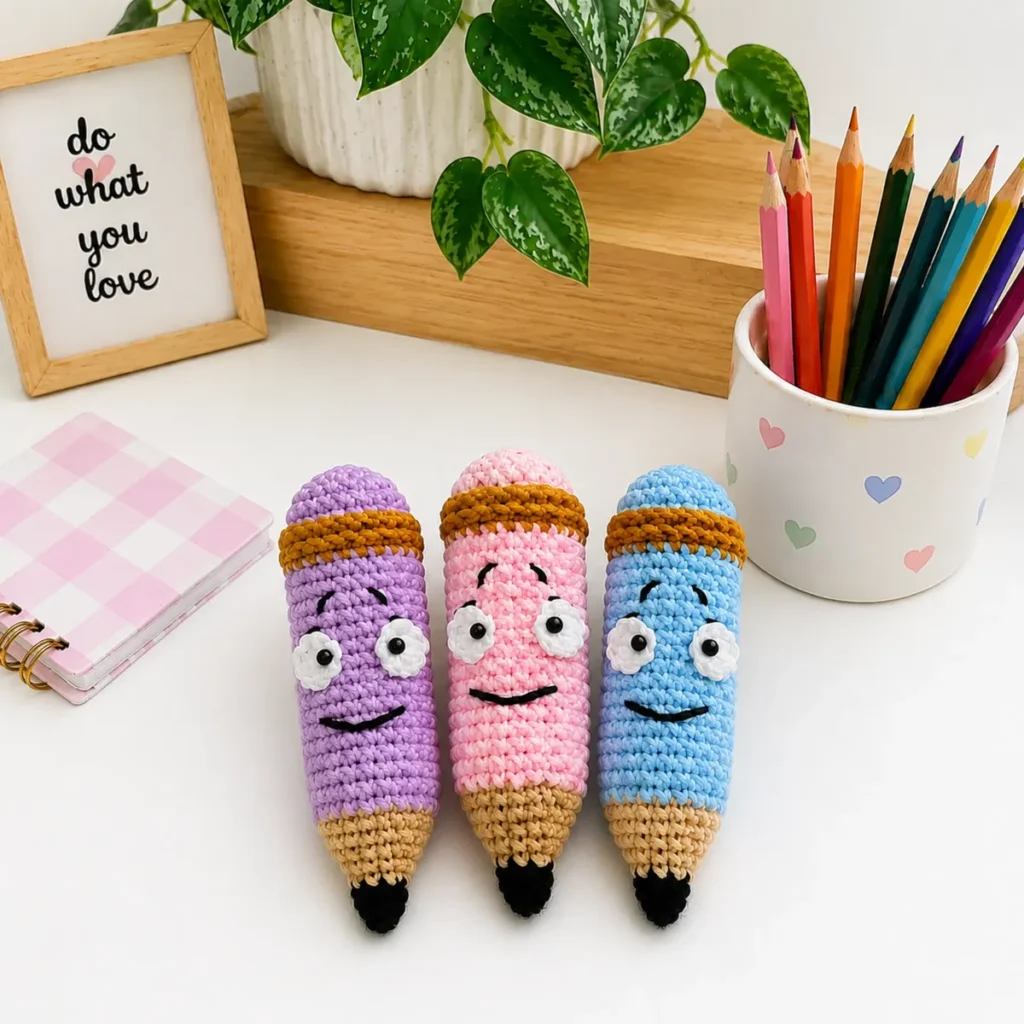
01 · The pieceWhat Amigurumi pencil toy with a mustard eraser band actually is
The Body is a single spiral piece that starts Black, runs 6 sc in MR through Rnd 1, then increases to 9 in Rnd 2 before the color changes to Beige for the remaining 16 rounds. The Eyes are worked separately as flat White discs from their own magic ring and later joined to the surface. What holds the piece together at the end is the safety eye hardware locking through the White eye pieces, the whipstitch seam around each eye's edge, and the fiberfill packed in as the spiral narrows.
Tension matters most where the Black tip closes: a loose stitch here shows fill through the fabric before you can correct it. The 2–3 stitch spacing between the eyes is a visual call, not a count to defend — center them by eye, not by row-counting. The eraser band edging is the one place with a fixed number: 24 sl st worked into the free loops, which needs to land exactly on the loops left unworked by the BLO round, not the ones already used.
02 · The count run17 rounds across 3 parts, each with its count
US terms throughout. Every row below ends with the count that round finishes on.
| Part | Qty | Finishes on |
|---|---|---|
| Body | 1 | - |
| Eyes(make 2) | 1 | - |
| Eraser Band Edging(make 2 — one for Rnd 25 FLO, one for Rnd 26 FLO) | 1 | - |
Begin with Black yarn.
| Round | Instruction | Count |
|---|---|---|
| Round 1 | 6 sc in MR. (6) | - |
| Round 2 | (1 sc, inc) × 3. (9) | - |
| Round 3 | 9 sc. (9)Fasten off Black. Join Beige. Weave in end securely inside the piece. Begin adding fiberfill gradually from this point, shaping the tip carefully as you go. | - |
| Round 4 | (2 sc, inc) × 3. (12) | - |
| Round 5 | (3 sc, inc) × 3. (15) | - |
| Round 6 | 2 sc, inc, (4 sc, inc) × 2, 2 sc. (18) | - |
| Round 7 | (5 sc, inc) × 3. (21) | - |
| Round 8 | 3 sc, inc, (6 sc, inc) × 2, 3 sc. (24)Fasten off Beige. Join Pink. Weave in end inside the piece. | - |
| Rounds 9–24 | 24 sc. (24) (16 rounds total) Fasten off Pink. Join Mustard. Weave in end inside the piece. | - |
| Round 25 | 24 sc. (24) | - |
| Round 26 | Working in BLO only: 24 sc. (24)Fasten off Mustard. Join Powder Pink. Weave in end inside the piece. | - |
| Round 27 | Working in BLO only: 24 sc. (24)From this point forward, work through both loops as normal. | - |
| Round 28 | 24 sc. (24) | - |
| Round 29 | (2 sc, dec) × 6. (18) | - |
| Round 30 | (1 sc, dec) × 6. (12)Stuff the body firmly now, shaping it into a smooth, even cylinder. This is your last chance to adjust the fiberfill before the opening closes. | - |
| Round 31 | 6 dec. (6), sl st into next st. Fasten off, leaving a long tail. Thread the tail onto your yarn needle and weave through the front loop of each remaining stitch around the opening. Pull tight to cinch the hole closed. Weave in the end. | - |
With White yarn.
| Round | Instruction | Count |
|---|---|---|
| Round 1 | 6 sc in MR, sl st to close. (6)Fasten off, leaving a long tail for sewing. | - |
With Mustard yarn, insert your hook into the free front loops of Rnd 25 — these are the loops left unworked after you crocheted Rnd 26 in BLO.
Work 24 sl st around in FLO. Fasten off. Weave in end.
Repeat this edging on the free front loops of Rnd 26 in the same way.
Techniques on this build
- Magic ring (MR)
- Opens both the Body (Rnd 1) and each Eye piece — cinch the center closed fully before the first increase round or the tip stays gappy.
- Continuous spiral with stitch marker
- The Body runs all 16 rounds without joining or chaining — move the marker every round or the color change from Black to Beige will land off-round.
- Front loop only / back loop only (FLO/BLO)
- Rnd 25 and Rnd 26 are each worked in BLO, leaving front loops free for the Eraser Band Edging — mixing up which loop is free breaks the ridge.
- Fasten off and rejoin for color change
- Black to Beige at the tip, then Mustard for the edging — weave each join in securely before fiberfill covers the tail and makes it hard to find.
Final fit-up
- Weave in the Black-to-Beige join at the tip before adding fill, since the tail becomes inaccessible once the diameter narrows further.
- Stuff gradually starting right after the Beige join, shaping the tip as you go rather than packing it all in at the final round.
- Close the top of the Body once stuffing is even and firm, drawing the last round tight so no gap sits under the eyes.
- Attach the White eye pieces with a safety eye through each center, washer pressed firm on the inside, then whipstitch the outer edge snug against the Body before working the Mustard eraser band edging into the free loops of Rnd 25 and Rnd 26.
How the parts fit
- Rnd 2's (1 sc, inc) × 3 spaces the six increases evenly around the ring, taking the count from 6 to 9 to round out the Black tip before Rnd 3 holds steady at 9 sc.
- The color change from Black to Beige falls right after Rnd 3, and fiberfill starts going in from that same point — the tip has to be filled while it's still open, since the spiral will close around it as later rounds add height.
- Rnds 25 and 26 are each worked in BLO, which is why the Eraser Band Edging exists as a separate pass: the front loops of both rounds are left unworked on purpose, reserved so the Mustard sl st edging can sit on top as a distinct ridge rather than blending into the body fabric.
Scaling the build
| Larger | Move up from the E-4 / 3.5 mm hook to a larger size in the same yarn — the stitch counts stay the same but the fabric loosens, producing a taller, wider Body. Recheck tension so stuffing still stays hidden. |
|---|---|
| Smaller | Drop to a smaller hook than E-4 / 3.5 mm — stitches tighten and the Body shrinks proportionally, though the piece may take slightly less fiberfill to fill firm. |
| Longer shaft | Repeat one of the straight Beige rounds in the barrel section of the Body an extra time — this adds length to the pencil shaft only, leaving the Black tip and the Mustard eraser band unaffected. |
03 · Putting it togetherHow the pieces go together
- S1
Position the two white eye pieces on the front of the body between Rnds 16 and 20, spacing them 2–3 stitches apart from each other at the center.
- S2
Attach a safety eye through the center of each white eye piece, then press the washer firmly on the inside to lock it in place.
- S3
Using the long yarn tails from the white eye pieces, sew each one onto the body using a whipstitch around the outer edge. Pull snug so each eye sits flat against the surface.
- S4
Using black embroidery thread or a length of Black yarn threaded onto your yarn needle, embroider pupils onto each eye.
- S5
Embroider eyelashes above each eye, eyebrows just above those, and a small curved mouth below the eyes on the front of the body.
- S6
Weave in all remaining ends.
04 · Snag listWhat went wrong on the bench, and the fix
Snag 1
Losing the round in the spiral
Place the stitch marker at the start of Rnd 1 and move it up every round; without it, the Black-to-Beige transition can land mid-round instead of at the seam.
Snag 2
Stuffing added too late
Pack the Black tip as soon as Beige is joined — waiting until the piece is fully worked means the narrow tip is no longer reachable.
Snag 3
Working into the wrong loop for the edging
Confirm the front loops of Rnd 25 or Rnd 26 are the ones left unworked by the BLO round, not the loops already used, then count to 24 sl st to close the band.
Snag 4
Eyes placed off-center or too close
Dry-fit both White eye pieces between Rnd 16 and Rnd 20 first, keeping 2–3 stitches between them, before pressing the safety eye washers home.
05 · QueriesQuestions logged against this build
Why is the Eraser Band Edging worked into free loops instead of straight into a round?
Rnds 25 and 26 are worked in BLO, which deliberately leaves their front loops unused. Working the Mustard sl st edging into those free loops afterward raises it as a visible ridge that reads as a separate eraser band rather than blending into the shaft.
Do the eyes need safety eye hardware, or can they be embroidered instead?
The pattern calls for 8–10 mm safety eyes pressed through the center of each White eye piece and locked with a washer before whipstitching the piece to the Body. Black embroidery thread is reserved for the eyelashes, eyebrows, and mouth, not the eyes themselves.
06 · Made byWho counted this one

Who writes Amigurumi Addict, how a build gets its number, and why every round on the site carries a stitch count.
07 · Next off the benchThree builds that sit near this one

Animals
Crochet a bunny or frog from one amigurumi base
How do you crochet a bunny and a frog from one base? Share Legs, Body, and Head; swap ears or eyes.

Animals
Crochet giraffe amigurumi pattern with horns and ears
How do you crochet a giraffe amigurumi? Shape head, body, legs, ears and horns in worsted yarn.

Animals
Amigurumi cat crochet pattern with oval muzzle and bow
How do you crochet an amigurumi cat with a flat muzzle? Shape it separately, pinch it, then sew it on.
Join the build log
One message when a build is issued
A drawing and its parts list, when one leaves the bench.