| Shelf | Level | Time | Hook | Yarn |
|---|---|---|---|---|
| Odds and ends | Intermediate | 2-3 hours | 2 mm | Worsted |
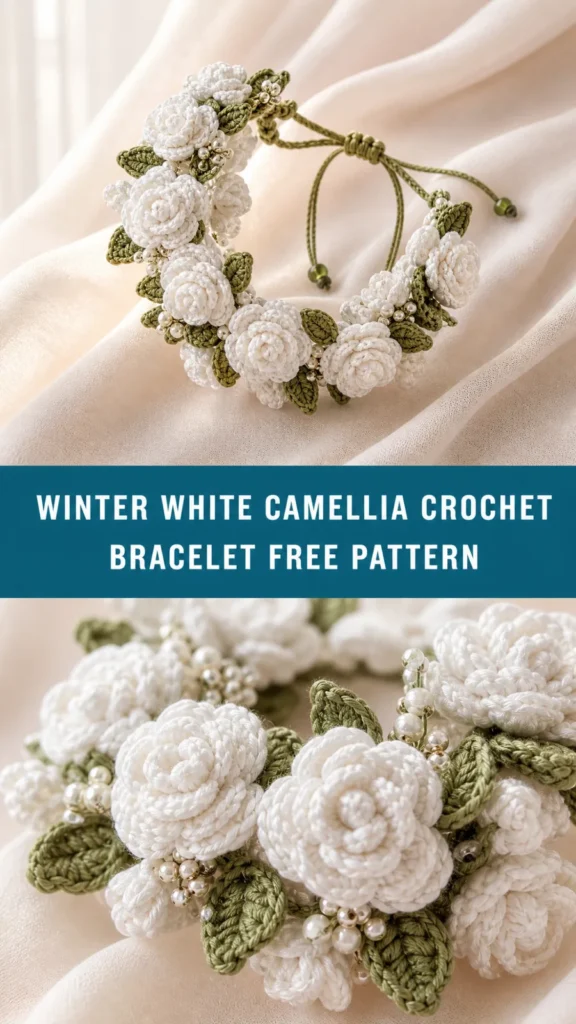
Winter white camellia crochet bracelet pattern
How is this crochet bracelet made? Rose, chrysanthemum, and puff flowers strung on leather cord with amber beads.
01 · The pieceWhat Winter white camellia crochet bracelet pattern actually is
The bracelet assembles from three crocheted flower motifs threaded onto a length of leather cord. The Rolled Rose starts as a flat strip worked in two rows, then coils into a spiral secured by its own yarn tail. The Layered Chrysanthemum builds in rounds from a magic ring, adding two tiers of petals off a single base round. Part 3 follows the same magic-ring start but stacks puff stitches in front of a second petal round worked behind them. Amber glass beads and copper seed beads separate the flowers along the cord, with knots at each end holding the whole strand together.
Rolling tension on the Rose matters most: too loose at the center and the coil won't hold its shape without extra tacking stitches. The front-loop-only and back-loop-only rounds on the Chrysanthemum need to land on the correct loop, but exact stitch tension there is forgiving since the petals curl regardless of gauge. Bead count is a range, not a fixed number, so spacing along the cord can be adjusted by eye. Cord length and knot placement carry more consequence than any single stitch, since they set the bracelet's finished fit.
02 · The count run11 rounds across 3 parts, each with its count
US terms throughout. Every row below ends with the count that round finishes on.
| Part | Qty | Finishes on |
|---|---|---|
| Main Pattern | 1 | (13) |
| Part 2 | 1 | (6) |
| Part 3 | 1 | (6) |
| Round | Instruction | Count |
|---|---|---|
| Round 1 | Ch 42. Sc in 2nd ch from hook, sc in next ch, *ch 3, skip 1 ch, sc in next 2 ch* repeat across. (27 sc, 13 ch-3 spaces) | - |
| Round 2 | Ch 1, turn. Sc in first sc, *5 dc in ch-3 space (this creates a petal), skip 1 sc, sc in next sc* repeat across. Fasten off, leaving a 12 inch tail. (13 petals)Assembly: Starting from the beginning of Row 1, roll the strip tightly for the center, then more loosely as you work outward. The petals will naturally fan out. Use your yarn tail to stitch through the base every few rolls to secure. Weave in ends on the underside. | (13) |
The finished rose measures approximately 1 inch in diameter. Do not worry if your first one looks a bit wonky. They get better with practice, I promise.
The Layered Chrysanthemum Pattern Make 4 chrysanthemums total: 2 in golden yellow, 1 in rust, 1 in burnt orange.
| Round | Instruction | Count |
|---|---|---|
| Round 1 | Magic ring, ch 1, 6 sc into ring, pull ring closed, sl st to first sc to join. (6 sc) | - |
| Round 2 | Ch 1, 2 sc in each st around, sl st to join. (12 sc) | - |
| Round 3 | Ch 1, *sc in next st, 2 sc in next st* repeat around, sl st to join. (18 sc) | - |
| Round 4 | Petal round Working in front loops only, *ch 3, 2 dc in same st, skip 2 sts, sl st in next st* repeat around. (6 petals) | (6) |
| Round 5 | Working in the unused back loops from Round 3, sl st to any back loop, *ch 4, 3 dc in same st, skip 2 sts, sl st in next st* repeat around. (6 petals)Fasten off. Weave in ends. The second layer of petals sits behind the first, creating dimension. | (6) |
The Textured Mum Bloom Pattern Make 3 mums total: 1 in burgundy, 1 in burnt orange, 1 in rust.
These little flowers have lots of texture from the bobble-like stitches.
| Round | Instruction | Count |
|---|---|---|
| Round 1 | Magic ring, ch 1, 6 sc into ring, pull ring closed, sl st to join. (6 sc) | - |
| Round 2 | Ch 1, 2 sc in each st around, sl st to join. (12 sc) | - |
| Round 3 | *Ch 2, 4 hdc in next st (creates a small puff), ch 2, sl st in next st* repeat around. (6 puffs) | (6) |
| Round 4 | Working behind the puffs into the Round 2 stitches, *ch 3, 5 dc in next st, ch 3, sl st in next st, skip 1 st* repeat around. (6 larger petals behind)Fasten off. Weave in ends. | - |
The Leaf Patterns
You will need approximately 20 to 25 leaves in various sizes and shades of green. Here are three variations.
Simple Small Leaf (make 10)
Ch 8. Sc in 2nd ch from hook, hdc in next ch, dc in next 2 ch, hdc in next ch, sc in next ch, (sc, ch 2, sc) in last ch. Now working along the other side of the chain: sc in next ch, hdc in next ch, dc in next 2 ch, hdc in next ch, sc in next ch, sl st to first sc. Fasten off.
Pointed Medium Leaf (make 8)
Ch 10. Sl st in 2nd ch from hook, sc in next ch, hdc in next ch, dc in next 2 ch, hdc in next ch, sc in next ch, sl st in next ch, (sl st, ch 2, sl st) in last ch. Mirror the pattern back along the opposite side of the chain. Fasten off.
Rounded Large Leaf (make 7)
Ch 12. Sc in 2nd ch from hook, sc in next ch, hdc in next 2 ch, dc in next 3 ch, hdc in next ch, sc in next ch, (sc, ch 3, sc) in last ch. Work back along the other side. Ch 1, do not turn. Working surface slip stitches up the center of the leaf to create a vein (optional detail). Fasten off.
Techniques on this build
- Rolling a flat strip
- Used for the Main Pattern's two-row strip; watch how tightly the first stitches roll, since that sets the bud at the center of the Rose.
- Front loop / back loop isolation
- Round 4 of Part 2 works the front loops of Round 3, Round 5 works the back loops of the same round; mismatching loops merges the two petal tiers.
- Puff stitch (4 hdc in one st)
- Round 3 of Part 3 builds six puffs from 4-hdc clusters; keep the loops on the hook even so the puff closes without flattening.
- Stringing through doubled cord
- Assembly threads flowers and beads onto the 2mm leather cord; a doubled cord needs a bead hole wide enough to pass through twice.
Final fit-up
- Weave in the fastened-off tail on the underside of each flower — the Rose, the four Chrysanthemums, and the Part 3 flower — so no ends show once strung.
- Use the Rolled Rose's 12-inch tail to stitch through the rolled base every few turns, locking the spiral before it leaves your hands.
- Thread the amber glass beads, copper seed beads, and finished flowers onto the 24-inch leather cord in the intended order, using the beading needle to ease the doubled cord through each bead.
- Knot both ends of the cord to hold the arrangement, then seal each knot with fabric glue or clear nail polish and trim the tails once dry.
How the parts fit
- Row 1 of the Main Pattern alternates two sc with a ch-3 space across the foundation chain, producing 13 ch-3 spaces — the 13 petals in Row 2 are fixed by that count, not chosen freely.
- Part 2's Round 3 increases to 18 sc, and that same round of stitches carries two petal layers: Round 4 takes the front loops, Round 5 returns to the back loops of the identical round for a second tier.
- Part 3 builds its puffs into the 12 sc of Round 2, then Round 4 works into those same Round 2 stitches again, behind the puffs, so both petal tiers share one base round instead of each getting its own increase round.
Scaling the build
| Larger | Cut the leather cord longer than the stated 24 inches before knotting. Flower and bead counts stay the same, but the finished loop sits looser on the wrist. |
|---|---|
| Larger flowers | Work the Rolled Rose and Chrysanthemum with a hook one size up. Stitch counts stay as written but the fabric relaxes, pushing the Rose past its 1 inch diameter. |
| Wider bead spacing | Use the upper end of the 40 to 50 copper seed bead range between motifs. The flowers sit farther apart along the same 24-inch cord. |
03 · Snag listWhat went wrong on the bench, and the fix
Snag 1
Rolling the Rose strip evenly throughout
Even tension flattens the center instead of forming a bud. Roll the first stitches tight, then let each ch-3 space loosen as the roll moves toward the tail.
Snag 2
Picking up the wrong loop on Round 5
Round 4 uses the front loops of Round 3, leaving the back loops open for Round 5. Mark the back loops with a stitch marker before starting Round 4.
Snag 3
Threading cord through beads unchecked
Doubled 2mm cord can jam partway through an amber bead's hole. Test-fit each bead on the doubled cord before committing to the final stringing order.
Snag 4
Trimming cord before glue sets
A knot cut too soon slips loose under wear. Hold each glued knot until tacky-dry and trim the tails last.
04 · QueriesQuestions logged against this build
How many crochet flowers does the bracelet need?
One Rolled Rose, four Layered Chrysanthemums (2 golden yellow, 1 rust, 1 burnt orange), and one Part 3 flower. Count and color-sort them before stringing so the order is set before the cord is knotted.
Does the copper seed bead count need to be exact?
No — the pattern gives a range of 40 to 50 beads in size 8/0 or 6/0. Use fewer for tighter spacing between flowers or more to spread them farther apart on the cord.
What keeps the bracelet from coming apart?
Knots at the cord ends, sealed with fabric glue or clear nail polish, hold the strand together. The amber glass beads also need holes wide enough for the doubled cord to pass through without binding at the knot.
05 · Made byWho counted this one

Who writes Amigurumi Addict, how a build gets its number, and why every round on the site carries a stitch count.
06 · Next off the benchThree builds that sit near this one

Odds and ends
Crochet a phone bag with strap, flap, and ring closure
How to crochet a phone bag? Join rounds from a 30-chain base, add a strap, flap, and ring.

Odds and ends
Crochet worsted weight socks with a turned heel
How do you crochet socks for winter? Build toe-up in worsted weight with a folded heel and ribbed leg.

Odds and ends
Toe-Up Woodland Walker Crochet Socks With Colorwork Cuff
How do you crochet toe-up socks with a colorwork cuff? Build the Toe, Heel, and stranded Cuff in order.
Join the build log
One message when a build is issued
A drawing and its parts list, when one leaves the bench.