| Shelf | Level | Time | Yarn |
|---|---|---|---|
| Odds and ends | Intermediate | 4-6 hours | Worsted |
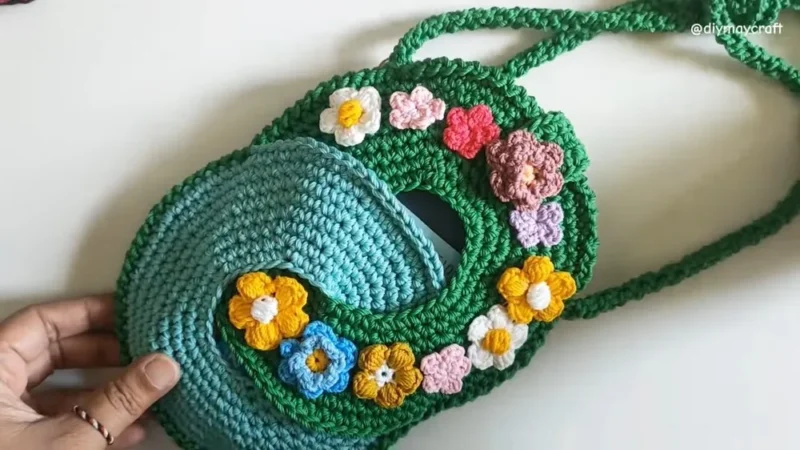
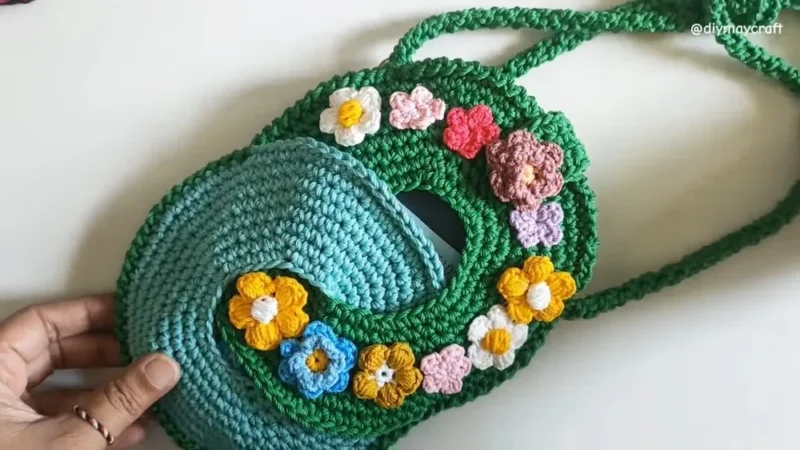
Crochet a phone bag with strap, flap, and ring closure
How to crochet a phone bag? Join rounds from a 30-chain base, add a strap, flap, and ring.

01 · The pieceWhat Crochet a phone bag with strap, flap, and ring closure actually is
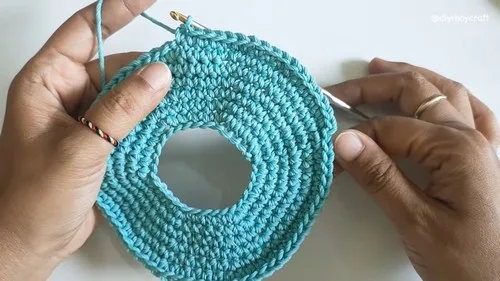
The bag body starts as a 30-chain foundation joined into a ring, then builds outward through single crochet rounds (Round 1 to Round 8) that increase to shape a tube. Two identical tubes are crocheted this way, then placed together, marked, and joined along their edges with a tapestry needle and a final slip-stitch-and-chain seam. A separate flap cover closes the opening with a button, a 120 cm chain becomes the strap, and a 1 cm ring sewn to the opposite side gives the strap somewhere to anchor.
Stitch counts in the early rounds matter: the increase pattern has to land evenly or the tube goes lopsided before the flap is even started. Strap length is the opposite case — 120 cm is a suggestion, not a specification, and can be shortened or lengthened without touching the body pattern. Button placement and any decorative flowers are cosmetic and carry no structural tolerance at all.
02 · The count run9 rounds across 1 part, each with its count
US terms throughout. Every row below ends with the count that round finishes on.
| Part | Qty | Finishes on |
|---|---|---|
| Joining | 1 | - |
| Round | Instruction | Count |
|---|---|---|
| Starting Chain | Make a slip knot and chain 30.Return to the first chain, join with a slip stitch, then chain 1 to start the first round. | - |
Bag Body Pattern:
| Round | Instruction | Count |
|---|---|---|
| Round 1 | Chain 3 more (total of 4 chains). Make one single crochet into the next chain, followed by two single crochets (increase) in the next chain. Repeat 5 times for a total of 36 single crochets. Join with a slip stitch. | - |
| Round 2 | Chain 1, then make a pattern of 5 single crochets and a single crochet increase. Repeat this pattern 6 times for a total of 42 single crochets. Join with a slip stitch. | - |
| Round 3 | Chain 1, make 3 single crochets, then increase. Follow with 6 single crochets, then increase, repeated 5 times. After, complete with 48 single crochets. Join with a slip stitch. | - |
| Round 4 | Chain 1, then 7 single crochets followed by an increase, repeated 6 times for a total of 54 single crochets. Join with a slip stitch. | - |
| Round 5 | Chain 1, make 4 single crochets, then increase, followed by 8 single crochets, and increase, repeated 5 times for a total of 60 single crochets. Join with a slip stitch. | - |
| Round 6 | Chain 1, pattern of 9 single crochets then increase, repeat 6 times for a total of 66 single crochets. Join with slip stitch. | - |
| Round 7 | Chain 1, 5 single crochets then increase, followed by 10 single crochets, and increase, repeated 5 times for a total of 72 single crochets. Join with a slip stitch. | - |
| Round 8 | Chain 1, 11 single crochets then increase, repeated 6 times for a total of 78 single crochets. Join with a slip stitch and cut the yarn, securing it with a match/lighter.Making the Second Piece: Repeat the same steps as above from Round 1 to Round 8 to create the second side of the bag. | - |
Techniques on this build
- Joining rounds with a slip stitch
- Used at the top of every round in the bag body; keep the join stitch snug so the seam line stays straight up the side.
- Single crochet increases
- Rounds 1 and 2 carry the shaping load, going from 30 chains to 36 then 42 stitches; space increases evenly so the tube doesn't cup or ruffle.
- Working flat rows for the cover
- The flap cover is worked back and forth rather than in the round since it needs to hang free over the opening, not wrap it.
- Sewing hardware with strong thread
- The ring attachment and button both rely on thread strength, not yarn strength, since they take the pull of the strap and the flap's daily use.
- Joining two body pieces
- After both tubes are complete, align them, count 30 stitches in from the slip-stitch section on each to mark matching points, whip the marked sections together with a tapestry needle, then count 12 stitches from where the pieces meet and finish the seam with a crochet hook using a slip stitch and chain method.
Final fit-up
- Weave in all yarn ends with the tapestry needle before attaching any hardware.
- Seal synthetic ends with a match or lighter for a fast finish that won't unravel.
- Crochet and attach the 120 cm strap to the bag body.
- Sew the 1 cm ring to the opposite side and secure the flap cover with its button, adding flowers if using them.
How the parts fit
- Round 1 turns the flat 30-chain foundation into a joined tube by working single crochet with six evenly spaced increases, reaching 36 stitches at the join.
- Round 2 repeats a 5-single-crochet-plus-increase pattern six times, taking the stitch count from 36 to 42 while keeping the increase points stacked away from Round 1's, which is what keeps the tube round rather than faceted.
- The flap cover is built as a flat piece instead of a joined round because it needs a free edge to close over the opening — a joined round would seal the bag shut instead of covering it.
Scaling the build
| Smaller | Use a finer hook and yarn combination to tighten gauge; the same 30-chain start and increase pattern will produce a more compact bag. |
|---|---|
| Adjust depth | Work one of the later straight (non-increase) rounds an extra time before moving on, which adds height to the tube without changing its circumference. |
03 · Putting it togetherHow the pieces go together
- S1
Second Piece:: Repeat the same steps as Round 1 to Round 8 to create the second side of the bag.
- S2
Preparation:: After creating both pieces, place them together, aligning the stitches.
- S3
Marking:: Count 30 stitches from the slip stitch section and mark each of the two circles.
- S4
Joining Stitches:: Use a tapestry needle to join the pieces together at the marked sections.
- S5
Final Joining:: Count 12 stitches from where the pieces meet and place a marker. Join the two pieces using a crochet hook and yarn, starting from the marker with a slip stitch and chain method.
- S6
Strap:: Make a crocheted chain approximately 120 cm long and attach it to the bag.
- S7
Cover:: Crochet a flap cover using single crochets and secure it with a button. Optionally, decorate with flowers.
- S8
Details:: Sew a 1 cm round ring on the opposite side for attachment, using a strong thread.
04 · Snag listWhat went wrong on the bench, and the fix
Snag 1
Losing count on increases
Place a marker at the start of each increase repeat so the 6-repeat pattern in Rounds 1 and 2 doesn't drift off by the last stitch.
Snag 2
Twisted starting chain
Check that the 30-chain foundation lies flat before joining with the slip stitch to start Round 1, or the tube will spiral instead of stacking straight.
Snag 3
Overheating fastened ends
Pass the flame quickly over the cut end rather than holding it in place, or the yarn will scorch instead of just sealing.
Snag 4
Loose ring attachment
Sew the 1 cm ring with strong thread and double back over the stitches, since it carries the full weight of the bag through the strap.
05 · QueriesQuestions logged against this build
How long should the strap be?
The pattern calls for a chain of about 120 cm, but this is adjustable. Add or remove chains before attaching it to fit how it should sit on the body.
Is the 1 cm ring necessary?
The ring gives the strap a fixed anchor point on the side opposite the flap. It can be skipped by sewing the strap directly to the body, though the ring keeps the attachment point neater and easier to reinforce.
What yarn and hook does this call for?
The sample uses Polithick Onitsuga with a 6/0 Tulips hook. Any worsted-weight yarn paired with a hook that matches that gauge will produce a similarly proportioned bag.
06 · Made byWho counted this one

Who writes Amigurumi Addict, how a build gets its number, and why every round on the site carries a stitch count.
07 · Next off the benchThree builds that sit near this one

Odds and ends
Crochet worsted weight socks with a turned heel
How do you crochet socks for winter? Build toe-up in worsted weight with a folded heel and ribbed leg.

Odds and ends
Toe-Up Woodland Walker Crochet Socks With Colorwork Cuff
How do you crochet toe-up socks with a colorwork cuff? Build the Toe, Heel, and stranded Cuff in order.
Odds and ends
How to crochet a mini basket for keepsakes
How do you crochet a mini basket? Work single crochet increases in a spiral from a chain ring, no seams needed.
Join the build log
One message when a build is issued
A drawing and its parts list, when one leaves the bench.