| Shelf | Level | Time | Hook | Yarn |
|---|---|---|---|---|
| Odds and ends | Intermediate | 4-6 hours | 3.0 mm | Sport (3-ply) |
Textured post-stitch beanie with a folded ribbed brim
What makes this beanie's texture pop? Crisscrossed post stitches over a folded ribbed brim.
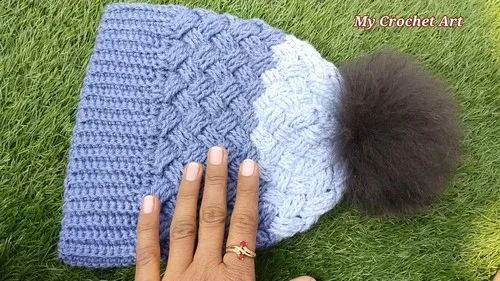
01 · The pieceWhat Textured post-stitch beanie with a folded ribbed brim actually is
The Beanie Hat Body sits on top of a Border strip worked flat, then folded in half and closed with slip stitches through the back loops of its short edges to form a ribbed loop. Round 1 of the Body works double crochet directly into the top of each border row, converting a flat rectangle into a circular foundation. From there, the Body's remaining rounds alternate crisscross front post triple crochet with back post triple crochet to raise the texture, and the crown closes when the last round's stitches are gathered shut with the tail.
Precision matters at the Border: its base row count must land on a multiple of six so the crisscross stitch groups in the Body divide evenly, and the back-loop-only rows need consistent loop selection or the ridged texture flattens. Length is more forgiving — the pattern targets about 16 inches unfolded (8 inches doubled), but Rows 2 and 3 repeat as many times as needed to reach a fit, and crown height stretches the same way by repeating the two-round Body sequence.
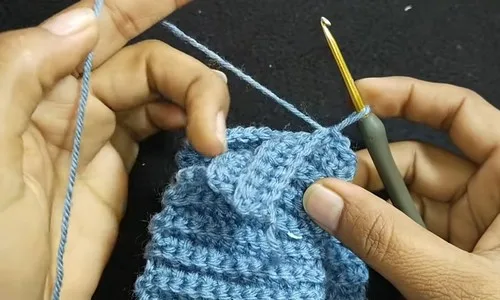
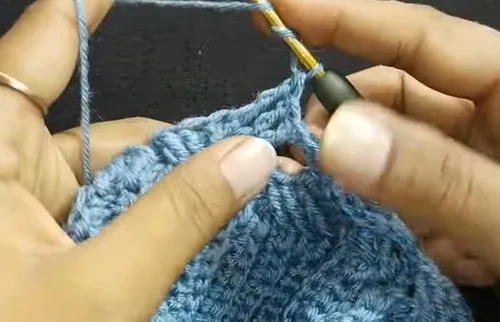
02 · The count run12 rounds across 2 parts, each with its count
US terms throughout. Every row below ends with the count that round finishes on.
| Part | Qty | Finishes on |
|---|---|---|
| Border | 1 | - |
| Beanie Hat Body | 1 | - |
| Round | Instruction | Count |
|---|---|---|
| Row 1 | Begin with a slip knot and chain 13; skip the first chain and make a slip stitch in the second chain; single crochet in each chain across to complete the first row. | - |
| Row 2 | Chain one, turn; single crochet into the back loop of each stitch. | - |
| Row 3 | Chain one, turn; slip stitch in the back loop of the first stitch, then single crochet into the back loops of the remaining stitches. | - |
| Row 4+ | Repeat Rows 2 and 3 until the border reaches about 16 inches (8 inches doubled); the base row count should be a multiple of six. | - |
| Round | Instruction | Count |
|---|---|---|
| Round 1 | Chain three; double crochet in the top of each border row around the loop; join with a slip stitch into the third chain to close the round. | - |
| Round 2 | Crisscross Front Post Triple Crochet Chain three; skip three double crochets; make three front post triple crochets; go back and make three front post triple crochets in the skipped stitches; repeat this sequence around; slip stitch into the third chain to join. | - |
| Round 3 | Alternating Post Stitches Chain three; make front post triple crochets into the bottom three stitches of the second crisscross; make back post triple crochets into the top three stitches of the first crisscross; repeat around; slip stitch into the third chain to join. | - |
| Round 4 | Repeat Round 2. | - |
| Round 5 | Repeat Round 3. | - |
| Round 6+ | Continue alternating Round 2 and Round 3 until the Beanie Hat reaches a height of 8 inches or desired length. | - |
| Round 7 | First Decrease Row Chain three; make two incomplete double crochets, then pull through all loops to decrease; repeat across the row; slip stitch to join. | - |
| Round 8 | Second Decrease Row Chain two; make two incomplete double crochets, pull through all loops to decrease; repeat across the row; slip stitch to join and chain one. | - |
Techniques on this build
- Back-loop-only single crochet
- Used through Border Rows 2 and 3; picking both loops instead of the back loop only flattens the rib the folded brim depends on.
- Front post triple crochet (FPtr)
- Forms half of every crisscross in Rounds 2 and 4; work around the post of the stitch below, not into its top, or the post stitch reads flat.
- Back post triple crochet (BPtr)
- Paired with FPtr in Rounds 3 and 5 to alternate the raised texture; approach from behind the work so the post sits recessed against the FPtr beside it.
- Slip-stitch seaming through back loops
- Joins the folded Border's short edges into a loop before the Body is picked up; keep the strip untwisted before closing the seam.
Final fit-up
- Close the crown: thread the cut tail through a yarn needle, weave it through the top stitches of the last Body round, and pull tight to shut the hole.
- Tie off the closure with a knot so the gathered crown holds under tension before the tail is buried.
- Weave in the closure tail and the Border's seam tail separately, then trim the excess close to the fabric.
- Attach a pompom to the closed crown as an optional finish once all ends are secured.
How the parts fit
- Round 1 of the Body works one double crochet into the top of each Border row, so the Border's total row count sets the stitch count the crisscross rounds must divide into groups of three.
- The Border is worked flat in rows rather than in the round because it is folded and seamed afterward — this lets its length (targeting 16 inches unfolded) be built independently of the head circumference before it becomes a loop.
- Rounds 2 and 4 skip ahead to place FPtr, then double back into the skipped stitches, while Rounds 3 and 5 work FPtr into the bottom of one crisscross and BPtr into the top of the one before it — the two-round pair repeats to carry the texture upward without resetting.
Scaling the build
| Larger | Repeat Border Rows 2 and 3 more times before folding so the doubled length runs past 16 inches, giving Round 1 of the Body a longer loop to work into. |
|---|---|
| Smaller | Work fewer repeats of Rows 2 and 3 so the doubled Border falls short of 16 inches while keeping the row total a multiple of six, for a snugger circumference. |
| Slouchier / taller crown | Repeat the two-round Body sequence (crisscross round plus alternating round) beyond the given rounds to add height without changing the Border or the circumference. |
03 · Putting it togetherHow the pieces go together
- S1
Fold the border in half.
- S2
Use slip stitches through the back loops of both edges to join the ends and form a loop.
- S3
Cut the yarn, leaving a long tail.
- S4
Thread the tail through a needle and weave through the top stitches.
- S5
Pull tightly to close the hole.
- S6
Tie a knot, weave in the end, and trim excess yarn.
- S7
Optional: Add a pompom to the top for a fun finish.
04 · Snag listWhat went wrong on the bench, and the fix
Snag 1
Border row count not a multiple of six
Count rows before folding and continue repeating Rows 2 and 3 until the total divides evenly by six, or the crisscross groups in the Body won't close cleanly.
Snag 2
Ribbing rows worked into both loops
Check that Rows 2 and 3 go into the back loop only; working both loops erases the ridge the folded brim relies on.
Snag 3
Front and back post triple crochet swapped
FPtr is worked from the front around the post, BPtr from behind; swapping them flattens the raised crisscross instead of alternating it.
Snag 4
Wrong skip count in the crisscross round
The sequence skips three stitches before working three FPtr and returning; miscounting shifts the whole round out of alignment, so mark the first stitch of the round with a stitch marker.
05 · QueriesQuestions logged against this build
How long should the Border be before folding?
The pattern targets about 16 inches unfolded, which becomes 8 inches once doubled, with a base row count that's a multiple of six. Repeat Rows 2 and 3 until you hit that length.
Can this beanie fit both children and adults?
Yes — the Notes state it suits either depending on the finished measurements you build to. Adjusting the Border length before folding is what changes the fit.
Why does the crown alternate two different stitch rounds?
Rounds 2 and 4 build crisscrossed front post triple crochet, while Rounds 3 and 5 alternate front and back post triple crochet over them. The pairing carries the raised texture up the crown instead of restarting it each round.
06 · Made byWho counted this one

Who writes Amigurumi Addict, how a build gets its number, and why every round on the site carries a stitch count.
07 · Next off the benchThree builds that sit near this one

Odds and ends
Crochet a phone bag with strap, flap, and ring closure
How to crochet a phone bag? Join rounds from a 30-chain base, add a strap, flap, and ring.

Odds and ends
Crochet worsted weight socks with a turned heel
How do you crochet socks for winter? Build toe-up in worsted weight with a folded heel and ribbed leg.

Odds and ends
Toe-Up Woodland Walker Crochet Socks With Colorwork Cuff
How do you crochet toe-up socks with a colorwork cuff? Build the Toe, Heel, and stranded Cuff in order.
Join the build log
One message when a build is issued
A drawing and its parts list, when one leaves the bench.