| Shelf | Level | Time | Hook | Yarn |
|---|---|---|---|---|
| Odds and ends | Intermediate | 4-6 hours | 4.5 mm | Worsted |
Mesh cardigan build: panels, neck decrease, and sleeve join
How do you size a mesh cardigan? Two 10-inch fronts join one 20-inch back panel at the shoulder.
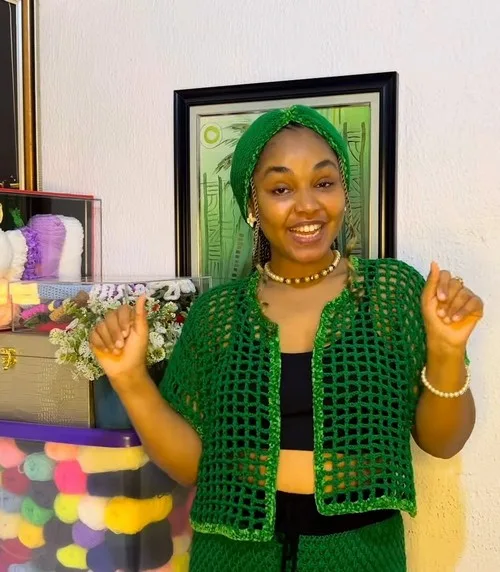
01 · The pieceWhat Mesh cardigan build: panels, neck decrease, and sleeve join actually is
The cardigan comes together from three flat panels: two Front Panels and one Back Panel, each worked in a chain-space mesh of double crochet and chain-3 arches. Shoulder seams join the panels first, followed by side seams that leave the armhole open for the optional Sleeves. A single crochet border, worked in velvet yarn, runs around the neck, down the front edges, and along the bottom hem, tying the three separate pieces into one visible frame.
Chain counts and mesh spacing matter most at the neck decrease, where Round 3 drops the starting chain from 6 to 5 and later rows shave a stitch at a time while combining two stitches at the row end. Panel width matters for fit — the Back Panel's 20-inch measurement must equal the combined width of both Front Panels. Row length is more forgiving: the mesh pattern tolerates small counting drift because the chain-3 spaces mask minor unevenness across a row.
02 · The count run7 rounds across 3 parts, each with its count
US terms throughout. Every row below ends with the count that round finishes on.
| Part | Qty | Finishes on |
|---|---|---|
| Front Panel (Make 2) | 2 | - |
| Sleeves (Optional) | 2 | - |
| Back Panel | 1 | - |
| Round | Instruction | Count |
|---|---|---|
| Row 1 | Chain 49 stitches to achieve a 10-inch width for the first front panel; Chain up 9, then double crochet in the 10th stitch from your hook to create the first mesh hole; Chain 3, skip 3 chains, double crochet in the next; Repeat across the row. | - |
| Row 2 | Chain 6, turn your work, skip the space, and double crochet into the next stitch; Continue the pattern across.Continue repeating Row 2 until you reach your desired length, preparing for the decrease closer to the neck area (this example begins the decrease after 19 rows). | - |
| Row 3 | On the 20th row, start the decrease: Chain 5 (instead of 6), then proceed with the normal pattern. | - |
| Row 4 | Subsequent decrease rows Reduce the initial chains by one stitch at the beginning of each row and perform a decrease at the end by combining two stitches into one. | - |
| Round | Instruction | Count |
|---|---|---|
| Round 1 | Attach the yarn under the arm; Chain 6 and work in triple crochet, chaining 2 between each stitch around the armhole. | - |
| Round 2 | Add rows to match the desired sleeve length.Finish with an edging if desired. | - |
The back panel should measure 20 inches wide (for this size) to match the combined width of the two front panels.
| Round | Instruction | Count |
|---|---|---|
| Row 1 | Repeat the mesh pattern without decreases for the same number of rows as the front panels, 28 rows in this example. | - |
Techniques on this build
- Chain-space mesh (dc, ch-3)
- Forms the body of the Front and Back Panels; skip exactly 3 chains between double crochets or the mesh spacing drifts row over row.
- Shaped decrease at the neck edge
- Front Panel Round 3 onward reduces the starting chain and combines two stitches at the row end; track which side of the row each decrease belongs to.
- Triple crochet armhole start
- Sleeves Round 1 attaches yarn under the arm and chains 6 into triple crochet with ch-2 spaces; keep the ch-2 gaps even so the sleeve mesh matches the body mesh.
- Single crochet edging in a second fiber
- The velvet yarn border runs around the neck, front panels, and bottom edge; stitch density needs to stay even through the corner turns.
Final fit-up
- Weave in yarn-change and panel ends with a tapestry needle before any seaming begins.
- Sew the shoulder seams with right sides facing, then measure and mark the armhole opening before closing the side seams.
- Block the joined panels flat to open the chain-3 mesh spaces evenly across the front and back before edging.
- Work the single crochet border in velvet yarn around the neck, front panels, and bottom edge, then attach the optional Sleeves at the marked armhole last.
How the parts fit
- The neck decrease is confined to the Front Panels and begins after row 19 in the sample, narrowing the starting chain by one stitch per row while combining two stitches at the row end — the Back Panel carries no shaping at all.
- The Back Panel is worked as a single flat rectangle because it needs no neck shaping; its 20-inch width exists only to match the combined width of the two Front Panels, not as an independent measurement.
- Sleeve attachment happens after both side seams are closed — the armhole is deliberately left open during seaming so the Sleeves' triple crochet round can be picked up directly at that edge.
Scaling the build
| Larger | Work the mesh with a heavier yarn and a hook larger than the specified 4.5 mm; the wider chain-3 spacing increases both bust and overall panel dimensions. |
|---|---|
| Smaller | Begin the neck decrease earlier than the sample's row 19; fewer rows before shaping shortens the finished body length. |
| Adjust width | Change the starting chain of the Front Panels in multiples of the mesh repeat, then set the Back Panel's width to match the new combined front measurement, as the pattern already requires. |
03 · Putting it togetherHow the pieces go together
- S1
Place the panels with their right sides facing each other; sew the shoulder seams together.
- S2
Measure and mark the armhole openings, then sew the sides of the cardigan, leaving the armhole open.
- S3
Work a border of single crochet around the neck, down the front panels, and along the bottom edge; use the velvet yarn for a rich, finished look.
- S4
Weave in any loose ends.
04 · Snag listWhat went wrong on the bench, and the fix
Snag 1
Miscounting skipped chains in the mesh
Count 3 skipped chains before every double crochet; a stitch marker at the start of each ch-3 arch keeps the count honest.
Snag 2
Losing track of the decrease start row
Place a stitch marker at row 19 before working Round 3 so the neck decrease begins on the correct row for both Front Panels.
Snag 3
Sewing side seams before marking armhole
Measure and mark the armhole opening first, then sew; sewing blind leaves an armhole that doesn't match its pair.
Snag 4
Working the edging before seams are closed
Complete the shoulder and side seams first so the single crochet border travels around a finished shape instead of loose panel edges.
05 · QueriesQuestions logged against this build
Why does the Back Panel measure 20 inches while each Front Panel is 10 inches?
The Back Panel's width is set to equal the two Front Panels added together, since all three panels form the bust circumference once the shoulder and side seams close. Matching that sum keeps the side seams straight.
Can the velvet yarn edging be skipped?
The velvet yarn is listed as optional in the materials list — the single crochet border itself is still worked around the neck, front panels, and bottom edge, but you can work it in the primary green yarn instead for a uniform-fiber finish rather than the mixed-texture edge.
Are the Sleeves required to finish the cardigan?
No, the Sleeves are marked optional and are attached only after the armhole is left open during side-seam sewing. Skipping them leaves a sleeveless cardigan with the armhole opening as the finished edge.
06 · Made byWho counted this one

Who writes Amigurumi Addict, how a build gets its number, and why every round on the site carries a stitch count.
07 · Next off the benchThree builds that sit near this one

Odds and ends
Crochet a phone bag with strap, flap, and ring closure
How to crochet a phone bag? Join rounds from a 30-chain base, add a strap, flap, and ring.

Odds and ends
Crochet worsted weight socks with a turned heel
How do you crochet socks for winter? Build toe-up in worsted weight with a folded heel and ribbed leg.

Odds and ends
Toe-Up Woodland Walker Crochet Socks With Colorwork Cuff
How do you crochet toe-up socks with a colorwork cuff? Build the Toe, Heel, and stranded Cuff in order.
Join the build log
One message when a build is issued
A drawing and its parts list, when one leaves the bench.