| Shelf | Level | Time | Hook | Yarn |
|---|---|---|---|---|
| Odds and ends | Intermediate | 4-6 Hours | 3.5 mm | Sport |
Ruby Mittens: Free Crochet Pattern for Children
Crochet cozy Ruby Mittens for kids with a ribbed cuff and mosaic colorwork. Free pattern with thumb gusset details for a snug, stylish fit.
01 · The pieceWhat Ruby Mittens: Free Crochet Pattern for Children actually is
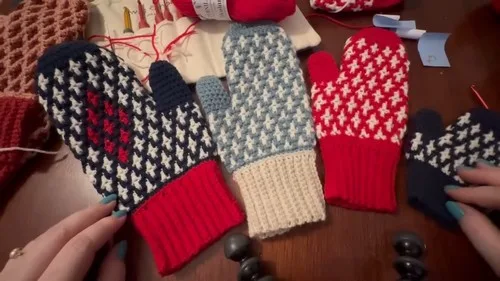
These Ruby Mittens bring together a snug ribbed cuff and a bold mosaic-patterned hand in two contrasting colors, creating a pair of mittens that feels as good as it looks. The textured colorwork gives them a woven, almost knit-like appearance while still being 100% crocheted. Designed in a small size to fit children ages 8-10, they're perfect for parents who want their little ones to head outside in something warm, sturdy, and genuinely eye-catching — not just another plain beanie-matching accessory.
This pattern leans intermediate thanks to the mosaic technique in the Main Pattern section, where color changes happen with intention to build the design, plus the added challenge of shaping a Thumb and Thumb Hole that fit naturally into the mitten body. If you've done basic increases, decreases, and simple color changes before, you'll pick this up quickly. Expect to spend about 4-6 hours total, including time to weave in ends from all those color swaps.
The finished mittens have a compact, close-fitting silhouette perfect for small hands, with a ribbed cuff that hugs the wrist to keep drafts out and a Mitten Closure that tapers neatly at the fingertips. The mosaic pattern gives them a rich, textured look that feels far more special than a store-bought pair. Made in a soft sport weight yarn, they're lightweight yet warm — and an absolutely thoughtful handmade gift for the colder months ahead.
- Start at the wrist with the Ribbing to create a stretchy, snug-fitting cuff foundation.
- Build upward into the Main Pattern, working eleven rounds of mosaic colorwork in two contrasting shades.
- Watch the interlocking texture emerge as Color A and Color B alternate to form the design.
- Shape the Thumb Hole partway through, setting stitches aside to open space for the thumb later.
- Continue the hand portion, then return to work the Thumb separately in its own two rounds.
- Taper the fingertip end using the Mitten Closure rounds to bring the top to a neat point.
- Weave in all color-change tails securely so the inside stays soft and smooth against skin.
- Repeat the entire process as a mirror image to complete a matching second mitten for the pair.
02 · The count run23 rounds across 5 parts, each with its count
US terms throughout. Every row below ends with the count that round finishes on.
| Part | Qty | Finishes on |
|---|---|---|
| The Ribbing (Cuff) | 1 | (12) |
| Main Pattern | 1 | - |
| The Thumb Hole | 1 | - |
| Mitten Closure | 1 | - |
| The Thumb | 1 | - |
With Color A, chain 13.
| Round | Instruction | Count |
|---|---|---|
| Row 1 | Sc in the second ch from hook and in each ch across. (12 sc) | - |
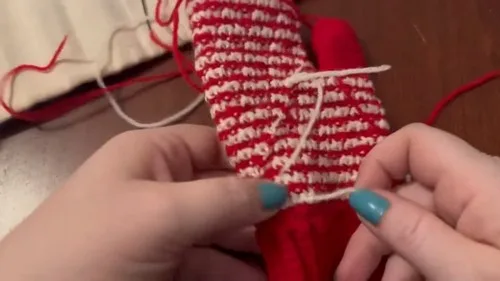
| Rows 2-36 | Ch 1, turn. Sc BLO in each st across. (12 sc BLO) Join ribbing by folding and working sl st through one loop of the first side and the back loop of the second side. (12 sl st) | (12) |
| Round | Instruction | Count |
|---|---|---|
| Round 1 | (Color A): Ch 1, sc evenly around edge of ribbing, 2 sc per ridge. Join. (36) | - |
| Round 2 | (Color B): Ch 1, sc BLO in each st. Join with Color A. (36) | - |
| Round 3 | (Color A): Ch 1, sc BLO in each st. Join with Color B. (36) | - |
| Round 4 | (Color B): Ch 1, sc BLO in next 3 sts, dc FLC two rounds below . Repeat. (48) | - |
| Round 5 | (Color A): Ch 1, dc FLC in middle st two rounds below, sc BLO in next 3 sts . Repeat. (48) | - |
| Round 6 | (Color B): Ch 1, dc FLC, sc BLO . Repeat. (48) | - |
| Round 7 | (Color A): Ch 1, dc FLC, sc BLO in next 3 sts . Repeat. (48) | - |
| Round 8 | (Color B): Ch 1, sc BLO, dc FLC, sc BLO in next 2 sts . Repeat. (48) | - |
| Round 9 | (Color A): Ch 1, sc BLO in 2 sts, dc FLC, sc BLO . Repeat. (48) | - |
| Round 10 | (Color B): Ch 1, sc BLO, dc FLC . Repeat. (48) | - |
| Round 11-18 | Repeat rounds 7–10 twice. (48) | - |
| Round | Instruction | Count |
|---|---|---|
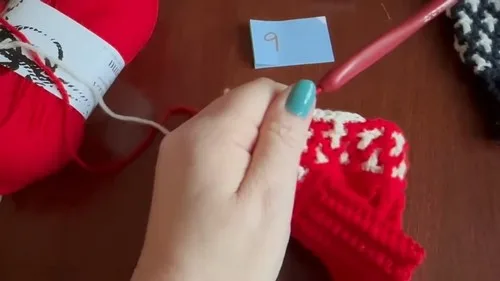
| Round 19 | (Color B): Ch 1. Work pattern repeat 3 times, skip 12 sts for thumb hole, sc BLO in 13th st, continue pattern. Join. (36) | - |
| Round 20-33 | Continue repeating rounds 7–10 until mitten reaches pinky finger length. (36) | - |
| Round | Instruction | Count |
|---|---|---|
| Round 34 | (Color A): Dc decrease round, skipping dc FLC sts. (27) | - |
| Round 35 | (Color A): Dc in each st around. (27) | - |
| Round 36 | (Color A): Dc2tog around. (14) | - |
| Round 37 | (Color A): Sc in each st in spiral. (~14) | - |
| Round 38 | (Color A): Skip 1 st, sc in next . Repeat. (~7) | - |
| Round 39 | (Color A): Skip 1 st, sl st in next . Repeat to close hole. | - |
| Round | Instruction | Count |
|---|---|---|
| Round 1 | Join Color A. Hdc into 12 skipped sts, add 2–3 extra hdc at joint. (~14–15) | - |
| Round 2-6 | Hdc around in spiral. Decrease: Skip 1 st, hdc in next . Repeat until 4–6 sts remain.Final Closure: Skip 1 st, sl st in next . Repeat until hole closes. | - |
03 · Before it goes to a childWhat has to be right, and what is allowed to drift
- 📏 This pattern is designed in a small size to fit children ages 8–10; adjust stitch and round counts as needed for a different size.
- 💡 Keep two separate small balls or bobbins of Color A and Color B handy before starting the Main Pattern — untangling yarn mid-round breaks your rhythm fast.
- 💡 Use a locking stitch marker at the very first stitch of each round throughout all 5 pattern parts; mosaic colorwork gets confusing fast if you lose track of where a round begins.
- 💡 Block your finished Ribbing (Cuff) gently with steam if it curls — sport weight yarn ribbing can be prone to rolling before the Main Pattern is added.
- 💡 When shaping the Thumb Hole, don't pull your working yarn too tight around the gap; a slightly relaxed tension there makes it much easier to pick up stitches cleanly afterward.
- 💡 Test your gauge with both colors before committing to the full Main Pattern — some yarns behave differently in dye lots and can subtly shift tension between Color A and B.
- 💡 Save your yarn tails from the Mitten Closure rounds until the very end; you can use them to reinforce the fingertip point where several decreases stack together.
04 · Snag listWhat went wrong on the bench, and the fix
Snag 1
Losing tension consistency
Carry the unused color loosely along the wrong side rather than cutting and rejoining each time, and stop every few rounds to gently stretch your work so the carried strands don't pucker the fabric.
Snag 2
Misplacing the Thumb Hole so it ends up
Mark the inside-facing edge of each mitten with a stitch marker or scrap yarn before starting the Thumb Hole rounds so your two mittens end up as true mirror images, not identical twins.
Snag 3
Rushing the color-change stitch
Always pull the new color through on the last yarn-over of the final stitch in the old color, and snug up that first stitch in the new color extra tight before continuing.
Snag 4
Skipping careful stitch counting in
Use a removable stitch marker at the start of each round and recount your total stitches every 2-3 rounds to catch any accidental increases or decreases before they multiply.
Snag 5
Weaving in ends too loosely
Weave each tail in two directions along the wrong-side floats for at least 2 inches, then trim close so the inside stays smooth against little wrists.
05 · VariantsOther ways to issue this one
The mosaic design in the Main Pattern is basically a blank canvas for color experimentation. Try a classic red-and-white candy-cane combo using Yarn's Sock-Ease in 'Cherry' and 'Cream' for a festive-adjacent pair, or go moody with a charcoal gray and mustard yellow using Cascade 220 Sport for an autumn feel. For a softer, gender-neutral palette, pair a dusty sage green with warm cream — Sirdar Snuggly DK works beautifully in a sport-weight substitution here since it's soft enough for sensitive kid skin. Sizing is easy to adjust: for smaller toddler hands, work one fewer round in the Main Pattern's 11 rounds and shorten the Ribbing (Cuff) by a round to keep proportions balanced; for older kids or a roomier fit, add one extra round to the Main Pattern before starting the Thumb Hole shaping. If your child runs between sizes, adding just a couple of extra stitches evenly around the cuff foundation (adjust your starting chain/round count by 2-4 stitches) can buy you some welcome wiggle room without disrupting the mosaic repeat too much. Yarn-wise, this pattern was designed for sport weight, but you can size up to a DK weight yarn with a 4.0mm hook for a slightly chunkier, extra-cozy mitten — just expect the finished size to run a bit larger. For themed variations, try school-color combos for team spirit, or a deep forest green with white for a woodland winter look. Metallic or self-striping sport weight yarns (like Premier Yarns Deja Vu Sport) can also add unexpected sparkle to the mosaic texture without any pattern changes needed.
I adore how the Ribbing section sets the tone right from round one — that stretchy, snug cuff is such a satisfying way to start, and it instantly signals 'this is going to fit well.' Then diving into the Main Pattern's mosaic colorwork is genuinely addictive; watching Color A and Color B interlock into a textured design round by round feels like magic, even though it's really just careful stitch placement. Shaping the Thumb and Thumb Hole is my favorite technical moment in this whole pattern — it's the kind of detail that makes a project feel like a 'real' garment rather than a simple tube. And finishing with the Mitten Closure, watching the top taper shut into a neat point, is such a rewarding payoff after eleven rounds of pattern work. Honestly, the best part is holding up the finished pair and seeing how the two colors play off each other — it never looks the same way twice depending on which shades you pick. These are the kind of mittens that make you want to start a second pair before you've even woven in the last end.
06 · QueriesQuestions logged against this build
What yarn weight works best for the Ruby Mittens if I don't have sport weight on hand?
You can substitute a light DK weight yarn and go up to a 4.0mm hook, though your finished mittens will run slightly larger and less snug at the cuff. Sport weight is recommended for the truest fit as designed.
How do I keep the mosaic colorwork from looking messy on the inside of the mitten?
Carry your unused color loosely across the back of the work rather than cutting it each round, and weave in only the starting and ending tails. This keeps the inside tidy and avoids a lumpy texture against the wrist.
Can I make the Ruby Mittens bigger for an older child?
Yes, add one extra round to the 11-round Main Pattern before beginning the Thumb Hole shaping to lengthen the hand portion. You can also add a couple of extra stitches evenly around your starting ribbing for extra width.
Is this pattern good for a beginner who has never done colorwork before?
It's rated intermediate because of the mosaic color changes and Thumb Hole shaping, so some prior comfort with basic stitches is helpful. If you've done simple stripes or color changes before, this is a great next step up.
How long does it realistically take to finish one pair of Ruby Mittens?
Most crocheters finish a pair in about 4-6 hours total, spread across a couple of sittings. The Main Pattern's 11 rounds take the longest due to the mosaic color changes, so budget extra time there.
Original pattern: https://crocheteverything.com/beautiful-ruby-mittens-free-crochet-pattern-for-children/
07 · Made byWho counted this one

Who writes Amigurumi Addict, how a build gets its number, and why every round on the site carries a stitch count.
08 · Next off the benchThree builds that sit near this one

Odds and ends
Crochet a phone bag with strap, flap, and ring closure
How to crochet a phone bag? Join rounds from a 30-chain base, add a strap, flap, and ring.

Odds and ends
Crochet worsted weight socks with a turned heel
How do you crochet socks for winter? Build toe-up in worsted weight with a folded heel and ribbed leg.

Odds and ends
Toe-Up Woodland Walker Crochet Socks With Colorwork Cuff
How do you crochet toe-up socks with a colorwork cuff? Build the Toe, Heel, and stranded Cuff in order.
Join the build log
One message when a build is issued
A drawing and its parts list, when one leaves the bench.