| Shelf | Level | Time | Hook | Yarn |
|---|---|---|---|---|
| Odds and ends | Intermediate | 4-6 hours | 5 mm | Worsted |
Ribbed band beanie with puff stitch crown rounds
Want a beanie with a stretchy ribbed band? This puff-stitch crown pattern sizes from newborn to adult.

01 · The pieceWhat Ribbed band beanie with puff stitch crown rounds actually is
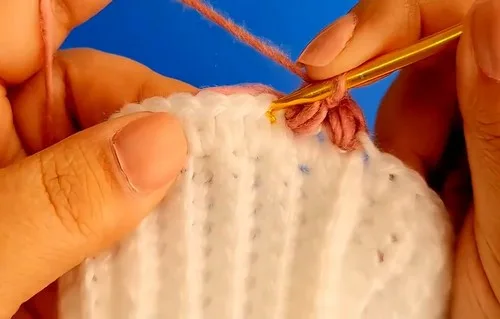
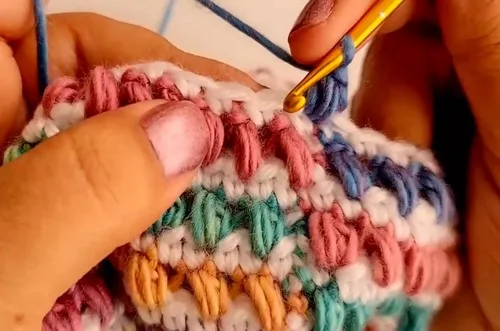
The hat builds from two separate pieces before it becomes one object. The Elastic Ribbing Band is worked flat, back and forth, then its two short edges are slip-stitched together to form a loop. Stitches are then picked up around that loop for the Main Pattern, which works in the round and alternates puff stitch rows in contrast color with single crochet rows in main color. The crown closes with sc2tog decreases and a cinched tail. Nothing is sewn on except the band join and the optional pom-pom.
Row count on the band is not negotiable — it sets the head circumference, so match it to the size chart exactly. The pickup step, by contrast, tolerates some drift: placing one sc at the end of each rib evens out minor gauge variation before the crown starts. Puff stitch height and loop tension can vary row to row without harming the fit, since the decrease rounds do the real shaping work at the top.
02 · The count run6 rounds across 3 parts, each with its count
US terms throughout. Every row below ends with the count that round finishes on.
| Part | Qty | Finishes on |
|---|---|---|
| The Elastic Ribbing Band | 1 | - |
| Main Pattern | 1 | - |
| Decreasing the Crown | 1 | - |
Chain 10
| Round | Instruction | Count |
|---|---|---|
| Row 1 | Work single crochet in the second chain from hook and in each chain across 10 scChain 1 turn Work sc in back loop only across for ribbing last stitch through both loops for clean edge Repeat until reaching the circumference for your chosen size | - |
| Round | Instruction | Count |
|---|---|---|
| Round 1 | Puff Stitch Round Change to contrast color chain 1 work puff stitch in same space skip 1 stitch puff stitch in next repeat around join with slip stitch | - |
| Round 2 | Single Crochet Round Change back to main color chain 1 sc in each stitch around join with slip stitchRepeat rounds 1 and 2 until reaching desired height Newborn 11 cm 4-10 Years 17 cm Adult Ladies 21 cm | - |
| Round | Instruction | Count |
|---|---|---|
| Decrease Round 1 | Single Crochet With main color chain 1 sc in first space skip 1 stitch sc in next repeat join with slip stitch | - |
| Decrease Round 2 | Puff Stitch With contrast color chain 1 puff stitch in first space skip 1 stitch puff stitch in next repeat join with slip stitchContinue decreasing alternating puff and sc rounds until crown narrows | - |
| Closing Round | Finish with sc2tog across cut long tail weave through remaining stitches pull tight to close | - |
Techniques on this build
- Back loop only single crochet
- Used through every row of the ribbing band; skipping to both loops by accident flattens the rib and kills the stretch.
- Puff stitch
- Forms Round 1 of the Main Pattern in contrast color; watch loop count on the hook before the final yarn-over so puffs stay uniform in height.
- Picking up stitches around a folded edge
- Used when joining the band into a loop and working sc evenly around it; uneven spacing here shows up as a wavy transition into the crown.
- sc2tog decreasing
- Closes the crown in the final rounds; keep tension even across the round so the closure doesn't pull to one side.
Final fit-up
- Weave in the color-change ends from each contrast-color puff stitch round separately, since main and contrast yarns cross at the join with slip stitch on every round.
- Cut a long tail at the last sc2tog round and thread it through the yarn needle.
- Weave the tail through the remaining stitches at the crown and pull tight to close the opening completely.
- Attach a pom-pom at the crown center if desired, securing it through the same closed point where the tail was pulled.
How the parts fit
- The Elastic Ribbing Band is worked flat rather than in the round because back loop only single crochet needs a turning row to build a visible rib; working it in rounds would hide the ridge on one side.
- Decreases are not built into the Main Pattern rows shown — the crown narrows by skipping 1 stitch between puff or sc stitches in each decrease round, which is a separate stage from the alternating puff/sc height rounds.
- The join with slip stitch through both edges of the folded band does double duty: it closes the band into a loop and sets the exact stitch count the Main Pattern's Round 1 picks up into.
Scaling the build
| Larger | Work more rows on the Elastic Ribbing Band — moving from the 84-row 4-10 Years count toward the 88 or 90 rows used for Adult Ladies or Adult Gents increases the circumference to match. |
|---|---|
| Smaller | Reduce the band to a lower row count, such as the 58 rows for 3-6 Months or 54 rows for Newborn, which shortens the circumference before any crown stitches are worked. |
| Taller or shorter crown | Repeat the alternating puff and sc rounds more or fewer times — the pattern lists 11 cm for Newborn up to 21 cm for Adult Ladies as the target height range before decreasing. |
03 · Putting it togetherHow the pieces go together
- S1
Fold ribbing band in half and join with slip stitch through both edges
- S2
Chain 1 and work single crochet evenly around placing one sc at the end of each rib
- S3
Join with slip stitch to first sc
04 · Snag listWhat went wrong on the bench, and the fix
Snag 1
Working into both loops on the rib
Check the last stitch of every row — the pattern calls for both loops there specifically for a clean edge, but every other stitch stays back loop only.
Snag 2
Losing the band's row count mid-way
Use a row counter or mark every ten rows with a scrap of yarn, since the final count is what determines which size you end up with.
Snag 3
Puff stitches at uneven heights
Pull each loop of the puff stitch to the same length before the closing yarn-over so the contrast-color round reads as a consistent texture, not a ragged one.
Snag 4
Uneven sc pickup around the folded band
Place one sc at the end of each rib as instructed rather than estimating spacing by eye, or the crown will start off-center on the band.
05 · QueriesQuestions logged against this build
Can the ribbing band and crown be worked in one color?
The pattern uses contrast color specifically for the puff stitch rounds to make the texture stand out against the main-color sc rounds. Working both in one color is possible but the puff stitch texture becomes harder to see.
Why does the band get folded before joining?
Folding the Elastic Ribbing Band in half and slip-stitching both edges together turns a flat strip into a closed loop with double thickness, which is what gives the finished edge its structure. The single sc row worked around it afterward sets up even stitches for the crown.
06 · Made byWho counted this one

Who writes Amigurumi Addict, how a build gets its number, and why every round on the site carries a stitch count.
07 · Next off the benchThree builds that sit near this one

Odds and ends
Crochet a phone bag with strap, flap, and ring closure
How to crochet a phone bag? Join rounds from a 30-chain base, add a strap, flap, and ring.

Odds and ends
Crochet worsted weight socks with a turned heel
How do you crochet socks for winter? Build toe-up in worsted weight with a folded heel and ribbed leg.

Odds and ends
Toe-Up Woodland Walker Crochet Socks With Colorwork Cuff
How do you crochet toe-up socks with a colorwork cuff? Build the Toe, Heel, and stranded Cuff in order.
Join the build log
One message when a build is issued
A drawing and its parts list, when one leaves the bench.