| Shelf | Level | Time | Hook | Yarn |
|---|---|---|---|---|
| Odds and ends | Intermediate | 12-18 Hours | 4.0 mm | Worsted |
Peach Blossom Crochet Toddler Dress Free Pattern
Crochet the Peach Blossom Toddler Dress with a button-placket bodice, shell stitch lace skirt, and scalloped hem. Free pattern for size 2T with ribbon wais
01 · The pieceWhat Peach Blossom Crochet Toddler Dress Free Pattern actually is
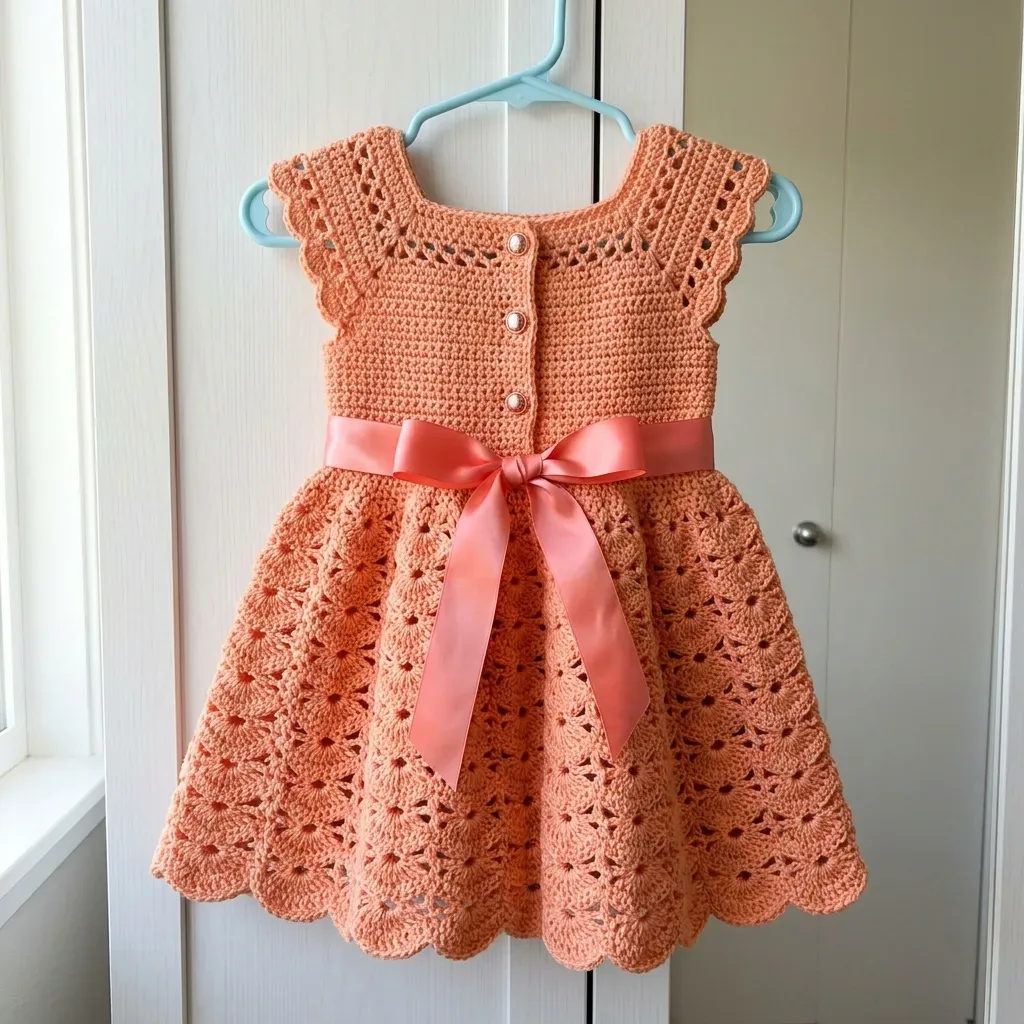
The Peach Blossom Crochet Toddler Dress is the kind of pattern that makes you fall in love with garment crochet all over again. It combines a tailored bodice with a button placket, a flowing shell stitch lace skirt, and a scalloped hem that catches the eye from every angle. This piece is perfect for crocheters who want to make something truly special for a birthday, holiday photo session, or first-year milestone, and it works up in soft peach or coral tones that photograph beautifully.
This dress is worked top down, starting at the neckline and flowing outward through the yoke, then splitting to work the bodice flat before rejoining in the round for the skirt. You will need to be comfortable transitioning between joined rounds and flat rows, working shell stitches with confidence, and tracking stitch counts closely since this is a fitted garment. Plan for roughly 12 to 18 hours of crochet time, plus extra for blocking the lace and threading the ribbon.
When finished, you'll have a size 2T dress measuring about 17 inches from shoulder to hem with a 20-inch chest circumference, featuring pearl buttons down the placket and a satin ribbon cinched through eyelets at the waist. It has that unmistakable boutique look with none of the seaming, since the top-down construction eliminates that final assembly step. This is a dress little ones will be twirled in, photographed in, and one you'll be proud to gift or hand down.
- Begin at the neckline and work the yoke rounds outward, increasing to shape the shoulders and chest.
- Add the neckline lace fan border around the collar edge for a delicate, boutique-style finish.
- Divide the stitches to separate the bodice from the underarms, setting up for flat row shaping.
- Work the bodice in flat rows, building the button placket structure down the center back or front.
- Rejoin all stitches into the round once the bodice rows are complete to begin the skirt section.
- Crochet the shell stitch skirt rounds, letting the lace pattern open into a flared, flowing shape.
- Work the waist eyelet round so a satin ribbon can be threaded through for cinching and finishing.
- Sew on the pearl buttons along the placket and thread the ribbon through the eyelets to complete the dress.
02 · The count run23 rounds across 6 parts, each with its count
US terms throughout. Every row below ends with the count that round finishes on.
| Part | Qty | Finishes on |
|---|---|---|
| Section 1: Yoke | 1 | - |
| Section 4: Bodice Rows | 1 | - |
| Section 6: Skirt | 1 | - |
| Section 2: Neckline Lace Fan Border | 1 | (8) |
| Section 3: Divide for Bodice | 1 | - |
| Section 5: Waist Eyelet Round | 1 | (43) |
The yoke begins at the neckline and is worked outward in joined rounds to the underarm.
Foundation: Work a magic ring or ch 4 and join with sl st to form a ring.
| Round | Instruction | Count |
|---|---|---|
| Round 1 | (RS): Ch 3 (counts as first dc), work 47 more dc into ring, join with sl st to top of beginning ch-3. (48 dc) | - |
| Round 2 | Ch 3 (counts as first dc), dc into same st as join, 2 dc into each st around, join with sl st to top of beginning ch-3. (96 dc) | - |
| Round 3 | Ch 3 (counts as first dc), dc into same st, dc into next st, (2 dc into next st, dc into next st) rep around to last st, 2 dc into last st, join with sl st to top of beginning ch-3. (144 dc) | - |
| Round 4 | Ch 3 (counts as first dc), dc into same st, dc into next 2 sts, (2 dc into next st, dc into next 2 sts) rep around, join with sl st to top of beginning ch-3. (192 dc)Place stitch markers to divide the yoke into 4 sections: Front: 52 sts Back: 52 sts Left sleeve opening: 44 sts Right sleeve opening: 44 sts | - |
| Round 5 | Ch 3 (counts as first dc), dc into each st around, join. (192 dc) | - |
| Round 6 | Ch 3, dc into same st, dc into next 5 sts, (2 dc into next st, dc into next 5 sts) rep around, join. (224 dc) | - |
| Round 7 | Ch 3, dc into each st around, join. (224 dc) | - |
| Round 8 | Ch 3, dc into same st, dc into next 6 sts, (2 dc into next st, dc into next 6 sts) rep around, join. (256 dc)Checkpoint: After Round 8, the yoke should measure approximately 3.5 inches or 9 cm from center ring to outer edge. | - |
The bodice is worked flat in hdc rows.
| Round | Instruction | Count |
|---|---|---|
| Round 1 | (RS): Ch 2 (counts as first hdc), hdc into each st and each ch across. Turn. (220 hdc) | - |
| Round 2 | through 10: Ch 2 (counts as first hdc), hdc into each st across. Turn. (220 hdc) | - |
| Round 11 | (RS): Ch 2, hdc into next 53 sts, hdc2tog, hdc into next 108 sts, hdc2tog, hdc into next 54 sts. Turn. (218 hdc) | - |
| Round 12 | through 14: Ch 2, hdc into each st across. Turn. (218 hdc) | - |
| Round 15 | (RS): Ch 2, hdc into next 52 sts, hdc2tog, hdc into next 108 sts, hdc2tog, hdc into next 52 sts. Turn. (216 hdc) | - |
| Round 16 | through 18: Ch 2, hdc into each st across. Turn. (216 hdc) Do not fasten off. Checkpoint: After Row 18, your piece should measure approximately 8 inches or 20 cm from neckline to current row. | - |
Skirt Setup Round: Ch 1, sc into first st and each st and ch-sp around. Work 1 sc per hdc and 2 sc per ch-2 sp. Join. (215 sc)
Increase Round: Ch 1, sc into each st around, placing 2 sc into one stitch at side seam area. Join. (216 sc)
Skirt Round 1 (Shell Foundation): Ch 3 (counts as first dc), 2 dc into same st, sk 2 sts, sc into next st, sk 2 sts, (5 dc into next st, sk 2 sts, sc into next st, sk 2 sts) 17 times, 2 dc into same st as beg ch-3, join with sl st to top of ch-3. (18 shells, 18 sc)
Skirt Round 2: Sl st to center dc of first shell, ch 1, sc into same st, ch 5, (sc into center dc of next shell, ch 5) 17 times, join with sl st to first sc. (18 sc, 18 ch-5 sps)
Skirt Round 3: Ch 3, 4 dc into same st, sc into ch-5 sp, (5 dc into sc, sc into ch-5 sp) 17 times, join. (18 shells, 18 sc)
Skirt Round 4 (sc conversion with increase): Sl st into any dc, ch 1, sc into same st, sc into next 4 dc, sc into sc, (sc into next 5 dc, sc into sc) 17 times. Join. (216 sc)
Skirt Increase Round A: Ch 1, (sc into next 8 sts, 2 sc into next st) 24 times, join. (240 sc)
Skirt Round 5: Ch 3, 2 dc into same st, sk 2 sts, sc into next st, sk 2 sts, (5 dc into next st, sk 2 sts, sc into next st, sk 2 sts) 19 times, 2 dc into first st to complete shell, join. (20 shells, 20 sc)
Skirt Round 6: Sl st to center dc of first shell, ch 1, sc into same st, ch 5, (sc into center dc of next shell, ch 5) 19 times, join. (20 sc, 20 ch-5 sps)
Skirt Round 7: Ch 3, 4 dc into same sc, sc into ch-5 sp, (5 dc into next sc, sc into next ch-5 sp) 19 times, join. (20 shells, 20 sc)
Skirt Round 8: Sl st to center dc of first shell, ch 1, sc into same st, ch 5, (sc into center dc of next shell, ch 5) 19 times, join. (20 sc, 20 ch-5 sps)
| Round | Instruction | Count |
|---|---|---|
| Round 9 | (sc conversion): Sl st into first dc, ch 1, sc into same st, sc into next 4 dc, sc into sc, (sc into next 5 dc, sc into sc) 19 times, join. (240 sc)Skirt Increase Round B: Ch 1, (sc into next 9 sts, 2 sc into next st) 24 times, join. (264 sc) | - |
| Round 14 | (sc conversion): Sl st into first dc, ch 1, sc into same st, sc into next 4 dc, sc into sc, (sc into next 5 dc, sc into sc) 21 times, join. (264 sc) | - |
| Round 15 | Ch 3, 2 dc into same st, sk 2 sts, sc into next st, sk 2 sts, (5 dc into next st, sk 2 sts, sc into next st, sk 2 sts) 21 times, 2 dc into first st, join. (22 shells, 22 sc) | - |
| Round 16 | Sl st to center dc, ch 1, sc into same st, ch 5, (sc into center dc of next shell, ch 5) 21 times, join. (22 sc, 22 ch-5 sps)Continue with scalloped hem edging, then fasten off. | - |
The neckline border is applied to the foundation ring edge.
With RS facing, join yarn at any stitch along the neckline edge.
| Round | Instruction | Count |
|---|---|---|
| Round 1 | Neckline Border Round 1: Ch 1, sc evenly around neckline edge, placing 1 sc per dc of Round 1. Join with sl st to first sc. (48 sc) | - |
| Round 2 | Neckline Border Round 2 (Fan Lace): Ch 1, sc into first st, (sk 2 sts, work Fan Stitch into next st, sk 2 sts, sc into next st) rep around. Join with sl st to first sc. (8 fans, 8 sc) | (8) |
| Round 3 | Neckline Border Round 3: Sl st across to first ch-2 sp of first fan, ch 1, sc into same ch-2 sp, (ch 3, sc into next ch-2 sp) rep around, ending ch 3, join to first sc. (8 sc, 8 ch-3 sps)Fasten off and weave in ends at neckline. | (8) |
Divide the yoke into front bodice, back bodice, and two armhole openings.
Count along Round 8’s 256 sts and divide as follows: Right front: 52 sts Right armhole: 26 sts (leave unworked for sleeve opening)
Back: 100 sts Left armhole: 26 sts (leave unworked)
Left front: 52 sts Total: 256 sts
Joining for bodice: Starting at right front, work across 52 right front sts, ch 8 for right underarm, sk 26 right armhole sts, work across 100 back sts, ch 8 for left underarm, sk 26 left armhole sts, work across 52 left front sts.
Bodice stitch count at join row: 52 + 8 + 100 + 8 + 52 = 220 sts across.
| Round | Instruction | Count |
|---|---|---|
| Round 1 | Join Row 18 ends together at center front with a sl st, forming a joined round. Adjust stitch count to 215 by skipping one stitch when joining. | - |
| Round 2 | Eyelet Round: Ch 2 (counts as hdc), hdc into next 2 sts, (ch 2, sk 2 sts, hdc into next 3 sts) 42 times, ch 2, sk 2, join with sl st to top of ch-2. (43 hdc-3 groups, 43 ch-2 eyelets) | (43) |
03 · Putting it togetherHow the pieces go together
- S1
Blocking: Wet block the finished dress on a blocking mat. Pin the skirt scallops into shape, gently stretching them to show off the lace pattern. Allow to dry completely before removing pins.
- S2
Ribbon: Thread the satin ribbon through the waist eyelets, weaving in and out. Center the ribbon ends at the front and tie in a bow.
- S3
Buttons: Sew decorative buttons along the front placket, spacing them evenly. These buttons are decorative and add that classic finished look.
- S4
Weave in all remaining ends using your tapestry needle.
04 · Before it goes to a childWhat has to be right, and what is allowed to drift
- 💡 Use at least 4 stitch markers to track the yoke increases, the divide-for-bodice point, and the start of each round in the shell stitch skirt so you never lose your place.
- 💡 Check your gauge in hdc flat rows before starting — 16 stitches and 12 rows should measure 4 inches with a G-6/4.0mm hook, since this fitted dress relies on accurate sizing.
- 💡 Block the shell stitch skirt aggressively on a blocking mat with pins to open up the lace pattern and create that beautiful scalloped movement in the hem.
- 💡 When holding Paintbox Simply DK double for Option 2, wind both strands into a single cake first so they feed evenly and don't twist or split while you work the lace.
- 💡 Sew buttons on after blocking, not before, so you can adjust placement precisely once you see the true finished shape and length of the bodice placket.
- 💡 Cut your satin ribbon a few inches longer than the 1-yard measurement to allow for tying a bow at the waist plus a little extra for trimming the ends neatly.
05 · Snag listWhat went wrong on the bench, and the fix
Snag 1
Skipping the gauge swatch before starting the yoke.
Because this is a fitted garment, work a swatch in hdc flat rows to confirm 16 stitches and 12 rows equal 4 inches, and adjust your hook size up or down until you match it before casting on.
Snag 2
Losing track of stitch counts when transitioning from joined rounds to flat rows for the bodice.
Place a stitch marker at the exact point where you divide for the bodice, and count your stitches immediately after dividing to confirm you have the correct number before working the first bodice row.
Snag 3
Working the shell stitches in the skirt inconsistently, causing uneven lace texture.
Count the chains and stitches within each shell carefully as you go, and use a stitch marker at the start of each round to make sure your shell pattern stays aligned round after round.
Snag 4
Placing the button placket eyelets or buttonholes unevenly, leading to gapping or misalignment.
Measure and mark button placement on one side of the placket first with locking stitch markers, then match the buttonhole spacing on the opposite side exactly before sewing on buttons.
Snag 5
Threading the ribbon through the waist eyelets before blocking the piece.
Block the entire dress first, including the lace skirt, and let it dry completely before threading the satin ribbon so the eyelets hold their shape and the ribbon lies flat.
Snag 6
Choosing a yarn that is too heavy or too light, which throws off the drape of the shell stitch lace.
Stick to true worsted weight yarn like Pound of Love, or hold two strands of DK weight yarn together as suggested, to keep the lace airy but structured as intended.
06 · VariantsOther ways to issue this one
There is something so satisfying about watching this dress transform from a simple neckline chain into a full, swishy skirt right in your hands. I adore the neckline lace fan border because it gives the yoke that delicate, boutique-quality finish before you've even started the bodice. Splitting for the bodice section and working those six rows flat lets you shape the button placket precisely, and sewing on pearl buttons afterward feels like the moment the dress really comes alive. The shell stitch skirt is pure magic to crochet; each round adds movement and drape you can feel forming under your hook. My favorite detail is the waist eyelet round, because threading that satin ribbon through afterward instantly elevates the whole piece from handmade to heirloom. And since this is worked top down with no seaming needed at the end, you get to enjoy uninterrupted momentum from first stitch to last. It's the kind of project where the finished product looks far more advanced than the actual skill required, which never gets old.
07 · QueriesQuestions logged against this build
What size does this pattern fit?
This pattern is written for toddler size 2T, fitting approximately 1 to 2 year olds with a 20-inch chest circumference. The finished length from shoulder to hem is about 17 inches.
Can I use a different yarn than the ones listed?
Yes, any worsted weight yarn with about 400 yards will work well, though machine washable acrylic or superwash merino are ideal for a child's garment. Just be sure to check your gauge, since this is a fitted piece.
Do I need to know how to seam to finish this dress?
No seaming is required at all. The dress is worked top down starting at the neckline, splitting for the bodice, and rejoining in the round for the skirt, so it comes together with almost no finishing work beyond weaving in ends.
Why does the pattern call for holding two strands of DK yarn together?
Holding two strands of Paintbox Yarns Simply DK together achieves worsted weight gauge while adding extra body to the shell stitch lace pattern. This substitution gives you more color flexibility if you want a custom peach shade.
How long does the ribbon and buttons take to finish at the end?
Plan for extra time beyond the crochet itself to sew on the 4 to 5 pearl buttons and thread the satin ribbon through the waist eyelets. This finishing step is part of why the total time estimate runs up to 18 hours.
Original pattern: https://crochetwithmia.com/peach-blossom-crochet-toddler-dress-free-pattern/
08 · Made byWho counted this one

Who writes Amigurumi Addict, how a build gets its number, and why every round on the site carries a stitch count.
09 · Next off the benchThree builds that sit near this one

Odds and ends
Crochet a phone bag with strap, flap, and ring closure
How to crochet a phone bag? Join rounds from a 30-chain base, add a strap, flap, and ring.

Odds and ends
Crochet worsted weight socks with a turned heel
How do you crochet socks for winter? Build toe-up in worsted weight with a folded heel and ribbed leg.

Odds and ends
Toe-Up Woodland Walker Crochet Socks With Colorwork Cuff
How do you crochet toe-up socks with a colorwork cuff? Build the Toe, Heel, and stranded Cuff in order.
Join the build log
One message when a build is issued
A drawing and its parts list, when one leaves the bench.