| Shelf | Level | Time | Hook | Yarn |
|---|---|---|---|---|
| Odds and ends | Beginner | 2-3 Hours | 3.5 mm | DK |
Newborn Top-Knot Hat Crochet Pattern for Absolute Beginners
Crochet an adorable newborn top-knot hat with easy front/back post double crochets. Beginner-friendly pattern sized for a 13.5-inch head.
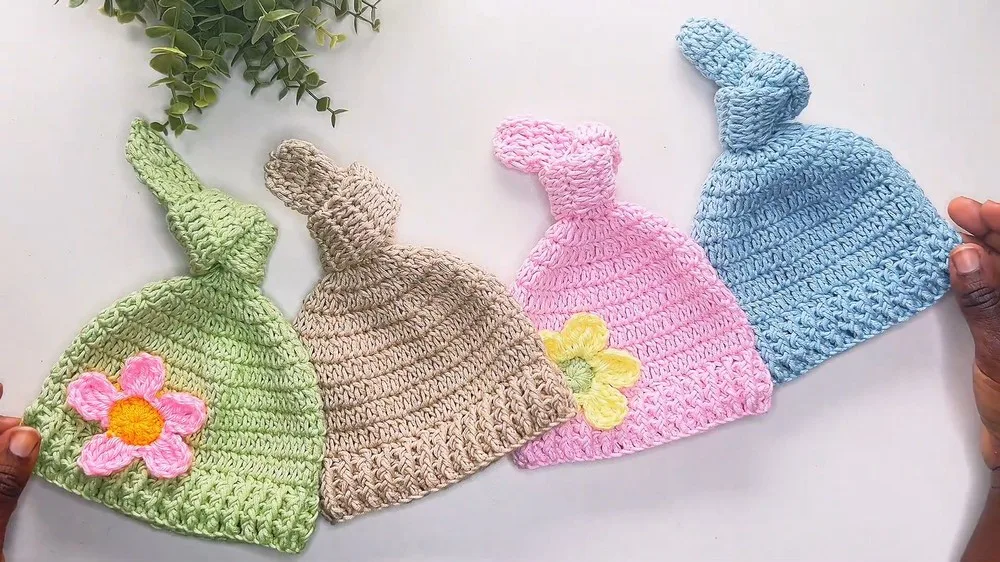
01 · The pieceWhat Newborn Top-Knot Hat Crochet Pattern for Absolute Beginners actually is
This newborn top-knot hat is one of those patterns that looks far more impressive than it actually is to make. Sized specifically for a 13.5-inch newborn head, it features a beautifully textured ribbed band created with front and back post double crochets, topped off with a playful little knot that you can style however you like. It's an ideal pick for new crocheters who want a project that feels special without being intimidating, and it's a favorite for baby showers, hospital gift bags, and newborn photo sessions.
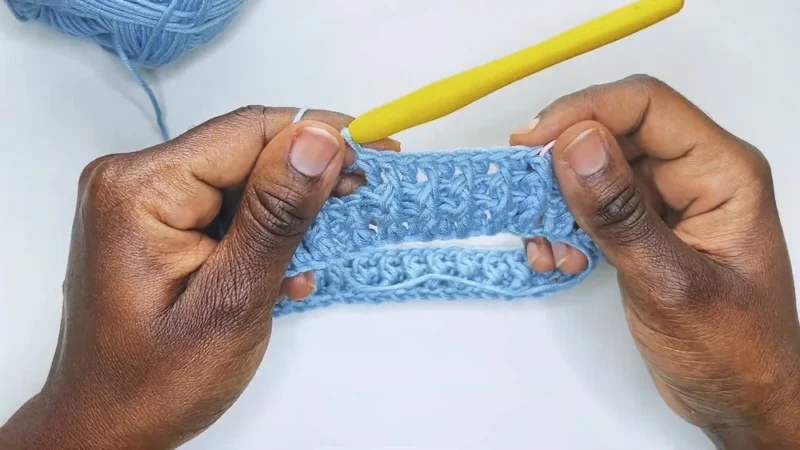
The techniques here are refreshingly approachable: basic chains, double crochets, and post stitches worked around a joined round. You'll practice slip stitching to join your rounds neatly and get comfortable with double crochet decreases as you shape the crown. Even if you've never worked a post stitch before, the ribbed texture is simply a matter of working around the post of a stitch instead of into the top — once you do it a few times, it clicks. Expect this project to take about 2-3 hours from slip knot to finished hat.
The finished hat is soft, stretchy, and perfectly snug thanks to the ribbing and the smaller 3.5 mm hook, which tightens up the stitches for a cozy fit. Worked in Bernat Softy Baby, it has a gentle, breathable feel against delicate newborn skin, with just enough give to accommodate those first weeks of rapid head growth. Left plain it's sweetly minimalist, or dress it up with a button or applique — either way, it makes an irresistible handmade gift that new parents will treasure.
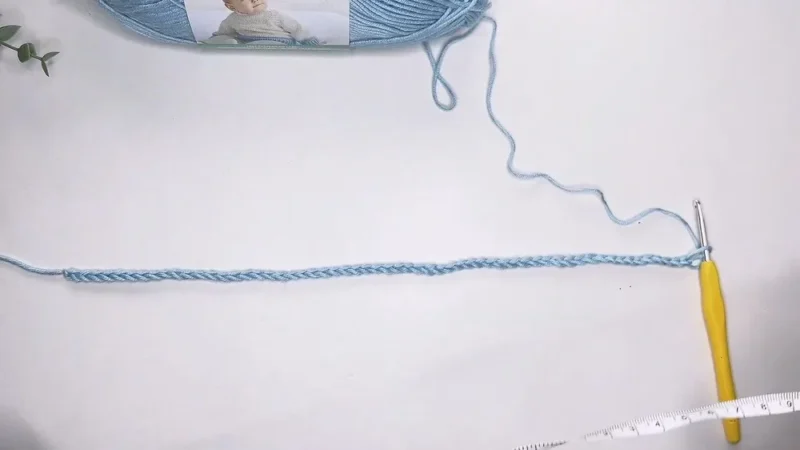
- Make a slip knot and chain the length needed to fit a 13.5-inch newborn head, checking that it isn't twisted.
- Join the chain into a circle with a slip stitch to form the foundation ring for your hat.
- Chain two and work a double crochet into each chain around, then slip stitch to close the round.
- Continue working the ribbed rounds until the hat body reaches the desired depth for a newborn fit.
- Begin shaping the crown by alternating double crochet decreases with regular double crochets to gradually taper the top.
- Keep repeating the decrease pattern round after round until only a small opening remains at the top.
- Gather and secure the remaining stitches into a top-knot shape, then weave in all ends with a yarn needle.
02 · The count run3 rounds across 1 part, each with its count
US terms throughout. Every row below ends with the count that round finishes on.
| Part | Qty | Finishes on |
|---|---|---|
| Main Pattern | 1 | - |
| Round | Instruction | Count |
|---|---|---|
| Round 1 | Double Crochets Chain two and work a row of double crochets into each chain. Complete the round by slip stitching into the first double crochet.Rounds 2–4: Creating the Ribbed Texture Alternate front post double crochets with back post double crochets to create the ribbed pattern. | - |
| Round 9 | Beginning Decreases Start reducing the stitch count by alternating double crochet decreases with regular double crochets.Continue until the round is complete. | - |
| Round 10-12 | Gradual Decreases Gradually shape the hat by adjusting the number of double crochet decreases in each round.By round 12, focus solely on decreases to achieve the desired shape. | - |
Optional: Add appliques, buttons, or other decorative elements to personalize the hat.
Final Thoughts
The tutorial ends with encouragement to watch additional videos on the channel for more baby crochet patterns and projects. The instructor also emphasizes the importance of liking, sharing, and subscribing to support their work.
03 · Putting it togetherHow the pieces go together
- S1
Weave in all loose ends for a neat finish.
- S2
Optional: Add appliques, buttons, or other decorative elements to personalize the hat.
04 · Before it goes to a childWhat has to be right, and what is allowed to drift
- 💡 Use the smaller 3.5 mm hook as instructed, even if the yarn label recommends 4 mm — this tighter gauge is what gives the hat its snug, stretchy fit for a newborn head.
- 💡 Place a removable stitch marker in the first stitch of every round so you never lose track of where your round begins or ends, especially during the post stitch rounds.
- 💡 Double-check your starting chain isn't twisted before slip stitching it into a circle — an untwisted chain is essential for the hat to lie flat and even.
- 💡 When working front and back post double crochets, keep your hook insertion consistent every round so the ribbing lines up in clean, straight columns rather than a jagged pattern.
- 💡 Count your stitches after each decrease round to make sure the crown is shaping evenly on all sides before continuing to the next round.
- 💡 Weave in your yarn tail securely at the top-knot with a yarn needle, and consider a few extra stitches at the base of the knot so it holds its shape through repeated laundering.
05 · Snag listWhat went wrong on the bench, and the fix
Snag 1
Twisting the starting chain before joining it into a circle with a slip stitch.
Lay your chain flat on a table before joining and run your finger along it to check for twists — the chain should form a smooth, flat loop with no spiral before you slip stitch the ends together.
Snag 2
Mixing up front post and back post double crochets, which flattens the ribbed texture.
Remember: front post means you insert your hook from front to back around the stitch post, and back post means front to back but around from behind. Place a stitch marker in your first stitch of each round to help you track which post stitch comes next.
Snag 3
Working too loosely with the 3.5 mm hook, resulting in a floppy hat that won't hold its ribbed shape.
Since this pattern intentionally sizes down from the recommended 4 mm hook, keep your tension slightly snug and consistent — if your stitches still look loose, try going down to a 3.25 mm hook instead.
Snag 4
Losing track of the double crochet decreases while shaping the crown, leading to a lumpy or uneven top.
Use a stitch marker at the start of each decrease round and count your stitches after every round to confirm the total is decreasing evenly before moving on.
Snag 5
Forgetting to slip stitch into the very first double crochet to close each round.
Always locate the top of your first stitch in the round (mark it if needed) and slip stitch directly into it before chaining up for the next round — skipping this leaves a visible gap in your rounds.
Snag 6
Making the top-knot too tight or too small to shape nicely once the hat is finished.
Leave a generous tail of stitches at the crown before cinching, and experiment with folding or rolling the top-knot section loosely before securing it with your yarn needle for a fuller, more playful knot.
06 · VariantsOther ways to issue this one
Once you've made the hat as written, there are so many fun ways to customize it. For colors, try a soft sage green or dusty mauve in Bernat Softy Baby for a gender-neutral gift, or go classic with pale blue or blush pink. A speckled or marled yarn like Baby Soft in a heathered colorway adds subtle visual interest to the ribbing without any extra effort. If you want a bolder look, work the last round of the ribbing in a contrasting color before starting the crown decreases — it creates a sweet little stripe right where the hat meets the top-knot. For sizing, this pattern is built for a 13.5-inch head circumference, but you can scale it for other sizes by adjusting your starting chain length: add or subtract in small increments (try 1-2 inches shorter for preemie sizing, or 1-2 inches longer for a 3-6 month fit), keeping your chain count in an even number to preserve the post stitch rib pattern. Just remember that changing the chain length will also shift how many rounds you need before starting your decreases, so measure as you go rather than following round counts blindly. Yarn-wise, if you want something extra soft, swap in a baby alpaca blend or a bamboo-cotton yarn for a silkier drape — just size your hook down slightly to match gauge, similar to how this pattern already sizes down from 4 mm to 3.5 mm. For themed variations, add a small crocheted heart or star applique to the brim, sew on tiny button 'ears' for an animal-inspired look, or skip the knot entirely and finish with a smooth, closed crown for an equally sweet, simpler silhouette.
I love this hat because it proves you don't need fancy techniques to make something genuinely adorable. The ribbed texture from the front and back post double crochets gives it that professional, boutique-store look, but it's really just a simple repeat once you get the rhythm down. There's something so satisfying about watching that ribbing stack up round after round, knowing it's what gives the hat its perfect stretchy fit around a newborn's tiny head. And then there's the top-knot — my favorite part! It's the little detail that turns a basic beanie into something Instagram-worthy, and you get to decide how big and floppy or neat and small you want it. I also appreciate that this pattern is forgiving. Using a 3.5 mm hook instead of the standard 4 mm tightens everything up beautifully, so even if your gauge runs a little loose, the fabric stays dense enough to keep baby's head warm. Whether you leave it totally plain or add a tiny button or fabric applique, this hat feels like a genuine keepsake — the kind of gift that gets tucked away in a memory box, not just worn once and forgotten.
07 · QueriesQuestions logged against this build
What yarn weight works best for this newborn top-knot hat?
This pattern uses Bernat Softy Baby, a cotton-acrylic blend in a DK-weight, which is soft and breathable for newborn skin. Any similar DK-weight baby yarn will work well as a substitute.
Why does the pattern call for a 3.5 mm hook instead of the recommended 4 mm?
Sizing down to a 3.5 mm hook creates a tighter, denser stitch, which helps the ribbed fabric hold its shape and stretch snugly around a newborn's head. It also compensates for the natural stretch of crochet fabric over time.
How do I make the top-knot bigger or smaller?
You can adjust the fullness of the top-knot by how loosely or tightly you cinch the remaining stitches at the crown before securing with your yarn needle. Leaving slightly more length before pulling tight gives you a fuller, floppier knot.
Can I skip the top-knot and make a plain beanie instead?
Yes, simply complete the crown decreases fully and close the hat smoothly instead of leaving a section to gather into a knot. This gives you a clean, classic newborn beanie using the same ribbed body.
Is this pattern really beginner-friendly even with the post stitches?
Absolutely — front and back post double crochets are simply worked around the stitch post rather than into the top, and once you've done a few, the rhythm becomes intuitive. Combined with basic chains and double crochets, this is a great confidence-building first project.
Original pattern: https://redagapeblog.com/crochet-newborn-top-knot-ha/
08 · Made byWho counted this one

Who writes Amigurumi Addict, how a build gets its number, and why every round on the site carries a stitch count.
09 · Next off the benchThree builds that sit near this one

Odds and ends
Crochet a phone bag with strap, flap, and ring closure
How to crochet a phone bag? Join rounds from a 30-chain base, add a strap, flap, and ring.

Odds and ends
Crochet worsted weight socks with a turned heel
How do you crochet socks for winter? Build toe-up in worsted weight with a folded heel and ribbed leg.

Odds and ends
Toe-Up Woodland Walker Crochet Socks With Colorwork Cuff
How do you crochet toe-up socks with a colorwork cuff? Build the Toe, Heel, and stranded Cuff in order.
Join the build log
One message when a build is issued
A drawing and its parts list, when one leaves the bench.