| Shelf | Level | Time | Yarn |
|---|---|---|---|
| Odds and ends | Intermediate | 4-6 Hours | Ribbon/Novelty |
Minimalist Crochet Bucket Bag Pattern for Everyday Style
Make a chic minimalist crochet bucket bag with organza ribbon and a textured stitch pattern. Perfect everyday accessory with clear step-by-step guidance.
01 · The pieceWhat Minimalist Crochet Bucket Bag Pattern for Everyday Style actually is
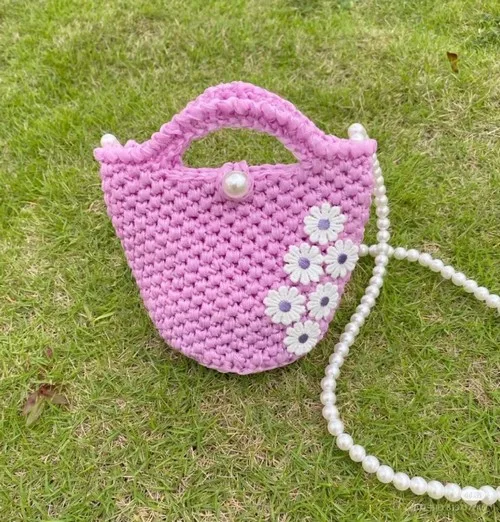
This minimalist crochet bucket bag is all about clean lines and quiet texture — the kind of piece you reach for again and again. Worked up in glossy organza ribbon instead of traditional yarn, it has a subtle sheen and structured drape that feels more 'boutique find' than 'handmade craft.' It's perfect for crocheters who love fashion-forward makes and want a project that actually gets worn, not just displayed on a shelf.
The magic happens through a clever combination of short and long stitches worked in rounds, creating a woven, basket-like texture that gives the bag its signature look without any complicated shaping. You'll start with a double-strand magic ring, build the base, then transition into the textured body before finishing with two chained handles. This is a great next-step project for confident beginners or intermediate crocheters — expect about 4 to 6 hours from ribbon ball to finished bag.
The finished bucket bag holds its shape beautifully thanks to the sturdy ribbon, landing at a roomy, everyday-carry size with a rounded base and gently flared sides. It has that effortless, minimalist aesthetic that looks equally at home at brunch or the farmer's market. Because it's so unique and polished, it also makes a genuinely covetable handmade gift for the fashion lover in your life.
- Roll your organza ribbon into a manageable ball and double the strand for extra strength before you begin.
- Form a magic ring with the doubled ribbon and work your starting round of single crochet stitches.
- Mark the first stitch with a stitch marker so you can always find the beginning of each round.
- Work the increasing rounds to shape a flat, sturdy base for the bag.
- Continue the textured rounds until the body reaches your desired height.
- Divide the top edge into four equal sections and skip the specified stitches to mark handle placement points.
- Chain each handle strap and attach both ends securely to their matching points on opposite sides of the bag.
02 · The count run9 rounds across 4 parts, each with its count
US terms throughout. Every row below ends with the count that round finishes on.
| Part | Qty | Finishes on |
|---|---|---|
| Base of the Bag | 1 | (10) |
| Increasing Rounds | 1 | (30) |
| Body of the Bag | 1 | - |
| Handles | 1 | (15) |
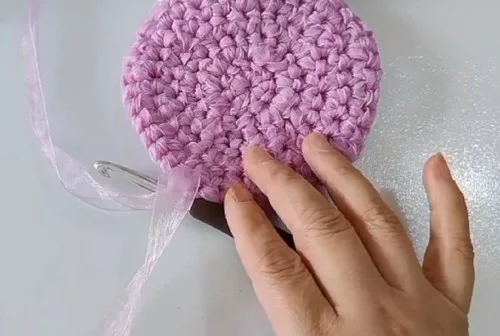
Preparing the Ribbon Roll the organza ribbon into a small ball to make it easier to work with. Use double strands for extra durability: hook two lines together before starting.
| Round | Instruction | Count |
|---|---|---|
| Round 1 | Leave a short tail and form a magic ring with the double ribbon. Work 10 single crochet (sc) stitches into the ring. Secure the first stitch with a stitch marker to mark the beginning of the round. | (10) |
| Round | Instruction | Count |
|---|---|---|
| Round 2 | Work 2 sc into each stitch (20 sts total). | (20) |
| Round 3 | Alternate between 2 sc in one stitch and 1 sc in the next (30 sts). | (30) |
| Round 4 | Use a "3 sc, 1 inc" repeat pattern. | - |
| Round 5 | Use a "4 sc, 1 inc" repeat pattern.Continue increasing with the formula: one more sc between each increase for each round. | - |
Add 1–2 extra rounds if you want a larger base.
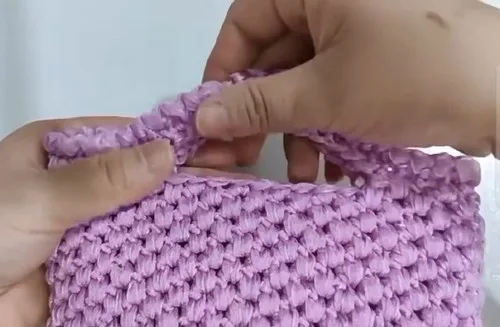
Stitch Pattern Begin working in rounds without increases. Use a combination of short and long stitches.
| Round | Instruction | Count |
|---|---|---|
| Body Rounds | For each repeat: insert a short stitch, then insert a long stitch under the short stitch from the previous round. Continue this pattern to form a textured fabric.Height Crochet the body up to 24 rows or to your preferred height. | - |
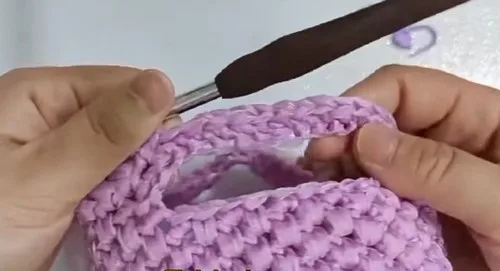
Placement Divide the final round of the top edge into 4 equal parts.
| Round | Instruction | Count |
|---|---|---|
| Handle Placement | For a bag with 43 stitches, place handles after skipping 11 stitches from each side. | (43) |
| Handle Straps | Chain 15 stitches for each handle. Attach each handle to its designated points on opposite sides of the bag. | (15) |
Reinforcing the Handles If the ribbon is too thick, use a needle to enlarge the holes before crocheting.
| Round | Instruction | Count |
|---|---|---|
| Reinforcing Round | Crochet one full round of single crochet stitches around the top edge and over the handles. After completing the round, make 2 slip stitches to finish neatly. | - |
03 · Putting it togetherHow the pieces go together
- S1
Trim any excess ribbon.
- S2
Carefully melt the ends of the ribbon with a lighter to prevent fraying.
- S3
Use a yarn needle to weave in any remaining ribbon tails inside the stitches for a clean look.
04 · Before it goes to a childWhat has to be right, and what is allowed to drift
- 💡 Choose a hook size that lets the ribbon glide smoothly without splitting — a slightly larger hook than you'd normally use for the equivalent yarn weight usually works best.
- 💡 Roll your ribbon into a compact ball before starting; loose, unrolled ribbon tangles quickly and makes tension inconsistent.
- 💡 Use a lighter to gently seal the cut ends of the ribbon if it starts to fray — just a quick pass is enough to prevent unraveling over time.
- 💡 Place your stitch marker in the very first stitch of each round of the textured body and move it up every round so you always know where you started.
- 💡 When dividing the top edge into four equal sections for handle placement, mark all four points first before attaching anything, so your handles end up symmetrical.
- 💡 Weave in ribbon tails carefully with a yarn needle, working through several stitches on the wrong side since slippery ribbon needs extra securing to stay put.
05 · Snag listWhat went wrong on the bench, and the fix
Snag 1
Working with a single strand of ribbon
Always hook two lines of ribbon together before starting your magic ring — the double strand is what gives the bag its structure and durability, and skipping it will result in a floppy, weak fabric.
Snag 2
Losing track of the beginning
Keep a stitch marker in the first stitch of every round and move it up as you go; without it, the short-and-long stitch pattern is easy to lose track of and your rounds can drift out of alignment.
Snag 3
Inserting the long stitch
Remember the long stitch should go under the short stitch from the previous round, not into the current round — slow down on this step until the placement feels automatic.
Snag 4
Miscounting stitches when dividing
Lay your work flat and physically count and mark each quarter point with stitch markers before starting the handle placement, rather than estimating by eye.
Snag 5
Skipping the wrong number of stitches
Double-check that you've skipped exactly 11 stitches from each side before attaching a handle base — an off-by-one error here will make the handles sit unevenly on the finished bag.
Snag 6
Letting the ribbon twist or tangle
Roll your organza ribbon into a small, tight ball before you begin, and periodically let your work hang free to untwist the strands as you crochet.
06 · VariantsOther ways to issue this one
There's something so satisfying about watching plain ribbon transform into a structured little bag! I love how the short-and-long stitch combo builds this beautiful woven texture round after round — it looks intricate but it's really just a simple repeat once you get the rhythm down. Working with double-stranded organza ribbon instead of yarn is such a fun twist too; it gives the bag body and a subtle shine that regular yarn just can't replicate. Dividing the top edge into four equal parts to place the handles feels like such a smart, tailored touch, and chaining those 15-stitch handle straps goes by so fast after the textured rounds. I also appreciate that this pattern doesn't overcomplicate things — no fiddly increases scattered everywhere, just a solid rhythm you can crochet while watching TV. And honestly, the moment you attach both handles and hold the finished bag up? That's the best part. It genuinely looks like something from a boutique shelf, not a craft table, and that gap between 'homemade' and 'high-end' is exactly what makes this one so much fun to make.
07 · QueriesQuestions logged against this build
Why do I need to double the ribbon strand?
Working with two strands held together gives the finished bag much more body and durability, which is essential since a single strand of ribbon alone would be too thin and floppy to hold its shape as a bag.
How do I keep my rounds textured stitches even?
The key is consistency in tension — always insert your long stitch under the short stitch from the round below, and keep your stitch marker moving up each round so you don't lose your place in the repeat.
What size bag will this pattern make?
Working 24 rows (or to your preferred height) on a 10-stitch magic ring base creates a roomy, everyday-sized bucket bag, but you can shorten or lengthen the body rows to adjust the final size to your liking.
Do the handles need to be exactly 15 chain stitches?
The 15-chain length gives a comfortable hand-carry strap, but you can lengthen the chain if you'd prefer a shoulder-carry handle — just keep both handles the same length for a balanced look.
Original pattern: https://crocheteverything.com/trending-minimalist-crochet-bucket-bag-pattern-for-everyday-style/
08 · Made byWho counted this one

Who writes Amigurumi Addict, how a build gets its number, and why every round on the site carries a stitch count.
09 · Next off the benchThree builds that sit near this one

Odds and ends
Crochet a phone bag with strap, flap, and ring closure
How to crochet a phone bag? Join rounds from a 30-chain base, add a strap, flap, and ring.

Odds and ends
Crochet worsted weight socks with a turned heel
How do you crochet socks for winter? Build toe-up in worsted weight with a folded heel and ribbed leg.

Odds and ends
Toe-Up Woodland Walker Crochet Socks With Colorwork Cuff
How do you crochet toe-up socks with a colorwork cuff? Build the Toe, Heel, and stranded Cuff in order.
Join the build log
One message when a build is issued
A drawing and its parts list, when one leaves the bench.