| Shelf | Level | Time | Yarn |
|---|---|---|---|
| Odds and ends | Intermediate | 10-14 hours | Worsted |
Men’s Crochet V-Neck Sweater With Shaped Sleeves
How do you crochet a men's V-neck sweater? Shape shoulders, sleeves, and collar with this guide.
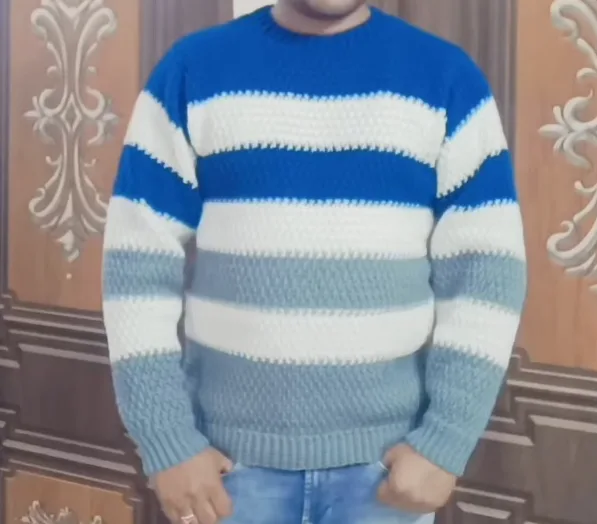
01 · The pieceWhat Men’s Crochet V-Neck Sweater With Shaped Sleeves actually is
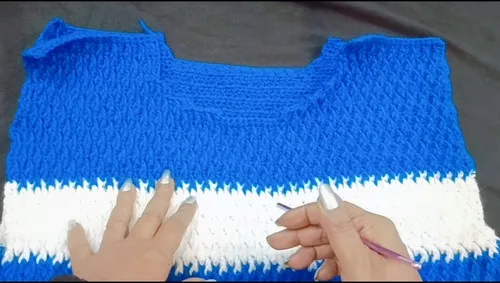
This sweater is built from a main body panel worked to length, then divided at the top into two shoulder panels separated by 23 to 24 unworked chains for the neckline. Each shoulder is shaped flat in rows with graduated neck-edge decreases, then joined to its pair with single crochet at the shoulder seam. Sleeves are worked separately with paired increases at both edges, set into the armhole opening, and closed with single crochet at the underarm and side seams. A ribbed Neck Border finishes the V-neck opening last.
Tolerance is tightest at the collar: Round 1 must total an odd stitch count for the front-post/back-post ribbing to alternate cleanly, and the 6-loop decrease at each shoulder seam has to land exactly there to avoid bulk. The V-neck decrease sequence (4, 3, 2, 1 stitches) must match on both sides or the neckline reads crooked. Overall body and sleeve length are flexible - the 25-inch body and 23-inch sleeve figures are targets for Large, adjustable by working more or fewer rounds before shaping starts.
02 · The count run9 rounds across 3 parts, each with its count
US terms throughout. Every row below ends with the count that round finishes on.
| Part | Qty | Finishes on |
|---|---|---|
| Neck Border (Collar) | 1 | - |
| First shoulder shaping (4 rows) | 1 | - |
| On first side, decrease at neck edge | 1 | - |
| Round | Instruction | Count |
|---|---|---|
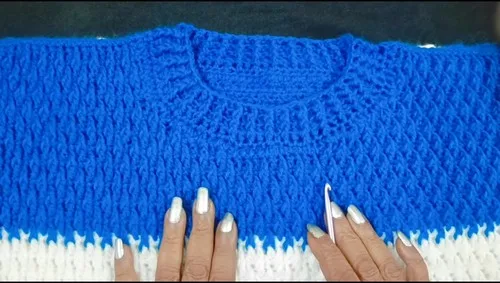
| Round 1 | Work double crochet evenly around neckline. Use a 6-loop decrease at shoulder seams and adjust stitch placement at V-neck edges. Ensure total stitch count is odd. Join with slip stitch. | - |
| Round 2 | and onward: Work front post double crochet and back post double crochet alternately to create ribbing. Continue for 3 to 4 rounds. Fasten off. | - |
Row 1: Work pattern across shoulder stitches.
Step by step: Row 1: Reattach yarn, work pattern across shoulder stitches; Work pattern in SC, skip last stitch at neck edge, turn.
| Round | Instruction | Count |
|---|---|---|
| Round 2 | Chain 1, turn, skip first stitch, work pattern to end. | - |
| Round 3 | Work pattern with no decrease.Step by step: Row 4: Work pattern, fasten off. | - |
| Round 4 | Work pattern with no decrease, fasten off. | - |
| Round | Instruction | Count |
|---|---|---|
| Round 3 | Decrease 4 stitches. | - |
| Round 5 | Decrease 3 stitches. | - |
| Round 7 | Decrease 2 stitches. | - |
| Round 9 | Decrease 1 stitch. Once shoulder matches back panel width, work 4 rows straight with no decreases.Repeat same shaping on the opposite side. | - |
Techniques on this build
- Front post/back post double crochet ribbing
- Used in Neck Border rounds 2 and onward; keep posts consistent so ribs run vertical instead of drifting sideways.
- Set-in sleeve assembly
- Used when attaching sleeves to the armhole opening; align sleeve center with the shoulder seam before stitching or the cap sits off-center.
- Graduated decrease shaping
- Used on the V-neck edge across rows 3, 5, 7, and 9 (4, 3, 2, then 1 stitch); keep decreases on the neck edge only, not the armhole edge.
Final fit-up
- Weave in yarn ends from the body panel, sleeves, and shoulder shaping rows before any seaming begins.
- Block the body panel and sleeve panels to their finished measurements so the seams meet flat once joined.
- Close shoulder seams, then side and underarm seams, with single crochet through both layers as set out in assembly.
- Attach sleeves last, matching the sleeve center to the shoulder seam before stitching into the armhole opening.
How the parts fit
- The 23 to 24 unworked chains at the center top set the neckline opening before the remaining stitches are divided equally for the two shoulders, so neckline width is fixed by chain count rather than by later shaping.
- Shoulder shaping is worked flat in rows rather than in rounds because the decreases in rows 3, 5, 7, and 9 apply only to the neck edge; a round would remove stitches from both edges at once.
- The 6-loop decrease at the shoulder seams in Neck Border Round 1 removes stitches exactly where the shoulder join meets the collar, keeping the ribbing from bunching at that seam.
Scaling the build
| Larger | Work additional rounds on the main body panel before the 22.5-inch shaping point. This adds length to the body while the shoulder width and neckline chain count stay the same. |
|---|---|
| Smaller | Work fewer ribbing rounds on the cuff ribbing, below the 21 ribs given for larger sizes. This shortens the cuff without affecting the sleeve's width increases. |
03 · Putting it togetherHow the pieces go together
- S1
Join shoulders by placing back and front panels together with wrong sides out and using single crochet.
- S2
Attach sleeves by aligning sleeve center with shoulder seam and stitching into armhole opening.
- S3
Join side seams and underarm seams with single crochet through both layers.
04 · Snag listWhat went wrong on the bench, and the fix
Snag 1
Uneven V-neck sides
Decrease exactly 4, 3, 2, then 1 stitch on rows 3, 5, 7, and 9 on both sides. A mismatched count on either side shows immediately at center front.
Snag 2
Even stitch count at collar
Round 1 of the Neck Border must total an odd number for the front-post/back-post ribbing to alternate correctly. Recount stitches before joining with a slip stitch.
Snag 3
Sleeve increases at the wrong rate
Increase one stitch at each end only every 4th round until the sleeve reaches about 13 inches wide. Increasing more often distorts the sleeve cap before assembly.
Snag 4
Sleeve set in off-center
Mark the sleeve center before stitching into the armhole opening. Without that marker the sleeve rotates and the underarm seam twists once joined.
05 · QueriesQuestions logged against this build
How do you know where to mark the center for the neckline?
Count the total chains across the top edge of the body panel and mark 23 or 24 chains at the center as unworked. This range sets the neckline for Large; adjust proportionally for other sizes.
Why is the shoulder decrease done in a set sequence of 4, 3, 2, then 1 stitch?
The graduated decrease shapes the V-neck edge gradually so the diagonal line is smooth rather than stepped. Each row removes fewer stitches as the shoulder narrows toward the required 20-stitch width.
Can the collar ribbing be worked longer than 4 rounds?
Yes, the front-post/back-post pattern in rounds 2 and onward can continue past 3 or 4 rounds for a taller collar. Keep the odd stitch count set in Round 1 throughout, however many rounds are added.
06 · Made byWho counted this one

Who writes Amigurumi Addict, how a build gets its number, and why every round on the site carries a stitch count.
07 · Next off the benchThree builds that sit near this one

Odds and ends
Crochet a phone bag with strap, flap, and ring closure
How to crochet a phone bag? Join rounds from a 30-chain base, add a strap, flap, and ring.

Odds and ends
Crochet worsted weight socks with a turned heel
How do you crochet socks for winter? Build toe-up in worsted weight with a folded heel and ribbed leg.

Odds and ends
Toe-Up Woodland Walker Crochet Socks With Colorwork Cuff
How do you crochet toe-up socks with a colorwork cuff? Build the Toe, Heel, and stranded Cuff in order.
Join the build log
One message when a build is issued
A drawing and its parts list, when one leaves the bench.