| Shelf | Level | Time | Hook | Yarn |
|---|---|---|---|---|
| Odds and ends | Intermediate | 4-6 Hours | 2.25 mm | Fingering/Sport |
Little Gnome Amigurumi Pattern: Pointy Hat & Rosy Cheeks
Crochet an adorable little gnome amigurumi with a pointy hat, rosy nose, and cozy boots. A charming step-by-step pattern for gift-worthy handmade toys.
01 · The pieceWhat Little Gnome Amigurumi Pattern: Pointy Hat & Rosy Cheeks actually is
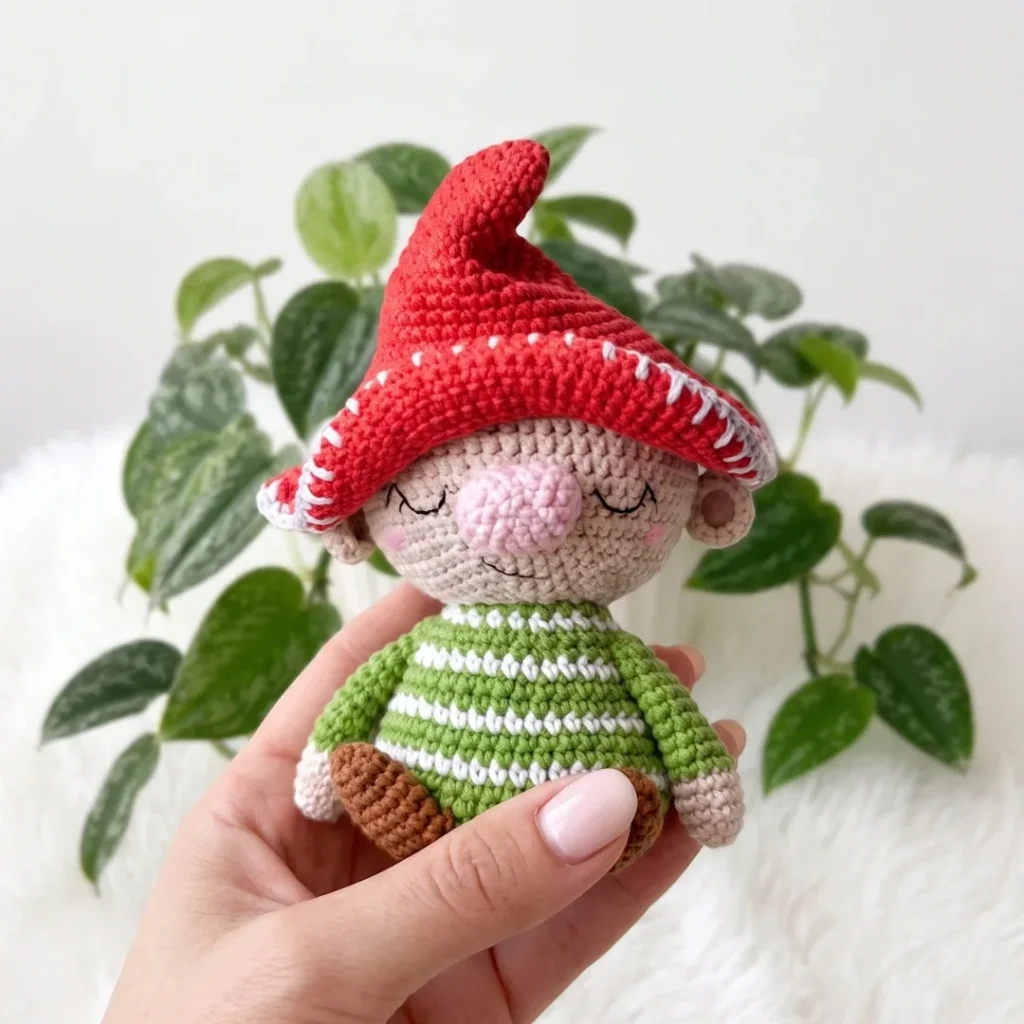
This little gnome amigurumi is the kind of pattern that makes you fall in love with a project halfway through the first round. With his tall pointy red hat, gray brim, rosy pink nose, and sturdy brown boots, he's got all the charm of a storybook character shrunk down into yarn. He's perfect for crocheters who adore whimsical characters and want a project that feels like more than just another round stuffed animal — this one has personality baked into every piece.
You'll work through seven separate pieces — head, body, legs, arms, nose, ears, and that signature hat — each built in continuous spiral rounds with a stitch marker to track your place. Expect plenty of increase and decrease rounds to shape the curves of the hat and the roundness of the head and body, plus several color changes for the trims and details. This sits comfortably at an intermediate level; if you've made a round amigurumi before, you're ready, and the whole gnome typically comes together in a focused weekend of crafting.
The finished gnome stands as a compact, huggable little figure with a plump stuffed body, tiny boot-clad legs, and that dramatic tapering hat as the crowning feature. He has a soft, cozy presence that looks equally sweet tucked on a bookshelf or nestled in a child's arms. Because he's quick to whip up in fingering or sport weight yarn, he also makes a wonderfully personal handmade gift for birthdays, holidays, or just because.
- Begin with the head, working continuous spiral rounds through 21 rounds while shaping increases and decreases for a rounded shape.
- Move on to the body, building it up over 23 rounds with a color change for the white trim detail.
- Crochet two identical legs with brown boot sections, each worked over 9 rounds, then set aside.
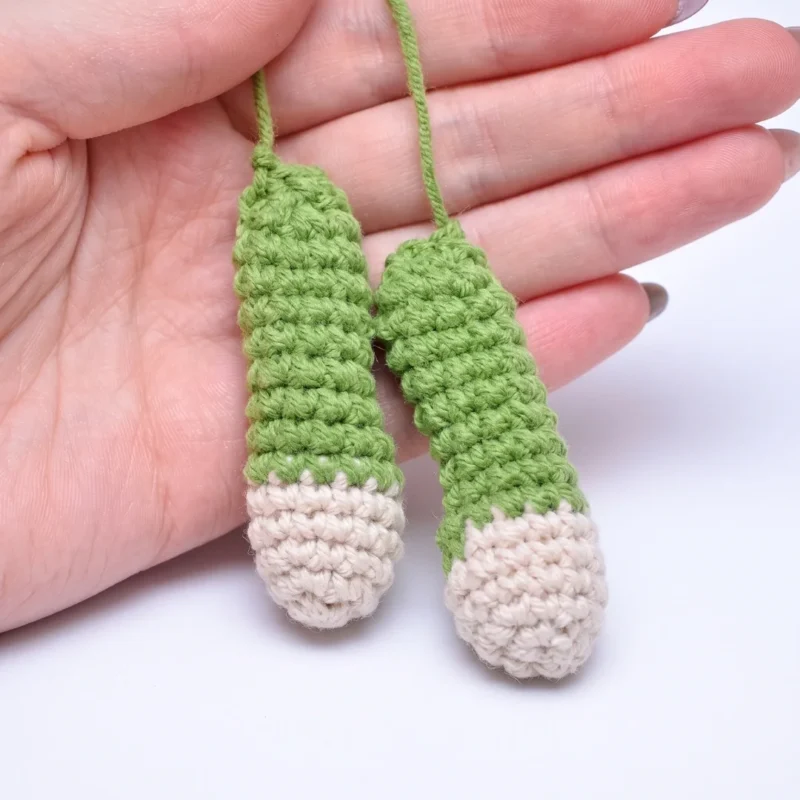
- Make two matching arms in green and beige over 9 rounds each, keeping tension consistent between the pair.
- Whip up the tiny 5-round nose in pink for that signature rosy charm.
- Make two small ears in beige, worked over just 3 rounds and left unstuffed, ready to sew onto the head.
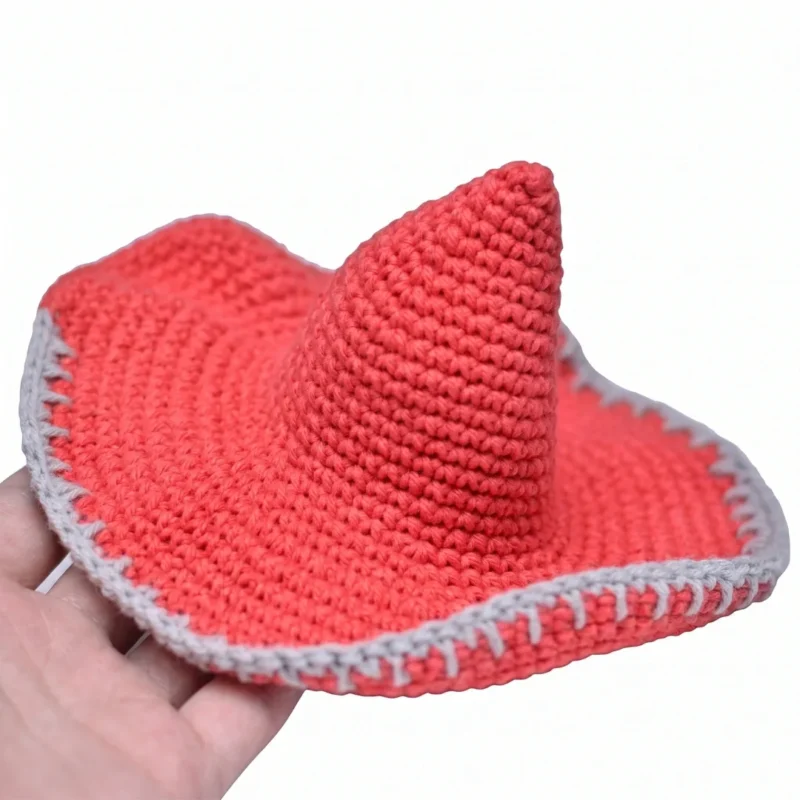
- Save the hat for last, working through all 30 rounds — 29 in red plus a gray brim round — to create the tall tapering shape.
- Stuff the head and body firmly but evenly as each piece nears its final closing rounds.
- Follow the eight assembly steps to sew the legs, ears, nose, arms, and hat onto the body, checking placement before securing each piece.
02 · The count run97 rounds across 7 parts, each with its count
US terms throughout. Every row below ends with the count that round finishes on.
| Part | Qty | Finishes on |
|---|---|---|
| Head | 1 | - |
| Body | 1 | - |
| Legs / Boots — Make 2 | 1 | - |
| Nose | 1 | - |
| Arms — Make 2 | 1 | - |
| Ears — Make 2 | 1 | - |
| Hat | 1 | - |
Work with beige yarn.
| Round | Instruction | Count |
|---|---|---|
| Round 1 | 6 sc in MR. (6) | - |
| Round 2 | inc in each st around. (12) | - |
| Round 3 | inc, sc repeat 6 times around. (18) | - |
| Round 4 | inc, 2 sc repeat 6 times around. (24) | - |
| Round 5 | inc, 3 sc repeat 6 times around. (30) | - |
| Round 6 | inc, 4 sc repeat 6 times around. (36) | - |
| Round 7 | inc, 5 sc repeat 6 times around. (42) | - |
| Round 8 | inc, 6 sc repeat 6 times around. (48) | - |
| Round 9 | inc, 7 sc repeat 6 times around. (54) | - |
| Round 10 | sc in each st around. (54) | - |
| Round 11 | inc, 8 sc repeat 6 times around. (60) | - |
| Round 12-18 | sc in each st around. (60) [7 rounds even] | - |
| Round 19 | dec, 8 sc repeat 6 times around. (54) | - |
| Round 20 | dec, 7 sc repeat 6 times around. (48) | - |
| Round 21 | dec, 6 sc repeat 6 times around. (42) | - |
At this point, install your safety eyes if using them. Stuff the head firmly and continue stuffing as you close.
| Round | Instruction | Count |
|---|---|---|
| Round 22 | dec, 5 sc repeat 6 times around. (36) | - |
| Round 23 | dec, 4 sc repeat 6 times around. (30) | - |
| Round 24 | dec, 3 sc repeat 6 times around. (24) | - |
| Round 25 | dec, 2 sc repeat 6 times around. (18) | - |
| Round 26 | dec, sc repeat 6 times around. (12) | - |
| Round 27 | dec 6 times around. (6)Close the opening by pulling the yarn tail through the remaining 6 stitches and pulling tight. | - |
Work with green yarn.
| Round | Instruction | Count |
|---|---|---|
| Round 1 | 6 sc in MR. (6) | - |
| Round 2 | inc in each st around. (12) | - |
| Round 3 | inc, sc repeat 6 times around. (18) | - |
| Round 4 | inc, 2 sc repeat 6 times around. (24) | - |
| Round 5 | inc, 3 sc repeat 6 times around. (30) | - |
| Round 6 | inc, 4 sc repeat 6 times around. (36) | - |
| Round 7 | inc, 5 sc repeat 6 times around. (42) | - |
| Round 8 | inc, 6 sc repeat 6 times around. (48) | - |
| Round 9 | Working in BLO, sc in each st around. (48) | - |
| Round 10-11 | sc in each st around. (48) [2 rounds even] | - |
| Round 12 | Switch to white yarn. sc in each st around. (48) | - |
| Round 13 | dec, 22 sc repeat 2 times around. (46) | - |
| Round 14 | dec, 21 sc repeat 2 times around. (44) | - |
| Round 15 | Switch to white yarn. dec, 20 sc repeat 2 times around. (42) | - |
| Round 16 | dec, 19 sc repeat 2 times around. (40) | - |
| Round 17 | dec, 18 sc repeat 2 times around. (38) | - |
| Round 18 | Switch to white yarn. dec, 17 sc repeat 2 times around. (36) | - |
| Round 19 | dec, 4 sc repeat 6 times around. (30) | - |
| Round 20 | sc in each st around. (30) | - |
| Round 21 | Switch to white yarn. dec, 3 sc repeat 6 times around. (24) | - |
| Round 22 | sc in each st around. (24) | - |
| Round 23 | dec, 2 sc repeat 6 times around. (18) | - |
| Round 24 | sc in each st around. (18)Leave a long yarn tail for sewing. Stuff the body firmly before attaching. | - |
Work with brown yarn.
| Round | Instruction | Count |
|---|---|---|
| Round 1 | 6 sc in MR. (6) | - |
| Round 2 | sc, inc repeat 3 times around. (9) | - |
| Round 3 | 2 sc, inc repeat 3 times around. (12) | - |
| Round 4 | sc in each st around. (12) | - |
| Round 5 | 3 sc, inc repeat 3 times around. (15) | - |
| Round 6-7 | sc in each st around. (15) [2 rounds even] | - |
| Round 8 | 3 sc, dec repeat 3 times around. (12) | - |
| Round 9 | sc in each st around. (12) | - |
| Round 10 | 2 sc, dec repeat 3 times around. (9)Flatten the top of the leg and work 4 sc through both layers at once to close the top seam. Leave a long yarn tail for sewing. | - |
Work with pink yarn.
Foundation: ch 4. Starting in the 2nd ch from hook:
| Round | Instruction | Count |
|---|---|---|
| Round 1 | (3 sc in same st, sc) repeat 2 times. (8) | - |
| Round 2 | inc 3 times, sc, inc 3 times, sc. (14) | - |
| Round 3 | sc, inc repeat 3 times, sc, sc, inc repeat 3 times, sc. (20) | - |
| Round 4 | sc in each st around. (20) | - |
| Round 5 | sc, dec repeat 3 times, sc, sc, dec repeat 3 times, sc. (14)Leave a yarn tail for sewing. Lightly stuff the nose before attaching. | - |
Begin with beige yarn.
| Round | Instruction | Count |
|---|---|---|
| Round 1 | 6 sc in MR. (6) | - |
| Round 2 | sc, inc repeat 3 times around. (9) | - |
| Round 3 | 2 sc, inc repeat 3 times around. (12) | - |
| Round 4-5 | sc in each st around. (12) [2 rounds even] Switch to green yarn. | - |
| Round 6 | dec, 10 sc. (11) | - |
| Round 7 | dec, 9 sc. (10) | - |
| Round 8 | dec, 8 sc. (9) | - |
| Round 9-13 | sc in each st around. (9) [5 rounds even] | - |
| Round 14 | dec, sc repeat 3 times around. (6)Leave a long yarn tail for sewing. Do not stuff the arms. | - |
Work with beige yarn.
| Round | Instruction | Count |
|---|---|---|
| Round 1 | 6 sc in MR. (6) | - |
| Round 2 | inc in each st around. (12) | - |
| Round 3 | sc in each st around. (12)Leave a long yarn tail for sewing. Do not stuff the ears. | - |
Work with red yarn.
| Round | Instruction | Count |
|---|---|---|
| Round 1 | 6 sc in MR. (6) | - |
| Round 2 | inc, sc repeat 3 times around. (9) | - |
| Round 3 | inc, 2 sc repeat 3 times around. (12) | - |
| Round 4 | inc, 3 sc repeat 3 times around. (15) | - |
| Round 5 | inc, 4 sc repeat 3 times around. (18) | - |
| Round 6 | inc, 5 sc repeat 3 times around. (21) | - |
| Round 7 | inc, 6 sc repeat 3 times around. (24) | - |
| Round 8 | inc, 7 sc repeat 3 times around. (27) | - |
| Round 9 | inc, 8 sc repeat 3 times around. (30) | - |
| Round 10 | inc, 9 sc repeat 3 times around. (33) | - |
| Round 11 | inc, 32 sc. (34) | - |
| Round 12 | inc, 33 sc. (35) | - |
| Round 13 | inc, 34 sc. (36) | - |
| Round 14 | inc, 35 sc. (37) | - |
| Round 15 | inc, 36 sc. (38) | - |
| Round 16 | inc, 37 sc. (39) | - |
| Round 17 | inc, 38 sc. (40) | - |
| Round 18 | inc, 39 sc. (41) | - |
| Round 19 | inc, 40 sc. (42) | - |
| Round 20 | 6 sc, inc repeat 6 times around. (48) | - |
| Round 21 | 7 sc, inc repeat 6 times around. (54) | - |
| Round 22 | 8 sc, inc repeat 6 times around. (60) | - |
| Round 23 | sc, inc repeat 30 times around. (90) | - |
| Round 24-26 | sc in each st around. (90) [3 rounds even] | - |
| Round 27 | 8 sc, inc repeat 10 times around. (100) | - |
| Round 28-29 | sc in each st around. (100) [2 rounds even] | - |
| Round 30 | (Brim): Switch to gray yarn. Working alternately into stitches of Rnd 29 and Rnd 28 in turn, sc around. This creates the folded brim effect — see Assembly notes below. (100) | - |
03 · Putting it togetherHow the pieces go together
- S1
Attach the legs to the bottom of the body, positioning them side by side and sewing through the flattened tops. Use the yarn tail and a whipstitch or mattress stitch for a secure join.
- S2
Attach the body to the underside of the head, aligning the centers. Sew around the full opening of the body neck edge to the head, using the yarn tail left from the body.
- S3
Attach the ears to either side of the head, roughly in line with the eyes. Sew through the flat base of each ear using the yarn tail.
- S4
Position and sew the nose onto the center of the face — slightly below the eyes. Finish stuffing it lightly before closing the seam completely.
- S5
Attach the arms to either side of the upper body, one on each side, with the beige hand section facing forward. Use the yarn tail to sew securely.
- S6
Place the hat on the head, centering it, and sew it into position through the brim stitches if you’d like it fixed in place.
- S7
Hat brim detail: The final gray round is worked by alternating each stitch between Rnd 29 and Rnd 28 of the hat. This pulls the brim into a gentle wave or rolled effect. Work one sc into a stitch of Rnd 29, then the next sc into the corresponding stitch of Rnd 28, continuing to alternate all the way around.
- S8
Weave in all ends securely with a tapestry needle.
04 · Before it goes to a childWhat has to be right, and what is allowed to drift
- 💡 Keep a small stitch marker on hand at all times — since every piece is worked in a continuous spiral with no joining rounds, it's the only way to reliably track where each round begins.
- 💡 Gauge is not critical for this project, but your fabric should be tight enough that stuffing doesn't show through — work with a slightly smaller hook than you'd normally choose for the yarn weight to keep your tension tight; this matters most on the head and body where stuffing needs to stay hidden.
- 💡 Stuff the head and body a little at a time as you crochet, rather than waiting until the piece is closed — it's much easier to distribute fiberfill evenly through an open round.
- 💡 Since the hat has the most rounds of any piece at 30, count your stitches frequently during the increase and decrease sections so the taper stays smooth and even.
- 💡 Save the nose and ear pieces for last since they're quick makes — the nose takes just 5 rounds and the ears only 3 — crocheting them fresh right before assembly helps you match tension across all the small facial details.
05 · Snag listWhat went wrong on the bench, and the fix
Snag 1
Losing track of the beginning
Place a stitch marker in the first stitch of every round and move it up as you go — this is essential since the pattern doesn't join rounds, so it's easy to drift off count without one.
Snag 2
Overstuffing or understuffing the head
Add stuffing in small pinches as you close each section, checking firmness by gently squeezing — you want it firm enough to hold shape but soft enough to sew through cleanly at the final decrease rounds.
Snag 3
Miscounting stitches during increase
Check your stitch count against the number given in parentheses at the end of every round before moving forward — catching an error one round early saves you from unraveling multiple rounds later.
Snag 4
Sewing the arms, legs, or nose
Pin or loosely tack each piece in place with a scrap of yarn and step back to check symmetry before committing to your final sewing — small position shifts make a big difference in the gnome's final expression.
Snag 5
Using a hook size too large
Stick close to the recommended US B-1 / 2.0–2.25mm hook, and consider going down half a size if your tension runs loose, to keep stitches tight enough to hide the stuffing.
06 · VariantsOther ways to issue this one
I adore how much personality this gnome packs into just seven pieces. Watching that hat go from a tiny magic ring to a tall, elegant point over 30 rounds is honestly one of my favorite parts of any amigurumi I've designed — the shaping feels almost architectural. The rosy pink nose worked in just 5 rounds adds instant charm with barely any effort, and I love how the gray brim frames his face like he's peeking out from underneath. Working the body and head in continuous spirals means no visible seams, so every piece looks polished and professional even if you're still building confidence with amigurumi techniques. The color changes between green, white, beige, and brown keep your hands busy and your yarn stash useful, and swapping in stitch markers to track each round takes all the guesswork out of counting. By the time you're sewing the pieces together in the eight assembly steps, you'll have a little guy with so much character that it's hard not to immediately want to make a whole gnome family.
07 · QueriesQuestions logged against this build
What yarn weight works best for this gnome pattern?
The pattern is designed for fingering or sport weight yarn like YarnArt Jeans, which gives the finished gnome a compact, detailed look. If you prefer a bigger gnome, you can size up to worsted weight, but you'll need a larger hook to match.
Do I need to know how to do color changes for this pattern?
Yes, several pieces including the body, hat, and boots require clean color changes between rounds. It's a great pattern for practicing this skill since the changes are worked at natural round boundaries.
Is this pattern suitable for a beginner?
It's best suited for someone with some amigurumi experience, since it involves continuous spiral rounds, shaping increases and decreases, and multiple color changes across six pieces. If you've completed at least one round amigurumi before, you should feel comfortable tackling this one.
How much yarn do I need for each color?
Exact yardage will depend on your tension and hook size, but since this is a small-scale amigurumi, small quantities of each color (green, white, beige, brown, red, gray, and pink) are typically sufficient. It's a great way to use up leftover fingering or sport weight scraps.
Can I skip embroidering the eyes?
Yes, and it's actually recommended if you're making the gnome for a child under 3, since safety eyes or embroidery floss can present a choking hazard for very young children. Simple embroidered stitches in black or dark brown work beautifully as a safer alternative.
Original pattern: https://amigurumiarts.com/little-gnome-amigurumi-free-crochet-pattern/
08 · Made byWho counted this one

Who writes Amigurumi Addict, how a build gets its number, and why every round on the site carries a stitch count.
09 · Next off the benchThree builds that sit near this one

Odds and ends
Crochet a phone bag with strap, flap, and ring closure
How to crochet a phone bag? Join rounds from a 30-chain base, add a strap, flap, and ring.

Odds and ends
Crochet worsted weight socks with a turned heel
How do you crochet socks for winter? Build toe-up in worsted weight with a folded heel and ribbed leg.

Odds and ends
Toe-Up Woodland Walker Crochet Socks With Colorwork Cuff
How do you crochet toe-up socks with a colorwork cuff? Build the Toe, Heel, and stranded Cuff in order.
Join the build log
One message when a build is issued
A drawing and its parts list, when one leaves the bench.