| Shelf | Level | Time | Hook | Yarn |
|---|---|---|---|---|
| Odds and ends | Intermediate | 6-9 hours | 1.65 mm | Size 10 Crochet Thread |
Layered lace bracelet with rolled thread crochet roses
How do you crochet a rose bracelet? Roll spiral roses, mesh a lace band, then edge with beaded picots.
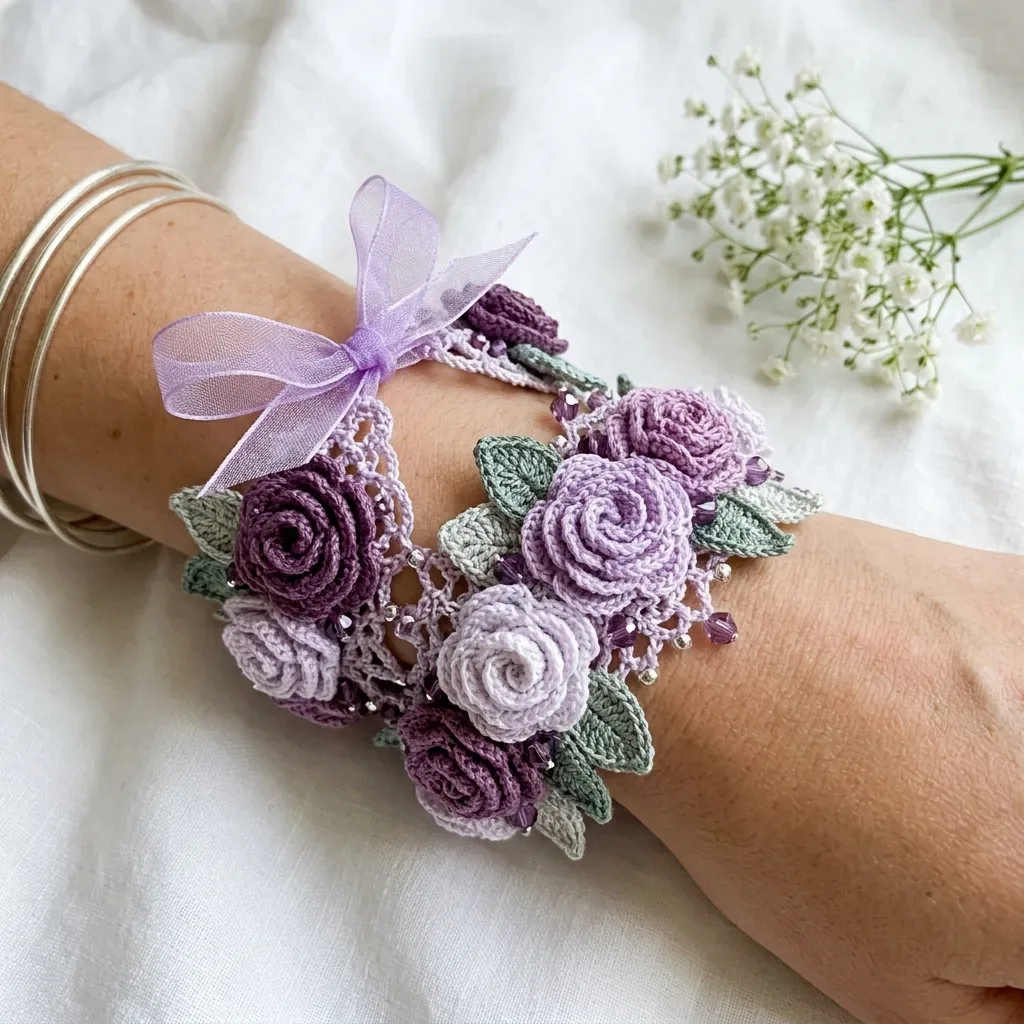
01 · The pieceWhat Layered lace bracelet with rolled thread crochet roses actually is
The bracelet is built from a Lace Band worked flat in Color B over 5 rows, edged on all four sides (Top Edge Ribbon Channel, Bottom Edge with Beaded Picot, and two Short Ends), then loaded on its front two-thirds with a Large Rose, Medium Rose, Small Rose, and 12 Leaves in Color D. Each rose starts as a flat strip that increases and shells, then rolls into a coil and is tacked through its own base with the fastening tail. Nothing is joined in the round; the whole piece is edges and coils held by tension and thread, not seams.
Precision matters on the Lace Band's ch-2 spacing and dc placement, since a dropped or added stitch shifts the mesh out of alignment across all 5 rows and telegraphs into the Top Edge channel where the ribbon must run straight. It matters less in how tightly a rose is rolled or how the 12 Leaves are angled once pinned down — both are adjusted by eye during Step 3's arrangement and locked in by blocking, so a slightly looser or tighter coil reads as variation, not error.
Length (circumference when flat): approximately 7.5 inches / 19 cm. Width (height of band): approximately 2 inches / 5 cm. Large rose diameter: approximately 1.25 inches / 3.2 cm. Medium rose diameter: approximately 1 inch / 2.5 cm. Small rose diameter: approximately 0.75 inches / 1.9 cm. The ribbon adds about 3 to 4 inches when tied. This cuff fits wrists measuring 6 to 7.5 inches, with easy customization options for other sizes.
Working in the lace band pattern with Color B and your size 7 steel hook: 18 stitches over 4 inches / 10 cm (counting dc and ch-2 spaces as one unit per repeat); 10 rows over 4 inches / 10 cm in the lace mesh pattern. Gauge for motifs: Large rose approximately 1.25 inches / 3.2 cm diameter; Leaf approximately 1 inch / 2.5 cm long. Gauge matters here — work a small swatch and adjust your hook size if needed.
02 · The count run19 rounds across 11 parts, each with its count
US terms throughout. Every row below ends with the count that round finishes on.
| Part | Qty | Finishes on |
|---|---|---|
| Lace Band (Worked in Color B) | 1 | - |
| Large Rose | 1 | - |
| Medium Rose | 1 | - |
| Small Rose | 1 | - |
| Leaves (Make 12 in Color D) | 1 | - |
| Band Edging | 1 | - |
| Top Edge (Ribbon Channel) | 1 | - |
| Left Short End | 1 | - |
| Bottom Edge (Decorative Beaded Picot) | 1 | - |
| Right Short End | 1 | - |
| Roses | 1 | - |
This is the foundation of your bracelet. Work slowly and count carefully.
Foundation Chain: Chain 19. (This creates the width of the band: approximately 2 inches.)
| Round | Instruction | Count |
|---|---|---|
| Round 1 | (RS): Dc into the 4th ch from hook (skipped 3 chs count as first dc), [ch 2, sk 2 ch, dc into next ch] 5 times. Turn. (6 dc, 5 ch-2 spaces) | - |
| Round 2 | Ch 5 (counts as dc + ch 2), sk first dc, dc into next dc, [ch 2, dc into next dc] 4 times, ch 2, dc into top of turning ch. Turn. (6 dc, 5 ch-2 spaces) | - |
| Round 3 | Ch 3 (counts as dc), dc into first ch-2 sp, ch 2, [dc into next dc, ch 2] 4 times, dc into next dc, ch 2, dc into 3rd ch of turning ch-5. Turn. (7 dc, 5 ch-2 spaces) | - |
After Row 3 is established, the pattern repeats:
| Round | Instruction | Count |
|---|---|---|
| Round 4 | And all even rows Ch 5, sk first dc, dc into next dc, [ch 2, dc into next dc] across, ending dc into 3rd ch of turning ch. Turn. (6 dc, 5 ch-2 spaces) | - |
| Round 5 | (and all odd rows from Row 3 onward): Ch 3, dc into first ch-2 sp, ch 2, [dc into next dc, ch 2] across, dc into 3rd ch of turning ch-5. Turn. (7 dc, 5 ch-2 spaces)Continue repeating Rows 4 and 5 alternately until the band measures 7 inches / 17.5 cm from the starting edge, approximately 35 rows total. | - |
Checkpoint: Your band should measure approximately 7 inches long by 2 inches wide when laid flat and lightly stretched.
Foundation: Ch 36.
| Round | Instruction | Count |
|---|---|---|
| Round 1 | Sc into 2nd ch from hook, sc into each ch across. Turn. (35 sc) | - |
| Round 2 | Ch 1, sc into first sc, [sc into next sc, 2 sc into next sc] across to last sc, sc into last sc. Turn. (52 sc) | - |
| Round 3 | Ch 1, [sc into next sc, sk 1 sc, Shell (5 dc) into next sc, sk 1 sc] repeat across, end with sc in last sc. Turn. (13 sc, 13 shells) | - |
| Round 4 | Ch 1, sl st loosely into each stitch across. Fasten off, leaving a 10 inch tail. (65 sl sts) | - |
To shape: Starting from one end, roll the strip gently with the WS facing inward and the RS petals curling outward. Pull the first few petals slightly tighter than later ones for a beautifully tight center. Secure by stitching through the base several times with your tail. Keep the tail for sewing onto the band.
Foundation: Ch 27.
| Round | Instruction | Count |
|---|---|---|
| Round 1 | Sc into 2nd ch from hook, sc into each ch across. Turn. (26 sc) | - |
| Round 2 | Ch 1, sc into first sc, [2 sc into next sc, sc into next sc] across. Turn. (39 sc) | - |
| Round 3 | Ch 1, [sc into next sc, sk 1 sc, Shell (5 dc) into next sc, sk 1 sc] repeat across, ending sc in last sc. Work 9 complete repeats, then sc into each of the last 3 sts. Turn. | - |
| Round 4 | Ch 1, sl st loosely across. Fasten off, leaving a 10 inch tail. Roll and secure as for Large Rose. | - |
Foundation: Ch 21.
| Round | Instruction | Count |
|---|---|---|
| Round 1 | Sc into 2nd ch from hook, sc into each ch across. Turn. (20 sc) | - |
| Round 2 | Ch 1, sc into first sc, [2 sc into next sc, sc into next sc] across, end 2 sc into last sc. Turn. (30 sc) | - |
| Round 3 | Ch 1, [sc into next sc, sk 1 sc, Shell (5 dc) into next sc, sk 1 sc] repeat across, ending sc in last sc. Work 7 complete repeats, sc into each of last 2 sts. Turn. | - |
| Round 4 | Ch 1, sl st loosely across. Fasten off, leaving a 10 inch tail. Roll and secure as for Large Rose. | - |
Each leaf is worked in the round from a foundation chain.
Foundation: Ch 10.
| Round | Instruction | Count |
|---|---|---|
| Round 1 | Starting in the 2nd ch from hook: sc, hdc, dc, dc, tr, dc, dc, hdc, sc. Work 3 sc into the last ch (this is the leaf tip). Now work back along the other side of the foundation chain: sc, hdc, dc, dc, tr, dc, dc, hdc, sc. Sl st into the first sc to join. | - |
| Round 2 | Optional for definition Ch 1, sc into each st around the leaf, working 3 sc into the center tip stitch. Sl st to join. Fasten off, leaving a 6 inch tail. | - |
Leaf dimensions: approximately 1 inch long, 0.5 inch wide at widest point.
The edging wraps around the entire perimeter. Join Color B with a sl st to any corner.
Work the top edge first (ribbon channel), then the two short ends, then the bottom edge with decorative beaded trim.
This edge creates small chain loops for the ribbon to weave through.
Join Color B to the top-right corner of the band.
Ch 1, sc into same corner st. [Ch 4, sk approximately 3 sts or 1 mesh unit along the edge, sc into next junction point] across the top edge. Work approximately 12 to 14 ch-4 loops across (adjust for even spacing). End with sc into the top-left corner. Do not fasten off.
Sc evenly down the short end, placing approximately 4 to 5 sc. Continue to the bottom edge.
This is the prominent decorative lower edge visible in photographs.
Pre-string 40 seed beads and 12 crystal beads alternating on your working thread.
Work across the bottom of the band as follows:
Sc into first junction point, [ch 3, sl st into same sc (plain picot), sc into next junction point, beaded picot (ch 3 with seed bead at tip, sl st into first ch), sc into next junction point, ch 4, slide 1 crystal bead up close to work, ch 1, sl st into first ch of the ch-4 to lock crystal bead in place, sc into next junction point] repeat across the bottom edge. Adjust to fit evenly. End with a plain picot.
Sc evenly up the short end, placing approximately 4 to 5 sc. Sl st to the first sc of the top edge to close, or fasten off and seam invisibly.
Fasten off and weave in ends.
Make roses in three sizes and three colors: Large Roses (make 4 total): 2 in Color A (Deep Plum), 2 in Color B (Medium Lavender)
Medium Roses (make 5 total): 2 in Color A, 2 in Color B, 1 in Color C (Pale Lilac)
Small Roses (make 4 total): 2 in Color A, 2 in Color C Total roses: 13
Techniques on this build
- Shell stitch
- Row 3 of the Large, Medium, and Small Rose strips; keep the sk-1 stitches on either side of each shell consistent or shells crowd and the rolled petal edge stops sitting evenly.
- Beaded Picot
- Used on the Bottom Edge; string the seed bead onto the working thread before starting the chain-3 so the bead lands at the picot's tip, not buried in the loop.
- Lace Mesh Unit
- Foundation of the Lace Band across all 5 rows; count the 5 ch-2 spaces before turning so the dc total doesn't creep row to row.
- Rolling and securing a spiral rose
- Follows the Row 4 slip-stitch row on each rose strip; roll from the Row 1 edge inward and stitch through the base with the 10-inch tail to keep the coil from unwinding.
Final fit-up
- Weave in tails from the Lace Band, all 12 Leaves, and each rose strip before rolling begins, so no loose ends get trapped inside a coil.
- Roll each rose strip from its Row 1 edge inward, using the Row 4 slip-stitch edge as the outer rim, and secure the coil by stitching through the base with the reserved 10-inch tail.
- Block the Lace Band, Leaves, and rolled Roses per Step 1: pin each to its finished dimension, mist with water, and let dry fully before arranging.
- Arrange and attach the roses and leaves to the band's front two-thirds per the assembly layout, then thread the organza ribbon through the Top Edge (Ribbon Channel) and tie.
How the parts fit
- Row 2 of the Large Rose increases 35 sc to 52 sc, and Medium Rose increases 26 sc to 39 sc, both by alternating single and doubled stitches; this added fullness is what makes the flat strip curl into a spiral once rolled, rather than lying straight.
- Row 3 on each rose places a Shell into every other stitch with a skip on each side, so shells sit close enough to overlap once the strip is coiled, building the layered petal look without any stitches worked in the round.
- The Lace Band is worked flat in rows rather than in the round because its ch-2 spaces need to align vertically row over row (Lace Mesh Unit repeats), and the dc count grows only at the turning-chain edges (6, 6, 7 dc) to shape the band's ends, not by adding mesh repeats mid-row.
Scaling the build
| Larger | Work additional rows onto the Lace Band beyond the 5 rows given, repeating the Row 3 mesh pattern, which lengthens the band to fit a larger wrist without changing rose or leaf counts. |
|---|---|
| Smaller | Work one fewer row on the Lace Band before adding the Bottom Edge and Top Edge trims, since band length is measured before those edgings go on. |
| Overall scale | Move to a slightly larger or smaller steel hook while keeping size 10 thread throughout; this scales the Lace Band width and all three rose diameters together, since substituting a heavier thread is not recommended per materials. |
03 · Putting it togetherHow the pieces go together
- S1
Step 1: Block all pieces lightly. Pin the band to correct dimensions and mist with water. Allow to dry. Do the same with leaves and roses.
- S2
Step 2: Lay the band flat with RS facing up. The ribbon-closure end (with ch-4 loops) is the back. The front and center is where flowers will go.
- S3
Step 3: Arrange roses on the front two-thirds of the band. Place the two large plum roses slightly offset from center. Place large lavender roses flanking them. Scatter medium and small roses around larger ones. Position pale lilac roses toward the lower center front as a focal point. Tuck leaves between and beneath roses with tips pointing outward and downward.
- S4
Step 4: Pin each motif in place. Using the tails and a fine tapestry needle, stitch each rose and leaf securely to the band. Stitch through rose bases several times in a cross pattern. Stitch leaves along their base and center spine.
- S5
Step 5: Using a beading needle, add clusters of 2 to 3 seed beads at the base of several roses and along leaf edges. Add single crystal bead accents near the center of several roses.
- S6
Step 6: Thread the organza ribbon through the ch-4 loop channel along the top edge, weaving in and out from one end to the other. Leave approximately 12 to 14 inches on each side for tying. Seal ribbon ends with fabric glue or a careful lighter singe.
- S7
Step 7: Weave in all remaining thread ends on the WS.
04 · Snag listWhat went wrong on the bench, and the fix
Snag 1
Bead threaded after the chain starts
String the seed bead onto the thread before beginning the Beaded Picot's chain-3. If the bead ends up mid-loop instead of at the tip, undo the picot and restring before continuing.
Snag 2
Shell spacing drifts across the row
Recount the skipped stitch on each side of every Shell; a missed skip shifts later shells out of alignment and the roll won't sit symmetrically.
Snag 3
Rose coil too loose or too tight
Roll with even tension from the Row 1 edge to the Row 4 rim, tacking the tail through the base every half-turn rather than only at the very end.
Snag 4
Ch-2 spaces miscounted on the Lace Band
Count all 5 ch-2 spaces before turning each row; an absorbed or skipped turning chain lets the dc count climb from 6 to 7 a row early.
05 · QueriesQuestions logged against this build
Can a thicker thread be used instead of size 10?
No. The materials note that the motif scale depends on size 10 thread, and a heavier thread would oversize the Shells and Lace Mesh Unit relative to the seed beads and beaded picots.
Why are the roses worked as flat strips instead of crocheted in rounds?
The strip's row-by-row increase (35 to 52 sc on the Large Rose, 26 to 39 sc on the Medium Rose) is what creates the curl; rolling the finished strip after its Shell and slip-stitch rows forms the spiral with far more control over tension than working the same shape in rounds.
How are the seed beads kept from sliding out of the picots?
Each bead is strung onto the working thread before the Beaded Picot's chain-3 begins, so it locks into the picot structure as the stitch forms. The Bottom Edge picots and any bead accents on the roses are further reinforced with a beading needle and strong thread or Fireline.
06 · Made byWho counted this one

Who writes Amigurumi Addict, how a build gets its number, and why every round on the site carries a stitch count.
07 · Next off the benchThree builds that sit near this one

Odds and ends
Crochet a phone bag with strap, flap, and ring closure
How to crochet a phone bag? Join rounds from a 30-chain base, add a strap, flap, and ring.

Odds and ends
Crochet worsted weight socks with a turned heel
How do you crochet socks for winter? Build toe-up in worsted weight with a folded heel and ribbed leg.

Odds and ends
Toe-Up Woodland Walker Crochet Socks With Colorwork Cuff
How do you crochet toe-up socks with a colorwork cuff? Build the Toe, Heel, and stranded Cuff in order.
Join the build log
One message when a build is issued
A drawing and its parts list, when one leaves the bench.