| Shelf | Level | Time | Hook | Yarn |
|---|---|---|---|---|
| Odds and ends | Intermediate | 10-14 hours | 3.25 mm | DK |
Granny square vest with fringe and button closure
How do you crochet a granny square vest? Join motifs, add an hdc border, straps, a button, and fringe.

01 · The pieceWhat Granny square vest with fringe and button closure actually is
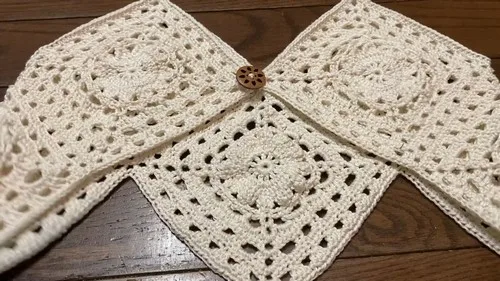
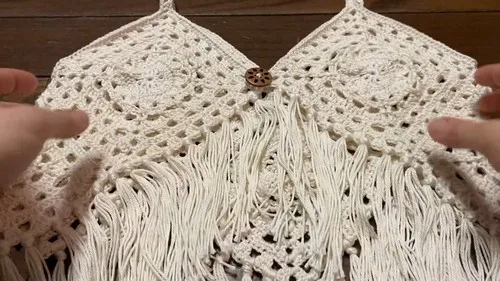
This vest builds from repeated granny squares, each begun as a chain-6 ring worked to 12 double crochets, then expanded in round 2 with a 2-dc, 1-dc repeat that opens corner spaces. Finished squares are sewn together into the vest's shape, and a half double crochet border travels the joined edge, turning 2 hdc, ch 1, 2 hdc corners at each seam. A wooden button and a crocheted loop close the front. Two chain-65 straps, worked back in a dc and ch-1 lace, attach at the shoulders.
Square size and dc count matter at the join: uneven squares throw off the border's corner spacing and leave gaps where the hdc rounds meet. The chain-1 spaces from round 1 need to survive into round 2 intact, since the border's corner increases depend on that structure lining up square to square. Strap length and fringe length are more forgiving — the chain-65 straps can flex with wear, and the four 13-inch fringe pieces per set even out once trimmed after attaching.
02 · The count run4 rounds across 3 parts, each with its count
US terms throughout. Every row below ends with the count that round finishes on.
| Part | Qty | Finishes on |
|---|---|---|
| Getting Started | 1 | - |
| Joining Squares & Border | 1 | - |
| Straps | 1 | - |
Create a slip knot and place it on your hook.
Chain 6 and slip stitch into the first chain to form a circle.
| Round | Instruction | Count |
|---|---|---|
| Round 1 | Chain 4 (counts as 1 dc + ch 1). Double crochet (dc) into the circle. Alternate ch 1, dc into the circle until you have 12 dcs total (including starting chain).Slip stitch into the third chain of the starting chain to close. | - |
| Round 2 | Chain 3 . In the next ch 1 space, make 2 dc . Dc on top of next dc stitch. Repeat: 2 dc in ch space, 1 dc in next stitch .Slip stitch to the top of the starting chain 3. | - |
| Round 3 | Flower Petals Chain 4. Work a treble crochet cluster: Yarn over twice, insert into stitch, yo, pull through two, twice. Repeat into same stitch. Yarn over twice, insert into next stitch, repeat above. Yarn over and pull through all four loops. Chain 4. Repeat the cluster petal pattern in sets of 3 stitches until you have 12 petals.Slip stitch into the top of the first cluster to close. | - |
| Round 4 | Forming the Square Chain 5 , slip stitch back into the same stitch. Chain 5 , skip to next cluster , slip stitch into top.Repeat chaining and slip stitching around. At 4 corners, chain 5 and slip stitch into same cluster to form square points. | - |
Sew all squares together in vest shape.
Start with slip knot at any corner.
Chain 2 , then half double crochet (hdc) in each stitch and ch 1 space around.
At each corner: 2 hdc, ch 1, 2 hdc into the same corner space.
Sew button on first corner.
Chain 65 for each strap.
Attach to opposite square with slip stitch .
Work back up the chain with: 2 dc, ch 1, skip 1 , repeat.
Attach the strap securely to the vest.
Repeat for second strap , and create a loop for the button .
Techniques on this build
- Ring foundation (chain-6 circle)
- Opens Round 1 of Getting Started; keep the ring snug enough to close with the slip stitch but loose enough for 12 dc to sit around it.
- Chain-space corner increases
- Drives Round 2's 2-dc, 1-dc repeat; skipping a chain-1 space collapses a corner and misaligns every later round.
- Border hdc with corner turns
- Used in Joining Squares & Border; the 2 hdc, ch 1, 2 hdc corner repeat needs to fall exactly at each sewn seam or the edge ripples.
- Chain-space strap lace
- Straps use 2 dc, ch 1, skip 1 worked back up the chain-65 base; uneven skips show immediately since the strap has no other stitches to hide behind.
Final fit-up
- Weave in yarn tails from each granny square before assembling, since the joins hide fewer ends than a single-piece garment.
- Sew squares together into the vest shape, matching corner chain-1 spaces so the border round has an unbroken corner sequence to work into.
- Sew the 2.5 cm wooden button to the first corner and crochet the strap-end loop to close over it.
- Cut 65 sets of four 13-inch yarn pieces and attach as fringe along the bottom edge, trimming even after all sets are tied on.
How the parts fit
- Round 2 increases land only in the round-1 chain-1 spaces (2 dc there, 1 dc on each dc), which keeps the square flat and marks four corners for later border work.
- The motif is worked in rounds and finished with a slip stitch join at each round's end, producing a flat square rather than a spiral, which is what lets multiple squares butt together for sewing.
- The border's 2 hdc, ch 1, 2 hdc corner repeat only works because the joined squares present a continuous edge with regular corner points already established at the round-1 stage.
Scaling the build
| Larger | Move up from the 3.25 mm hook to a larger size; the same round counts produce bigger squares and a roomier vest overall. |
|---|---|
| Smaller | Drop to a hook smaller than 3.25 mm; the granny squares tighten and shrink, reducing the vest's finished width and length together. |
| Adjust coverage | Add or leave out squares when sewing the vest shape together, and lengthen or shorten the chain-65 strap base to match shoulder measurements. |
03 · Putting it togetherHow the pieces go together
- S1
Finish border with half double crochets .
- S2
For fringe:
- S3
Cut 65 sets of four 13" yarn pieces .
- S4
Attach fringe along the vest’s bottom edge.
04 · Snag listWhat went wrong on the bench, and the fix
Snag 1
Wrong dc count in round 1
Count all 12 dc, including the starting ch-4, before the slip stitch closes the ring; a square short one repeat throws off every corner downstream.
Snag 2
Losing track of corner spaces
Mark each round-1 chain-1 space with a scrap of contrasting yarn so round 2's 2-dc corners land in the right spot.
Snag 3
Uneven skips in strap lace
Keep the skip-1 count consistent across the chain-65 base; skipping two by accident shortens the strap's dc, ch-1 rhythm and shows as an asymmetrical lace.
Snag 4
Fringe pieces cut to different lengths
Cut all 65 sets of four 13-inch pieces before attaching any, then trim the whole fringe row level once every set is tied on.
05 · QueriesQuestions logged against this build
How many granny squares does this vest need?
The pattern doesn't fix a square count; work squares from the Getting Started rounds until you have enough to sew into the vest shape at your size. Lay them out against a well-fitting vest before joining to confirm coverage.
Can the button be swapped for a different closure?
Yes, though the loop is worked to fit the 2.5 cm wooden button, so a much larger or smaller button will need the loop's stitch count adjusted to match. Sew the button to the first corner as instructed regardless of size.
What if the fringe ends up uneven?
Cut all 65 sets of four 13-inch pieces before attaching any, then trim the whole row once all sets are tied to the bottom edge. Attaching first and cutting length by eye is what causes the unevenness.
06 · Made byWho counted this one

Who writes Amigurumi Addict, how a build gets its number, and why every round on the site carries a stitch count.
07 · Next off the benchThree builds that sit near this one

Odds and ends
Crochet a phone bag with strap, flap, and ring closure
How to crochet a phone bag? Join rounds from a 30-chain base, add a strap, flap, and ring.

Odds and ends
Crochet worsted weight socks with a turned heel
How do you crochet socks for winter? Build toe-up in worsted weight with a folded heel and ribbed leg.

Odds and ends
Toe-Up Woodland Walker Crochet Socks With Colorwork Cuff
How do you crochet toe-up socks with a colorwork cuff? Build the Toe, Heel, and stranded Cuff in order.
Join the build log
One message when a build is issued
A drawing and its parts list, when one leaves the bench.