| Shelf | Level | Time | Hook | Yarn |
|---|---|---|---|---|
| Odds and ends | Intermediate | 4-6 hours | 4 mm | Light (DK) |
Granny square lace top: twelve ten-round squares joined
How is this granny square lace top made? Twelve ten-round granny squares joined together and finished with pico stitch
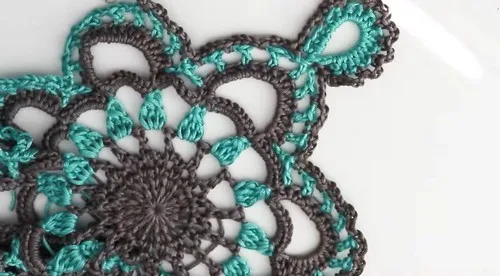
01 · The pieceWhat Granny square lace top: twelve ten-round squares joined actually is
The garment is built from twelve identical granny squares. Each square starts with a magic ring that anchors Round 1's sixteen extended double crochet stitches, separated by chain-1 spaces and closed with a slip stitch join. Round 2 converts those gaps into sixteen chain-3 loops, anchored by single crochet stitches worked into each chain-1 space. Eight more rounds (Rounds 3 through 10) build out the square with graduated stitch patterns — including color changes, chain loops, and stitch clusters — with every round closing the same way: slip stitch to the top of the starting chain. Once twelve squares are complete, they are joined at their corners with single crochet and chain-2 stitches, then all edges are trimmed with pico stitch.
Stitch count matters at the join: sixteen clusters in Round 1 must land in sixteen spaces by Round 2, or the loop count drifts through every round that follows. Chain lengths carry less weight — the extended double crochet plus chain-1 combination in the opening chain can flex slightly without distorting the motif, since blocking each square to 10½ inches (28 cm) evens out small tension differences. The split between 1-2 balls of blue and 4-5 balls of gray follows personal color choice, not structural need.
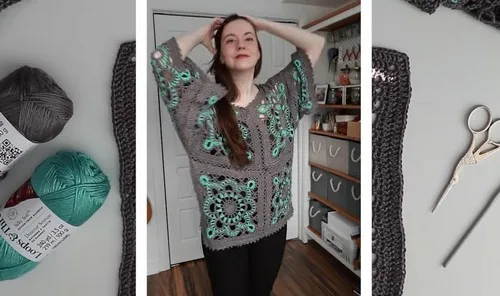
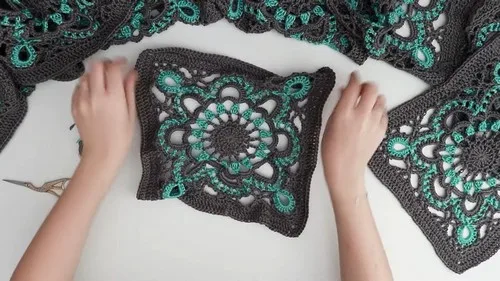
02 · The count run10 rounds across 2 parts, each with its count
US terms throughout. Every row below ends with the count that round finishes on.
| Part | Qty | Finishes on |
|---|---|---|
| Creating the Square | 1 | - |
| Finishing the Edges | 1 | - |
| Round | Instruction | Count |
|---|---|---|
| Round 1 | Start with a magic ring. Chain 5 (counts as extended double crochet and chain 1).Repeat extended double crochet and chain 1 for a total of 16 times. | - |
| Round 2 | Chain 4 (counts as single crochet and chain 3). Make a single crochet into the next chain-1 space.Repeat around for a total of 16 loops. | - |
| Round 3 | Chain 5, make an extended double crochet into the next chain space, chain 3.Repeat around. | - |
| Round 4 | Change colors. Chain 3, create a double crochet three together, chain 5, and repeat around.Join with a slip stitch. | - |
| Round 5 | Change to the original color. Make 9 single crochets in each chain-5 space. Chain 11, single crochet in the middle, chain 1, and make 17 half double crochets.Repeat this pattern around. | - |
| Round 6 | Join with a slip stitch, change colors. Chain 4, skip a stitch, double crochet, chain 2, and repeat.Make a double crochet two together. | - |
| Round 7 | Chain 2, single crochet, chain 3, and repeat. Make single crochets on each side of the double crochet two together.Make 10 single crochets in the loop. | - |
| Round 8 | Chain 4, double crochet, chain 3, and create a special stitch pattern. Double crochet in the middle, chain 3, and repeat.Finish the round. | - |
| Round 9 | Chain 2, make two half double crochets, and then three in every other space, with four at the corners. | - |
| Round 10 | Chain 3, double crochet in every stitch. Add or remove rows as preferred. | - |
Use the Pico Stitch to finish all edges, including the neckline, waist, and armholes.
Chain three, insert hook into two stitches, and pull yarn through.
Single crochet into the next three stitches.
Repeat until all edges are complete.
Techniques on this build
- Magic ring start
- Opens Round 1; keep the ring cinched before working the first extended double crochet so all sixteen stitches sit at even tension.
- Extended double crochet
- Worked sixteen times in Round 1 and repeated into the chain spaces beyond; watch that the extra chain at the base of each stitch stays consistent so the motif lies flat.
- Chain-space loop building
- Round 2 turns Round 1's chain-1 gaps into sixteen chain-3 loops; single crochet stitches must land in the space, not in the stitch top, to keep the loop count at sixteen.
- Pico stitch edging
- Applied in the Finishing the Edges part along the neckline, waist, and armholes; count three single crochet between each pico so the bumps space evenly.
- Joining squares
- After all twelve squares are complete, single crochet, chain 2, and slip stitch into the corners of adjacent squares, alternating between squares until all twelve are connected.
Final fit-up
- Weave in ends left from the magic ring start and from each blue-to-gray color change.
- Block each completed square flat to its finished 10½ x 10½ inch (28 x 28 cm) measurement.
- Join all twelve completed squares together using single crochet, chain 2, and slip stitch at their corners, alternating between squares until fully connected.
- Work the pico stitch continuously around the neckline, waist, and armhole edges as specified in Finishing the Edges.
- Press or steam-set the pico edging lightly so the picos hold their shape without flattening the extended double crochet body.
How the parts fit
- Round 1's sixteen extended double crochet stitches, each followed by a chain-1 space, set a repeat-of-sixteen grid that Round 2's sixteen loops must match — that multiple of sixteen carries through the rounds that follow.
- Round 2's single crochet stitches land in Round 1's chain-1 spaces rather than in the extended double crochet stitches themselves, so each round's anchor points telescope from the previous round's gaps, not its stitch tops.
- Every round joins with a slip stitch and reopens with a counted turning chain (chain 4 or chain 5) that itself stands in for a stitch, which is why each square closes into concentric rounds and holds at a fixed 10½ inch measurement instead of spiraling outward.
- The garment's overall shape comes from how the twelve squares are joined, not from shaping worked within a single square; corner-to-corner joins with single crochet and chain 2 are what create the neckline, waist, and armhole openings before the pico stitch trims them.
Scaling the build
| Larger | Move up from the size 3 light yarn and 4mm hook to a heavier yarn and larger hook; each stitch enlarges and every square finishes wider than 10½ inches without changing the round sequence. |
|---|---|
| Smaller | Drop below the 4mm hook while keeping size 3 yarn; tighter extended double crochet stitches pull each finished square under 10½ inches. |
| Adjust panel size | Round 10 explicitly allows adding or removing rows to adjust each square's finished size: work chain 3, double crochet in every stitch as usual, but repeat that round more times for a larger square or fewer for a smaller one before starting Finishing the Edges. |
03 · Putting it togetherHow the pieces go together
- S1
Create a total of 12 granny squares.
- S2
Use a slip knot to join the squares.
- S3
Single crochet, chain 2, and slip stitch into the corners of adjacent squares.
- S4
Repeat this process, alternating between squares, until all are connected.
04 · Snag listWhat went wrong on the bench, and the fix
Snag 1
Magic ring pulled unevenly
Cinch the ring fully closed before the first extended double crochet; a loose ring lets Round 1's sixteen stitches bunch on one side.
Snag 2
Turning chain worked as a plain chain
Remember chain 5 counts as an extended double crochet plus chain 1 (and chain 4 as single crochet plus chain 3); do not add an extra stitch into the same space at the start of a round.
Snag 3
Joining into the wrong space
Join each round's slip stitch to the top of that round's starting chain, not to the nearest chain-1 or chain-3 loop, or the round count drifts into a spiral.
Snag 4
Uneven pico spacing along edges
Count exactly three single crochet stitches between each pico repeat so the edging sits level along the neckline, waist, and armholes.
05 · QueriesQuestions logged against this build
Can this top be made in one solid color instead of blue and gray?
Yes. The blue-and-gray split is a color choice, not a structural requirement, so a single yarn can carry each square from the magic ring through all ten rounds. Just keep total yardage similar to the combined 1-2 balls of blue and 4-5 balls of gray listed.
What yarn weight does this pattern actually call for?
It calls for a size 3, or light-weight, yarn worked on a 4mm hook. That combination is what produces the 10½ inch (28 cm) finished square measurement stated in the materials.
How does the flat square become a wearable top?
Twelve identical squares, each finished at 10½ x 10½ inches through the Creating the Square instructions, are joined together with single crochet, chain 2, and slip stitch into their corners, alternating between squares until all twelve are connected — this joining is what builds the garment's neckline, waist, and armhole shaping. The Finishing the Edges part then runs the pico stitch along those joined edges.
06 · Made byWho counted this one

Who writes Amigurumi Addict, how a build gets its number, and why every round on the site carries a stitch count.
07 · Next off the benchThree builds that sit near this one

Odds and ends
Crochet a phone bag with strap, flap, and ring closure
How to crochet a phone bag? Join rounds from a 30-chain base, add a strap, flap, and ring.

Odds and ends
Crochet worsted weight socks with a turned heel
How do you crochet socks for winter? Build toe-up in worsted weight with a folded heel and ribbed leg.

Odds and ends
Toe-Up Woodland Walker Crochet Socks With Colorwork Cuff
How do you crochet toe-up socks with a colorwork cuff? Build the Toe, Heel, and stranded Cuff in order.
Join the build log
One message when a build is issued
A drawing and its parts list, when one leaves the bench.