| Shelf | Level | Time | Hook | Yarn |
|---|---|---|---|---|
| Odds and ends | Intermediate | 8-10 hours | 4.0 mm | DK |
Granny Square Baby Dress in Ocean Blue Tones
How do you shape a granny square baby dress with no increases? Two square sizes joined at the waist do it.
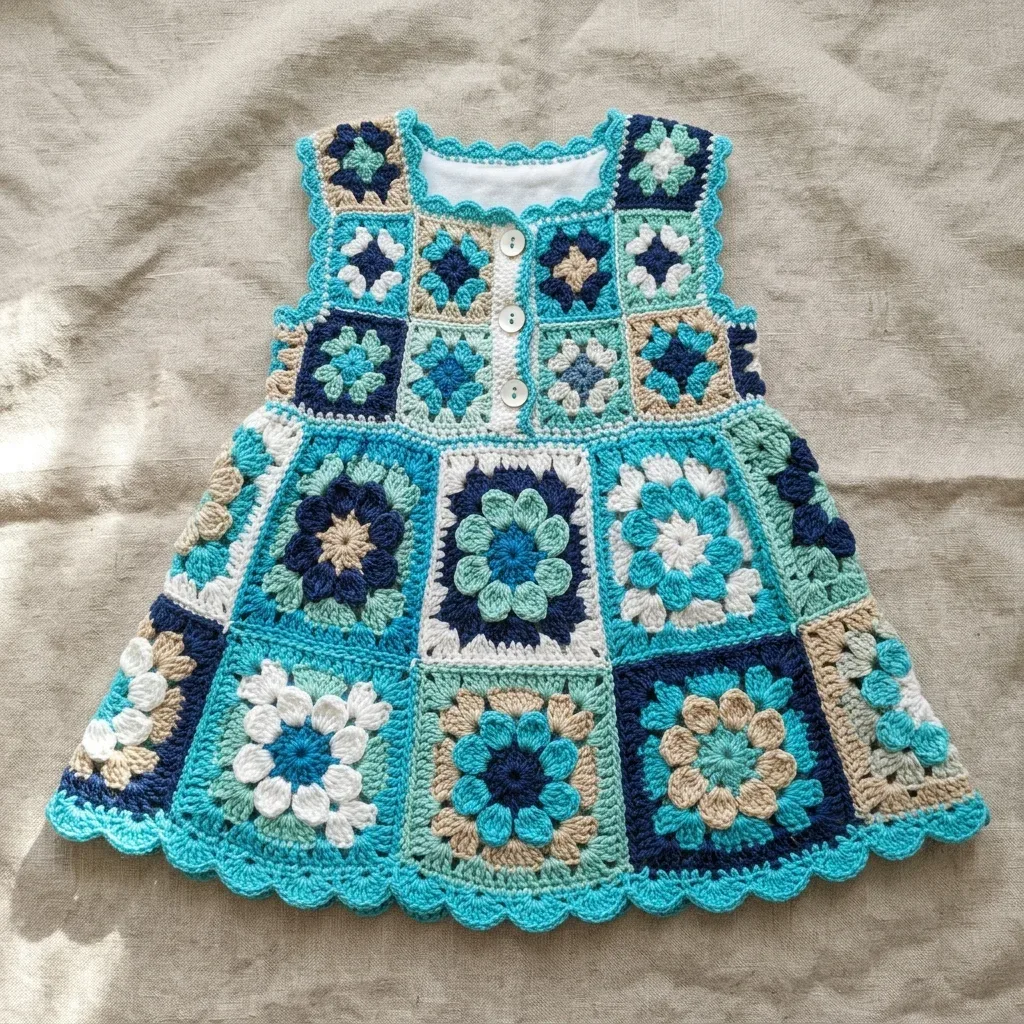
01 · The pieceWhat Granny Square Baby Dress in Ocean Blue Tones actually is
This dress is built from twenty granny squares in two sizes: three-round squares at 2.5 inches for the bodice, four-round squares at 3.5 inches for the skirt. Each square is worked in a fixed color order — Navy, White, Turquoise — with the combination repeated twice across the panel. Squares join on their final round using JAYG, replacing corner ch-2 spaces and side ch-1 spaces with slip stitches into the neighboring square, so no separate seaming pass is needed. A button placket and neckline border, both in Yarn A, finish the openings.
Precision matters at the JAYG points: corner ch-2 spaces and side ch-1 spaces must line up with their counterparts on the adjacent square, or the panel will pucker at the waist seam. Popcorn placement inside the larger skirt squares also needs consistent front-to-back hook insertion, or the raised stitches face inconsistent directions. Color sequencing within a square, by contrast, has no structural consequence — swap yarn colors for the Navy/White/Turquoise order freely, since the size difference between bodice and skirt squares does the shaping, not the palette.
02 · The count run6 rounds across 2 parts, each with its count
US terms throughout. Every row below ends with the count that round finishes on.
| Part | Qty | Finishes on |
|---|---|---|
| Jayg | 1 | - |
| S10 | 1 | - |
rnd: round yo: yarn over pc: popcorn stitch Special Stitches Explained 3-Double Crochet Cluster (3dc-cl)
This creates a textured bump by working three incomplete double crochets into the same spot, then joining them at the top.
Yarn over, insert hook into indicated stitch or space, yarn over and pull up a loop, yarn over and pull through 2 loops (2 loops remain on hook). Yarn over, insert hook into same spot, yarn over and pull up a loop, yarn over and pull through 2 loops (3 loops on hook). Yarn over, insert hook into same spot, yarn over and pull up a loop, yarn over and pull through 2 loops (4 loops on hook). Yarn over and pull through all 4 loops. One cluster complete.
Popcorn Stitch (pc)
This creates the raised, three-dimensional petal effect you see in some of the larger skirt squares.
Work 5 double crochets into the indicated stitch or space. Remove your hook from the working loop. Insert your hook from front to back through the top of the first double crochet of the group. Pick up the working loop and pull it through. Chain 1 to close if you want a tighter popcorn.
Join As You Go (JAYG) Flat Slip Stitch Join This technique connects squares while you work the final round, eliminating separate seaming.
When working the final round of a new square, at each corner chain-2 space that borders a completed square, replace the corner ch-2 with: chain 1, slip stitch into the corresponding corner ch-2 space of the adjacent square, chain 1. Along the sides, replace each ch-1 space between shell groups with a slip stitch into the corresponding ch-1 space of the adjacent square.
Scallop Edging
Slip stitch into indicated stitch, chain 2, work 4 double crochets into same stitch, skip 2 stitches, slip stitch into next stitch. This creates one shell.
Understanding the Construction Before diving into the step by step instructions, here is how this dress comes together: Small granny squares (20 total): 10 for front bodice, 10 for back bodice
Large granny squares (18 total): 9 for front skirt, 9 for back skirt Popcorn accent squares (8 total): 4 for front skirt, 4 for back skirt
The front bodice splits into Left Front (4 squares in a 2×2 grid) and Right Front (4 squares in a 2×2 grid) with a button placket gap between them. The back bodice is one continuous 4×3 grid.
All squares use turquoise as the final round color, creating that beautiful unified border effect.
Small Granny Square Instructions (Bodice)
Finished size: 2.5 inches / 6.5 cm square Make 20 total
The starting color (Round 1) and second color (Round 2) vary by square. Round 3 is always Yarn A (Turquoise).
| Round | Instruction | Count |
|---|---|---|
| Round 1 | With first color, make a magic ring (or chain 4, slip stitch to form ring). Chain 3 (counts as first double crochet here and throughout), work 2 double crochets into ring, chain 2, (3 double crochets into ring, chain 2) 3 times, slip stitch to top of beginning chain-3 to join.Fasten off first color. | - |
| Round 2 | Join second color with slip stitch into any ch-2 corner space. Chain 3, 2 double crochets into same corner space, chain 2, 3 double crochets into same corner space (first corner made), chain 1, (3 dc, ch 2, 3 dc) into next ch-2 corner space, chain 1. Repeat from ( ) 2 more times.Slip stitch to top of beginning chain-3 to join. Fasten off second color. | - |
| Round 3 | Join Yarn A (Turquoise) with slip stitch into any ch-2 corner space. Chain 3, 2 double crochets into same corner space, chain 2, 3 double crochets into same corner space (corner made), chain 1, 3 double crochets into next ch-1 side space, chain 1, (3 dc, ch 2, 3 dc) into next ch-2 corner space, chain 1, 3 double crochets into next ch-1 side space, chain 1. Repeat from ( ) 2 more times.Slip stitch to top of beginning chain-3 to join. Fasten off Yarn A, or if using JAYG, proceed with join on this round. | - |
Large Granny Square Instructions (Skirt)
Finished size: 3.5 inches / 9 cm square Make 18 total Work Rounds 1 through 3 exactly as the Small Granny Square.
| Round | Instruction | Count |
|---|---|---|
| Round 4 | Join Yarn A (Turquoise) if not already attached, into any ch-2 corner space. Chain 3, 2 double crochets into same corner space, chain 2, 3 double crochets into same corner space (corner made), chain 1, (3 double crochets into next ch-1 space, chain 1) twice, (3 dc, ch 2, 3 dc) into next ch-2 corner space, chain 1, (3 double crochets into next ch-1 space, chain 1) twice. Repeat from ( ) 2 more times.Slip stitch to top of beginning chain-3 to join. Fasten off or proceed with JAYG. | - |
Popcorn Accent Squares (Optional Variation)
These are large granny squares where Round 3 uses popcorn stitches instead of standard shell groups on the side spaces. This creates those beautiful raised petal effects visible in the finished dress.
Make 8 total Work Rounds 1 and 2 as standard.
| Round | Instruction | Count |
|---|---|---|
| Round 3 | Variation Join accent color into any ch-2 corner space. Chain 3, 2 double crochets into same corner space, chain 2, 3 double crochets into same corner space (corner), chain 1, work 1 popcorn into next ch-1 side space, chain 1, (3 dc, ch 2, 3 dc) into next ch-2 corner space, chain 1, work 1 popcorn into next ch-1 side space, chain 1. Repeat around.Slip stitch to top of beginning chain-3. Fasten off. | - |
Color Combinations for Each Square Here is your color map. Each small square uses these combinations:
Round 1 Navy, Round 2 White, Round 3 Turquoise Make each combination twice to total 20 small squares.
Assembly Step by Step Building the Left Front Bodice Make Square S1. Set aside.
Make Square S2. On its final Round 3, JAYG S2 to the right side of S1 along one edge.
Make Square S3. JAYG to the bottom of S1.
Make Square S4. JAYG to the bottom of S2 and to the right of S3.
Left Front Bodice complete: 2 squares wide, 2 squares tall Building the Right Front Bodice Repeat the process using Squares S5, S6, S7, S8 in the same 2×2 arrangement.
Building the Back Bodice
Using Squares S9, S10, and remaining squares arranged in a 4 column by 3 row grid, JAYG each square as you go.
Back Bodice complete: 4 squares wide, 3 squares tall Joining Shoulders
Align the top edge of the Left Front Bodice (top row of 2 squares) with the corresponding top-left corner of the Back Bodice (top-left 2 squares). With Yarn A, slip stitch join through corresponding edge spaces across the shoulder width.
Repeat for Right Front Bodice joining to the top-right 2 squares of the back bodice.
Joining Side Seams
With Yarn A, slip stitch the left outer edge of the Left Front Bodice to the left outer edge of the Back Bodice from shoulder down to waist. Repeat for right side.
Building and Attaching the Skirt
Build the Front Skirt Panel (9 squares in a 3×3 grid) and Back Skirt Panel (9 squares in a 3×3 grid) using JAYG.
Join skirt panels at side seams with slip stitch.
Align the top edge of the skirt with the bottom edge of the bodice. The slight width difference creates the natural flare. Slip stitch through corresponding spaces around the entire waist circumference.
Finishing Details Button Placket
With Yarn A and RS facing, work single crochet along the right front center edge from neckline to waist. Create 3 button loops evenly spaced: chain 4, skip 2 stitches, slip stitch back into edge, continue with single crochet.
Work matching single crochet edging along the left front center edge without loops. Sew 3 buttons to correspond with loops.
Neckline Border
With Yarn A, work single crochet evenly around the entire neckline opening (approximately 56 to 60 stitches). Work one round of scallop edging around.
Armhole Border
With Yarn A, work single crochet evenly around each armhole opening (approximately 36 to 40 stitches). Work one round of scallop edging around each.
Hem Border
| Round | Instruction | Count |
|---|---|---|
| Round 1 | Work single crochet around the entire hem with 3 single crochets into each corner space (approximately 120 stitches total).Round 2: Work scallop edging around entire hem. Blocking and Final Touches Weave in all ends on the wrong side, threading each through at least 5 stitches in two directions. | - |
Wet block your dress by soaking in cool water with mild soap for 10 minutes. Press out excess water in a towel without wringing. Lay flat on a blocking mat, pin at corners, and let dry completely for 12 to 24 hours.
For the optional neckline lining, cut a 2-inch wide strip of white cotton jersey long enough to wrap the neckline plus seam allowance. Fold raw edges under, press, and hand stitch to the wrong side of the neckline.
Care Instructions
Machine wash cold on gentle cycle if using acrylic yarn. Lay flat to dry. Never tumble dry as this may distort the squares. For cotton yarn, hand wash and lay flat to dry.
This crochet pattern takes approximately 15 to 22 hours depending on your speed, and every moment is worth it. The finished dress makes a stunning gift for baby showers, first birthdays, or your own little one. Those raised popcorn flowers, the scalloped edges, the beautiful color harmony. It all comes together into something truly special.
If you loved working on this ocean blue granny square baby dress, save this pattern to your Pinterest boards so you can find it again. And please leave a comment below if you make one. I would love to hear which color combination you chose and see how your version turned out.
Techniques on this build
- Join-as-you-go (JAYG)
- Worked on the final round of each new square; match corner ch-2 spaces and side ch-1 spaces to the completed square exactly, or the seam line shifts.
- 3-double crochet cluster (3dc-cl)
- Three incomplete double crochets into one spot, joined at the top; track the loop count (2, then 3, then 4 loops) before the final pull-through.
- Popcorn stitch
- Used in the larger skirt squares for the raised petal effect; insert the hook front to back through the first double crochet's top so the popcorn pops toward the right side.
- Button loop placket
- Worked along the right front center edge in single crochet with three loops (chain 4, skip 2, slip stitch back); space loops evenly before starting the edging.
Final fit-up
- Weave in ends from all twenty S10 squares before assembly proceeds further, since JAYG seams leave less room to hide tails later.
- Block the joined bodice and skirt panels flat so all squares sit at their stated 2.5-inch and 3.5-inch measurements before the waist join is judged for fit.
- Cut and stitch the white cotton jersey fabric to the neckline interior for a soft-against-skin lining under the single crochet border.
- Sew the three white buttons to the left front edge to correspond with the button loops on the right front, closing the placket.
How the parts fit
- Bodice squares stop at three rounds (2.5 inches) while skirt squares run to four rounds (3.5 inches); the size gap at the waist join produces the A-line flare without any increase rounds.
- JAYG is confined to the final round of each new square only — earlier rounds are worked in the open, so the join itself adds no extra rounds to the square's construction.
- The Navy/White/Turquoise combination is worked twice to reach twenty squares total, indicating the panel is built as paired sections (left and right front, or matched bodice halves) rather than one continuous color run.
Scaling the build
| Larger | Move up from the G-6/4.0mm hook to a larger size while keeping the same DK yarn; every square grows slightly, scaling the whole dress up without changing the round counts. |
|---|---|
| Larger | Work an additional round onto the four-round skirt squares before the JAYG round; this adds a shell round, pushing the skirt squares past 3.5 inches and increasing flare and hem length. |
03 · Putting it togetherHow the pieces go together
- S1
Button Placket: With Yarn A and RS facing, work single crochet along the right front center edge from neckline to waist. Create 3 button loops evenly spaced: chain 4, skip 2 stitches, slip stitch back into edge, continue with single crochet. Work matching single crochet edging along the left front center edge without loops. Sew 3 buttons to correspond with loops.
- S2
Neckline Border: With Yarn A, work single crochet evenly around the entire neckline opening (approximately 56 to 60 stitches). Work one round of scallop edging around.
- S3
Armhole Border: With Yarn A, work single crochet evenly around each armhole opening (approximately 36 to 40 stitches). Work one round of scallop edging around each.
- S4
Hem Border: Round 1: Work single crochet around the entire hem with 3 single crochets into each corner space (approximately 120 stitches total). Round 2: Work scallop edging around entire hem.
04 · Snag listWhat went wrong on the bench, and the fix
Snag 1
Mismatched JAYG corner spaces
Confirm you're slip-stitching into the corresponding corner ch-2 space on the adjacent square, not a side ch-1 space, before closing the corner with the second chain-1.
Snag 2
Losing count mid-cluster
Pause after each yarn-over/pull-through pair in the 3dc-cl and confirm the loop count on the hook (2, then 3, then 4) before pulling through all four.
Snag 3
Popcorn facing the wrong side
Always insert the hook from front to back through the top of the first double crochet of the group; inserting back to front flips the popcorn to the wrong side of the fabric.
Snag 4
Uneven button loop spacing
Mark the three loop positions along the right front edge with stitch markers before crocheting the placket, rather than eyeballing spacing as you go.
05 · QueriesQuestions logged against this build
Why do the bodice and skirt use different round counts?
The bodice squares stop at three rounds (2.5 inches) and the skirt squares run to four rounds (3.5 inches). Joining the two sizes at the waist creates the A-line flare directly, with no shaping rounds needed.
Can the yarn be substituted?
Yes — Pound of Love works with a slightly smaller hook, and Drops Safran gives sharper stitch definition on its cotton-polyester blend. Avoid fuzzy or textured yarns, since they obscure the granny square detail this pattern relies on.
Do the squares need to be sewn together afterward?
No. JAYG is worked into the final round of each new square, replacing corner and side chain spaces with slip stitches into the adjacent square, so there's no separate seaming step.
06 · Made byWho counted this one

Who writes Amigurumi Addict, how a build gets its number, and why every round on the site carries a stitch count.
07 · Next off the benchThree builds that sit near this one

Odds and ends
Crochet a phone bag with strap, flap, and ring closure
How to crochet a phone bag? Join rounds from a 30-chain base, add a strap, flap, and ring.

Odds and ends
Crochet worsted weight socks with a turned heel
How do you crochet socks for winter? Build toe-up in worsted weight with a folded heel and ribbed leg.

Odds and ends
Toe-Up Woodland Walker Crochet Socks With Colorwork Cuff
How do you crochet toe-up socks with a colorwork cuff? Build the Toe, Heel, and stranded Cuff in order.
Join the build log
One message when a build is issued
A drawing and its parts list, when one leaves the bench.