| Shelf | Level | Time | Hook | Yarn |
|---|---|---|---|---|
| Odds and ends | Confident Beginner to Intermediate | 6-8 Hours | 6.0 mm | Bulky |
Forest Jewel Tone Shell Crossbody Free Crochet Pattern
Make a structured shell-stitch crossbody bag with ridged texture and scalloped edges. Free crochet pattern with clear, beginner-friendly instructions.
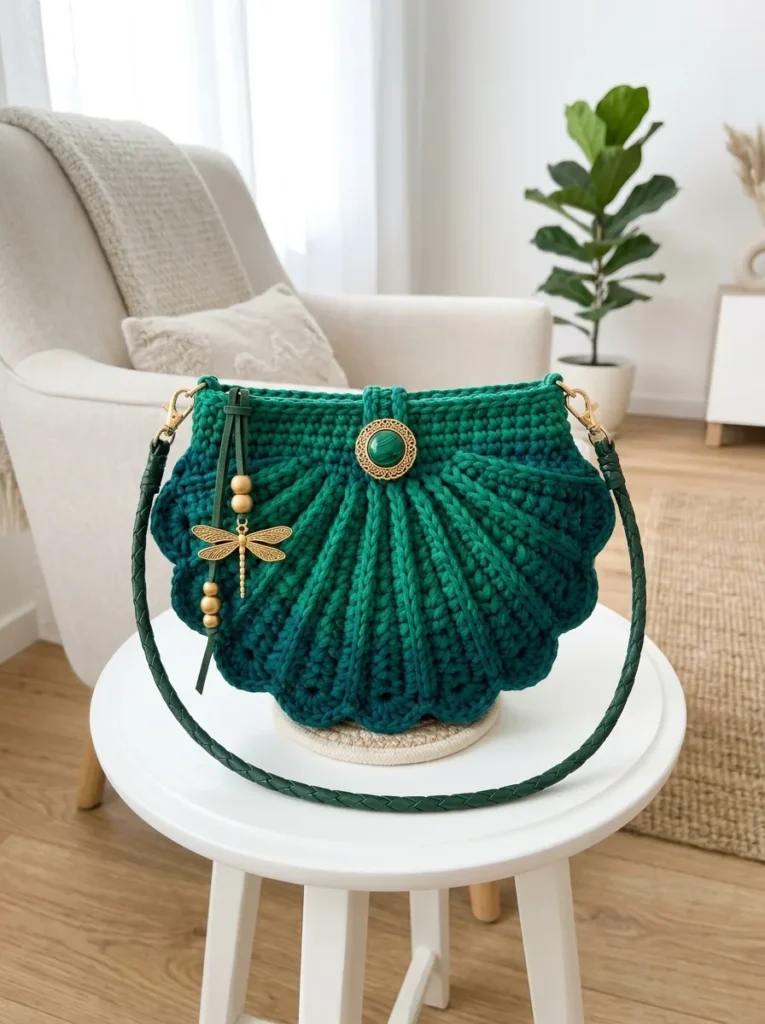
01 · The pieceWhat Forest Jewel Tone Shell Crossbody Free Crochet Pattern actually is
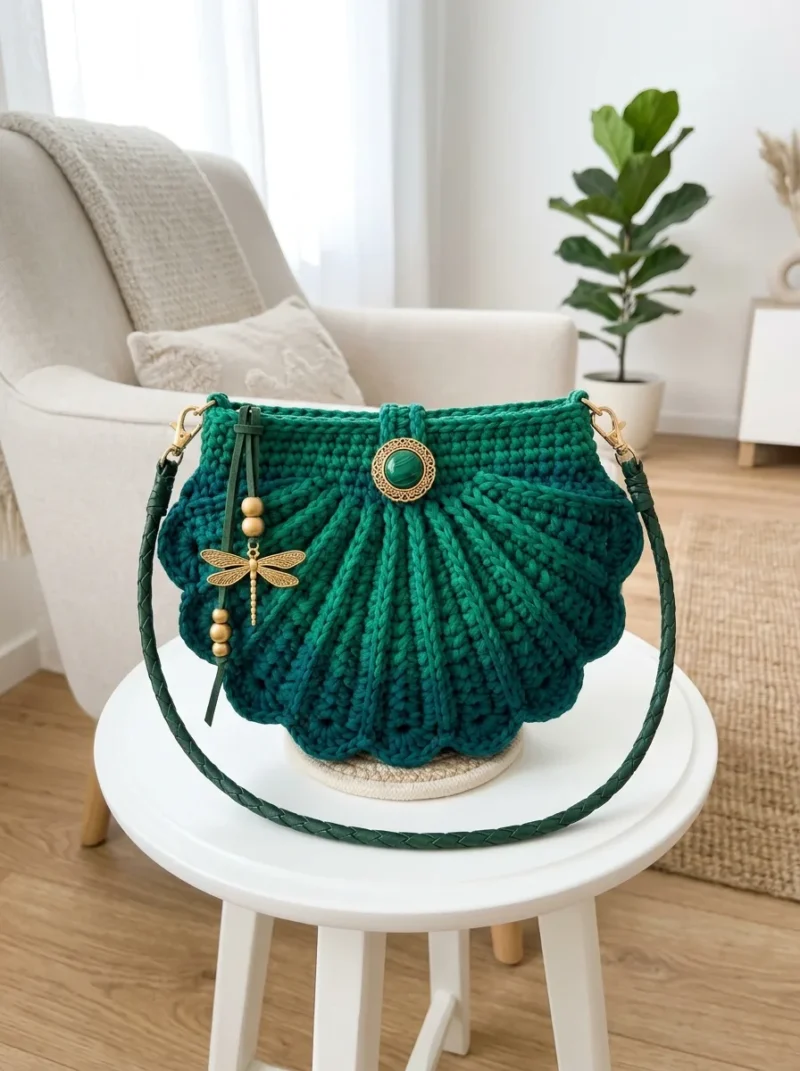
This Forest Jewel Tone Shell Crossbody is a structured, textured bag built from two identical shell-shaped panels joined together into one substantial crossbody silhouette. What makes it special is the raised ridge texture running through the shell shaping, paired with a scalloped edge that gives the whole bag a jewel-like, faceted look. It is perfect for crocheters who want to make something wearable and durable, not just decorative, using thick bulky yarn that works up fast.
The core techniques are back loop only stitching for those satisfying ridges, straightforward increasing and decreasing to build the shell shape, and basic seaming to join the two panels together. You will also make small hardware attachment tabs and a closure tab, so a little bit of finishing work is involved. Expect somewhere around 6 to 8 hours total, spread across the foundation, top band, shell shaping, scalloped edging, and final assembly.
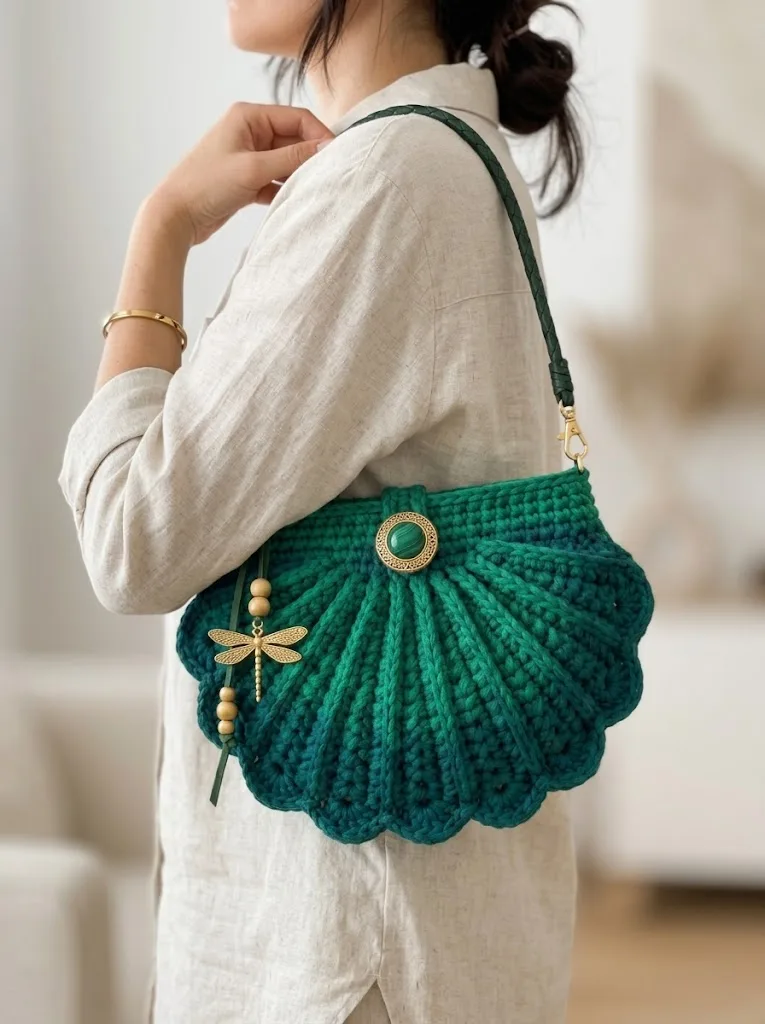
The finished bag measures roughly 11 inches wide and 9 inches tall, with about 2 inches of depth once lined and stuffed slightly for shape, not including the strap. It has real presence on the body, substantial without being bulky, thanks to the dense fabric bulky yarn and a 6.0mm hook create. With its cabochon-style button closure and charm embellishment, it makes a genuinely gorgeous handmade gift or a signature piece for your own everyday rotation.
- Start with the foundation round to establish your base stitch count for the first shell panel.
- Build up the shell shape over a few rounds, working into the back loop only for that ridged texture.
- Create the scalloped edge along one side, following the shaping section to form the wavy bumps.
- Repeat the entire foundation, shell shaping, and scalloped edge process to make a matching second panel.
- Work the top band across both panels to unify them and set up the bag's opening.
- Make two small hardware attachment tabs and one closure tab separately for the strap and button closure.
- Seam the two panels together using a tapestry needle, keeping tension even for a smooth shape.
- Attach the hardware tabs, sew on your decorative button and charm, and add the fabric lining to finish.
02 · The count run19 rounds across 7 parts, each with its count
US terms throughout. Every row below ends with the count that round finishes on.
| Part | Qty | Finishes on |
|---|---|---|
| Foundation | 1 | - |
| Top Band | 1 | - |
| Hardware Attachment Tabs (Make 2) | 1 | - |
| Closure Tab | 1 | - |
| Building the Shell Shape | 1 | - |
| Creating the Scalloped Edge | 1 | - |
| Scallop Shaping Section | 1 | - |
| Round | Instruction | Count |
|---|---|---|
| Round 1 | Ch 4. Sc in 2nd ch from hook and in each ch across. Turn. (3 sts) | - |
The top band creates the structured opening of your bag and provides attachment points for the strap.
Setup: With the joined panels positioned so the opening faces up, join yarn at one side seam.
| Round | Instruction | Count |
|---|---|---|
| Round 1 | Ch 1, sc evenly around the top opening, working approximately 33 sts across the front panel and 33 sts across the back panel. Sl st to first sc to join. (66 sts) | - |
| Round 2 | Ch 1, sc in BLO in each st around. Sl st to join. (66 sts) | - |
| Round 3 | Ch 1, sc in BLO in each st around. Sl st to join. (66 sts) | - |
| Round 4 | Ch 1, sc in both loops in each st around. Sl st to join. (66 sts) | - |
| Round 5 | Ch 1, sc in each st around. Sl st to join. Fasten off. (66 sts) Weave in all ends. | - |
These small tabs hold your D-rings or swivel clasps.
| Round | Instruction | Count |
|---|---|---|
| Round 1 | Ch 8. Sc in 2nd ch from hook and in each ch across. Turn. (7 sts) | - |
| Round 2 | through 4: Ch 1, sc in each st across. Turn. (7 sts) Fasten off, leaving a 12 inch tail.To attach: Fold each tab through a D-ring. Position at the top corners of your bag where the side seams meet the top band. Sew securely in place using the yarn tail. | - |
| Round | Instruction | Count |
|---|---|---|
| Round 1 | Ch 6. Sc in 2nd ch from hook and in each ch across. Turn. (5 sts) | - |
| Round 2 | through 8: Ch 1, sc in each st across. Turn. (5 sts) Fasten off, leaving a long tail. | - |
Center this tab at the top front of your bag, positioning it so it folds over toward the front panel. Sew the base securely to the inside of the top band. Attach your decorative button or brooch to the front of the bag, aligning it with the tab for closure.
| Round | Instruction | Count |
|---|---|---|
| Round 2 | Ch 1, 2 sc in first st, sc in next st, 2 sc in last st. Turn. (5 sts) | - |
| Round 3 | Ch 1, working in BLO, 2 sc in first st, sc in each st across to last st, 2 sc in last st. Turn. (7 sts) | - |
| Round 4 | Ch 1, working in BLO, 2 sc in first st, sc in each st across to last st, 2 sc in last st. Turn. (9 sts)Rows 5 through 18: Repeat Row 4, continuing to work in BLO and increasing 2 stitches per row. | - |
Now we shape the iconic shell curves along the outer edge.
| Round | Instruction | Count |
|---|---|---|
| Round 19 | Ch 1, working in BLO, sc in each st across. Turn. (37 sts) No increases this row. | - |
| Round 20 | Ch 1, sk first st, working in BLO, sc in each st across to last 2 sts, sk 1 st, sc in last st. Turn. (35 sts) | - |
| Round 21 | Ch 1, working in BLO, sc in each st across. Turn. (35 sts) | - |
| Round 22 | Ch 1, sk first st, working in BLO, sc in each st across to last 2 sts, sk 1 st, sc in last st. Turn. (33 sts) | - |
This is where the shell gets its wavy edge. Do not worry if it looks ruffled. That is exactly right.
| Round | Instruction | Count |
|---|---|---|
| Round 23 | Ch 1, 3 sc in first st, sc in next 4 sts, sl st in next st, sc in next 4 sts, 3 sc in next st, sc in next 4 sts, sl st in next st, sc in next 4 sts, 3 sc in next st, sc in next 4 sts, sl st in next st, sc in next 4 sts, 3 sc in last st. (41 sts including sl sts) | - |
Note: The groups of 3 sc create the peaks of your scallops, while the slip stitches create the valleys. This mimics how a real shell fans out.
| Round | Instruction | Count |
|---|---|---|
| Round 24 | Working along the curved edge, sl st in each st around, keeping your tension even. This creates a finished edge.Fasten off, leaving a long tail (approximately 24 inches) for seaming later. | - |
03 · Putting it togetherHow the pieces go together
- S1
Strap Attachment: Clip your crossbody strap to the D-rings on each side. Adjust length for comfortable wear, typically sitting at hip level.
- S2
Optional Lining: For a polished interior, cut two pieces of coordinating fabric using your crochet panels as templates, adding 1/2 inch seam allowance. Sew the fabric pieces together along the curved edge, leaving the top open. Slip the lining inside the bag with wrong sides together. Hand stitch the lining to the inside of the top band using small invisible stitches.
- S3
Charm Embellishment: The dragonfly charm shown adds whimsy and movement. Attach any decorative charm to one of the D-rings using a small jump ring or directly through the clip.
- S4
Blocking: Lightly steam block your finished bag if the fabric feels uneven. Do not wet block t-shirt yarn as it may stretch permanently.
04 · Before it goes to a childWhat has to be right, and what is allowed to drift
- 💡 Always work your back loop only stitches consistently around every round of the shell shaping and top band, this is what creates the ridged ribbing look, one missed round will visibly break the pattern.
- 💡 Use at least 4 stitch markers, one for tracking your round start point and additional ones for flagging increase or decrease stitches during the shell shaping and scalloped edge sections.
- 💡 Swatch first even though gauge isn't critical here, 10 sc by 10 rows should measure about 4 inches with your 6.0mm hook and bulky yarn, adjust hook size up or down if your swatch is off.
- 💡 If substituting t-shirt or tape yarn with two strands of worsted weight held together, wind them onto one manageable ball or bobbin beforehand so they feed evenly and don't tangle mid-round.
- 💡 Block or steam your scalloped edge lightly after finishing to help those wavy bumps sit crisp and even, this small step makes a big visual difference in the final look.
- 💡 Cut your fabric lining slightly larger than your finished panel size and hand-baste it in place before final seaming, so it stays put and doesn't shift while you sew the bag together.
05 · Snag listWhat went wrong on the bench, and the fix
Snag 1
Working into both loops instead of the back loop only, which flattens the ridge texture entirely.
Slow down at the start of each round and consciously insert your hook only under the back loop, closest to you. If your ridges aren't showing, this is almost always the cause, rip back to the last correct round and redo it.
Snag 2
Losing track of increase and decrease placement while shaping the shell panels, causing the panel to skew or curl.
Use stitch markers to flag the exact stitches where increases or decreases happen each round, and recount your total stitch count at the end of every round before moving on.
Snag 3
Mismatched panel sizes between the two shell panels, making the final seam pucker or gap.
Work both panels back to back rather than fully finishing one before starting the other, checking row counts and measurements against each other at every stage.
Snag 4
Seaming the panels together too tightly or too loosely, distorting the finished bag shape.
Use a tapestry needle with a whip stitch or mattress stitch seam, and pin or clip the panels together at several points first to distribute tension evenly before you start sewing.
Snag 5
Skipping or misplacing the hardware attachment tabs, leading to a strap that pulls unevenly or sits crooked.
Attach both tabs at mirrored, symmetrical points on the top band, measuring from the center seam on each side to confirm they match before sewing them down permanently.
Snag 6
Choosing a yarn that's too thin or drapey, resulting in a floppy bag that won't hold its structured shell shape.
Stick with a true bulky weight tube or t-shirt yarn, or hold two strands of worsted together as directed, and consider adding a stiff fabric lining to reinforce the structure further.
06 · VariantsOther ways to issue this one
The yarn choice completely changes this bag's personality, so have fun with it. Try Hobbii Rainbow Cotton or Re-Up tape yarn in a deep emerald or amethyst for that jewel-tone shell effect from the original, or go neutral with a natural cotton and swap the cabochon for a wooden button for a boho look. Holding two strands of Wool-Ease worsted together is a great budget substitution if t-shirt yarn is hard to source locally, and it still produces the dense, structured fabric this bag needs to hold its shape. For a color-blocked version, work one shell panel in a solid jewel tone and the second panel in a contrasting metallic-flecked yarn, then let the scalloped edging tie both panels together in a third accent color. If you want a smaller everyday version, work the foundation and shell shaping rounds with slightly shorter turning rows so your finished panel comes in a couple inches narrower and shorter than the 11 by 9 inch original, keeping the same stitch pattern throughout, just fewer total rows before you begin the scalloped edge. You could also lengthen the strap tabs and add a second hardware tab pair partway down for an adjustable-length crossbody strap. Swap the fabric lining for a bold print or a quilted cotton for extra structure, and consider adding a second smaller charm alongside the main closure charm for a layered, curated look. For gifting, monogram a small crocheted tag using a contrasting scrap of the same bulky yarn and stitch it to the interior lining before final assembly.
I adore how this bag tricks people into thinking it is complicated when really it is just two matching shell panels worked flat and seamed together. Working into the back loop only for those ridge lines is one of my favorite low-effort, high-impact techniques, no cables, no fancy hooks, just consistent back loop stitching that reads as intentional and polished. The scalloped edge section is where the personality really shows up, those little wavy bumps catch light beautifully in a chunky cotton or tape yarn. I also love that this pattern gives you two tiny hardware tabs and a dedicated closure tab, small details that make the difference between a homemade look and a boutique look. Attaching that malachite-style cabochon button at the end feels like placing a jewel into a setting you built yourself. Because it works up in bulky weight yarn on a 6.0mm hook, progress is visible fast, which keeps momentum high through the shell shaping rounds. This is a project that rewards patience during finishing without demanding advanced skills to start.
07 · QueriesQuestions logged against this build
Can I make this bag without t-shirt or tape yarn?
Yes, holding two strands of worsted weight yarn together works beautifully as a substitute. The key is achieving that dense, sturdy fabric, so avoid anything too soft or drapey that won't hold the shell shape.
Why aren't my ridge lines showing up like in the photos?
This almost always means you're accidentally working into both loops instead of the back loop only. Double check each round and make sure your hook is going under just the back loop, leaving the front loop unused.
Do I need to line this bag with fabric?
The pattern recommends coordinating fabric and basic sewing supplies for a lining, which adds structure and durability. It's optional for the shell shape itself, but it does help the bag hold its form and protects your belongings inside.
What size hook and yarn do I need, and how important is gauge?
You'll want a 6.0mm hook with bulky weight yarn, roughly 250 to 300 grams total. Gauge isn't critical for fit, but swatching helps ensure your finished bag matches the listed 11 by 9 inch dimensions.
How do the two panels join together into the finished bag?
Each shell panel is worked flat and identically, then the pair is seamed together using a tapestry needle, with the top band, tabs, and closure worked in afterward. Basic seaming skills, similar to finishing a simple bag or hat, are all you need.
Original pattern: https://crochetwithmia.com/forest-jewel-tone-shell-crossbody-free-crochet-pattern/
08 · Made byWho counted this one

Who writes Amigurumi Addict, how a build gets its number, and why every round on the site carries a stitch count.
09 · Next off the benchThree builds that sit near this one

Odds and ends
Crochet a phone bag with strap, flap, and ring closure
How to crochet a phone bag? Join rounds from a 30-chain base, add a strap, flap, and ring.

Odds and ends
Crochet worsted weight socks with a turned heel
How do you crochet socks for winter? Build toe-up in worsted weight with a folded heel and ribbed leg.

Odds and ends
Toe-Up Woodland Walker Crochet Socks With Colorwork Cuff
How do you crochet toe-up socks with a colorwork cuff? Build the Toe, Heel, and stranded Cuff in order.
Join the build log
One message when a build is issued
A drawing and its parts list, when one leaves the bench.