| Shelf | Level | Time | Hook | Yarn |
|---|---|---|---|---|
| Odds and ends | Intermediate | 6-8 hours | 4 mm | Fingering |
Flat slip stitch socks with a knitted look
How do you crochet socks that look knitted? Work flat slip stitch rows in BLO, then turn a short row heel.
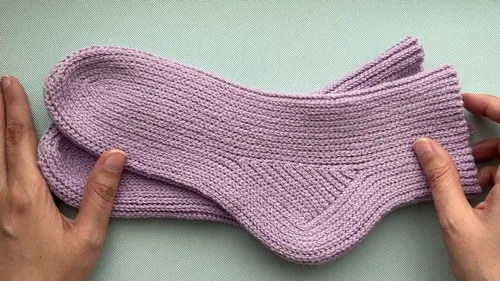
01 · The pieceWhat Flat slip stitch socks with a knitted look actually is
The sock starts as a chain of 106 worked over contrasting thread, a provisional edge you will reopen later. Main yarn joins and the cuff builds flat, 106 slip stitches in BLO row after row, ten rows deep, before the piece narrows to 104 and a marker sets the heel at the 62nd stitch from the toe end. Short rows turn the heel in paired decreases from 20 down to 2, rejoined through the side-bar, then the leg resumes at 26 stitches to the cuff edge before the whole foot closes at 82 stitches, 2 left unworked at the toe.
The marker at stitch 62 and the leave-2-unworked turns at each row end are the tolerances that matter — miscount either and the heel pocket sits off-center or the toe closes lopsided. The ten straight rows of the cuff and the long BLO runs down the foot are far more forgiving: the ridge structure of back-loop slip stitch disguises minor tension drift, so an occasional loose or tight stitch in those stretches will not show once the fabric is blocked flat.
Customize your size and color to make each pair uniquely yours — the pattern as written fits size 36, with a note to adjust the starting chain length and heel placement for other sizes.
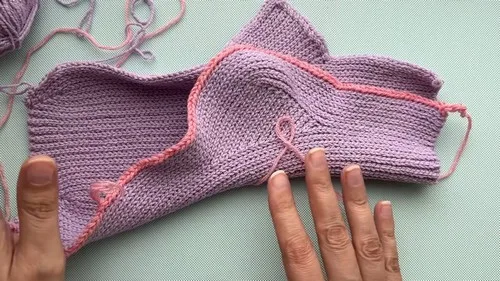
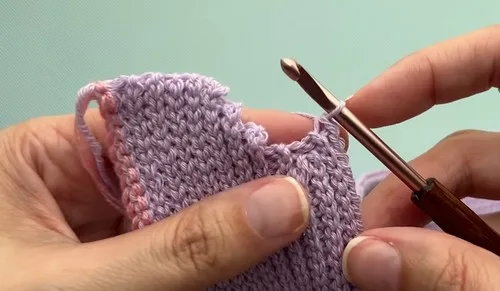
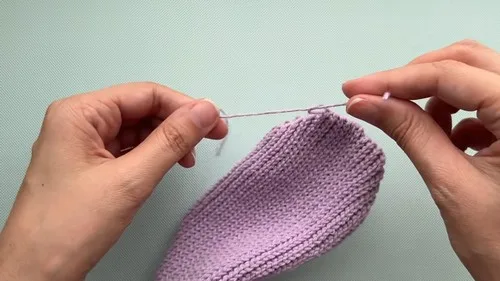
02 · The count run26 rounds across 10 parts, each with its count
US terms throughout. Every row below ends with the count that round finishes on.
| Part | Qty | Finishes on |
|---|---|---|
| Foundation and Cuff | 1 | - |
| First Toe Shaping Section | 1 | - |
| First Heel Gusset | 1 | - |
| Transition Rows and Toe Shaping | 1 | - |
| Continue short rows | 1 | - |
| Second Toe Shaping Section | 1 | - |
| Middle Full Rows | 1 | - |
| Third Toe Shaping Section | 1 | - |
| Second Heel Gusset | 1 | - |
| Final Full Rows and Seaming | 1 | - |
All stitches are worked in slip stitch in the back loop only (BLO). Pattern fits size 36; adjust chain and heel placement for other sizes.
| Round | Instruction | Count |
|---|---|---|
| Foundation chain | Chain 106 using contrasting thread. | - |
| Back bump row | Join main yarn. Ch 1, turn, and work 106 slip stitches in the back bump. | - |
| 10 rows, 106 st | Ch 1, turn, and work 106 slip stitches in BLO for 10 more rows. | - |
| Round | Instruction | Count |
|---|---|---|
| 104 st row | Ch 1, turn. Work 104 slip stitches in BLO, leaving 2 stitches unworked at the end. | - |
Place a marker on the 62nd stitch from the toe end.
| Round | Instruction | Count |
|---|---|---|
| 60 st row | Ch 1, turn, and work 60 slip stitches in BLO to the stitch before the marker. | - |
| Edge join row | Work 2 slip stitches into the vertical edge to join. | - |
| Heel short rows | Work short rows, decreasing by 2 stitches each pair (20, 18, 16, 14, 12, 10, 8, 6, 4, 2). | - |
| Heel join + 26 st | After the final pair, join with 1 slip stitch into the side-bar and work 26 slip stitches across to the cuff edge. | - |
| Round | Instruction | Count |
|---|---|---|
| Transition row | Ch 1, turn. Work slip stitches in BLO, joining over heel steps. Leave 2 stitches unworked at the toe end (82 total). | - |
| 84 st row | Ch 1, turn, and work 84 slip stitches in BLO. | - |
| Round | Instruction | Count |
|---|---|---|
| Row 16 | 80 sl st, leave 2 unworked. | - |
| Row 17 | 80 sl st. | - |
| Row 18 | 78 sl st, leave 2 unworked. | - |
| Row 19 | 78 sl st. | - |
| Round | Instruction | Count |
|---|---|---|
| 2 rows, 78 st | Work 2 rows of 78 sl st. | - |
| Increase rows | Increase gradually: 80, 82, 84, 86 sl st across the next rows, joining over each step. | - |
| 2 rows, 86 st | Work 2 full rows of 86 sl st. | - |
| Round | Instruction | Count |
|---|---|---|
| 18 rows, 86 st | Work 18 rows (10 pairs) of 86 slip stitches in BLO. | - |
| Round | Instruction | Count |
|---|---|---|
| 8 decrease rows | Work 8 rows of decreasing short rows (similar to first toe shaping). | - |
| 6 increase rows | Then work 6 rows of increasing short rows (mirroring previous increases). | - |
| Round | Instruction | Count |
|---|---|---|
| 26 st row | Work 26 slip stitches in BLO. | - |
| Heel short rows | Begin short rows, increasing from 2 to 20 stitches. | - |
| Heel join row | After final pair, join over the step and work 60 slip stitches to edge. | - |
| 104 st row | Ch 1, turn. Work 60 sl st to heel peak, 20 along the gusset edge, then 24 to end (104 total). | - |
| Round | Instruction | Count |
|---|---|---|
| 106 st row | Ch 1, turn. Work 106 slip stitches in BLO across the row. | - |
| 8 rows, 106 st | Work 8 more rows of 106 sl st in BLO.Cut yarn, unravel last row, and use the long tail to seam invisibly using a mattress or precision stitch. | - |
Techniques on this build
- Slip stitch in the back loop only (BLO)
- Worked in every row from the cuff through the toe; consistent loop selection is what produces the knit-like ridge, so check the loop before each insertion.
- Working into the back bump of a foundation chain
- The first row after joining main yarn goes into the back bump of the 106-chain; an inaccurate count here throws off every row that follows.
- Short row heel turn
- The paired decrease sequence (20 through 2) shapes the heel; turn precisely at each pair or the heel cup will not sit square.
- Joining through the vertical edge and side-bar
- Used to close the heel pocket and rejoin to the leg; work into the edge itself, not a loop of the previous row, or a gap opens at the join.
Final fit-up
- Cut yarn, unravel the last row, and use the long tail to seam the long vertical edges together with a mattress or precision stitch, closing the leg and foot into a tube.
- Remove the contrasting foundation thread.
- Weave in all ends, including the main yarn tail at the join.
- Sew the toe closed by whipstitching both edges together and pull tight to shape the toe.
How the parts fit
- The heel turn concentrates all its shaping in the short-row pairs (20, 18, 16, 14, 12, 10, 8, 6, 4, 2), so the heel cup forms from a single tapering wedge rather than a separately worked flap.
- Rows 16 through 19 alternate a decrease row (leaving 2 stitches unworked) with a full row worked straight across — the toe closes in stages rather than every row, which is why the count drops from 80 to 78 only every second row.
- The foundation chain is worked over contrasting thread so it can be removed later, letting the toe close by joining live stitches instead of seaming through a cast-on edge.
Scaling the build
| Larger | Go up a hook size; at a looser gauge than 32-33 stitches per 10 cm the same stitch counts produce a bigger sock. |
|---|---|
| Smaller | Drop to a finer sock yarn and a smaller hook to tighten the gauge above 32-33 stitches per 10 cm, shrinking the finished piece without changing any count. |
| Longer leg | Add extra straight rows to the ten-row cuff section before the heel marker is placed, lengthening the leg above the heel. |
03 · Snag listWhat went wrong on the bench, and the fix
Snag 1
Catching the front loop instead of back
Check which loop sits toward you before each insertion; a single front-loop stitch breaks the ridge line and is easy to spot on the next row.
Snag 2
Miscounting to the 62nd stitch marker
Count from the toe end with the piece flat and place a locking marker rather than counting by eye mid-row.
Snag 3
Working the last 2 stitches instead of leaving them
Treat the 'leave 2 unworked' instruction as a hard stop; these unworked stitches are what shape the toe and heel edges.
Snag 4
Joining side-bar stitches into a loop instead of the edge
Insert the hook into the vertical edge itself at the join rows, not into a stitch loop, to keep the seam gap-free.
04 · QueriesQuestions logged against this build
Why is this sock worked flat instead of in the round?
Working flat lets every row go into the back loop only, which is what produces the knit-stitch look. In continuous rounds the BLO ridge would twist and the pattern would lose its straight vertical lines.
What is the contrasting thread at the start for?
It forms a provisional foundation chain that gets removed later. Once undone, the live stitches are joined directly to close the toe instead of seaming through a cast-on edge.
How is this pattern adjusted for a different foot size?
The note in the pattern points to changing the starting chain length and shifting where the heel marker and short rows fall. This pattern as written fits size 36, so any resize starts with those two reference points.
05 · Made byWho counted this one

Who writes Amigurumi Addict, how a build gets its number, and why every round on the site carries a stitch count.
06 · Next off the benchThree builds that sit near this one

Odds and ends
Crochet a phone bag with strap, flap, and ring closure
How to crochet a phone bag? Join rounds from a 30-chain base, add a strap, flap, and ring.

Odds and ends
Crochet worsted weight socks with a turned heel
How do you crochet socks for winter? Build toe-up in worsted weight with a folded heel and ribbed leg.

Odds and ends
Toe-Up Woodland Walker Crochet Socks With Colorwork Cuff
How do you crochet toe-up socks with a colorwork cuff? Build the Toe, Heel, and stranded Cuff in order.
Join the build log
One message when a build is issued
A drawing and its parts list, when one leaves the bench.