| Shelf | Level | Time | Hook | Yarn |
|---|---|---|---|---|
| Odds and ends | Beginner | 3-4 Hours | 3.5 mm | Worsted |
Easy Crochet Head Scarf Pattern for Beginners
Learn to crochet a stylish head scarf with comfortable straps and decorative edging. This beginner-friendly pattern uses simple dc and sc stitches througho
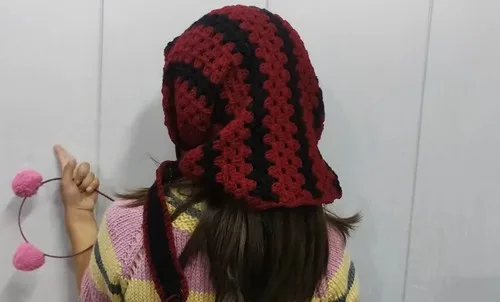
01 · The pieceWhat Easy Crochet Head Scarf Pattern for Beginners actually is
This head scarf pattern creates a comfortable, stylish accessory with two soft straps that tie or wrap around your head, finished off with a clean single crochet edging that frames the whole piece. What makes it special is how customizable it is — worked in a bold black and maroon combo here, but easily swapped for whatever colors match your wardrobe. It's perfect for crocheters who want a fast, satisfying project that actually gets worn on repeat, not tucked away in a drawer.
You'll use only double crochet and single crochet throughout, alternating between the two as you move through the strap sections, the increasing section that shapes the body, and the decreasing section that tapers it back down. Because there's no shaping trickery like invisible decreases or puff stitches, this is genuinely approachable for someone newer to crochet who's comfortable with the basics. Expect to spend somewhere between 3 to 4 hours total, including the edging round.
The finished head scarf lies flat with a gently shaped body between two long straps, giving it a triangular, bandana-like silhouette that ties easily and sits comfortably against the hairline. The maroon single crochet border adds a crisp pop of contrast against the black body, giving it a polished, boutique-quality finish. It makes a lovely quick gift for a friend who loves accessories, or a fun addition to your own handmade wardrobe.
- Start Color A and work the First Strap section using alternating dc and sc rows to build the first tie.
- Move into the Increasing Section, still in Color A, to begin shaping the scarf's body wider.
- Work the Decreasing Section over five rounds to taper the body back down to a point.
- Return to the remaining 5 stitches and repeat the strap sequence for 34 rows to form the second tie.
- Fasten off the second strap once it matches the length of the first.
- Attach Color B at a corner and single crochet evenly all the way around the entire scarf for a clean border.
- Slip stitch to close the edging round, fasten off, and weave in every loose end.
02 · The count run17 rounds across 5 parts, each with its count
US terms throughout. Every row below ends with the count that round finishes on.
| Part | Qty | Finishes on |
|---|---|---|
| Part 1 First Strap (Color A) | 1 | - |
| Increasing Section (Color A) | 1 | (40) |
| Main Body (Color B) | 1 | - |
| Decreasing Section | 1 | (40) |
| Second Strap and Edging | 1 | - |
Make a slip knot and chain 7
| Round | Instruction | Count |
|---|---|---|
| Round 1 | Work 5 dc across | - |
| Round 2 | Chain 1, work 5 sc across | - |
| Rounds 3-34 | Rows 3 to 34: Alternate dc rows and sc rows until 34 rows are completed | - |
| Round | Instruction | Count |
|---|---|---|
| Round 1 | Chain 1, work 2 sc in each stitch across (10 sc) | - |
| Round 2 | Chain 1, work 2 sc in each stitch across (20 sc) | - |
| Round 3 | Chain 1, work 2 sc in each stitch across (40 sc), fasten off with Color B | (40) |
| Round | Instruction | Count |
|---|---|---|
| Round 1 | Chain 2, work 1 dc in each stitch across (40 dc) | - |
| Round 2 | Chain 2, work 1 dc in next stitch, then repeat 1 dc, 2 dc in next stitch across (60 dc) | - |
| Round 3 | Chain 3, skip 2 stitches, work 3 dc cluster in next stitch, repeat across, end with 2 dc and 1 dc in turning chainFollowing Rows: Chain 3, work 3 dc clusters in spaces between clusters of previous row Continue granny stitch pattern for 34 rows or desired length | - |
| Round | Instruction | Count |
|---|---|---|
| Round 1 | (Color B): Chain 2, work 1 dc, then repeat 1 dc, dc2tog across (40 stitches) | (40) |
| Round 2 | (Color B): Chain 2, work 1 dc across (40 dc), fasten off with Color A | (40) |
| Round 3 | (Color A): Chain 1, sc2tog across (20 sc) | - |
| Round 4 | (Color A): Chain 1, sc2tog across (10 sc) | - |
| Round 5 | (Color A): Chain 1, sc2tog across (5 sc) | - |
| Round | Instruction | Count |
|---|---|---|
| Round 1 | Using remaining 5 stitches, repeat strap sequence from Part 1, alternating dc and sc rows for 34 rows, then fasten off | - |
| Round 2 | Attach Color B at corner and work sc evenly around entire scarfStep by step Along sides, place 2 sc in each dc row side and 1 sc in each sc row side | - |
| Round 3 | Slip stitch to join, fasten off, and weave in ends | - |
03 · Before it goes to a childWhat has to be right, and what is allowed to drift
- 💡 Place a stitch marker at the start of each round in the Increasing and Decreasing Sections so you always know where your round begins, since it's easy to lose track when the stitch count is changing.
- 💡 When you attach Color B at the corner for the edging, leave a longer tail than usual (about 6 inches) so you have plenty of room to weave in securely without it coming loose.
- 💡 Block the finished scarf gently by pinning it into shape and misting with water — this helps the dc and sc rows sit flat and gives the edging a crisp, professional line.
- 💡 Try both straps on before fastening off the second one to make sure the length feels comfortable for tying, since head sizes vary and the pattern is easy to adjust on the fly.
04 · Snag listWhat went wrong on the bench, and the fix
Snag 1
Losing track of which row is a dc row
Use a stitch marker or a sticky note to mark every 4th or 5th row, or keep a simple tally on paper as you go so you never lose the alternating rhythm.
Snag 2
Working the two straps to different
Count and record your total row number for the first strap, then match that exact count when working the second strap from the remaining 5 stitches.
Snag 3
Uneven edging around the scarf
Remember to place 2 sc in each dc row side and only 1 sc in each sc row side — this ratio keeps the border from puckering or rippling.
Snag 4
Color B bleeding into Color A stitches
Attach Color B cleanly at the corner with a fresh slip knot rather than trying to carry it up from the last Color A stitch, and weave in that end separately.
Snag 5
Skipping or missing the slip stitch
Always slip stitch into your very first sc of the round to close it neatly before fastening off, checking that the join sits flush with the rest of the border.
Snag 6
Tension tightening up unexpectedly
Pause every few rows to check your gauge against earlier rows, and consciously relax your hook grip when moving from the taller dc into the shorter sc.
05 · QueriesQuestions logged against this build
What yarn weight works best for this head scarf pattern?
A worsted weight yarn pairs perfectly with the 3.5 mm hook called for in this pattern, giving you sturdy fabric that holds its shape without being stiff. Cotton-acrylic blends work especially well since they hold their form nicely for wearable accessories.
Can I make this scarf with just one color instead of two?
Absolutely — simply use Color A for the entire piece, including the edging round, for a more subtle, monochromatic look. The contrast edging is a lovely design choice but isn't required for the pattern to work structurally.
How long are the straps on this head scarf?
The straps are worked for 34 rows alternating between dc and sc, which gives enough length to comfortably tie behind your head or at the nape of your neck. If you want extra length for a bigger bow, you can add a few more rows evenly to both straps.
Do I need any special stitches or techniques for this pattern?
No — this pattern only uses double crochet and single crochet stitches, making it very approachable for beginners. There's no need for invisible decreases, puff stitches, or other advanced techniques.
How do I keep the edging looking neat and even?
The key is following the placement guide exactly: 2 sc in each dc row side and 1 sc in each sc row side as you work around the scarf. This ratio compensates for the different heights of dc and sc rows so your border lies flat instead of rippling or puckering.
Original pattern: https://crocheteverything.com/easy-crochet-head-scarf-pattern-for-beginners/
06 · Made byWho counted this one

Who writes Amigurumi Addict, how a build gets its number, and why every round on the site carries a stitch count.
07 · Next off the benchThree builds that sit near this one

Odds and ends
Crochet a phone bag with strap, flap, and ring closure
How to crochet a phone bag? Join rounds from a 30-chain base, add a strap, flap, and ring.

Odds and ends
Crochet worsted weight socks with a turned heel
How do you crochet socks for winter? Build toe-up in worsted weight with a folded heel and ribbed leg.

Odds and ends
Toe-Up Woodland Walker Crochet Socks With Colorwork Cuff
How do you crochet toe-up socks with a colorwork cuff? Build the Toe, Heel, and stranded Cuff in order.
Join the build log
One message when a build is issued
A drawing and its parts list, when one leaves the bench.