| Shelf | Level | Time | Hook | Yarn |
|---|---|---|---|---|
| Odds and ends | Intermediate | 8-12 Hours | 4.0 mm | Worsted |
Dusty Rose Romantic Crochet Bell Top Free Pattern
Crochet a romantic dusty rose bell top with lace panels, ribbed neckline, and dimensional roses. Free intermediate pattern with row-by-row lace instruction
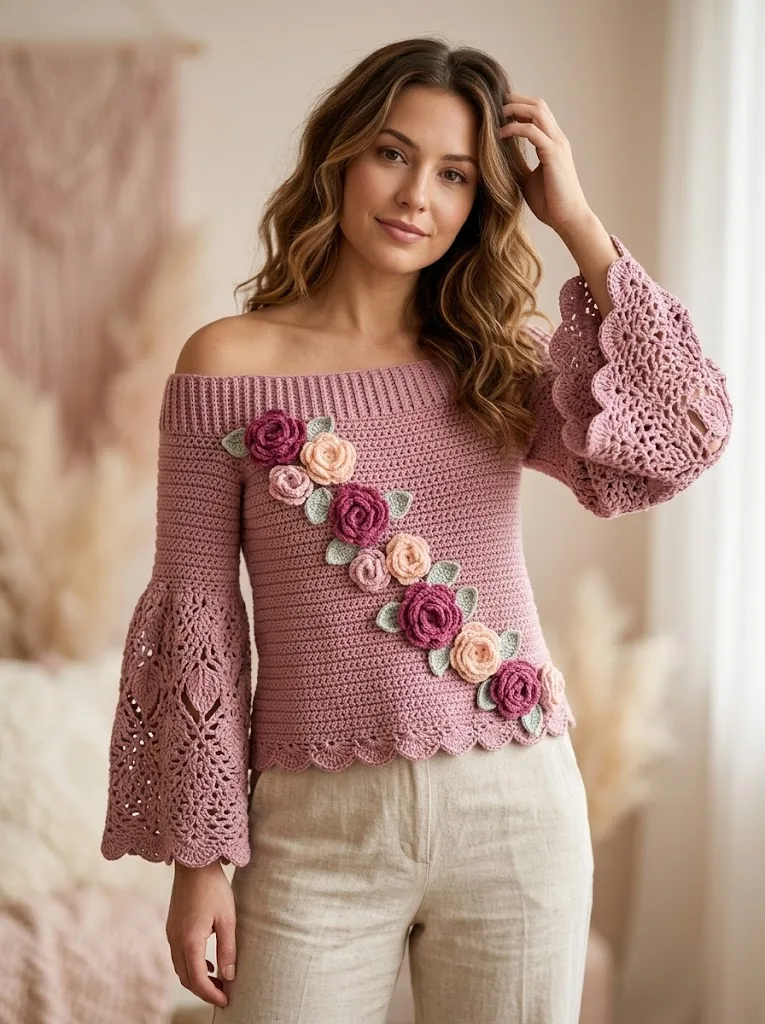
01 · The pieceWhat Dusty Rose Romantic Crochet Bell Top Free Pattern actually is
This Dusty Rose Romantic Crochet Bell Top is the kind of garment that makes people ask where you bought it, until you tell them you made it yourself. Between the ribbed neckband, the leaf-motif lace bell panels, and the trio of coiled roses in burgundy, dusty pink, and blush, this top blends texture and femininity in a way that feels both handmade and elevated. It's perfect for the crocheter who wants a garment project that still feels special the fifth time they wear it, not just the first.
You'll work through a Body Front and Back Panel, a Ribbed Neckband worked in back loops only for that knit-like stretch, two Lace Bell Panels with shell stitch detailing, a Scalloped Body Hem, Spaghetti Straps, and a set of Coiled Roses with Leaves to finish. The lace sections require some concentration since they're written row by row, but the roses are genuinely beginner friendly once the coiling technique clicks. Expect somewhere around 8 to 12 hours total, spread across a few relaxed sessions rather than one sitting.
The finished top is shown in a Small, with a soft dusty rose body, romantic bell sleeves, and dimensional florals clustered for visual impact. It has that rare combination of polish and warmth, structured enough to look intentional, soft enough to feel like your favorite worn-in tee. Pair it with jeans, a flowy skirt, or a slip dress, and it also makes a genuinely lovely handmade gift for a rose-loving friend or a milestone birthday.
- Crochet the Body Front Panel first, working through all seven rounds to establish the main silhouette.
- Work the Body Back Panel to match, then set both pieces aside for assembly later.
- Add the Ribbed Neckband, working both rounds into the back loop only for a stretchy, textured edge.
- Crochet the two Lace Bell Panels row by row, taking your time through the shell stitch repeats.
- Steam block the lace panels gently to open up the shell pattern before attaching them to the body.
- Work the Scalloped Body Hem around the bottom edge for a finished, professional-looking border.
- Make the Spaghetti Straps, then pin them in place and try the top on to check fit before sewing.
- Coil your Crocheted Roses and stitch on the Leaves, clustering them onto the top as your finishing detail.
02 · The count run22 rounds across 8 parts, each with its count
US terms throughout. Every row below ends with the count that round finishes on.
| Part | Qty | Finishes on |
|---|---|---|
| Part 1: Body Front Panel | 1 | - |
| Part 3: Ribbed Neckband | 1 | - |
| Part 4: Lace Bell Panels (make 2) | 1 | - |
| Part 5: Scalloped Body Hem | 1 | - |
| Part 7: Crocheted Roses | 1 | - |
| Part 8: Leaves (make 12 to 15) | 1 | - |
| Part 2: Body Back Panel | 1 | - |
| Part 6: Spaghetti Straps (make 2) | 1 | - |
The body is worked flat in rows, then seamed at the sides.
Foundation: With MC and 4.0mm hook, ch 78.
| Round | Instruction | Count |
|---|---|---|
| Round 1 | Sc in 2nd ch from hook and in each ch across. (77 sc) | - |
| Round 2 | Ch 1, turn. Sc in each st across. (77 sc) | - |
| Round 3 | through 50: Repeat Row 2. (77 sc each row) You should now have a rectangle approximately 17 inches wide and 10 inches tall. | - |
Shape for Underarm:
| Round | Instruction | Count |
|---|---|---|
| Round 51 | Ch 1, turn. Sk first 5 sts, sc in next 67 sts, leave last 5 sts unworked. (67 sc) | - |
| Round 52 | through 60: Ch 1, turn. Sc in each st across. (67 sc) | - |
Divide for Neckline:
| Round | Instruction | Count |
|---|---|---|
| Round 61 | Ch 1, turn. Sc in first 25 sts. Leave remaining sts unworked. (25 sc) — this is the left shoulder. | - |
| Round 62 | through 65: Continue on these 25 sts, decreasing 1 st at neck edge each row. (21 sc after Row 65)Rows 66 through 70: Work even on 21 sts. Fasten off. Rejoin yarn to work right shoulder, skipping center 17 sts for neckline. Work Rows 61 through 70 in mirror image. | - |
The neckband is worked separately and sewn on. This creates that beautiful stretch and texture.
Foundation: Ch 12.
| Round | Instruction | Count |
|---|---|---|
| Round 1 | Sc in 2nd ch from hook and in each ch across. (11 sc) | - |
| Round 2 | Ch 1, turn. Working in BLO, sc in each st across. (11 sc) Repeat Row 2 until piece measures approximately 30 inches or stretches comfortably around entire neckline opening.Fasten off, leaving long tail for seaming. | - |
These dramatic sleeves are the star of the show. Each panel is worked flat, then attached along the side seams.
Foundation: With MC, ch 42.
| Round | Instruction | Count |
|---|---|---|
| Round 1 | Dc in 4th ch from hook, dc in each ch across. (40 dc) | - |
| Round 2 | Ch 3 (counts as dc), turn. Dc in each st across. (40 dc) | - |
| Round 3 | Ch 3, turn. Dc in next 3 sts. *Ch 2, sk 2, dc in next 4 sts.* Repeat from * across. (40 sts including ch spaces) | - |
| Round 4 | Ch 3, turn. *Dc in each dc, 2 dc in ch-2 sp.* Repeat across. (40 dc)Row 5 through 8: Repeat Rows 3 and 4 twice more. | - |
| Round 9 | Ch 5, turn. Sk 2, dc in next st. *Ch 2, sk 2, dc in next st.* Repeat across. (14 dc, 13 ch-2 sps) | - |
| Round 10 | Ch 3, turn. 5 dc in first ch-2 sp (shell made). *Sc in next ch-2 sp, 5 dc in next ch-2 sp (shell).* Repeat across. | - |
| Round 11 | Ch 6, turn. Sc in center dc of first shell. *Ch 5, sc in center dc of next shell.* Repeat across. | - |
| Round 12 | through 20: Continue alternating shell rows and chain loop rows, gradually increasing the shells to create the leaf fan shapes visible in the photo.Scalloped Edge: Final Row: *7 dc in ch-5 sp, sl st between shells.* Repeat across to create scalloped bottom edge. | - |
With right side facing, join MC to bottom edge of body.
| Round | Instruction | Count |
|---|---|---|
| Round 1 | Sc evenly around entire bottom edge, working approximately 3 sc per 2 row ends. Join with sl st. | - |
| Round 2 | Ch 1. *Sc in next st, sk 2, 5 dc in next st (shell), sk 2.* Repeat around. Join. | - |
| Round 3 | *Sc in center dc of shell, ch 3, sc in next sc, ch 3.* Repeat around. Join. Fasten off. | - |
These dimensional roses are easier than they look. You create a ruffled strip, then coil it into a rose shape.
Large Rose (make 4 in assorted colors): Ch 40.
| Round | Instruction | Count |
|---|---|---|
| Round 1 | Dc in 4th ch from hook. *3 dc in next ch.* Repeat across. The strip will ruffle dramatically.Fasten off, leaving 12 inch tail. Coil the strip starting from the beginning (tighter center), stitching through the bottom as you go to secure. The ruffles become petals. | - |
Foundation: With sage green, ch 10.
| Round | Instruction | Count |
|---|---|---|
| Round 1 | Sl st in 2nd ch from hook, sc in next, hdc in next, dc in next 2, hdc in next, sc in next, sl st in last. Ch 1, do not turn. Working along opposite side of foundation chain, sl st, sc, hdc, dc, dc, hdc, sc, sl st.This creates a pointed leaf shape. Fasten off, leaving tail for attaching. | - |
Work exactly as Front Panel through Row 60.
Row 61 through 70: Continue working straight across all 67 sts without neckline shaping. The back neckline will be created by the ribbed neckband.
Fasten off.
Method: Ch 100. Sl st in 2nd ch from hook and in each ch across. Fasten off.
This creates a firm, thin strap approximately 14 inches long. Adjust chain count for your preferred length.
03 · Putting it togetherHow the pieces go together
- S1
Step 1: Block all pieces lightly. Pin body panels with wrong sides together and seam side edges using mattress stitch or slip stitch through both loops.
- S2
Step 2: Attach lace bell panels along side seams, positioning so they drape from underarm to hem.
- S3
Step 3: Seam ribbed neckband into a loop. Pin evenly around neckline opening with seam at center back. Whip stitch in place, stretching slightly as you go.
- S4
Step 4: Attach straps to front and back of neckband, approximately 4 inches from center on each side. Try on and adjust placement for your shoulders.
- S5
Step 5: Arrange roses and leaves in a cascading diagonal line from upper left toward lower right (as shown in photo). Pin in place. Once satisfied, stitch each piece securely to the body using yarn tails and tapestry needle.
- S6
Step 6: Weave in all ends. Block finished garment if desired.
04 · Before it goes to a childWhat has to be right, and what is allowed to drift
- 💡 Use a 4.0mm hook for the Body Front and Back Panels and Lace Bell Panels, but don't be afraid to drop down half a size for the Coiled Roses if your petals are looking limp instead of ruffled.
- 💡 Place a stitch marker at the start of each round on the Body Front Panel and Ribbed Neckband so you never lose track of where your rounds begin, especially since the neckband is worked in back loops only.
- 💡 Work up one Coiled Rose before committing to the full set of roses in Rose Dark, Rose Medium, and Rose Light, since the coiling technique takes a practice piece to click.
- 💡 Steam block the Lace Bell Panels before assembly so the shell stitch pattern relaxes open, making the leaf motif visible and giving the sleeves proper drape.
- 💡 Leave long tails, at least 8-10 inches, when fastening off any piece meant for sewing, including the roses, leaves, and straps, to save yarn and make assembly far less fiddly.
- 💡 Pin your Spaghetti Straps and try the top on before sewing them permanently, adjusting length as needed since fit varies significantly between bodies.
05 · Snag listWhat went wrong on the bench, and the fix
Snag 1
Skipping a swatch and working the lace panels at the wrong gauge
Since the Lace Bell Panels rely on shell stitches opening up evenly, work a small swatch first and steam block it before committing to all 8 rounds, adjusting your hook size if the shells look tight or sloppy.
Snag 2
Working the Ribbed Neckband into both loops instead of back loop only
Double-check each stitch of the neckband rounds; if you accidentally work into both loops, the ribbing will lie flat instead of forming the stretchy ridges the pattern relies on, so rip back and redo that round.
Snag 3
Not leaving long enough tails when fastening off the roses, leaves, or straps
Leave at least 8-10 inches of tail on any piece meant to be sewn on, since short tails make it nearly impossible to securely attach roses and leaves without weaving in extra yarn.
Snag 4
Attaching straps before trying the top
Pin the Spaghetti Straps in place first and try the top on to check fit and strap length before sewing them permanently, since body shapes vary and this pattern specifically calls for trying on as you go.
Snag 5
Skipping the steam blocking step on the lace panels
Gently steam the Lace Bell Panels before attaching them to the body; skipping this step leaves the shell stitch pattern looking bunched and closed rather than open and airy.
06 · VariantsOther ways to issue this one
This pattern is wonderfully adaptable once you understand the individual pieces. For a bolder look, swap the dusty rose main color for a deep terracotta or rust with roses in mustard, cream, and burnt orange for an autumn-inspired version. A crisp white MC with roses in coral, seafoam, and buttercream reads as a fresh summer garden party top. For yarn substitutions, 24/7 Cotton and Paintbox Cotton DK are both listed, but Scheepjes Catona or We Crochet Dishie work beautifully too since they hold stitch definition well for the lace panels and roses alike. If you want fewer roses for a more minimalist look, cluster just 2-3 near one shoulder instead of covering a wider area, and reduce your Leaves batch from 12-15 down to 6-8 to match. For a cooler-weather version, work the Spaghetti Straps pattern into slightly wider straps for more coverage, or add a simple single crochet border around the armholes for a cap-sleeve feel instead of relying solely on the bell panels for arm coverage. Sizing up is mostly about adjusting your Body Front and Back Panel width and rechecking your Ribbed Neckband length against your own measurements before sewing, since the pattern encourages trying it on as you go. You could also make the roses in a single monochrome palette, three tonal pinks instead of the burgundy-to-blush gradient, for a softer, more subtle floral effect. And if cotton drape isn't your priority, a cotton-linen blend gives the bell sleeves an even airier, more textured movement.
I love this pattern because it proves you don't need advanced techniques to make something that looks intricate. The Back Loop Only ribbing on the neckband is such a simple trick, working into just the back loop, but it completely transforms the edge into something that mimics knit ribbing, stretchy and textured against the skin. Then there's the Coiled Rose technique: you crochet a long ruffled strip, coil it up, and suddenly you have a dimensional flower that looks like it took hours but really just takes patience. Layering three shades, burgundy, dusty pink, and pale peach, gives the roses depth instead of flatness. The Lace Bell Panels are where the real payoff happens; the shell stitches open up into this airy, leaf-like drape once you steam block them, and watching that transformation is deeply satisfying. Even the Scalloped Hem, just three rounds, gives the whole piece that finished, boutique-quality edge. This is a project that rewards slow, careful making, and every part of it, from the ribbing to the roses, teaches you something you'll reach for again.
07 · QueriesQuestions logged against this build
Is this pattern really okay for a first garment?
Yes, as long as you're comfortable with basic stitches and reading patterns, this can absolutely be your first garment. The lace rows are written out row by row so you're never guessing, and the roses are genuinely beginner friendly once you practice one.
What yarn works best for this top?
The pattern recommends 100% cotton or a cotton/acrylic blend like 24/7 Cotton, Paintbox Yarns Cotton DK, or Drops Safran. Cotton holds the structure of the lace panels better than pure acrylic and gives the bell sleeves that beautiful drape.
How many roses do I need to make?
The pattern calls for a set of Crocheted Roses paired with 12 to 15 Leaves, giving you enough to create a full dimensional cluster. You can always make fewer roses and fewer leaves if you prefer a more minimal floral accent.
How do I make sure the straps are the right length?
Pin the Spaghetti Straps in place and try the top on before sewing anything permanently, since the pattern specifically recommends checking fit as you go. Bodies vary quite a bit, so this step saves you from unpicking finished seams later.
Original pattern: https://crochetwithmia.com/dusty-rose-romantic-crochet-bell-top-free-pattern/
08 · Made byWho counted this one

Who writes Amigurumi Addict, how a build gets its number, and why every round on the site carries a stitch count.
09 · Next off the benchThree builds that sit near this one

Odds and ends
Crochet a phone bag with strap, flap, and ring closure
How to crochet a phone bag? Join rounds from a 30-chain base, add a strap, flap, and ring.

Odds and ends
Crochet worsted weight socks with a turned heel
How do you crochet socks for winter? Build toe-up in worsted weight with a folded heel and ribbed leg.

Odds and ends
Toe-Up Woodland Walker Crochet Socks With Colorwork Cuff
How do you crochet toe-up socks with a colorwork cuff? Build the Toe, Heel, and stranded Cuff in order.
Join the build log
One message when a build is issued
A drawing and its parts list, when one leaves the bench.