| Shelf | Level | Time | Hook | Yarn |
|---|---|---|---|---|
| Odds and ends | Intermediate | 4-6 Hours | 1.75 mm | Worsted |
Crochet Tree Garland Pattern For Holiday Decor
Make a charming crochet tree garland with this easy pattern featuring two-color trees, simple assembly, and cozy handmade holiday decor charm.
01 · The pieceWhat Crochet Tree Garland Pattern For Holiday Decor actually is
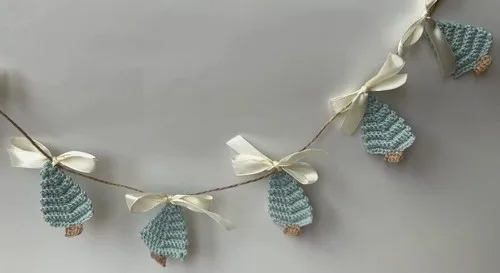
This crochet tree garland pattern turns simple rounds of stitches into a string of sweet little trees perfect for dressing up any space during the holiday season. What makes it so special is how quickly a handful of small trees comes together into a garland that feels both handmade and polished. It's an ideal project for crocheters who want a fast, satisfying make that doubles as decor for a mantel, doorway, or festive table setting.
You'll work through a 13-round main pattern to build the tree shape, followed by a shorter 2-round piece, using two yarn colors to create contrast between the trunk and foliage. Expect to practice steady round counting, color changes, and simple shaping as the tree narrows toward the top. This is a comfortable intermediate-level project, and most crocheters can finish a full garland of trees in a single weekend or a few relaxed evenings.
The finished garland strings together multiple two-toned trees along natural twine and satin ribbon, creating a rustic-meets-elegant look that suits farmhouse, cottagecore, or classic holiday styling. Each tree has a soft, huggable texture thanks to worsted-weight yarn, and the whole strand feels substantial without being heavy. It makes a lovely handmade gift for hosts, teachers, or fellow crochet lovers who appreciate a thoughtful, one-of-a-kind decoration.
- Start each little tree by working the main pattern in the round to build up its tapered shape over thirteen rounds.
- Finish the top of the tree with the shorter two-round piece to close off the shape neatly.
- Weave in all yarn tails securely so the color-changed sections stay tidy and won't unravel later.
- Repeat the tree-making process for as many trees as you'd like your garland to include.
- Lay the finished trees out in your desired order and spacing before attaching anything permanently.
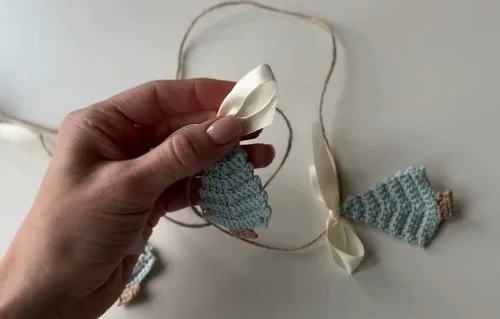
- Thread natural twine and satin ribbon through the top of each tree to string them together.
- Knot the twine and ribbon on either side of each tree to hold spacing and hang your finished garland.
02 · The count run15 rounds across 2 parts, each with its count
US terms throughout. Every row below ends with the count that round finishes on.
| Part | Qty | Finishes on |
|---|---|---|
| Tree Pattern | 1 | - |
| Trunk Pattern | 1 | - |
Foundation Chain 15
| Round | Instruction | Count |
|---|---|---|
| Row 1 | single crochet 14, chain 1 | - |
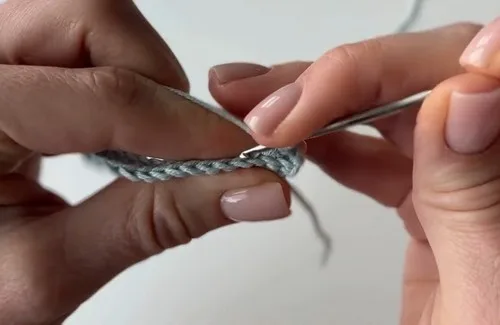
| Row 2 | back loop only 6 sc, 1 dec, 6 sc, chain 1 | - |
| Row 3 | back loop only 5 sc, 1 dec, 6 sc, chain 1 | - |
| Row 4 | back loop only 5 sc, 1 dec, 5 sc, chain 1 | - |
| Row 5 | back loop only 4 sc, 1 dec, 5 sc, chain 1 | - |
| Row 6 | back loop only 4 sc, 1 dec, 4 sc, chain 1 | - |
| Row 7 | back loop only 3 sc, 1 dec, 4 sc, chain 1 | - |
| Row 8 | back loop only 3 sc, 1 dec, 3 sc, chain 1 | - |
| Row 9 | back loop only 2 sc, 1 dec, 3 sc, chain 1 | - |
| Row 10 | back loop only 2 sc, 1 dec, 2 sc, chain 1 | - |
| Row 11 | back loop only 1 sc, 1 dec, 2 sc, chain 1 | - |
| Row 12 | back loop only 1 sc, 1 dec, 1 sc, chain 1 | - |
| Row 13 | decrease using 3 chains Secure with 1 chain, cut yarn, hide tail | - |
Setup Join second color to bottom
| Round | Instruction | Count |
|---|---|---|
| Row 1 | single crochet 4 | - |
| Row 2 | single crochet 4 Secure yarn and hide tail | - |
03 · Putting it togetherHow the pieces go together
- S1
Attach trees evenly along twine
- S2
Thread satin ribbon through twine and top of tree
- S3
Tie ribbon into a bow and trim
- S4
Repeat for remaining trees
04 · Before it goes to a childWhat has to be right, and what is allowed to drift
- 💡 Use a 1.75mm hook consistently throughout both the 13-round and 2-round pattern pieces to keep your tree sizes matching across the whole garland.
- 💡 Keep a small stitch marker set on hand — marking the beginning of each round makes the 13-round main pattern much easier to track without losing your place.
- 💡 Block your finished trees lightly with a warm iron on a low setting or a light steam to help them sit flat and even before stringing them onto the garland.
- 💡 Cut your natural twine and satin ribbon a few inches longer than you think you'll need, since threading multiple trees plus tying finished ends uses more length than expected.
- 💡 Test your color combination on one full tree before committing to yarn for the entire garland, since some color pairings read very differently once trunk and foliage are joined.
05 · Snag listWhat went wrong on the bench, and the fix
Snag 1
Losing track of round count
Place a stitch marker in the first stitch of every round and move it up as you go, so you always have a quick visual reference for where each new round begins.
Snag 2
Working the short 2-round piece
Check your tension against the main pattern rounds and consider going up a partial hook size if the 2-round piece feels noticeably tighter.
Snag 3
Trees coming out different sizes
Crochet a couple of trees in one sitting when possible, or warm up with a few practice stitches before starting a new tree to reset your tension.
Snag 4
Threading the twine or ribbon through
Lay all finished trees out on a flat surface in your desired order and spacing before threading, adjusting placement until the arrangement looks balanced.
Snag 5
Leaving yarn tails unwoven
Weave in every tail securely along the color-change line using a needle, running it through several stitches in both directions for extra hold.
06 · VariantsOther ways to issue this one
This garland is endlessly customizable, so don't be afraid to make it your own! For a classic holiday palette, try a deep pine green for the tree body with a rich brown or tan for the trunk portion — Vanna's Choice or Super Saver in 'Hunter Green' and 'Café Latte' work beautifully. Want a winter wonderland vibe instead? Swap in white or icy blue yarn with silver metallic thread held together for a frosty sparkle. For a farmhouse look, use cream and burlap-tone yarns and lean into the natural twine for stringing rather than ribbon. If you're making this for a non-holiday occasion, consider a rainbow gradient garland using leftover scraps in pink, yellow, and turquoise for a year-round nursery or party decoration. Size-wise, if you want mini trees for a smaller display, try dropping down to a 1.5mm hook and reducing your starting stitch count slightly in the first few rounds, keeping the same shaping ratio throughout the 13 rounds. For oversized statement trees, size up to a 2.25mm hook with a light worsted or DK yarn and expect each tree to grow proportionally larger without changing your round count. You can also vary spacing along the garland — cluster trees close together for a fuller look, or space them 4-6 inches apart along the twine for a more minimalist, airy display. Adding small pom-poms, tiny wooden beads, or a single jingle bell at the base of each tree between garland pieces is another easy way to personalize the finished piece for gifting or your own home.
I adore this pattern because it takes something as simple as a tiny crocheted tree and turns it into a showstopping garland with almost no fuss. Working through the 13 rounds of the main tree body is deeply satisfying — you can watch the shape narrow and take form round by round, and the color change between your two yarns gives each tree that classic trunk-and-foliage look without any fiddly intarsia. The quick 2-round piece adds just enough detail to finish the shape off beautifully. What really gets me excited is the assembly: stringing the finished trees onto natural twine and satin ribbon feels like the fun, creative payoff after all that careful stitching. It's the kind of project where the individual pieces are small and portable enough to crochet on the go, but the finished garland makes a huge visual impact once it's draped across a mantel or doorway. Plus, since you're making multiple trees, it's a great pattern for practicing consistency in your gauge and color changes — by the third or fourth tree, your stitches will look wonderfully uniform.
07 · QueriesQuestions logged against this build
What yarn weight works best for this crochet tree garland?
A worsted-weight yarn paired with the 1.75mm hook gives the trees a firm, well-defined shape that holds up nicely on a garland. If you prefer a denser, more amigurumi-like texture, you can experiment with a slightly smaller hook for tighter stitches.
How many trees do I need to make a full garland?
This depends entirely on how long you'd like your finished garland and how closely you space the trees along the twine. A mantel-length garland typically looks full with anywhere from 6 to 10 trees, but you can make as many or as few as your space calls for.
Can I use one color instead of two for the trees?
Absolutely — while the pattern is designed with two colors to distinguish the trunk from the tree body, a single solid color still looks charming and simplifies the color-change steps considerably.
Is this pattern suitable for someone newer to crochet?
It's rated intermediate mainly because of the color changes and consistent round shaping across 13 rounds, but a confident beginner who has practiced basic increases and decreases should be able to follow along with a little patience.
What's the best way to attach the finished trees to the twine?
Most crocheters thread the twine or ribbon directly through a stitch near the top of each tree using a yarn needle, then knot it securely on both sides to keep the spacing in place. This method keeps the trees sitting upright and prevents them from sliding along the garland.
Original pattern: https://crocheteverything.com/crochet-tree-garland-pattern-for-holiday-decor/
08 · Made byWho counted this one

Who writes Amigurumi Addict, how a build gets its number, and why every round on the site carries a stitch count.
09 · Next off the benchThree builds that sit near this one

Odds and ends
Crochet a phone bag with strap, flap, and ring closure
How to crochet a phone bag? Join rounds from a 30-chain base, add a strap, flap, and ring.

Odds and ends
Crochet worsted weight socks with a turned heel
How do you crochet socks for winter? Build toe-up in worsted weight with a folded heel and ribbed leg.

Odds and ends
Toe-Up Woodland Walker Crochet Socks With Colorwork Cuff
How do you crochet toe-up socks with a colorwork cuff? Build the Toe, Heel, and stranded Cuff in order.
Join the build log
One message when a build is issued
A drawing and its parts list, when one leaves the bench.