| Shelf | Level | Time | Hook | Yarn |
|---|---|---|---|---|
| Odds and ends | Intermediate | 4-6 Hours | 18 mm | Worsted |
Crochet Teddy Bear in Pajamas Pattern: Cozy Amigurumi Friend
Make an adorable crochet teddy bear in pajamas with bunny booties, a knit hat, and a cozy scarf. A detailed amigurumi pattern for a snuggly nursery gift.
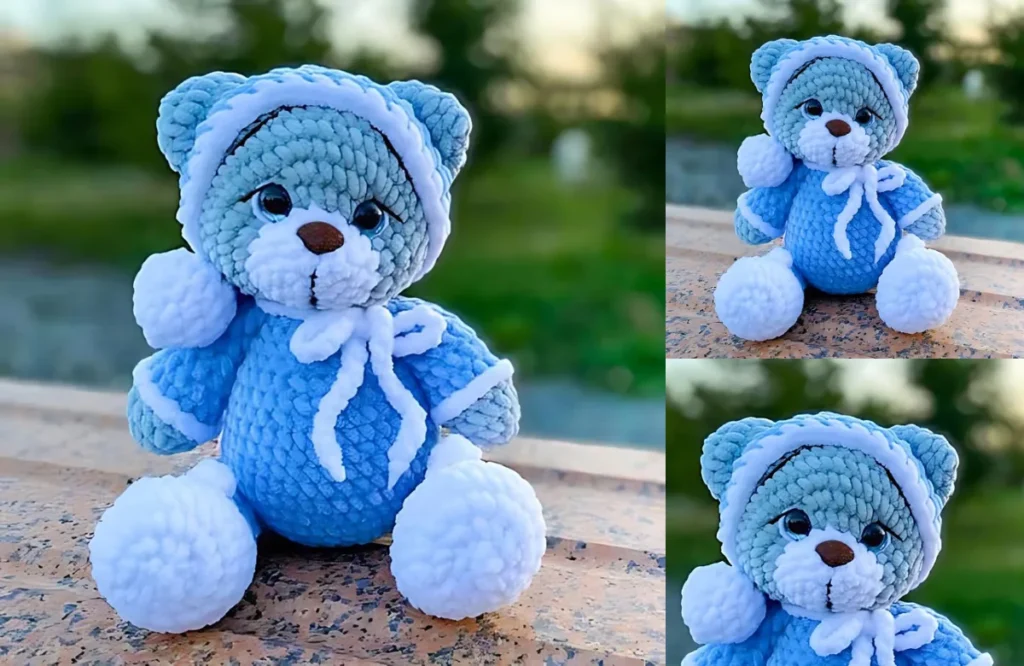
01 · The pieceWhat Crochet Teddy Bear in Pajamas Pattern: Cozy Amigurumi Friend actually is
This pattern builds a plush teddy bear dressed head to toe for bedtime, complete with a knitted-look hat, a jaunty pompom, a simple scarf, and the sweetest detail of all — tiny crocheted bunny booties worked right into the legs. It's the kind of amigurumi that feels like a finished character the moment you set down the hook, perfect for crocheters who love toys with personality and a story built right into the stitches.
You'll work entirely in the round using magic rings, single crochet, half double crochet, increases, and decreases, plus a color-change technique for the booties and a fold-and-close seam on the arms. With nine separate pieces including a 25-round hat, this is best suited to someone who has finished at least one or two amigurumi before, set aside for a relaxed weekend of stitching over a few sittings.
The finished bear stands as a soft, huggable plush with a rounded head, jointed limbs for gentle posability, and a fully dressed silhouette that reads instantly as "ready for bed." Stuffed with holofiber for that cloud-like squish, he's substantial enough to be a keepsake nursery decoration and soft enough to be a real, loved lovey — a gift that feels handmade in the best way.
- Start with the legs, working each one in the round and shaping a bunny bootee with a color change partway through.
- Crochet the arms in matching pairs, then fold each one flat and single crochet the opening closed for a neat seam.
- Work the small ears and tail separately, finishing each with a slip stitch and a long tail for sewing later.
- Build the body and head as the two largest pieces, stuffing firmly with holofiber as the rounds progress.
- Insert the safety eyes and nose into the head before closing it up completely.
- Join the arms and legs to the body using safety joints so the finished bear can be posed.
- Crochet the tall hat over many rounds, starting with a small pompom, then top it with the finished pompom for the finishing touch.
- Add the simple one-round scarf around the neck to complete the sleepy pajama look.
02 · The count run91 rounds across 8 parts, each with its count
US terms throughout. Every row below ends with the count that round finishes on.
| Part | Qty | Finishes on |
|---|---|---|
| Legs | 2 | - |
| Arms | 2 | - |
| Ears | 2 | - |
| Tail | 1 | - |
| Scarf | 1 | - |
| Body | 1 | - |
| Head | 1 | - |
| Hat | 1 | - |
There are white crochet bunny booties on the feet.
Color changes in the last stitch of round 9.
Stitch 6 and 8 are done under the ears of the bootee.
You can start stuffing from round 12.
Stuff the leg as needed.
Between round 6 and round 7, insert the joint.
Close the hole after round 17.
| Round | Instruction | Count |
|---|---|---|
| Round 1 | 6 sc in a MR. (6) | - |
| Round 2 | 6 inc. (12) | - |
| Round 3 | 12 inc. (24) | - |
| Round 4-6 | 24 sc. (24) | - |
| Round 7 | 6 sc, 6 dec, 6 sc. (18) | - |
| Round 8 | 5 sc, 4 dec, 5 sc. (14) | - |
| Round 9 | 6 sc, 4 ch, from the second chain stitch from the hook 4 hdc, 1 slst, 1 sc, 4 ch, from the second chain stitch from the hook 4 hdc, 6 sc. (13) | - |
| Round 10 | 13 sc. | - |
| Round 11-15 | 13 sc. (13) | - |
| Round 16 | Dec, 5 sc, dec, 6 sc. | - |
| Round 17 | 5 dec. | - |
Color changes in the last stitch of round 4.
Fold in half and crochet 4 sc through both sides to close.
| Round | Instruction | Count |
|---|---|---|
| Round 1 | 6 sc in a MR. (6) | - |
| Round 2 | 6 inc. (12) | - |
| Round 3 | (5 sc, inc) x 2. (14) | - |
| Round 4 | 14 sc. | - |
| Round 5 | Dec, 6 sc, inc, 5 sc. (14) | - |
| Round 6 | 6 sc, dec, 5 sc, dec. (12) | - |
| Round 7 | 12 sc. | - |
| Round 8 | 5 sc, dec, 4 sc, dec. (10) | - |
| Round 9 | 4 sc, dec, 4 sc. (9) | - |
| Round 10-11 | 9 sc. (9) | - |
| Round | Instruction | Count |
|---|---|---|
| Round 1 | 6 sc in a MR. (6) | - |
| Round 2 | 6 inc. (12) | - |
| Round 3 | (1 sc, inc) x 6. (18) | - |
| Round 4 | 18 sc. | - |
| Round 5 | Dec, 8 sc, dec, slst.Cut the yarn, leaving a tail for sewing. | - |
| Round | Instruction | Count |
|---|---|---|
| Round 1 | 6 sc in a MR. (6) | - |
| Round 2 | 6 inc. (12)Cut the yarn, leaving a tail for sewing. | - |
| Round | Instruction | Count |
|---|---|---|
| Round 1 | Chain 70 sts. | - |
Place the legs between round 6 and round 7.
Begin stuffing at round 18.
Finish stuffing after round 20.
Cut the yarn, leaving a tail for attaching the head.
| Round | Instruction | Count |
|---|---|---|
| Round 1 | 6 sc in a MR. (6) | - |
| Round 2 | 6 inc. (12) | - |
| Round 3 | (1 sc, inc) x 6. (18) | - |
| Round 4 | (2 sc, inc) x 6. (24) | - |
| Round 5 | (3 sc, inc) x 6. (30) | - |
| Round 6 | (4 sc, inc) x 6. (36) | - |
| Round 7 | (11 sc, inc) x 3. (39) | - |
| Round 8-12 | 39 sc. (39) | - |
| Round 13 | (11 sc, dec) x 3. (36) | - |
| Round 14 | 36 sc. | - |
| Round 15 | (4 sc, dec) x 6. (30) | - |
| Round 16 | 4 sc, dec, (3 sc, dec) x 5. (24) | - |
| Round 17 | 24 sc. | - |
| Round 18 | 3 sc, dec, (2 sc, dec) x 5. (18) | - |
| Round 19 | 8 sc, dec, 7 sc, dec. (16) | - |
| Round 20 | 3 sc, 4 sc (with arm), 5 sc, 4 sc (with arm), 1 slst. | - |
Color changes in the last stitch of round 4.
Attach the nose between rounds 2 and 3.
Attach the eyes between rounds 5 and 6, about 7 stitches apart.
Close the hole after round 19.
| Round | Instruction | Count |
|---|---|---|
| Round 1 | 6 sc in a MR. (6) | - |
| Round 2 | 6 inc. (12) | - |
| Round 3 | (1 sc, inc) x 6. (18) | - |
| Round 4 | 18 sc. (18) | - |
| Round 5 | 2 sc, 14 inc, 2 sc. (32) | - |
| Round 6 | 5 sc, (2 sc, inc) x 7, 7 sc. (39) | - |
| Round 7 | 8 sc, (5 sc, inc) x 3, 13 sc. (42) | - |
| Round 8-12 | 42 sc. (42) | - |
| Round 13 | (12 sc, dec) x 3. (39) | - |
| Round 14 | 12 sc, dec, (11 sc, dec) x 2. (36) | - |
| Round 15 | 5 sc, dec, (4 sc, dec) x 5. (30) | - |
| Round 16 | 4 sc, dec, (3 sc, dec) x 5. (24) | - |
| Round 17 | 3 sc, dec, (2 sc, dec) x 5. (18) | - |
| Round 18 | 2 sc, dec, (1 sc, dec) x 5. (12) | - |
| Round 19 | 1 sc, 5 dec. | - |
As the last step, we will make the teddy bear's hat. We start by making the pompom.
| Round | Instruction | Count |
|---|---|---|
| Pompom Round 1 | 6 sc in a MR. (6) | - |
| Pompom Round 2 | 6 inc. (12) | - |
| Pompom Round 3 | (1 sc, inc) x 6. (18) | - |
| Pompom Round 4 | 18 sc. | - |
| Pompom Round 5 | (1 sc, dec) x 6. (12) | - |
| Pompom Round 6 | 4 dec.Attach the blue yarn to the pompom before starting the hat. | - |
| Round 1 | 4 sc. | - |
| Round 2 | (1 sc, inc) x 2. (6) | - |
| Round 3 | 6 sc. | - |
| Round 4 | (1 sc, inc) x 3. (9) | - |
| Round 5 | 9 sc. | - |
| Round 6 | (2 sc, inc) x 3. (12) | - |
| Round 7 | 12 sc. | - |
| Round 8 | (2 sc, inc) x 4. (16) | - |
| Round 9 | 16 sc. | - |
| Round 10 | (3 sc, inc) x 4. (20) | - |
| Round 11 | 20 sc. | - |
| Round 12 | (9 sc, inc) x 2. (22) | - |
| Round 13 | 22 sc. | - |
| Round 14 | (10 sc, inc) x 2. (24) | - |
| Round 15 | 24 sc. | - |
| Round 16 | (11 sc, inc) x 2. (26) | - |
| Round 17 | 26 sc. | - |
| Round 18 | (12 sc, inc) x 2. (28) | - |
| Round 19 | 28 sc. | - |
| Round 20 | (13 sc, inc) x 2. (30) | - |
| Round 21 | 7 sc, 5 ch, skip 5 sts, 5 sc, 5 ch, skip 5 sts, 7 sc, inc. (31) | - |
| Round 22 | 31 sc. | - |
| Round 23 | 30 sc, inc. (32) | - |
| Round 24 | 31 sc, inc. (33) | - |
| Round 25 | 31 sc, 2 slst.Cut the yarn and hide the ends. | - |
03 · Before it goes to a childWhat has to be right, and what is allowed to drift
- Use safety joints for the arms and legs so the finished bear can be posed while staying secure for long-term handling.
- Holofiber stuffing gives a lighter, cloud-soft fill compared to regular polyester fiberfill, so pack it slightly more densely for the same firmness.
- The ears finish with a slip stitch and a long tail left for sewing — don't cut this too short, you'll need it to attach the ear securely.
- Plush yarn can obscure fine stitch definition, so count stitches carefully rather than relying on sight alone, especially during increase and decrease rounds.
- Assemble the bootee details on the legs before attaching the legs to the body, since it's far easier to work the color changes on a flat, unattached piece.
- Have both safety eye and nose hardware on hand before you finish the head, since backing out to add them after stuffing is difficult and can distort the shape.
04 · Snag listWhat went wrong on the bench, and the fix
Snag 1
Losing track of the bootee color change on the legs.
Mark round 9 with a stitch marker before you start the leg, and remember the swap happens on the very last stitch of that round so the new color sits ready for round 10.
Snag 2
Forgetting to place safety eyes
Always insert and secure the 14mm eyes and 14/18mm nose while the head is still open enough to reach inside and attach the washers firmly.
Snag 3
Under-stuffing the body and limbs, leaving the bear floppy.
Stuff firmly with holofiber as you go, adding small amounts every few rounds rather than trying to cram it all in at the end.
Snag 4
Sewing the arms on before completing
Finish folding the arm piece flat and single crochet through both sides to close it completely before attaching it to the body with joints.
Snag 5
Rushing the 25-round hat
Work the hat in a well-lit spot and count stitches at the end of every round, since a long piece like this hides mistakes until the shaping goes visibly off.
Snag 6
Attaching ears and tail before deciding
Pin all small pieces in place with removable stitch markers first, step back to check symmetry, then sew everything down permanently.
05 · VariantsOther ways to issue this one
The pajama theme is begging for personalization, so start with color. Try a dusty rose body with cream booties and a burgundy hat for a vintage nursery look, or go bold with a mustard bear, navy pajama accents, and a red-and-white striped scarf for a storybook feel. Swap the plush yarn for a smooth worsted-weight cotton blend if you want crisper stitch definition on the hat's texture, or use a fuzzy boucle for the ears and tail only to add contrast against a smoother body. Size is easy to play with too — go up to a 5mm hook with the same stitch counts for a slightly bigger, squishier bear, or drop to a 3.5mm hook for a firmer, more compact version that's sturdier for little hands. If you want a girl-coded version, skip the hat and pompom and instead crochet a simple bow from scrap yarn to clip near one ear, keeping the booties and scarf for a coordinated sleepover look. For gifting, personalize the scarf with a contrasting stripe in the recipient's favorite color, or work the tail and ear tips in a metallic or sparkle-blend yarn for a special-occasion version. You could also omit the hat entirely and use that saved time to add a matching tiny blanket, crocheted flat and draped over one arm, so the bear looks like he's mid-bedtime-routine. However you style it, keep the safety eyes and nose sized to 14mm and 14/18mm respectively so the proportions on the head stay balanced no matter what colorway you choose.
I'm a sucker for amigurumi that tells a little story, and this teddy in his pajamas does exactly that. The bunny bootie detail worked right into rounds 7 through 11 of the legs is genuinely clever — you're not sewing on separate shoes, you're color-changing and shaping them into the leg itself, which feels like a magic trick the first time it clicks. The jointed arms and legs mean the finished bear can sit, wave, or flop into a hug, and the fold-and-close seam on the arms gives them a flat, paw-like bottom that's so satisfying to whip stitch shut. Then there's the hat — twenty-five rounds is a real commitment, but it turns this from "cute bear" into "fully outfitted character," and topping it with a fluffy pompom is the kind of finishing touch that makes people stop and coo. Add the little scarf and you've got texture, color-blocking, and personality in every single piece. This is the project I reach for when I want my hands busy on something that rewards patience with a genuinely huggable, gift-ready result.
06 · QueriesQuestions logged against this build
What yarn works best for this teddy bear pattern?
A soft plush yarn is ideal for the body and limbs to get that classic huggable teddy texture. If you want more visible stitch definition on the hat, a smooth worsted-weight yarn is a good substitute for that piece only.
Do I need both safety eyes and a safety nose?
Yes, this pattern calls for 14mm safety eyes and a 14/18mm safety nose to give the bear his face. Insert and secure both from the inside of the head before you finish stuffing and closing it.
How are the bunny bootie details made on the legs?
The booties are built directly into the legs using a color change on the final stitch of round 9, with specific stitches worked under the bootee's ears in later rounds. No separate pieces are sewn on — it's all shaped in the leg itself.
Why does the pattern use joints instead of just sewing the limbs on?
Joints let the arms and legs move and hold a pose, giving the finished bear a more dynamic, huggable feel than a fixed sewn attachment. They're inserted during assembly of each limb before it's joined to the body.
Is this pattern good for a beginner?
It's better suited to someone with at least one or two amigurumi projects under their belt, since it combines multiple pieces, a color change, joints, and a lengthy 25-round hat. A confident beginner who has practiced increases and decreases could still tackle it with patience.
Original pattern: https://onrecip.com/free-crochet-teddy-bear-in-pajamas-pattern/
07 · Made byWho counted this one

Who writes Amigurumi Addict, how a build gets its number, and why every round on the site carries a stitch count.
08 · Next off the benchThree builds that sit near this one

Odds and ends
Crochet a phone bag with strap, flap, and ring closure
How to crochet a phone bag? Join rounds from a 30-chain base, add a strap, flap, and ring.

Odds and ends
Crochet worsted weight socks with a turned heel
How do you crochet socks for winter? Build toe-up in worsted weight with a folded heel and ribbed leg.

Odds and ends
Toe-Up Woodland Walker Crochet Socks With Colorwork Cuff
How do you crochet toe-up socks with a colorwork cuff? Build the Toe, Heel, and stranded Cuff in order.
Join the build log
One message when a build is issued
A drawing and its parts list, when one leaves the bench.