| Shelf | Level | Time | Hook | Yarn |
|---|---|---|---|---|
| Odds and ends | Intermediate | 4-6 Hours | 3.5 mm | Worsted |
Crochet Rasta Hat Pattern: Bold Striped Beanie
Crochet a vibrant rasta-striped beanie with this easy written pattern using black, green, yellow, and red bon bon yarn scraps and a 3.5mm hook.
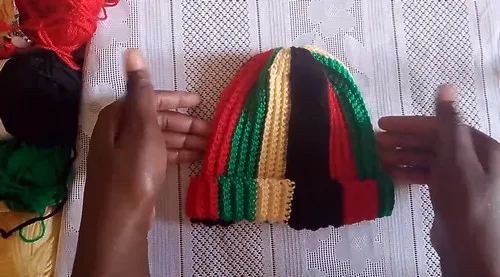
01 · The pieceWhat Crochet Rasta Hat Pattern: Bold Striped Beanie actually is
This crochet rasta hat is a flat-worked beanie built entirely from single crochet and slip stitch rows, then seamed into shape at the end. What makes it special is the bold color-blocked construction — four unmistakable rasta stripes worked six rows at a time, creating a graphic look that feels both retro and completely current. It's the perfect project for anyone who loves a statement accessory, wants to use up bon bon leftovers, or is hunting for a quick handmade gift with serious personality.
The main techniques here are working in rows with a turning chain, using slip stitches to form a neat ribbed edge along the top of the hat, and working single crochet through the front loop only for texture. Color changes happen every six rows by cutting and tying on new yarn, so you'll get comfortable weaving in ends. This is a great beginner-friendly project — simple stitches and clear, repeatable steps make the flat-then-seam construction easy to follow from start to finish.
Once seamed, this hat becomes a slouchy, textured beanie with a distinctive front-loop ridge pattern running across each stripe. The finished piece has real structure thanks to the single crochet base, yet still stretches comfortably to fit. It's a fantastic gift for music lovers, festival-goers, or anyone who wants a pop of color in their cold-weather wardrobe — and because it's made from leftover bon bon yarn, every hat turns out a little different.
- Chain a long foundation row and work back along it in single crochet with a few slip stitches at one edge to start the ridge.
- Turn your work at the end of every row and repeat the slip stitch and single crochet pattern to build the fabric in rows.
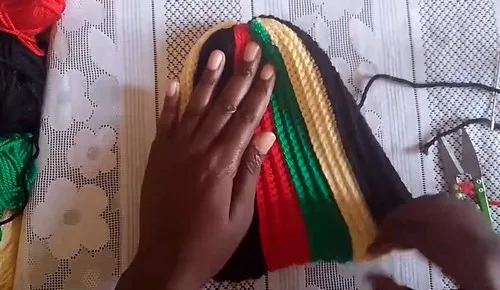
- Work six full rows in black yarn before cutting it and tying on your next color to keep the stripes crisp.
- Continue the same row pattern through green, then yellow, then red, working six rows in each color in turn.
- Leave long yarn tails at both ends of your final row so you have plenty to sew with later.
- Fold the finished rectangle and sew the side seam together to form the tube shape of the hat.
- Turn the piece inside out and cinch the top opening closed tightly with the remaining yarn tail.
- Knot off the seam securely, weave in any last loose ends, and turn the hat right side out to finish.
02 · The count run4 rounds across 1 part, each with its count
US terms throughout. Every row below ends with the count that round finishes on.
| Part | Qty | Finishes on |
|---|---|---|
| Main Pattern | 1 | - |
| Round | Instruction | Count |
|---|---|---|
| Foundation Chain | Create a chain of 38 stitches. | - |
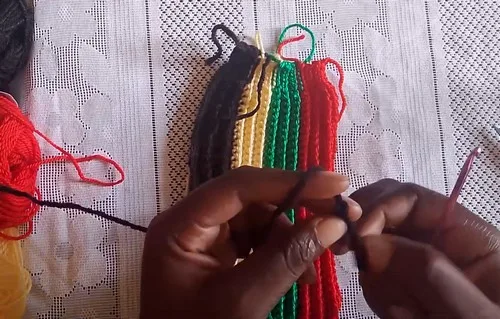
| Row 1 | Make one more chain stitch, then crochet 33 single stitches and five slip stitches back along the chain. | - |
| Row 2 | Turn your work, crochet five slip stitches, and continue with single stitches for the rest of the row, inserting the hook into the front section of the stitch. | - |
| Row 3+ | Repeat this pattern for each row: five slip stitches at the top, followed by 33 single stitches.Work six rows of black yarn. | - |
When changing colors, cut the yarn and tie on the new color.
After all the rows are completed, work one final row of black yarn.
03 · Putting it togetherHow the pieces go together
- S1
Leave enough yarn at both ends of this final row for sewing.
- S2
Sew the sides of the piece together.
- S3
Tuck in any loose ends.
- S4
Turn the work inside out and use the remaining yarn to sew around the top opening, pulling it tight to close it completely.
- S5
Secure the seam with a knot and cut the excess yarn.
- S6
Turn the hat right side out.
04 · Before it goes to a childWhat has to be right, and what is allowed to drift
- Bon bon yarn typically comes in a big multi-strand ball with a slightly fuzzy texture, so give your stitches a gentle check for consistent tension across colors.
- Always leave generous yarn tails at color changes — you'll need them both for weaving in and for reinforcing the seam later.
- The five slip stitches at the start of each row form the top ridge of the hat, so keep them snug but not tight to avoid puckering.
- Work a quick gauge swatch first if you're unsure about your hook tension, since the finished width depends on the 38-chain foundation staying consistent.
- When turning your work between rows, make sure your turning chain doesn't accidentally get counted as an extra stitch.
- Save weaving in all your ends until after the seaming steps are complete, so you can use the tails to reinforce weak spots in the seam if needed.
05 · Snag listWhat went wrong on the bench, and the fix
Snag 1
Losing track of the slip stitch count
Count out loud as you work the five slip stitches each time, and place a stitch marker at the transition point until it becomes automatic.
Snag 2
Forgetting to work into the front loop
Check your hook placement before each stitch in the single crochet sections — you should see a visible loop left behind on top of each stitch.
Snag 3
Cutting yarn too short when changing
Leave at least a 6-inch tail every time you cut yarn so you have enough length to secure and hide the end later.
Snag 4
Sewing the side seam before checking
Lay the piece flat and match up the stripe lines on both edges before pinning or clipping, then seam slowly to keep colors aligned.
06 · VariantsOther ways to issue this one
The rasta palette is iconic, but this pattern is really just a striped color-blocking formula, so swap it freely. Try a sunset version with burnt orange, hot pink, and golden yellow, or go moody with charcoal, forest green, and burgundy for a fall-ready look. For a kid's version, brighten things up with sky blue, lime, and white stripes instead of the traditional colors. You can also play with stripe width — instead of six rows per color, try four rows for a busier, more playful pattern, or eight to ten rows for bolder, calmer blocks of color. If you want a more subtle effect, alternate two colors instead of four, repeating them until you reach your desired hat height. Yarn substitution is easy here: any worsted-weight yarn works in place of bon bon leftovers, so raid your stash of odds and ends from other projects — this pattern is practically designed for scrap-busting. If your yarn is a different weight, just adjust your hook size accordingly and check your gauge against the width of the foundation chain before committing to the full 38 stitches. For sizing, add or remove a few stitches to the foundation chain in multiples of two to make the hat looser or snugger, and add extra six-row color sections if you want a longer, slouchier crown. You could even work every other stripe in a fuzzy or textured yarn for a fun mixed-texture finish, or add a pom-pom to the top seam for a playful finishing touch that plays beautifully against the bold stripes.
I love this hat because it turns a pile of leftover bon bon yarn into something with real presence. There's nothing subtle about it — the black, green, yellow, and red stripes announce themselves the moment you slip it on, and watching each color block build up row by row is honestly one of the most satisfying parts of making it. Working the slip stitches at the edge of every row gives the piece a lovely subtle ridge that you don't get from straight single crochet, and crocheting through the front loop only adds a ribbed texture that makes the whole hat feel more considered than a basic beanie. I also love that it's worked flat — no fiddly magic rings or round counting, just steady rows you can pick up and put down. By the time you sew the side seam and cinch the top closed, you'll have gone from a stack of loose ends to a hat with genuine wearable style, and that transformation never gets old for me.
07 · QueriesQuestions logged against this build
What yarn weight works best if I don't have bon bon leftovers?
Any worsted-weight yarn is a great substitute — just pair it with the same 3.5mm hook and check that your stitch count matches the pattern's width. Using scraps from multiple projects is actually part of the fun of this design.
Do I need to know how to change colors mid-project for this pattern?
Yes, but it's simple — you cut the working yarn and tie on the new color at the start of a new six-row section. It's a great pattern for practicing clean color transitions if you're newer to striping.
Why does the pattern use slip stitches at the start of each row?
The five slip stitches create the ribbed edge that runs along the top of the finished hat, giving it structure and a nice textured line. They're worked consistently on every row to keep that ridge even.
How do I know if my hat will fit an average adult head?
The foundation chain of 38 stitches plus one turning chain is sized for an average adult, but you can add a couple of stitches for a looser fit or remove a couple for a snugger one. Just keep changes in even numbers to preserve the stitch pattern.
What's the best way to close up the top of the hat neatly?
Turn the piece inside out, then use the leftover yarn tail to sew around the top opening and pull it tight before knotting off securely. Turning it inside out first keeps your closing stitches hidden on the wrong side once you flip it back.
Original pattern: https://crocheteverything.com/crochet-rasta-hat-pattern-with-vibrant-colors/
08 · Made byWho counted this one

Who writes Amigurumi Addict, how a build gets its number, and why every round on the site carries a stitch count.
09 · Next off the benchThree builds that sit near this one

Odds and ends
Crochet a phone bag with strap, flap, and ring closure
How to crochet a phone bag? Join rounds from a 30-chain base, add a strap, flap, and ring.

Odds and ends
Crochet worsted weight socks with a turned heel
How do you crochet socks for winter? Build toe-up in worsted weight with a folded heel and ribbed leg.

Odds and ends
Toe-Up Woodland Walker Crochet Socks With Colorwork Cuff
How do you crochet toe-up socks with a colorwork cuff? Build the Toe, Heel, and stranded Cuff in order.
Join the build log
One message when a build is issued
A drawing and its parts list, when one leaves the bench.