| Shelf | Level | Time | Hook | Yarn |
|---|---|---|---|---|
| Odds and ends | Intermediate | 8-12 Hours | 5 mm | Worsted |
Crochet Full Sleeve Cardigan Pattern With Herringbone Stitch
Make a custom-fit herringbone cardigan with full sleeves, cuff ribbing, and a cozy HDC setup row sized to your exact bust or hip measurements.
01 · The pieceWhat Crochet Full Sleeve Cardigan Pattern With Herringbone Stitch actually is
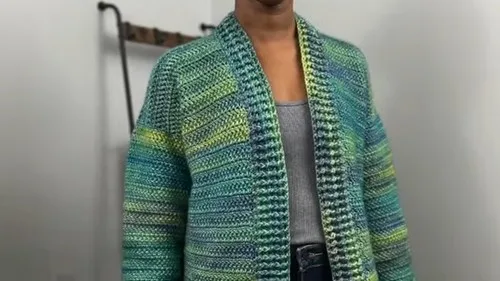
This Full Sleeve Cardigan is built entirely around your own body measurements, which means no more guessing whether a pattern's 'medium' will actually fit your shoulders or hips. Using the herringbone stitch for texture and structure, this cardigan gives you a woven, knit-like fabric that drapes beautifully instead of stiffening up like basic single crochet. It's perfect for crocheters who are tired of one-size patterns and want a wearable piece that's tailored specifically to them, from the width of the back panel down to the ribbed cuffs.
The star technique here is the herringbone half double crochet, worked with that distinctive Yarn Over, Pull Through One, Yarn Over, Finish sequence that creates the diagonal, sweater-knit texture the whole cardigan is known for. You'll also work applied cuff ribbing and a clean HDC setup row to transition between sections. This is an intermediate-friendly project — you should be comfortable with basic increases and following your own calculated stitch/chain counts — and realistically takes 8 to 12 hours spread across a few relaxed sessions.
The finished cardigan is a substantial, full-sleeve wearable layer sized precisely to your bust or hip measurement with 2+ inches of positive ease built in for comfortable movement. The herringbone texture gives it a soft, structured drape that looks tailored rather than boxy, while the ribbed cuffs add a polished, ready-to-wear finish. Because it's made to your exact measurements, it also makes a genuinely thoughtful handmade gift once you've taken the recipient's numbers.
- Measure your Bust or Hip circumference and add at least 2 inches of positive ease for comfortable movement.
- Divide that total width in half to find your exact Back Panel Width, then chain to that length.
- Work the herringbone stitch rows using the Yarn Over, Pull Through One, Yarn Over, Finish sequence to build the back.
- Calculate each Front Panel by subtracting 3-4 inches from the Back Panel Width, then dividing that result in half.
- Chain and work each front panel separately to its calculated width using the same herringbone technique.
- Work the Setup Row in HDC to transition cleanly between the body sections and the ribbing.
- Add the Applied Cuff Ribbing to the sleeve edges for a snug, finished wrist opening.
- Follow the assembly steps to seam the panels together into your fully custom-fit cardigan.
02 · The count run5 rounds across 7 parts, each with its count
US terms throughout. Every row below ends with the count that round finishes on.
| Part | Qty | Finishes on |
|---|---|---|
| Key Measurements | 1 | - |
| Back Panel | 1 | - |
| Front Panels (Make 2) | 1 | - |
| Sleeves (Make 2) | 1 | - |
| Cuff Ribbing (Applied Ribbing) | 1 | - |
| Hem Ribbing | 1 | - |
| Front/Neck Ribbing | 1 | - |
You'll need these measurements to calculate the panel dimensions:
Bust/Hip: Widest circumference of your bust or hips. Used for cardigan width.
Cardigan Length: From the top of your shoulder to the desired hemline.
Armhole Depth: From the top of your shoulder to the bottom of the arm opening.
Upper Arm Circumference: Around the widest part of your upper arm.
Arm Length: From the center of your neck to your wrist.
Calculation Calculation and Starting: Take your Bust/Hip measurement and add 2 inches or more of positive ease. Divide the total width in half (e.g., 40 inches / 2 = 20 inches wide). Chain until the starting chain measures the required panel width (e.g., 20 inches).
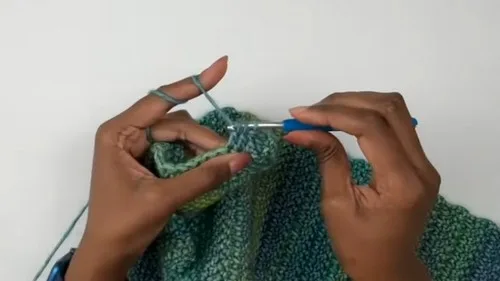
Step by step The Herringbone Double Crochet (HBDC) Stitch — Step by step: Start: Yarn over, insert hook into the indicated stitch. Yarn over and pull up a loop (3 loops on hook). Pull Through One: Pull the first loop through the second loop (like a slip stitch). Yarn Over: Yarn over and pull through the first loop. Finish: Yarn over and pull through the final two loops.
| Round | Instruction | Count |
|---|---|---|
| Round 1 | Skip 2 chains (counts as DC), work HBDC across the row, and work a regular DC in the last chain. | - |
| Round 2 | & All Subsequent Rows: Chain 1, DC in the first stitch, HBDC across the row, and DC in the top of the turning chain.Length: Continue repeating until the panel is 2 inches shorter than your total desired length (e.g., 29 inches long). | - |
Calculation Calculation and Starting: Subtract 3 to 4 inches from the total Back Panel Width (e.g., 20 inches - 3 inches = 17 inches). Divide the result in half (e.g., 17 inches / 2 = 8.5 inches wide). Chain to the required width (e.g., 8.5 inches).
Rows: Work rows as for the Back Panel (starting and ending with DC, using HBDC in between). Work the same number of rows as the completed Back Panel.
Fasten off and make a second identical panel.
Calculation Calculation and Starting: Use the largest of the following numbers for sleeve width: (Armhole Depth x 2) or Upper Arm Circumference. Add optional ease (e.g., 13 inches + 2 inches = 15 inches wide). Sleeve length (Before Cuff): Subtract half of your Back Panel width from your Arm Length. Chain to the required sleeve width (e.g., 15 inches).
Main Body Rows: Work rows exactly as for the Back Panel until the sleeve reaches the required length (e.g., 19 inches).
| Round | Instruction | Count |
|---|---|---|
| Round 1 | (Decrease): Chain 1, DC in the first stitch, DC2Tog across the row. | - |
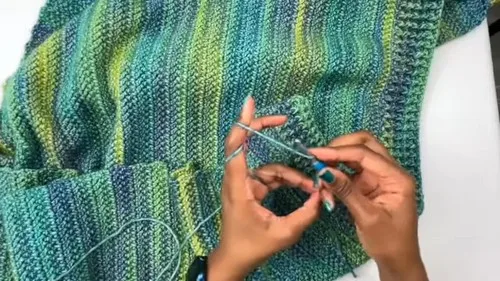
| Round 2 | (Single Crochet): Chain 1, SC in each stitch across the row. Ribbing Rows: SC Back Loop Only across the row. Repeat until the cuff is the desired width (e.g., 2 inches).Fasten off and make a second sleeve. | - |
Start with a standing HDC in the first stitch of the bottom edge, work 1 HDC in each stitch across the hemline.
Ribbing Rows (FPDC/BPDC)
| Round | Instruction | Count |
|---|---|---|
| Round 1 | Chain 1, HDC in the first stitch, FPDC and BPDC across the row. Subsequent Rows: Turn, chain 1, HDC in the first stitch, FPDC over FPDC, BPDC over BPDC.Repeat until ribbing is 2.5 to 3 inches long. | - |
Setup Row (HDC) : Work 1 HDC per row up the hem ribbing, then up the front panel to the neckline.
Ribbing Rows (FPDC/BPDC) : Work FPDC and BPDC as you did for the hem ribbing.
Fasten off and weave in all remaining ends.
03 · Putting it togetherHow the pieces go together
- S1
Shoulder Seams : Sew the Front Panels to the Back Panel along the top shoulder edges.
- S2
Sleeve Attachment : Align the center of the sleeve top with the shoulder seam and sew the sleeve to the armhole.
- S3
Side and Arm Seams : Sew the arm and side seams, starting at the cuff and continuing down to the hem.
04 · Before it goes to a childWhat has to be right, and what is allowed to drift
- 💡 Take your Bust or Hip measurement over the clothing you'd actually wear under the cardigan, so the positive ease you add is accurate to real-world wear.
- 💡 A 5mm hook is the standard here, but sizing down slightly gives a tighter, more structured herringbone fabric — swatch both to see which drape you prefer before committing to a full panel.
- 💡 Keep your tape measure handy throughout, not just at the start — checking your chain length against your calculated panel width as you go prevents having to rip back a long foundation chain.
- 💡 When dividing your Back Panel Width for the front panels, write both numbers down (the subtracted total and the halved width) so you don't have to recalculate mid-project.
- 💡 Use stitch markers to flag the start of the Setup Row (HDC) and the transition into Cuff Ribbing, since these sections use different stitch heights that are easy to blur together visually.
- 💡 Block your finished panels before seaming if your yarn allows it — herringbone stitch can look slightly slanted off the hook, and blocking evens out the diagonal texture beautifully.
05 · Snag listWhat went wrong on the bench, and the fix
Snag 1
Skipping the gauge swatch before calculating panel widths.
Since every measurement in this pattern (back panel, front panels, sleeves) is derived from your starting chain length, work a small herringbone swatch first to confirm your stitches-per-inch, otherwise your final cardigan won't match the math.
Snag 2
Confusing the herringbone 'Pull Through
Remember Pull Through One is worked like a slip stitch — pull the first loop through the second loop only, leaving two loops on the hook — before you yarn over again for the Finish step; rushing this creates a lumpy, uneven texture.
Snag 3
Forgetting to subtract the 3-4 inches
The front panels are intentionally narrower than half the back panel width to account for the cardigan opening; always subtract those 3-4 inches from the Back Panel Width before dividing in half, or your fronts will overlap oddly.
Snag 4
Adding too much or too little positive
Stick with a minimum of 2 inches of positive ease for a classic cardigan drape; less will feel tight when layered over clothing, and significantly more will shift the whole garment into an oversized silhouette that changes your panel math.
Snag 5
Working the Applied Cuff Ribbing
Since ribbing is meant to snug the cuff, consider dropping to a smaller hook size just for the ribbing rounds, and check the fit against your wrist before finishing off.
Snag 6
Losing track of row and round counts
Place a stitch marker at the start of each new section and jot down a quick tally on paper or a stitch counter app, since herringbone's dense texture makes rows easy to miscount by eye.
06 · VariantsOther ways to issue this one
I love this cardigan because it flips the usual crochet garment problem on its head — instead of hoping a pattern's sizing works out, you build the whole thing around your own bust or hip measurement from the very first chain. Watching the herringbone stitch stack up round after round is honestly one of the most satisfying things in my crochet queue; that Yarn Over, Pull Through One, Yarn Over, Finish rhythm creates this gorgeous diagonal knit-like texture that feels so much more elevated than plain single crochet. The math is simple once you sit down with it — halving your width, subtracting a few inches for the back panel, halving again for symmetry — and there's real pride in chaining exactly to your calculated width and knowing it's going to fit. Then the applied cuff ribbing and that crisp HDC setup row tie everything together with a finished, boutique feel. It's the kind of project that teaches you to trust measurements over generic size labels, and honestly, once you've made one custom cardigan, it's hard to go back to guessing.
07 · QueriesQuestions logged against this build
Do I need to know herringbone half double crochet before starting this cardigan?
Yes, familiarity with the Yarn Over, Pull Through One, Yarn Over, Finish sequence is essential since it's the main stitch used throughout the cardigan body. If you're new to it, practice on a small swatch first so your gauge is accurate before you chain your full panel width.
How do I know how wide to make my back panel?
Take your Bust or Hip measurement, add at least 2 inches of positive ease, then divide that total in half — this final number is your Back Panel Width to chain to. For example, a 40-inch measurement becomes a 20-inch wide back panel.
Why are the front panels narrower than half the back panel?
The front panels are calculated by subtracting 3-4 inches from the Back Panel Width before dividing in half, which accounts for the cardigan's open front and natural overlap. This keeps the fronts from being too wide and bunching at center front.
Can I use a different yarn weight than worsted?
Yes, but you'll need to gauge swatch and adjust your hook size accordingly, since all panel measurements in this pattern are based on your actual chain length in inches, not stitch counts. A lighter or heavier yarn will simply require more or fewer stitches to reach the same target width.
What's the purpose of the Applied Cuff Ribbing at the sleeve ends?
The cuff ribbing is worked directly onto the sleeve edge to create a snug, stretchy finish that hugs the wrist rather than leaving a flared, unfinished edge. It's what gives the cardigan its polished, ready-to-wear look.
Original pattern: https://crocheteverything.com/crochet-full-sleeve-cardigan-pattern-with-herringbone-stitch/
08 · Made byWho counted this one

Who writes Amigurumi Addict, how a build gets its number, and why every round on the site carries a stitch count.
09 · Next off the benchThree builds that sit near this one

Odds and ends
Crochet a phone bag with strap, flap, and ring closure
How to crochet a phone bag? Join rounds from a 30-chain base, add a strap, flap, and ring.

Odds and ends
Crochet worsted weight socks with a turned heel
How do you crochet socks for winter? Build toe-up in worsted weight with a folded heel and ribbed leg.

Odds and ends
Toe-Up Woodland Walker Crochet Socks With Colorwork Cuff
How do you crochet toe-up socks with a colorwork cuff? Build the Toe, Heel, and stranded Cuff in order.
Join the build log
One message when a build is issued
A drawing and its parts list, when one leaves the bench.