| Shelf | Level | Time | Hook | Yarn |
|---|---|---|---|---|
| Odds and ends | Intermediate | 4-6 hours | 3.5 mm | Sport |
Colorful Apache Tears stitch mittens crochet pattern
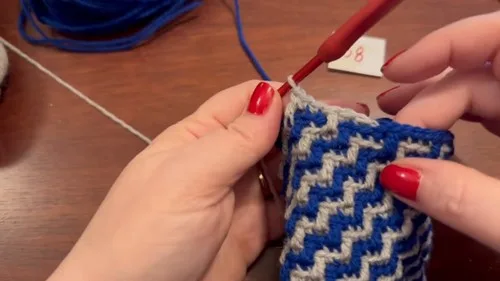
How is Apache Tears stitch worked in mittens? BLO rounds place a DC two rows below for texture.
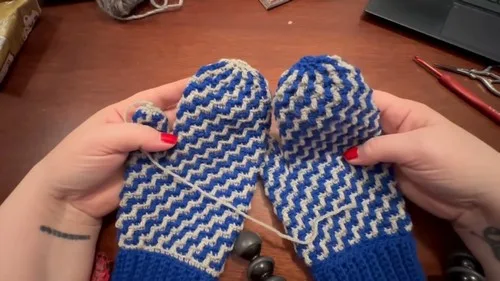
01 · The pieceWhat Colorful Apache Tears stitch mittens crochet pattern actually is
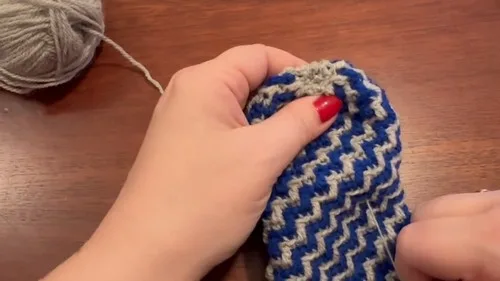
The mitten begins as a flat ribbing panel, worked back and forth in back-loop-only single crochet, then folded and slip-stitched into a circle to form the cuff. From that seam, the Mitten Body rounds build upward in a spiral, alternating Color A and Color B without turning. A skipped section in the body opens the Thumb Hole; the Thumb itself is built separately, its first round anchored to those skipped stitches and bridged across the gap with three single crochets before spiraling to its own decrease closure.
Stitch count matters at the seams: the ribbing's 14 stitches per row set the cuff width, and the jump to 39 stitches in Mitten Body Round 2 has to land exactly for the Apache Tears repeat (3 SC BLO, 1 DC) to divide evenly. Color placement is looser - Color A and Color B swap by round regardless of which leftover skein fills each slot, so a scrappy substitution changes the look, not the fit. Ribbing row count can flex slightly before the fold without throwing off the join.
02 · The count run18 rounds across 6 parts, each with its count
US terms throughout. Every row below ends with the count that round finishes on.
| Part | Qty | Finishes on |
|---|---|---|
| Ribbing (Color B) | 1 | - |
| Mitten Body | 1 | - |
| Thumb | 1 | - |
| Main Pattern | 1 | - |
| Thumb Hole and Body | 1 | - |
| Closing/Decrease | 1 | - |
Chain 15
| Round | Instruction | Count |
|---|---|---|
| Round 1 | SC in second chain from hook and across (14 SC) | - |
| Round 2 | 38 Ch 1, turn, SC in BLO across (14 SC per row) Fold ribbing and join edges with SL ST through both loops to form a circle, Ch 1 to secure | - |
| Round | Instruction | Count |
|---|---|---|
| Round 1 | Color B SC into each of the 38 ribbing rows, cut yarn, invisible join (38 SC) | - |
| Round 2 | Color A, join into BLO, Ch 1, SC BLO in each stitch, add 1 extra SC in same stitch to total 39 stitches, join with Color B | - |
| Round 3 | Color B Ch 1, SC BLO in each stitch, join with Color A | - |
| Round 4 | Color A, Ch 1, repeat 3 SC BLO, 1 DC straight down into stitch two rows below, repeat 13 times, join with Color B | - |
| Round | Instruction | Count |
|---|---|---|
| Round 1 | Color B attach to first skipped stitch of thumb hole, Ch 1, repeat Standard Pattern Repeat 3 times across skipped stitches, add 3 SC over bridge, join with Color A | - |
| Round 2 | Color A, Ch 1, repeat Standard Pattern Repeat 3 times, 3 SC into added stitches, 1 DC into stitch before thumb skip, join with Color B (4 repeats total) | - |
| Rounds 3–11 | Work Standard Pattern Repeat 4 times each round, alternating colors Decrease Round: Color A, cut Color B, continue spiral with repeat Skip 1, 2 SC BLO, 1 DC two rows downFinal Close: Color A, spiral repeat Skip 2, 1 SL ST into both loops of next DC until hole is closed, cut yarn and sew shut | - |
| Round | Instruction | Count |
|---|---|---|
| Rounds 5–18 | Alternate colors each round. Repeat 3 SC BLO, 1 DC straight down into stitch two rows below of same color, skip stitch behind DC. Continue for 14 rounds. | - |
| Round | Instruction | Count |
|---|---|---|
| Round 19 | Color B Ch 1, repeat 3 SC, 1 DC once, Ch 12, skip 12 stitches, SC into 13th stitch, continue repeat around, join with Color ARounds 20-37: Work Standard Pattern Repeat 10 times per round, alternating colors | - |
| Round | Instruction | Count |
|---|---|---|
| Round 38 | Color A, repeat Skip 1, 2 SC BLO, 1 DC two rows down, join with Color B | - |
| Round 39 | Color B repeat 1 DC two rows down, 2 SC BLO, join with Color A | - |
| Round 40 | Color A, repeat Skip 1, 1 SC BLO, 1 DC two rows down, join with Color B | - |
| Round 41 | Color B repeat 1 SC BLO into DC below, 1 DC two rows down, join with Color A | - |
| Round 42 | Color A, repeat Skip 1, 1 DC two rows down, continue spiral (do not join) | - |
| Round 43 | Color A, SC into each DC from previous round in spiral | - |
| Round 44 | Color A, repeat Skip 1, 1 SL ST in both loops until hole is closed, cut yarn and sew shut | - |
Techniques on this build
- Back loop only single crochet
- Runs through the ribbing rows and every Mitten Body round; skipping to both loops flattens the ridge the whole texture depends on.
- Apache Tears relief stitch (DC two rows below)
- Appears in Mitten Body Round 4 and the Thumb's repeat rounds; reaching down two rows pulls tension tighter than a standard DC.
- Invisible join
- Closes Mitten Body Round 1 and starts the Thumb; a sloppy join here shows as a visible step in an otherwise spiral fabric.
- Flat-to-circle seaming
- Used once, to fold the finished Ribbing and slip stitch both loops together; row ends must align before the seam is closed.
Final fit-up
- Close the Thumb tip by working the Final Close spiral, slip stitching through both loops of each DC until the hole draws shut.
- Weave in the color-change tails left at each Color A/Color B join throughout Mitten Body and Thumb rounds.
- Weave in the tail from the Ribbing's fold-and-join seam separately, since it sits at the cuff edge rather than mid-round.
- Block the mitten flat to even out the ribbing rows and open up the Apache Tears texture on the body.
How the parts fit
- The stitch count rises from 38 to 39 in Mitten Body Round 2, where one extra SC is added into the same stitch; this sets up a count the Round 4 repeat (3 SC BLO, 1 DC, times 13) can divide evenly.
- The Ribbing is worked flat over turned rows rather than in the round, because back-loop-only stitching needs a turning edge to build the visible ridge; folded and seamed afterward, it becomes the cuff.
- The Thumb Hole is not cut or added after the fact - stitches are simply skipped in the body, then picked up directly in Thumb Round 1 and bridged with 3 SC, joining both openings without a separate seam.
Scaling the build
| Larger | Work the same stitch counts with a heavier yarn than the sport weight called for, keeping the 3.5 mm hook; the fabric grows with the yarn thickness for a roomier fit. |
|---|---|
| Smaller | Drop to a hook smaller than 3.5 mm while keeping the sport weight yarn and stitch counts as given; the tighter gauge shrinks the overall mitten. |
| Longer cuff | Add extra rows to the Ribbing before folding and joining it into a circle; this lengthens the cuff without changing the Mitten Body or Thumb stitch counts. |
03 · Snag listWhat went wrong on the bench, and the fix
Snag 1
Losing the BLO ridge
Check which loop sits at the front before each stitch in the ribbing rows and every Mitten Body round; working into both loops flattens the ridge that the Apache Tears texture relies on.
Snag 2
Drifting ribbing row count
Recount the ribbing rows against the stated 14-stitch width before folding and joining; a few extra or missing rows changes the circumference the mitten body is built onto.
Snag 3
Miscounting the Apache Tears repeat
Mark the start of Mitten Body Round 4 and confirm the 39-stitch count before working the 3 SC BLO, 1 DC sequence 13 times.
Snag 4
Loose bridge over the thumb hole
Work the 3 SC added over the gap in Thumb Round 1 at the same tension as the surrounding stitches, then confirm Thumb Round 2 lands on its 4 repeats before continuing.
04 · QueriesQuestions logged against this build
What does Apache Tears stitch mean in this pattern?
It refers to the DC worked straight down into the stitch two rows below, used in Mitten Body Round 4 and repeated through the Thumb rounds. The stitch pulls up through the BLO rounds to create a raised, straight relief line.
Why fold and join the ribbing instead of working it in the round?
Back-loop-only stitching needs turned rows to build the visible ridge that reads as ribbing; working the same stitch in continuous rounds doesn't produce the same stretch line. Folding the flat panel and seaming both loops together turns it into a cuff without losing that texture.
05 · Made byWho counted this one

Who writes Amigurumi Addict, how a build gets its number, and why every round on the site carries a stitch count.
06 · Next off the benchThree builds that sit near this one

Odds and ends
Crochet a phone bag with strap, flap, and ring closure
How to crochet a phone bag? Join rounds from a 30-chain base, add a strap, flap, and ring.

Odds and ends
Crochet worsted weight socks with a turned heel
How do you crochet socks for winter? Build toe-up in worsted weight with a folded heel and ribbed leg.

Odds and ends
Toe-Up Woodland Walker Crochet Socks With Colorwork Cuff
How do you crochet toe-up socks with a colorwork cuff? Build the Toe, Heel, and stranded Cuff in order.
Join the build log
One message when a build is issued
A drawing and its parts list, when one leaves the bench.